- Error «pshed.dll has been deleted or is corrupted» on startup.
- Синий экран: «A problem has been detected and Windows has been shut down to prevent damage to your computer». Простейшие методы устранения проблем
- Причины появления синего экрана («A problem has been detected and Windows has been shut down to prevent damage to your computer»)
- Проверка аппаратной части компьютера
- Как определить точную причину сбоя?
- Что делать, если сообщение «A problem has been detected and…» выскакивает в работающей системе постоянно?
- Программные сбои и методы их устранения
- How to delete or uninstall Windows from your PC
- 1. How to delete Windows when it is the only operating system installed
- 2. How to delete one Windows when you have multiple Windows operating systems installed in a dual-boot or multi-boot configuration
- 3. How to delete Windows when you installed it alongside a Linux distribution such as Ubuntu, in a dual-boot or multi-boot configuration
- Why did you want to remove Windows?
Error «pshed.dll has been deleted or is corrupted» on startup.
Sometimes when I turn on my computer, running Windows Vista, it boots fine and everything runs fine.
Other times when I turn on my computer, it gives me this error «pshed.dll has been deleted or is corrupted». The error tells me to insert my Windows Vista disc and run the ‘repair’ function once I boot off it. I will come back to that. So once this error comes up it then tells me to boot Vista normally and I try Safe Mode, Last good Configuration Mode, normal mode and nothing will boot, the error just keeps showing up.
Up until this error I have never had any problems with this computer or Vista. My computer is not old and I have not made any changes to the hardware or software.
So the error screen asked me to repair windows through booting the Windows Vista disc. I did this for a numerous amount of times. Every time, I boot into the disc, click repair and wait for it to check for errors. It then asks me to restore or cancel. I click restore, after a couple of minutes a RAM error comes up and says that a specific memory address could not be read. I try the repair again and again, each time the memory error shows up, but each time with a different address. So it is not my RAM that is the problem, I also did an error check for that and nothing showed up. .
I have also looked in the System32 folder and found the pshed.dll is there but I do not have access to modify it, but that seems normal because I have another computer running Windows 7 and that file has the same permission. The one thing I noticed with my Windows 7 computer is that it has pshed.dll in system32 folder and in syswow64 (yes I am running 64-bit on both computers), but on this Vista computer the pshed.dll file is not in the syswow64 folder, just the system32 folder.
Any help would be much appreciated in helping me solve this stupid boot problem.
Синий экран: «A problem has been detected and Windows has been shut down to prevent damage to your computer». Простейшие методы устранения проблем

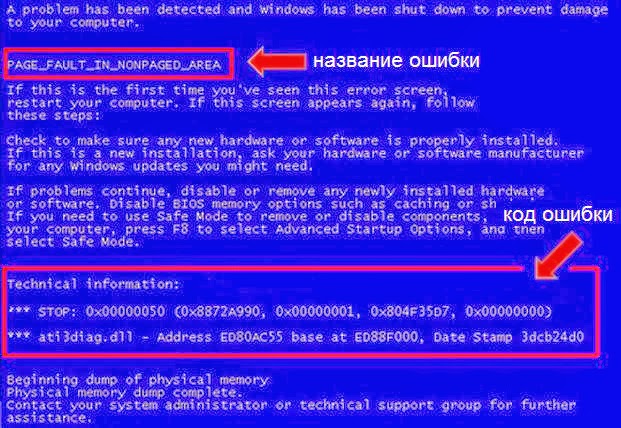
Само собой разумеется, что появление синих экранов смерти либо при загрузке Windows, либо в работающей системе, да еще и с выдачей сообщений вроде «A problem has been detected and Windows…», любого пользователя заставляет задуматься над тем, почему это происходит и как устранить возникшие сбои, применяя для этого простейшие методы. К сожалению, выявить истинную причину такого поведения компьютера сразу удается далеко не всегда. Дело в том, что сам синий экран может содержать только описание проблемы и стоп-код без четкого объяснения, почему это случилось, не говоря уже об информации о проблемном устройстве. Хорошо, если внизу экрана имеется ссылка на какой-то файл драйвера, по которому сразу можно определить, что послужило причиной сбоя. Но что делать, если таких указаний нет? Попробуем разобраться в сложившейся ситуации и рассмотрим наиболее действенные методы их исправления.
Причины появления синего экрана («A problem has been detected and Windows has been shut down to prevent damage to your computer»)
Для начала давайте разберемся, что именно означает появление этого сообщения. Если его перевести, получается, что в системе была обнаружена проблема, и работа Windows во избежание повреждения компьютера была прекращена. Что за этим стоит, часто понять очень сложно, однако все сбои условно можно разделить на аппаратные и программные. К проблемам с аппаратной частью (установленным оборудованием) чаще всего относят сбои в работе или поломки, связанные с основными компонентами компьютера (жесткие диски, оперативная память, видеокарты, системы охлаждения и т. д.).
Что касается сбоев программных, чаще всего к появлению экранов с сообщением «A problem has been… and Windows…» приводит некорректная работа драйверов устройств (причем далеко не всегда именно графических ускорителей), некоторых важных служб самих операционных систем, повреждение системных файлов и библиотек, воздействие вирусов и т. д.
Проверка аппаратной части компьютера
Как правило, большинство специалистов рекомендует начать устранение проблем с чистки компьютера от пыли и засорения (это в первую очередь относится к стационарным системным блокам, а не к ноутбукам). Попробуйте хотя бы удалить пыль при помощи самого обычного пылесоса, установив мощность всасывания на самый минимум, какой только возможен, а то можно повредить некоторые важные компоненты на материнской плате.
Неплохо заодно посмотреть на характеристики блока питания и установленную систему охлаждения. Синий экран с уведомлением «A problem has been detected…» как раз и может появляться в случае нехватки для некоторых компонентов питания или их перегрева при ненадлежащем охлаждении (чаще всего такие проблемы наблюдаются с процессорами и графическими адаптерами). Скачки напряжения тоже могут приводить к сбоям в работе оборудования.
Очень часто появление синего экрана, сопровождаемое сообщением «A problem has been detected and Windows…», специалисты связывают с нарушениями в работе оперативной памяти.
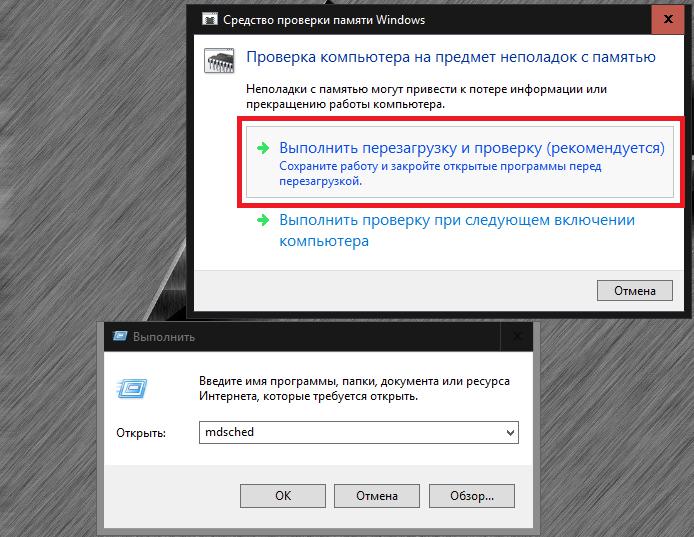
Проверить ее можно стандартным средством диагностики Windows (mdsched) или при помощи утилиты Memtest86/86+, которую можно записать на съемный носитель и загрузить еще до старта системы.
Не менее распространенными являются и проблемы с жесткими дисками, когда на них присутствует слишком много сбойных или нестабильных секторов и ошибок, или они просто начали выходить из строя, отслужив свой срок.
Как определить точную причину сбоя?
Как уже было сказано выше, если после сообщения «A problem has been detected and Windows…» имеется ссылка на какой-то файл, чаще всего представляющий собой сбойный драйвер, устранением проблем можно заняться немедленно. Но для случаев, когда присутствует только стоп-код, определить «виновника» такого поведения системы можно и по нему.
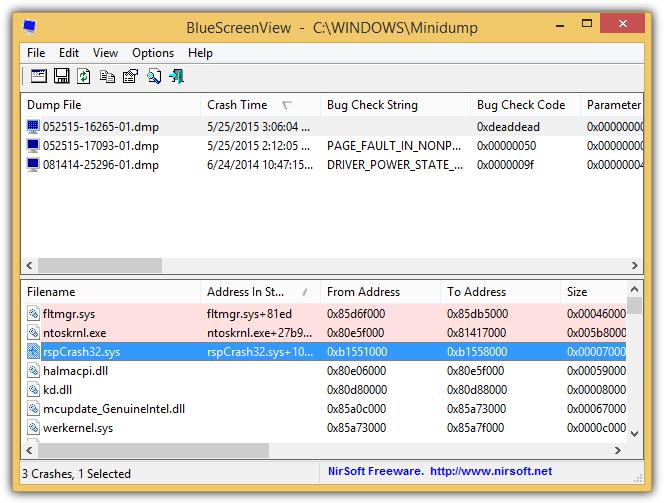
Оптимальным вариантом считается использование программы BlueScreenView, в которой нужно нажать ссылку AppCrashView, после чего и будет выдано подробное описание проблемы.
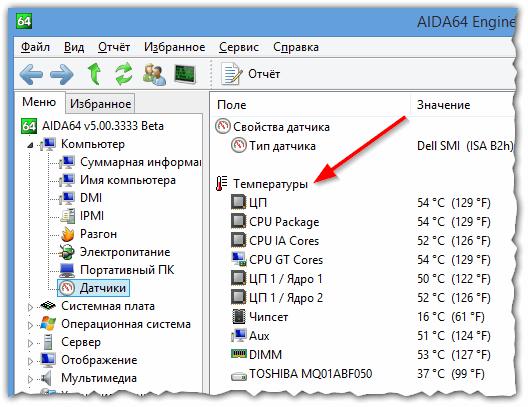
Для обнаружения проблем, связанных с перегревом оборудования, следует воспользоваться утилитами вроде AIDA64 (бывший Everest), CPU-Z, GPU-Z и им подобными, а перенастроить систему охлаждения можно за счет использования программы SpeedFan.
Что делать, если сообщение «A problem has been detected and…» выскакивает в работающей системе постоянно?
Если вышеуказанных приложений под рукой нет, желательно по возможности извлекать из материнской платы основные компоненты (планки памяти, звуковые и сетевые карты и т. д.), после чего проверять загрузку системы. Кстати, такая методика позволяет достаточно просто выявить и нерабочие планки памяти, если их установлено несколько.
Программные сбои и методы их устранения
Наконец, рассмотрим некоторые методы избавления от синего экрана «A problem has been detected and Windows…» путем устранения программных сбоев. Очень часто они связаны именно с драйверами устройств. Если автоматизированных программ для установки или обновления управляющего ПО (Driver Booster, SlimDrivers, DriverMax, DriverPack Solution) у пользователя нет, в самом простом случае можно попытаться переустановить сбойный драйвер в «Диспетчере устройств».
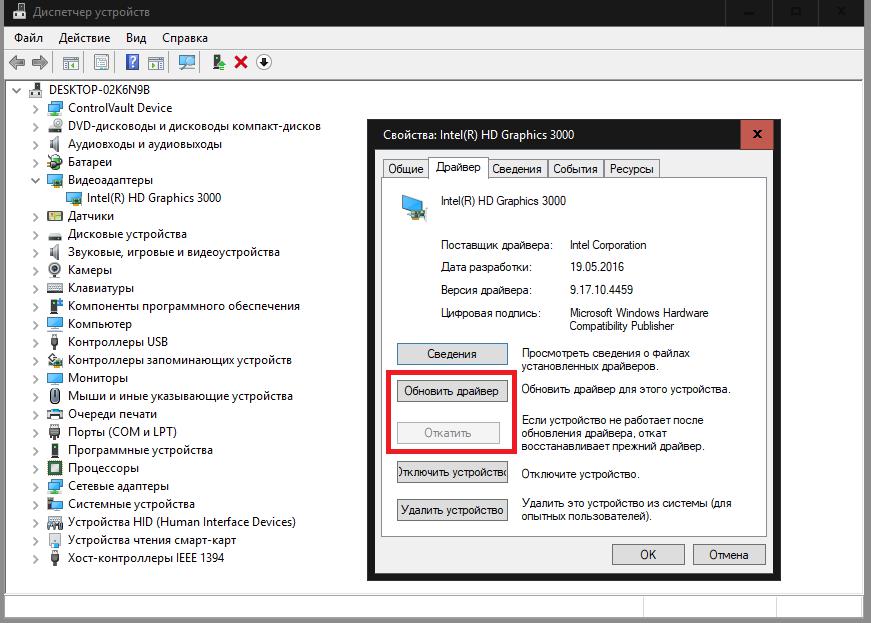
В случае возможного наличия обновленного драйвера, который теоретически мог бы вызвать появление такой проблемы, тут же можно выполнить откат.
Само собой разумеется, что иногда даже отсутствие свободного места в системном разделе может провоцировать появление таких ошибок и сбоев. На всякий случай почистите диск «С», причем так, чтобы свободным оказалось пространство на уровне 5-10 % от его общего размера.
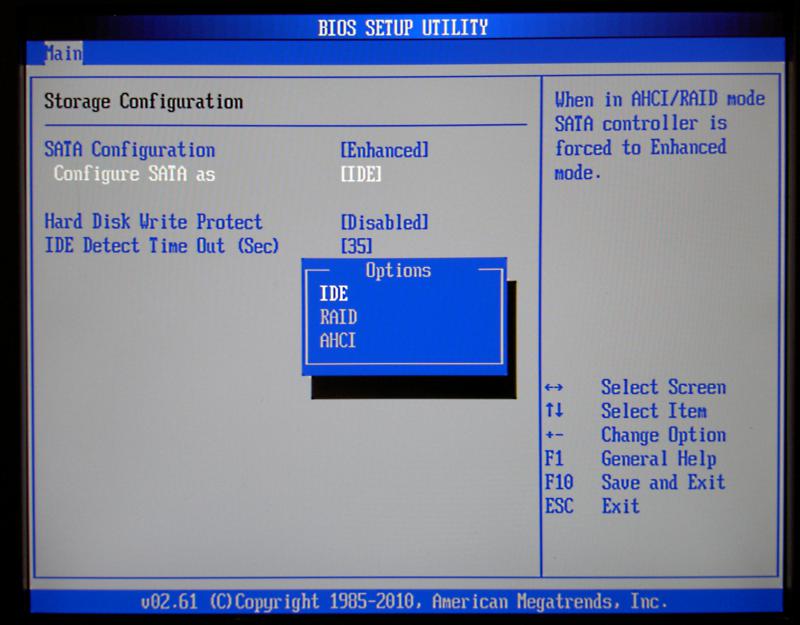
Для жестких дисков иногда бывает необходимо переключить контроллер SATA в режим IDE вместо AHCI в настройках BIOS/UEFI. В некоторых случаях также дает результат полный сброс настроек или обновление прошивки первичных систем.
Наконец, проверьте систему на вирусы, используя для этого портативные сканеры или загрузочные утилиты, в общем случае обозначаемые как «Rescue Disk», с которых можно загрузить интерфейс антивируса вместо Windows и выполнить углубленное сканирование, включая скрытые области жесткого диска и оперативную память.
How to delete or uninstall Windows from your PC
Some of our readers have asked us how they can remove Windows from their computers. Some of them want to remove Windows and empty their drives, some have dual-boot configurations and want to keep only one Windows version, and other have Windows and Linux running alongside, and prefer to get rid of Windows altogether. We wanted to help, so here are all the steps you need to take in these situations:
IMPORTANT: Make sure that you back up the data you have on the drive where Windows is installed. If you do not back it up while Windows is installed and works well, you risk losing your data if something goes wrong along the way.
1. How to delete Windows when it is the only operating system installed
If you installed just one Windows operating system, then the uninstallation is simple. Create a USB recovery drive or an installation CD/DVD or USB memory stick with the operating system that you want to use next, and boot from it.
Then, on the recovery screen or during the installation of the new operating system, select the existing Windows partition(s) and format or delete it (them).
Alternatively, you can boot from the recovery disk, load Command Prompt, and then use the diskpart and format commands to remove or format the Windows partition(s) you no longer need. If you need help with these commands or with opening Command Prompt from the recovery environment, you find instructions in these tutorials:
2. How to delete one Windows when you have multiple Windows operating systems installed in a dual-boot or multi-boot configuration
What if you have two or more Windows operating systems installed on the same computer, and you want to uninstall one of them? For example, let’s assume that you have installed Windows 10 to dual-boot alongside Windows 7. You may want to remove the older Windows 7 and use the space occupied by Windows 7 to create a new partition or to resize your existing Windows 10 partition. How do you do that?
First of all, remove the boot entry for the Windows version that you want to uninstall. In our example, that’s Windows 7. Perform this action from the version of Windows that you want to keep. In our case, that is Windows 10.
Start the Windows operating system that you want to keep and open the System Configuration tool. A quick way to launch it is to use the Run window. Simultaneously press the Windows + R keys on your keyboard and, in the Run window, enter type msconfig. Press Enter or click/tap OK, and the System Configuration tool opens.
We use the System Configuration tool because it is available in all Windows versions. If you prefer, you can also use other boot managers, but make sure that the one you choose is compatible with all the operating systems that you have installed.
In System Configuration, go to the Boot tab, and check whether the Windows that you want to keep is set as default. To do that, select it and then press “Set as default.”
Next, select the Windows that you want to uninstall, click Delete, and then Apply or OK.
To test if everything is OK with the Windows that you want to keep, restart your computer and see if you can boot without problems. You should be able to.
If something terribly wrong happens and you cannot boot correctly, you can repair the boot entries using the Windows installation media. Read Fix problems that keep Windows from loading, with Startup Repair and How to use the Command Prompt to fix issues with your PC’s boot records, for help.
Now that the boot entry is gone, it is time to erase or format the partition used by the Windows that you want removed. Format it if you plan to reuse that partition to install another operating system, or eliminate the entire volume if you would instead use that space to extend other partitions.
For both actions, you can use the Disk Management tool. Open it with a click/tap on its shortcut from the WinX menu (press Win + X on your keyboard), or use one of the methods we described here.
In the Disk Management window, right-click or tap and hold on the partition that you want to be removed (the one with the operating system that you uninstall), and select “Delete Volume” to erase it. Then, you can add the available space to other partitions.
If you want to reuse the same partition for another operating system, you should format the partition instead of deleting it. For example, if you want to remove Windows 7 so that you can install another operating system, select the partition, right-click or tap and hold on it, and then click/tap on Format in the contextual menu.
Windows warns you that you are about to erase all the data stored on that partition, and you might also get a warning that the selected partition is in use. To continue the formatting, press Yes. Once you do that, you can see that the Windows that you wanted to uninstall has been removed.
3. How to delete Windows when you installed it alongside a Linux distribution such as Ubuntu, in a dual-boot or multi-boot configuration
If you have a multi-boot setup that includes non-Microsoft operating systems, like Ubuntu Linux, the steps are similar to the ones in the previous section, but you have to perform them from Linux. Let’s assume that you have a dual-boot setup with Ubuntu and Windows 10 running alongside on the same computer. How do you get rid of Windows 10 and keep Ubuntu?
First of all, remove the Windows 10 system partition(s). To do so, you need an app that can manage drives and partitions. The one found by default in Ubuntu is called Disks. Start by opening the Applications menu with a click/tap on its button from the bottom-left corner of the screen.
On the Applications screen, type disks in the search field from the top. In the list of search results, click or tap Disks.
In the Disks app, select the Windows partition that you want to remove. It should be easy to spot because it’s usually formatted using NTFS. After you select it, click/tap the – (minus) button beneath the list of Volumes.
Ubuntu asks if you “are sure you want to delete the partition.” Click Delete.
Confirm the action by entering the administrator password, and then click/tap Authenticate.
Now, the Windows partition should be no more. However, there may be other Windows partitions found on your computer, such as System Reserved or Recovery partitions. If there are, you might want to delete those also, using the same procedure.
After you have deleted all the Windows partitions that you no longer need, reboot your computer.
When your computer starts, the GRUB loader should still show Windows 10 as an available operating system to boot from. However, it does not work, because you deleted its partition(s). To completely forget that a Windows operating system was ever found on your computer, you need to delete its entry from the GRUB boot menu. Fortunately, that’s easy: start Ubuntu again and login with your user account.
Open a Terminal window by simultaneously pressing the Ctrl + Alt + T keys on your keyboard. In the Terminal, type the command sudo update-grub and press Enter. Type the password of your administrator account and press Enter once more.
After a moment or two, Ubuntu updates the GRUB boot menu and removes the Windows 10 entry from it. From now on, you can enjoy a Windows-free Linux experience. 🙂
Why did you want to remove Windows?
As you have seen, uninstalling Windows is not as hard as it may seem. Anyone can do it with a bit of attention to the steps detailed above. If you are looking for guides on installing different versions of Windows, do not hesitate to read the recommendations below and, if you have something to add to our guide, write us a comment.


