- Windows hdd imaging software
- Windows hdd imaging software
- CREATE A BOOTABLE USB DRIVE USING WIN32 DISK IMAGER
- DOWNLOAD FILES
- FORMAT THE REMOVABLE DRIVE
- SELECT THE ISO IMAGE
- WRITING THE ISO IMAGE
- STEP – 1: Getting your ISO File.
- Step -2 Format your Flash Drive
- Step-3: Writing the ISO image on flash drive
- 5 Free Disk Imaging/Cloning Utilities for Windows
- Paragon Backup & Recovery
- DriveImage XML
- Macrium Reflect Free
- EaseUS Todo Backup Free
- CloneZilla
Windows hdd imaging software
Partition Table Doctor
Сообщение отредактировал Яр Всеслав — 24.05.16, 22:28
EASEUS Partition Master
Сообщение отредактировал Яр Всеслав — 24.05.16, 22:38
Norton Partition Magic
Сообщение отредактировал Яр Всеслав — 24.05.16, 23:10
Сообщение отредактировал Яр Всеслав — 24.05.16, 23:42
Загрузочный диск на базе Windows 8.1 с Acronis Backup 11.5
и Paragon Hard Disk Manager 14 с интегрированными драйверами SATA/SCSI/RAID UEFIx32 для планшетов.
Пересобрал Windows 8.1 PE с Acronis Backup 11.5 для загрузки на планшетах с флешки.
просто распаковать образ на флешку нфтс.
скачать:
обе программы открываются поверх друг друга — сначало акронис и поверх неё парагон, можно свернуть парагон под ним будет акронис сервер.
кроме всего прочего диск позволяет сравнить работу акрониса и парагона — очевидно, что акронис не видит 2 раздела на планшетах, а парагон видит.
Сообщение отредактировал Яр Всеслав — 28.05.16, 14:41

первоначально написанные для линукс
портированы и под виндовс
скачать:
https://sourceforge.net/projects/qtparted/
Сообщение отредактировал Яр Всеслав — 27.06.16, 15:46
Macrorit Disk Partition Expert 4.9.3
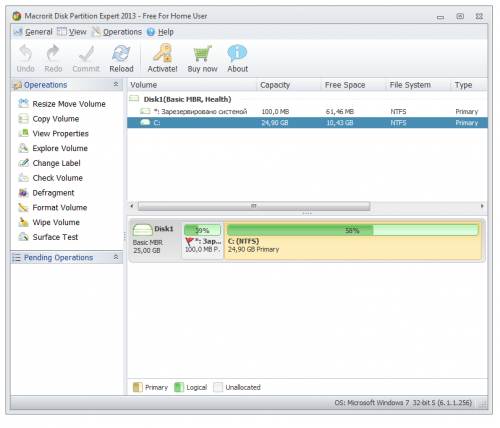
Бесплатная версия отличной программы, которая позволит вам вести управление вашими жесткими дисками, скачать Macrorit Disk Partition Expert можно ниже. Разработчики пишут о том, что эта единственная программа не требующая от вас денег, которая обладает передовой технологией отключения защиты и аварийного восстановления данных. Вы сможете работать с разделами дисков не переживая за то, что будет потеряна информация, стоит выделить отличный мастер по работе с разделами. Macrorit Disk Partition Expert может работать с дисками объемом свыше 2ТБ и MBR/GPT дисками.
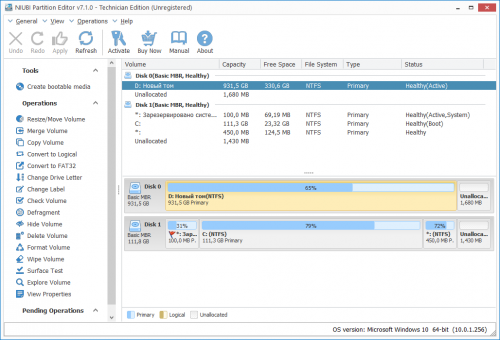
NIUBI Partition Editor Technician Edition 7.1.0
Управления разделами дисков. Это программное обеспечение совместимо с Windows Server 2016/2012/2008/2003 и Windows 10/8/7/Vista/XP. Поддерживаются локальные/съемные жесткие диск, VMware, Hyper-V и все типы аппаратного RAID. NIUBI Partition Editor интегрировал уникальную технологию защиты данных Roll-Back, которая может откатить компьютер до состояния, прежде чем автоматически изменить размер, если возникла какая-либо проблема с оборудованием, поэтому вам не нужно беспокоиться о безопасности данных. Кроме того, встроенный уникальный алгоритм перемещения файлов позволяет изменять размер раздела на 30% — на 300% быстрее, чем другие инструменты.
Сообщение отредактировал Яр Всеслав — 18.04.18, 13:03
NIUBI Partition Editor Repack Diakov
Управления разделами дисков. Это программное обеспечение совместимо с Windows Server 2016/2012/2008/2003 и Windows 10/8/7/Vista/XP. Поддерживаются локальные/съемные жесткие диск, VMware, Hyper-V и все типы аппаратного RAID. NIUBI Partition Editor интегрировал уникальную технологию защиты данных Roll-Back, которая может откатить компьютер до состояния, прежде чем автоматически изменить размер, если возникла какая-либо проблема с оборудованием, поэтому вам не нужно беспокоиться о безопасности данных. Кроме того, встроенный уникальный алгоритм перемещения файлов позволяет изменять размер раздела на 30% — на 300% быстрее, чем другие инструменты.
Сообщение отредактировал Яр Всеслав — 18.04.18, 13:38
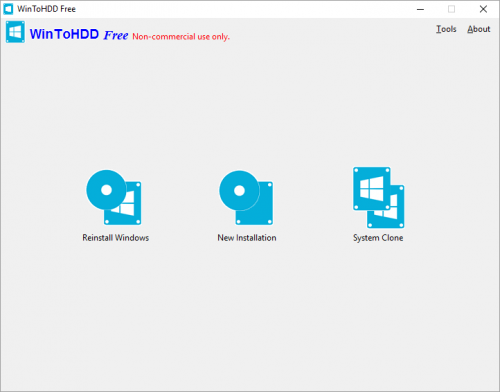
Утилита для установки, переустановки и клонирования текущей операционки Windows без использования CD/DVD-дисков или USB-накопителей. Программа очень проста в настройке и не требует каких-то специальных знаний. Главное меню представляет собой окошко с тремя основными операциями:
Reinstall Windows (переустановка Windows),
New Installation (новая установка операционной системы),
System Clone (клонирование операционки).
Теперь если вы захотите переустановить свою ОС, то просто кликните на соответствующую иконку, укажите путь к iso-файлу с требуемой системой, выберите раздел установки и дождитесь окончания процесса. Все проходит аналогично и с новой инсталляцией «оси».
При клонировании вы дополнительно увидите всю информацию о текущей операционной системе, после чего сможете перенести ее на другой диск (HDD или SSD).
Если вам необходимо установить (или клонировать) операционную систему Windows на USB-диск, то для этого стоит воспользоваться приложением WinToUSB.
Partition Wizard
10.2.2 Portable
Программа для работы с разделами жесткого диска. Вы сможете изменить их размер, можно создать новый раздел, удалить или отформатировать разделы, скачать Partition Wizard Home Edition можно ниже. Можно работать с дисками, которые объединены с RAID массивами.
Также вы сможете конвертировать файловую систему FAT в NTFS, можно работать с жесткими дисками размером более 2 ТБ, можно копировать разделы, тестировать диска на работоспособность, вести установку активного раздела и так далее.
Windows hdd imaging software
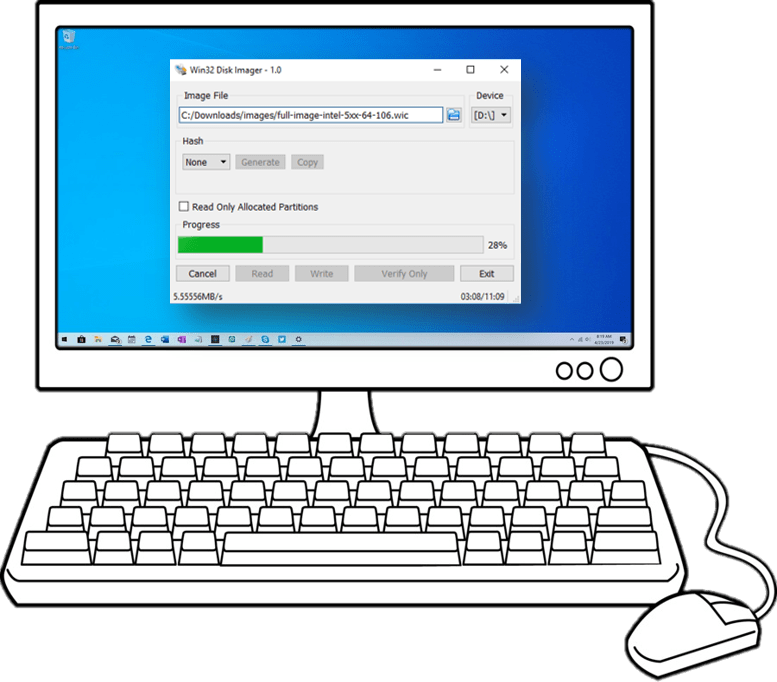
Win32 Disk Imager is a program which write a raw disk image to a removable device. Download it and follow step by step file to write ISO File to your USB Drive !
CREATE A BOOTABLE USB DRIVE USING WIN32 DISK IMAGER

DOWNLOAD FILES
To create a bootable drive all you need is ISO file (Which you wants to write) and Win32 Disk Imager (Which you can download from here)

FORMAT THE REMOVABLE DRIVE
Before you perform writing it is always a good practice to plug and format the removable drive / USB Stick. (You can skip this step as the tool will automatically perform this step)

SELECT THE ISO IMAGE
Now Open the Win32 Disk Imager and select the ISO file which you want to write also select the Drive (USB Stick) from the option.

WRITING THE ISO IMAGE
After selecting file path, click on the ‘Write’ button. A pop-up will appears simply click on ‘Yes’. After completing file transfer a Success pop up will appear and you will able to remove the USB Stick, Done!
STEP – 1: Getting your ISO File.
This is a very first and important step. In order to write any ISO Image file you have get a copy of it first. basically we require to write any OS like windows XP or Windows 10 so all you need is an ISO image of that OS. You must be take care that it should not be corrupted.
Getting a copy of windows in ISO file is very is as its available on internet. However if you don’t know where you can get Windows 10 ISO image to make it bootable i will help you here!
Simply follow these steps to get a fresh copy of any OS like Windows 10:
Before you download the tool make sure you have:
- An internet connection (internet service provider fees may apply).
- Sufficient data storage available on a computer, USB or external drive for the download.
- A blank USB flash drive with at least 8GB of space or blank DVD (and DVD burner) if you want to create media. We recommend using a blank USB or blank DVD, because any content on it will be deleted.
- When burning a DVD from an ISO file, if you are told the disc image file is too large you will need to use Dual Layer (DL) DVD Media.
Check a few things on the PC where you want to install Windows 10:
- 64-bit or 32-bit processor (CPU). You’ll create either a 64-bit or 32-bit version of Windows 10. To check this on your PC, go to PC info in PC settings or System in Control Panel, and look for System type.
- System requirements. Make sure the PC meets the system requirements for Windows 10. We also recommend going to the PC manufacturer’s website for additional info about updated drivers and hardware compatibility.
- Language in Windows. You’ll need to choose the same language when you install Windows 10. To see what language you’re currently using, go to Time and language in PC settings or Region in Control Panel.
- Edition of Windows. You should also choose the same edition of Windows. To check what edition you’re currently running, go to PC info in PC settings or System in Control Panel, and look for Windows edition.
Step -2 Format your Flash Drive
In this step you need to make your pendrive/ flash drive writable you need to format it first. To perform a quick format Insert your Flash drive in USB Port then go to my computer and right click on Flash drive and click on format
Now click on start and it will be formatted!
Step-3: Writing the ISO image on flash drive
Now the most important step! First of all Open the Win32 Disk Imager and click on folder icon and navigate the folder where you have downloaded the ISO image; in most of the time it will check for download folder and by default it will pick only ISO file type. So you easily select it.
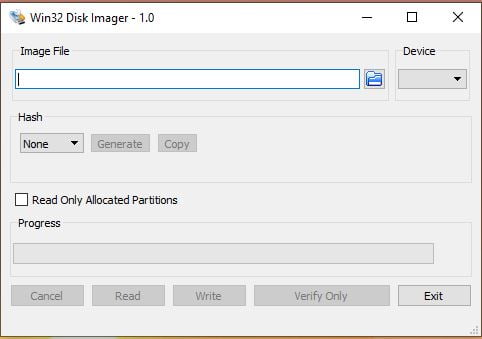
The simple interface of Win32 Disk Imager ISO allow you to easily understand and simplify the file transfer process. After selecting the ISO Image which you want to write and USB Drive all you need to hit the ‘Write’ button.
Just after clicking on Write button a pop-up will display, for confirmation to continue. After selecting ‘Yes’, a progress bar will show, along with the transfer speed, so that you can monitor the progress until completion. On the Completion of transfer, A Success massage will display which means it perfectly Written the ISO File to USB Drive!
After successful writing the ISO Image file to pendrive you will be able to remove it!
5 Free Disk Imaging/Cloning Utilities for Windows
Start right back where you left off before the crash
Creating a good backup of your computer system involves not only backing up all of your data, but also backing up all Windows and system files when they are in a working and stable state. When a hard drive crashes or the Windows operating system becomes corrupt, it would be preferable to not only be able to load back your data quickly, but also to load back the entire OS with all of your user settings, bookmarks, installed drivers, installed applications, and more.
A good way to have both things taken care of at once is to create an image of your hard drive. By creating an image, your entire system state, including the OS and data files, is captured like a snapshot and can be reloaded at any time. It’s the best way to protect your data and is the fastest solution also. However, it’s not necessarily the easiest solution since most imaging programs require a bit of trial and error when performing a restore.
In this article, I’ll mention a couple of my favorite freeware programs for cloning a hard drive. You’ll find a lot of paid solutions also like Acronis, which make the process easier, but can cost a good chunk of change. If you hate computers and want the simplest process possible, then go for commercial software. Otherwise, read on for some great freeware apps for cloning your hard drive.
Paragon Backup & Recovery
Paragon Backup & Recovery is one of my favorite tools for backing up and restoring hard drives at home. It has a slew of features and is very reliable. It’s been around for a very long time and therefore the software is polished and works perfectly on all versions of Windows from Windows 2000 to Windows 8.1 32-bit or 64-bit. Here’s a list of features that make Paragon one of the best freeware utilities in this category.

– Complete disk backup including GPT disks
– Differential backups so that you can create one full image and then save space on future backups. I believe Paragon is the only freeware one I mention here that supports differential backups.
– Unique backup capsule feature that lets you store the backup on a local hard disk in a hidden partition for easy recovery if they active partition fails
– Linux and WinPE bootable recovery media options
– Restore an entire image or only certain files and folders from an image
The only annoying thing about the program is that it includes all the features from the commercial version too and when you try to use one of them, it will try to upsell you the paid version of the program. It’s not a major nuisance, but it’s slightly annoying. I would rather they just strip it down to the bare minimum and if I like the program, I might be interested in purchasing the more feature-full version.
The free version can still do a lot of other stuff too like create, delete, and formats partitions, hide/unhide partitions, and mark partitions as active.
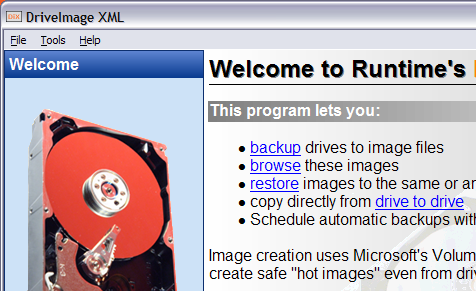
DriveImage XML
DriveImage XML is a completely free data recovery program that you can use to create images and backups of logical drives and Windows partitions. Here are a couple of the major features of this program:
– Quickly backup logical drives and Windows partitions to image files without having to restart Windows (you can remain logged in)
– Easily browse, view or extract files from the images
– Restore the images to the same drive or to a different drive
– Copy data directly from drive to drive
– Schedule automatic backups and image creations with Task Scheduler
– Run the program from the Live CD or from the WinPE boot CD-ROM
The nice thing about DriveImage XML is that it uses Microsoft’s Volume Shadow Service (VSS), which means you can create hot images of hard drives that are in use. It supports Windows XP, Windows Server 2003, Windows Vista, Windows 7 and Windows 8.
The one thing to remember though when restoring an image is that the partition you are restoring to needs to be of the same size or larger. You cannot restore to a smaller partition size than the original. Also, DriveImage XML does not perform incremental backups after the first backup image, so you’ll either have to have a lot of space or you will have to delete older backups.
Macrium Reflect Free
Macrium Reflect Free is another popular free utility for disk imaging or disk cloning. In terms of design, the GUI for Macrium is much better than Drive Image XML. It’s clean and looks more modern. The layout is also easier to navigate and understand.

You can clone a disk or image a disk. Cloning is better if you want to move everything on one disk to another hard disk, i.e. a larger disk. Imaging a disk can be scheduled whereas cloning has to be done manually. You can then restore the images to the same hard drive, a replacement hard drive or even to a new computer, though the last option will require a paid version of Macrium to restore to the new hardware.
Macrium also has a Linux rescue CD and Windows PE rescue CD that can be used to restore an image to a new hard drive. The restore process is fairly straightforward and if you get confused anywhere, they have tutorials for creating images, restoring images, troubleshooting problems, etc. in the knowledgebase. It’s a good program for a novice user.
EaseUS Todo Backup Free
EaseUS creates a lot of different products and one of the best is Todo Backup. Again, like Paragon, they want to upsell you to their paid versions, but the free version worked just fine for me when performing a backup and restore.
It’s got a simple clean interface and is a little better than Paragon when it comes to upselling. It just have a little bar at the bottom of the window that say “Upgrade Now to get a more powerful edition”.

Using the free version, you can only recover to the same disk or a new disk on the same machine. If you want to recover to new hardware, then you’ll have to purchase their paid software just like Paragon and Macrium do. Feature-wise, it’s closest to Paragon in terms of what it supports. You can restore using their WinPE bootable media and it works as expected.
I also found EaseUS Todo backup to be very easy to use, especially when following their online guides. Overall, it’s a great choice for a novice user.
CloneZilla
If you’re more of an advanced user, then CloneZilla may be the right choice for you. Clonezilla is basically a live CD that you boot from and then work with from there. Unlike other programs, it doesn’t have an executable file that you can run inside Windows. That right there will be reason enough for most people to choose something else.

However, if you’re familiar with the DOS environment and really want the most customization options for creating your backup or disk image, then CloneZilla has you covered. Here’s an abbreviated list of features:
– Supports a large range of file systems including ext2, ext3, ext4, xfs, jfs, FAT12, FAT16, FAT32, NTFS, HFS+, UFS, VMFS3, VMFS5 and minix
– Both MBR and GPT formatted hard drives supported
– Image file can be stored locally or on an NFS server, Samba server, or SSH server.
Performing a clone and restore in CloneZilla was a bit more work than I had expected and it certainly had many pitfalls for novice users. Thankfully, they have some documentation with step by step instructions for performing common operations. Again, this is a great tool for advanced users only.
Those are my favorite 5 tools for cloning or imaging a disk in Windows. If you have another suggestion not mentioned here, feel free to post it in the comments. Enjoy!
Founder of Online Tech Tips and managing editor. He began blogging in 2007 and quit his job in 2010 to blog full-time. He has over 15 years of industry experience in IT and holds several technical certifications. Read Aseem’s Full Bio


