- Fix problems that block programs from being installed or removed
- What it fixes
- Use the System File Checker tool to repair missing or corrupted system files
- Run the System File Checker tool (SFC.exe)
- More Information
- Fix File Explorer if it won’t open or start
- Error opening Help in Windows-based programs: «Feature not included» or «Help not supported»
- Symptoms
- Resolution
- More information for advanced users
- Windows Update error 80070422
- Known issues that may occur after you install WinHlp32.exe
- How to address compatibility issues that are related to WinHlp32.exe
- How to enable macros on a single computer after you install WinHlp32.exe
- Manually enable macros on a single computer
- How to unblock .hlp files that are stored on an intranet on a single computer after you install WinHlp32.exe
- Manually unblock .hlp files that are stored on an intranet on a single computer
- Registry entries and group policies for network administrators
- Help content providers who release .hlp files
Fix problems that block programs from being installed or removed
Note: Use these steps for Windows programs. If you’re having problems with an app you got from Microsoft Store, go to Fix problems with apps from Microsoft Store.
The Program Install and Uninstall troubleshooter helps you automatically repair issues when you’re blocked from installing or removing programs. It also fixes corrupted registry keys.
First, you’ll need to download the troubleshooter.
If you see the File Download box when you start downloading, select Run or Open.
The troubleshooter provides steps for you to follow. If a program isn’t listed in the uninstall options, you’ll be asked for that program’s product code. To access the code, you’ll need a tool for reading MSI files—which is typically available to IT professionals. You’ll find the product code in the property table of the MSI file.
What it fixes
The troubleshooter helps fix problems that:
Corrupt registry keys on 64-bit operating systems.
Corrupt registry keys that control the update data.
Prevent new programs from being installed.
Prevent existing programs from being completely uninstalled or updated.
Block you from uninstalling a program through Add or Remove Programs (or Programs and Features) in Control Panel.
If you’re trying to remove malware, you can use Windows Security (or another antivirus tool), or you can use the Windows Malicious Software Removal tool.
Use the System File Checker tool to repair missing or corrupted system files
If some Windows functions aren’t working or Windows crashes, use the System File Checker to scan Windows and restore your files.
Though the steps below might look complicated at first glance, just follow them in order, step-by-step, and we’ll try to get you back on track.
Run the System File Checker tool (SFC.exe)
To do this, follow these steps:
Open an elevated command prompt. To do this, do the following as your appropriate:
If you are running Windows 10, Windows 8.1 or Windows 8, first run the inbox Deployment Image Servicing and Management (DISM) tool prior to running the System File Checker. (If you are running Windows 7 or Windows Vista, skip to Step 3.)
Type the following command, and then press Enter. It may take several minutes for the command operation to be completed.
DISM.exe /Online /Cleanup-image /Restorehealth
Important: When you run this command, DISM uses Windows Update to provide the files that are required to fix corruptions. However, if your Windows Update client is already broken, use a running Windows installation as the repair source, or use a Windows side-by-side folder from a network share or from a removable media, such as the Windows DVD, as the source of the files. To do this, run the following command instead:
DISM.exe /Online /Cleanup-Image /RestoreHealth /Source: C:\RepairSource\Windows /LimitAccess
Note: Replace the C:\RepairSource\Windows placeholder with the location of your repair source. For more information about using the DISM tool to repair Windows, reference Repair a Windows Image.
At the command prompt, type the following command, and then press ENTER:
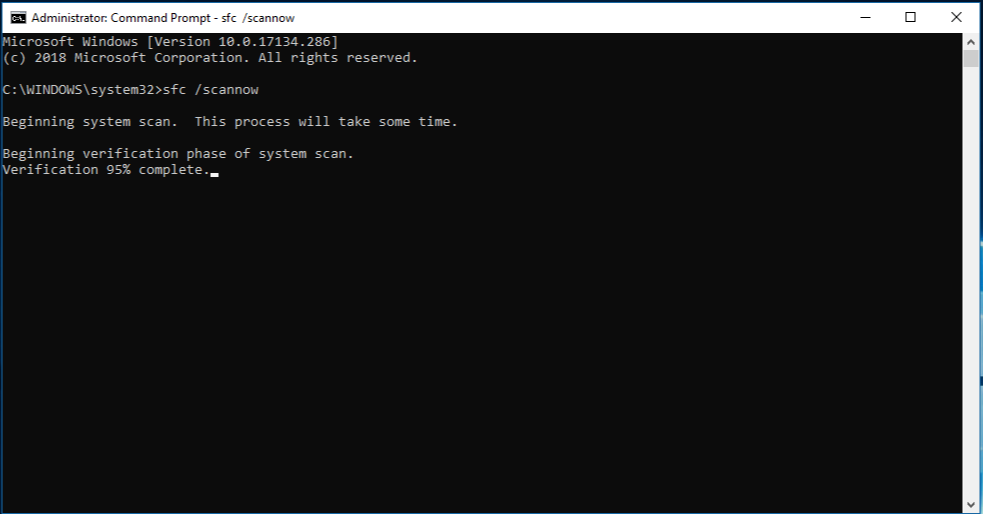
The sfc /scannow command will scan all protected system files, and replace corrupted files with a cached copy that is located in a compressed folder at %WinDir%\System32\dllcache.
The %WinDir% placeholder represents the Windows operating system folder. For example, C:\Windows.
Note Do not close this Command Prompt window until the verification is 100% complete. The scan results will be shown after this process is finished.
After the process is finished, you may receive one of the following messages:
Windows Resource Protection did not find any integrity violations.
This means that you do not have any missing or corrupted system files.
Windows Resource Protection could not perform the requested operation.
To resolve this problem, perform the System File Checker scan in safe mode, and make sure that the PendingDeletes and PendingRenames folders exist under %WinDir%\WinSxS\Temp.
Windows Resource Protection found corrupt files and successfully repaired them. Details are included in the CBS.Log %WinDir%\Logs\CBS\CBS.log.
To view the detail information about the system file scan and restoration, go to How to view details of the System File Checker process.
Windows Resource Protection found corrupt files but was unable to fix some of them. Details are included in the CBS.Log %WinDir%\Logs\CBS\CBS.log.
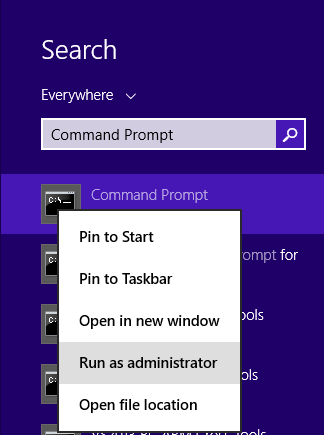
Swipe in from the right edge of the screen, and then tap Search. Or, if you are using a mouse, point to the lower-right corner of the screen, and then click Search. Type Command Prompt in the Search box, right-click Command Prompt, and then click Run as administrator. If you are prompted for an administrator password or for a confirmation, type the password, or click Allow.
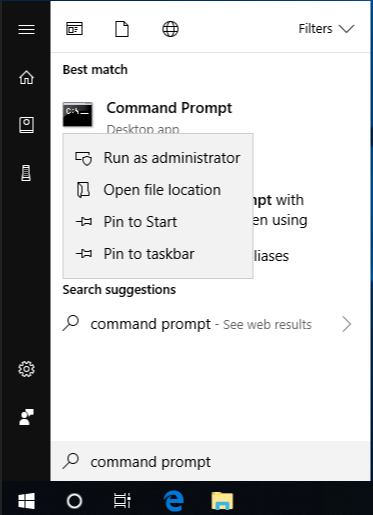
To do this, click Start, type Command Prompt or cmd in the Search box, right-click Command Prompt, and then click Run as administrator. If you are prompted for an administrator password or for a confirmation, type the password, or click Allow.
More Information
To view the details that included in the CBS.Log file, you can copy the information to the Sfcdetails.txt file by using the Findstr command, and then view the details in the Sfcdetails.txt. To do this, follow these steps:
Open an elevated command prompt as described in the previous step 1.
At the command prompt, type the following command, and then press ENTER:
Note The Sfcdetails.txt file contains details from every time that the System File Checker tool has been run on the computer. The file includes information about files that were not repaired by the System File Checker tool. Verify the date and time entries to determine the problem files that were found the last time that you ran the System File Checker tool.
Open the Sfcdetails.txt file from your desktop.
The Sfcdetails.txt file uses the following format:
Date/Time SFC detail The following sample log file contains an entry for a file that could not be repaired: 2007-01-12 12:10:42, Info CSI 00000008 [SR] Cannot repair member file [l:34<17>]»Accessibility.dll» of Accessibility, Version = 6.0.6000.16386, pA = PROCESSOR_ARCHITECTURE_MSIL (8), Culture neutral, VersionScope neutral, PublicKeyToken =
How to manually replace a corrupted system file with a known good copy of the file
After you determine which system file was corrupted and could not be repaired through the detail information in the Sfcdetails.txt file, find where the corrupted file located, and then manually replace the corrupted file with a known good copy of the file. To do this, follow these steps:
Note You may be able to get a known good copy of the system file from another computer that is running the same version of Windows with your computer. You may perform a System File Checker process on that computer to make sure the system file that you intend to copy is a good copy.
Take administrative ownership of the corrupted system file. To do this, at an elevated command prompt, copy and then paste (or type) the following command, and then press ENTER:
takeown /f Path_And_File_Name Note The Path_And_File_Name placeholder represents the path and the file name of the corrupted file. For example, type takeown /f C:\windows\system32\jscript.dll. 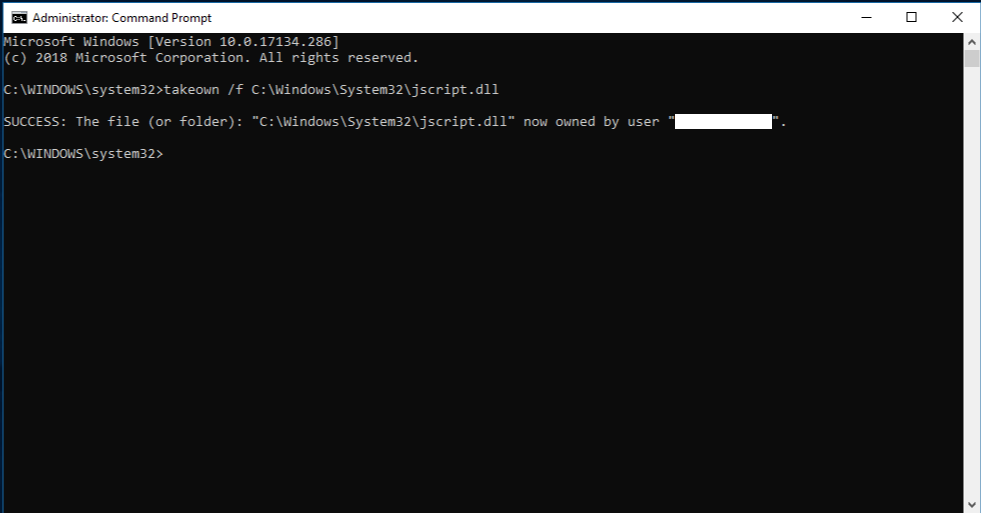
Grant administrators full access to the corrupted system file. To do this, copy and paste (or type) the following command, and then press ENTER:
icacls Path_And_File_Name /GRANT ADMINISTRATORS:F Note The Path_And_File_Name placeholder represents the path and the file name of the corrupted file. For example, type icacls C:\windows\system32\jscript.dll /grant administrators:F.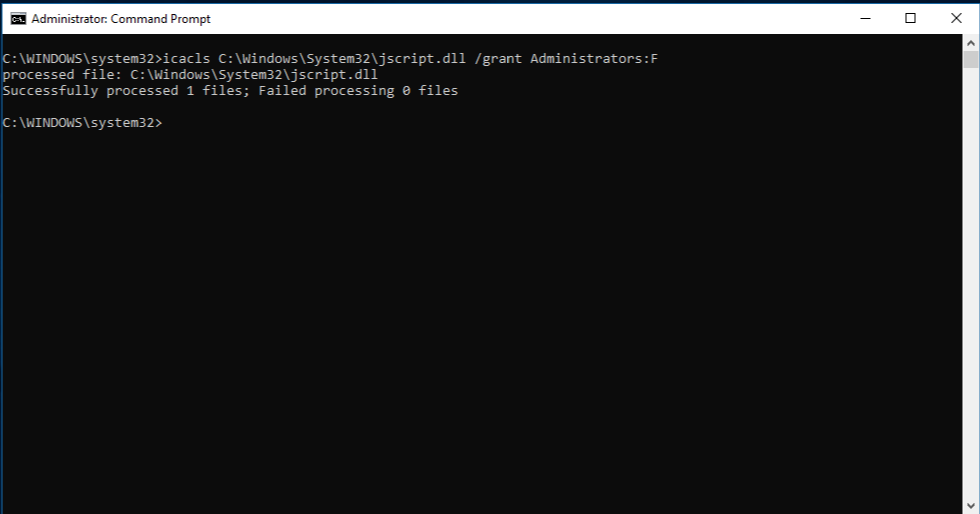
Replace the corrupted system file with a known good copy of the file. To do this, copy and paste (or type) the following command, and then press ENTER:
Copy Source_File Destination Note The Source_File placeholder represents the path and file name of the known good copy of the file on your computer, and the Destination placeholder represents the path and file name of the corrupted file. For example, type copy E:\temp\jscript.dll C:\windows\system32\jscript.dll.
If the steps above don’t work, you may need to reinstall Windows. For more info, see Windows 10 recovery options.
Fix File Explorer if it won’t open or start
Note: File Explorer is not the same tool as Internet Explorer. To open Internet Explorer, in the search box on the taskbar, type Internet Explorer, and then select Internet Explorer (Desktop app) from the results.
To open File Explorer in Windows 10, select its icon on the taskbar, press the Windows logo key + E on your keyboard, or select Start > Documents (directly beneath your user icon).
Here are some things to try if File Explorer won’t open.
Select the Start button > Settings > Update & Security > Windows Update . Then select Check for updates. Install any available updates and restart your device if required.

Even if you don’t see updates that require restarting, doing so ensures that any pending updates are installed.
On the taskbar, type control panel in the search box. Select Control Panel from the results.
Select System > Advanced system settings.
On the Advanced tab, under Performance, select Settings > Advanced.
Ensure that Adjust for best performance of is set to Programs.
Under Virtual memory,select Change and make sure that Automatically manage paging file sizes for all drives is selected.
Restart your PC. This resets explorer.exe.
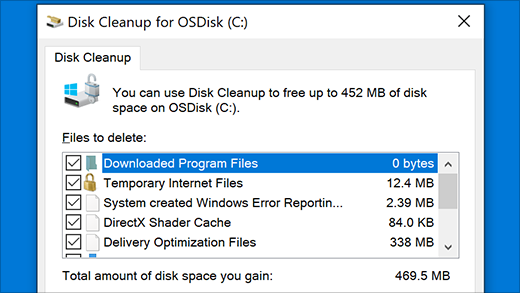
On the taskbar, type disk cleanup in the search box. Select Disk Cleanup from the results.
Select the check box by each type of file. (Make sure there’s nothing important in your Recycle Bin before emptying it.)
On the taskbar, type control panel in the search box. Select Control Panel from the results.
On the View by menu, choose Large icons or Small icons.
Select Troubleshooting > View all > System Maintenance.
On the System Maintenance troubleshooter, select Next > Try troubleshooting as an administrator and review the results.
Automatic Repair is a tools that attempts to fix registry corruption. To run it:
Select the Start button > Settings > Update & Security .
Select Recovery > Advanced Startup > Restart now > Windows 10 Advanced Startup.
On the Choose an option screen, select Troubleshoot. Then, on the Advanced Options screen, select Automated Repair.
Enter your name and password.
Automatic Repair now begins. Your computer may restart during this process.
If File Explorer doesn’t work more reliably after trying these steps, please send feedback through Feedback Hub so Microsoft can investigate potential issues.
Error opening Help in Windows-based programs: «Feature not included» or «Help not supported»
The Windows Help program is not supported in Windows 10, Windows Server 2012 or later versions of Windows Server. The Windows Help program is available for Windows Vista, 7, 8 and 8.1 only.
Microsoft strongly recommends that software developers discontinue using the Windows Help application. Software developers who ship programs that rely on .hlp files are encouraged to transition their Help experience to an alternative Help file format, such as CHM, HTML, or XML. For more information see the MSDN article Which Version of Help do I Need? While Microsoft develops future Help technologies, we encourage Help authors to continue using HTML Help 1.4. HTML Help 1.4 is included in Windows versions starting with Windows 7.
Symptoms
When you try to open Help in Windows-based programs, you receive one of the following error messages.
The Help for this program was created in Windows Help format, which was used in previous versions of Windows and it is not supported in Windows Vista.
The Help for this program was created in Windows Help format, which depends on a feature that isn’t included in this version of Windows. However, you can download a program that will allow you to view Help created in the Windows Help format.
The Help for this program was created in Windows Help format, which depends on a feature that isn’t included in this version of Windows. For more information, go to the Microsoft Help and Support website.
Resolution
To view 32-bit Help files with the .hlp file extension in Windows, you will need to download and install WinHlp32.exe from the Microsoft Download Center.
Important notes for downloading this program
Open the links by using Internet Explorer.
If you see a «Validation Required» message when you open the download page, click Continue, and then follow the on-screen instructions.
When you are prompted to download the file, select the file name that contains «x64» for 64-bit versions of Windows or «x86» for 32-bit versions of Windows. Use the following auto-detection information to make your choice.
The Windows Help program is not supported in Windows Server 2012 or later versions of Windows Server.
If you encounter problems when you install WinHlp32.exe or use Help, go to the «More information» section.
More information for advanced users
This problem occurs when Windows Help uses an earlier version of the Windows Help program (WinHlp32.exe) to display content.
Windows Update error 80070422
Manually fix this problem
If you receive Windows Update error 80070422 when you download the WinHlp32.exe update, you may have to change the Windows Update service settings, and then restart the service. To do this, follow these steps:
Click Start, and type Services in the Start Search or Search Programs and files text box.
Double-click Services from the Programs list. If you are prompted for an administrator password or for confirmation, type the password, or provide confirmation.
Right-click the Windows Update service, and then click Properties.
On the General tab, make sure that Automatic is selected next to Startup type.
Next to Service status, check whether the service is started. If it is not started, click Start. If you are prompted for an administrator password or for confirmation, type the password, or provide confirmation.
Known issues that may occur after you install WinHlp32.exe
The following list shows the known functionality regressions from previous releases of WinHlp32.exe. The following known issues apply only to the version of WinHlp32.exe that is discussed in this article.
Macros are disabled
By default, the following macros are disabled in Windows Help:
However, all other macros in .hlp files will function as they did in past releases. Therefore, if an .hlp file that depends on these macros is opened after you install Windows Help for Windows Vista, Windows 7, Windows Server 2008, or Windows Server 2008 R2, some functionality of the file may not work correctly. If this occurs, you may receive the following error message:
There was a problem running the macro. (1037)
If you have to use these macros, you can turn them on by using the Group Policy workaround or the registry workaround that is described in the «Registry entries and group policies for network administrators» section.
Cannot access .hlp files that are stored on intranet sites
By default, you cannot use WinHlp32.exe to access .hlp files that are stored on intranet sites. If you try to open a remote file, you receive the following error message:
Cannot display this help file. Try opening the help file again, and if you still receive this message, copy the help file to a different drive, and try again.
If you have to access .hlp files that are stored on intranet sites, you can unblock them by using the Group Policy workaround or registry workaround that is described in the «Registry entries and group policies for network administrators» section.
Noninteractive user access is blocked
Access has been blocked to .hlp files by noninteractive users, such as system processes. The user does not receive an error message when this error occurs.
Drag-and-drop functionality is disabled
Support for drag-and-drop functionality in the application has been disabled. The user does not receive an error message when this error occurs.
Dependencies on «How to Use Help» files
The Help files that are titled «How to Use Help» were removed from Windows Vista and Windows Server 2008. The following files were removed:
These files are not included in Windows 7 or in Windows Server 2008 R2.
The .hlp files that depend on these files may return an error when you try to open them.
How to address compatibility issues that are related to WinHlp32.exe
You can use the WinHlp32.exe to view 32-bit Help files. This release provides Group Policy settings and registry subkeys that you can use to work around application-compatibility issues. For example, the Group Policy settings and registry subkeys can be used to resolve issues that are related to macros in .hlp files and to access .hlp files that are stored on intranet sites. However, if users view Help files from an unknown source, the computer will be put at more risk if they enable these policies or these settings. Therefore, you should use caution when you decide whether to implement the application-compatibility workarounds that are described in this section.
Use the following questions to determine whether to install WinHlp32.exe, and which policy changes and registry changes to make.
Do you have to have the applications and the functionality that are affected by the removal of WinHlp32.ex?
How many applications require WinHlp32.exe? How many applications are affected by the functionality changes? How important are these applications?
How severe is the malfunction that’s caused by the changes?
What are your security requirements and security capabilities?
Which is more important: That you can use the WinHlp32.exe functionality or that you make sure that your security is as strong as possible?
Do external security measures, such as a local or a corporate firewall, give you sufficient confidence that you can install WinHlp32.exe and make the policy changes or the registry changes that are described in this article?
If you are in an organization, does your organization deliver content in the .hlp format?
Can you modify the program or the contents so that they do not have to use WinHlp32.exe functionality? For example, can you convert the help content that is currently in the .hlp format to an alternative file format such as .chm, .html, or .xml?
Does your organization store .hlp files on an intranet site? Can you install these files locally instead?
How to enable macros on a single computer after you install WinHlp32.exe
After you install the WinHelp32.exe program that is discussed in this article, certain macros are disabled. For more information about this issue, see the «Known issues» section.
This section contains steps to re-enable these macros by modifying a registry key. If your computer is in a managed environment, do not follow these steps without first consulting with your IT department. IT departments may decide not to re-enable macros or they may decide to re-enable them by using group policies. IT departments should read this article in its entirety before you continue.
Warning This article offers information about how to work around issues that are caused by changes in this release of Windows Help. However, Microsoft makes no specific recommendations about which registry keys and which values are right for your unique environment. If you are in a managed environment, your IT department is the best judge of how to weigh the advantages of these workarounds against the risks of using them. The safer course is to use no registry workarounds at all.
Note To perform the steps in this task, you must be logged on to the computer by using an administrator account. By using an administrator account, you can make changes to your computer that you cannot make with any other account, such as a standard account.
To log on by using an administrator account, you must know the password for an administrator account on your computer. If you are performing these steps on your personal computer, you are likely already logged on by using an administrator account. If you are performing these steps on a computer at work, you might have to ask the system administrator for help.
Manually enable macros on a single computer
Important
Follow the steps in this section carefully. Serious problems might occur if you modify the registry incorrectly. Before you modify it, back up the registry for restoration in case problems occur.
To enable macros on a single computer after you install WinHelp32.exe, follow these steps:
Log on by using an administrator account.
Press the Windows logo key + R, type regedit, and then click OK.
 If you are prompted for an administratorpassword or for confirmation, type the password, or click Continue.
On 32-bit editions of Windows, locate and then select the following registry subkey:
HKEY_LOCAL_MACHINE\SOFTWARE\Microsoft
On 64-bit editions of Windows, locate and then select the following registry subkey:
On the Edit menu, point to New, and then click Key.
Type WinHelp, and then press Enter.
Click the WinHelp key.
On the Edit menu, point to New, and then click DWORD (32-bit) Value.
Type AllowProgrammaticMacros, and then press Enter.
On the Edit menu, click Modify.
In the Value data box, type 1, click Hexadecimal in the Base area, and then click OK.
Exit Registry Editor.
How to unblock .hlp files that are stored on an intranet on a single computer after you install WinHlp32.exe
After you install the WinHelp32.exe file that is discussed in this article, .hlp files that are stored on intranet sites are blocked. For more information about this issue, see the «Known issues» section.
This article contains steps to unblock these .hlp files by modifying a registry key. If your computer is in a managed environment, do not follow these steps without first consulting with your IT department. IT departments may decide not to re-enable macros or they may decide to re-enable them by using group policies.
Important This article contains information that shows you how to help lower security settings or how to turn off security features on a computer. You can make these changes to work around a specific problem. Before you make these changes, we recommend that you evaluate the risks that are associated with implementing this workaround in your particular environment. If you implement this workaround, take any appropriate additional steps to help protect the computer.
Warning This article offers information about how to work around issues that are caused by changes in this release of Windows Help. However, Microsoft makes no specific recommendations about which registry keys and which values are right for your unique environment. If you are in a managed environment, your IT department is the best judge of how to weigh the advantages of these workarounds against the risks of using them. The safer course is to use no registry workarounds at all.
Note To perform the steps in this task, you must be logged on to the computer by using an administrator account. By using an administrator account, you can make changes to your computer that you cannot make with any other account, such as a standard account.
To log on by using with an administrator account, you must know the password for an administrator account on your computer. If you are performing these steps on your personal computer, you are likely already logged on with an administrator account. If you are performing these steps on a computer at work, you might have to ask the system administrator for help.
Manually unblock .hlp files that are stored on an intranet on a single computer
Important
Follow the steps in this section carefully. Serious problems might occur if you modify the registry incorrectly. Before you modify it, back up the registry for restoration in case problems occur.
To unblock .hlp files after you install WinHelp32.exe, follow these steps:
Log on by using an administrator account.
Press the Windows logo key + R, type regedit, and then click OK.
If you are prompted for an administratorpassword or for confirmation, type the password, or click Continue.
On 32-bit editions of Windows, locate and then select the following registry subkey:
HKEY_LOCAL_MACHINE\SOFTWARE\Microsoft
On 64-bit editions of Windows, locate and then select the following registry subkey:
On the Edit menu, point to New, and then click Key.
Type WinHelp, and then press Enter.
Click the WinHelp key.
On the Edit menu, point to New, and then click DWORD (32-bit) Value.
Type AllowIntranetAccess, and then press Enter.
On the Edit menu, click Modify.
In the Value data box, type 1, click Hexadecimal in the Base area, and then click OK.
Exit Registry Editor.
Registry entries and group policies for network administrators
Warning This workaround may make a computer or a network more vulnerable to attack by malicious users or by malicious software such as viruses. We do not recommend this workaround but are providing this information so that you can implement this workaround at your own discretion. Use this workaround at your own risk.
Warning This article offers information about how to work around issues that are caused by changes in this release of Windows Help. However, Microsoft makes no specific recommendations about which registry keys and which values are right for your organization. Your IT department is the best judge of how to weigh the advantages of these workarounds against the risks of using them. The safer course is to use no registry workarounds at all.
The WinHlp32.exe download provides Group Policy settings and registry entries to work around two known issues in this release of Windows Help. By using the following Group Policy settings or registry entries, network administrators and individual users can re-enable macros and unblock .hlp files that are stored on intranet sites. A local computer Group Policy setting and a current user Group Policy setting are provided as a workaround for each feature. You can also use a user registry setting to manage each feature.
For each feature, precedence is given in the following order:
Local computer Group Policy
Current user Group Policy
User registry setting
If a policy has not been set for a feature, and the user registry setting for the feature has not been set, the features will behave as described in the «Known issues» section.
Important This section, method, or task contains steps that tell you how to modify the registry. However, serious problems might occur if you modify the registry incorrectly. Therefore, make sure that you follow these steps carefully. For added protection, back up the registry before you modify it. Then, you can restore the registry if a problem occurs. For more information about how to back up and restore the registry, click the following article number to view the article in the Microsoft Knowledge Base:
322756 How to back up and restore the registry in Windows
How to enable macros
Network administrators can use the Allow programmatic macros in WinHlp32.exe Group Policy setting to turn on or to turn off macros in .hlp files. Administrators can use the Group Policy Management Console (GPMC) to manage this Group Policy setting. For more information about Group Policy, see the «References» section.
If neither the local computer Group Policy nor the current user Group Policy for this feature has been set, users can modify the user registry setting for this feature to turn on or to turn off macros in .hlp files. To change this setting, users must first add the following new subkey to the registry:
HKEY_LOCAL_MACHINE\SOFTWARE\Microsoft\WinHelp Then, users must add a DWORD value that is named AllowProgrammaticMacros to this subkey. If the value for AllowProgrammaticMacros is set to 1, the macros will be turned on. If the value is set to 0, the macros will be turned off. If this registry value does not exist, the macros will be turned off.
How to unblock .hlp files that are stored on an intranet
Network administrators can use the Allow WinHlp32.exe to access .hlp files stored on intranet sites Group Policy setting to unblock .hlp files that are stored on the intranet. Administrators can use the GPMC to manage this Group Policy setting. For more information about Group Policy, see the «References» section.
If neither Group Policy setting for this feature has been set, users can modify the user registry setting for this feature to block or to unblock .hlp files that are stored on intranet sites. To change this setting, users must first add the following new subkey to the registry:
HKEY_LOCAL_MACHINE\SOFTWARE\Microsoft\WinHelp Then, users must add a DWORD value that is named AllowIntranetAccess to this subkey. If the value for AllowIntranetAccess is set to 1, the .hlp files that are stored on intranet sites will be available. If the value is set to 0, the .hlp files that are stored on intranet sites will be blocked. If this registry value does not exist, the .hlp files that are stored on intranet sites will be blocked.
Help content providers who release .hlp files
Starting with Windows Vista, the older Help component (WinHlp32.exe) is replaced by a new Help component that adds more functionality for newer versions of Windows.
The WinHlp32.exe technology will not be supported in its current form in future Windows releases. Therefore, we strongly recommend that software developers no longer use this Windows Help program. Software developers who release programs that rely on .hlp files are encouraged to transition their Help systems to an alternative Help file format, such as .chm, .html, or .xml. They will also have to change their calls from the WinHelp API to the new content source. Several third-party tools are available to help software developers convert Help content from one format to another format.


