- Fix problems with the Start menu
- Show a hidden taskbar
- How to hide App list in Start Menu in Windows 10
- Hide App list from Windows 10 Start Menu
- Related Posts
- How to restart StartMenuExperienceHost.exe using Command Prompt or PowerShell on Windows 10
- How to customize Windows 10 Start layout by replacing the .xml file
- How to enable Windows 10 Full screen Start Menu using REGEDIT or GPEDIT
- [email protected]
- Registry Hacks for Start Menu and Taskbar in Windows 10
- Registry Hacks for Start Menu and Taskbar in Windows 10
- Registry Hacks for Start Menu in Windows 10
- Disable Windows 10 Live Tiles Permanently
- Remove Recently added Apps on Start Menu
- Disable context menu in Start Menu in Windows 10
- Remove All Programs List from Start Menu
- Collapse Windows 10 Start Menu
- Registry Hacks for Taskbar in Windows 10
- Enable Seconds in Taskbar Clock
- Remove People App Icon from the Taskbar
- Disable Thumbnail Preview in the Taskbar
- Increase Size of Preview Thumbnail on the Taskbar
- Remove System Tray from the Taskbar
- Do not Display Custom Toolbar on Taskbar
Fix problems with the Start menu
If you can’t see Start on your taskbar, the taskbar may be hidden.
Show a hidden taskbar
Press the Windows logo key + I, then select Personalization > Taskbar .
Turn on Lock the taskbar.
Turn off Automatically hide the taskbar in desktop mode or Automatically hide the taskbar in tablet mode.
If that doesn’t resolve the issue you’re experiencing, select any of the following headings to see steps you can try to get it working again.
Press Ctrl + Shift + Esc to open Task Manager. You may need to select More details at the bottom of the window to see everything.
Select the Processes tab.
Scroll down to Windows Explorer, select it, then select Restart.
The process may take a few seconds, and your taskbar and Start menu may not be visible while Windows Explorer restarts. You can close Task Manager when the process is complete.
Press the Windows logo key + I.
In Settings, choose Update & security > Windows Update , and then select Check for updates. Install any available updates and restart your computer if required.
Note: Need another way to get to Settings? Press the Windows logo key + R, then type ms-settings: (note the colon) in the Open box. Select OK to open Settings.
If you didn’t have any updates that required a restart, it’s still a good idea to restart your device to make sure any pending updates are installed.
To restart your device when you can’t access Start , press Ctrl + Alt + Delete, select Power and then select Restart .
Note: You can also manually shut down your device by pressing and holding the power button. Shutting down this way risks losing unsaved data, so first be sure to save and close everything you’re working on. If you shut down this way, you can restart your device by pressing the power button again.
While it’s likely you have the most recent drivers, if you’re still having trouble with the Start menu, you can try fixing it by manually updating your graphics or audio drivers. For more info, see Update drivers in Windows 10.
If you still can’t fix your problem with the Start menu, try creating a new local administrator account.
If you’re signed in with your Microsoft account, remove the link to that account first by doing the following (if that’s not how you’re signed in, skip to creating a new administrator account):
Press the Windows logo key + I.
In Settings, select Accounts > Your info (in some versions, it may be under Email & accounts instead).
Select Sign in with a local account instead. You’ll see this link only if you’re using a Microsoft account, and you may not see it if your device is on a network.
Type your Microsoft account password and select Next.
Choose a new account name, password, and password hint, and then select Finish and sign out.
Create the new administrator account:
Press the Windows logo key + I.
In Settings, select Accounts > Family & other people (or Other users , if you’re using Windows 10 Enterprise).
Under Other users , select Add someone else to this PC.
On Windows 10 Home and Windows 10 Professional, provide a name for the user and a password, and then select Next. On Windows 10 Enterprise, select I don’t have this person’s sign-in information, and then select Add a user without a Microsoft account.
Set a user name, password, and password hint. Then select Next > Finish.
Next, make the new account an administrator account:
Under Family & other people (or Other users , if you’re using Windows 10 Enterprise), choose the account you created, and then select Change account type.
Under Account type, select Administrator > OK.
Sign out of your account and then sign in to your new account. If everything is fixed, move your personal data and files to the new account.
To move your personal files from your old account to your new account, try opening File Explorer, expanding This PC > OSDisk (C:), and looking in the Users folder, where you should see folders for both accounts. You can then copy and paste your files from the old account folder to similar locations in the new account folder. Or if you prefer, you can upload your files from your old account to OneDrive, and then sign into the new account and download the files from OneDrive.
If the problem still isn’t fixed, try deleting the old administrator account:
Under Other users, select the old administrator account, then select Remove > Delete account and data.
After the old account is removed, restart your device and sign in with the new account again.
If you were using a Microsoft account to sign in before, associate the Microsoft account with the new administrator account.
In Settings , select Accounts > Your info (in some versions, it may be under Email & accounts instead).
Select Sign in with a Microsoft account instead and enter your account info. You’ll see this link only if you’re using a local account, and you may not see it if your device is on a network.
Note: Need another way to get to Settings? Press Windows logo key + R, then type ms-settings: (note the colon) in the Open box. Select OK to open Settings.
If none of the previous options work, try resetting your PC using Recovery options in Windows 10.
How to hide App list in Start Menu in Windows 10
Windows 10 v1703 offers a lot of Start Menu customization. You can have a normal old-style Start Menu, or you can have a full-screen Modern start. You can have a Start with no tiles or a Start with all the tiles. I’ve noticed a lot of users focusing on the design elements of their PC’s Start Menu. This post will show you how to make the Start Menu show only the Tiles, not the all applications list – which appears on the left side.

This way you can get a great design, and the Start menu looks proportional to the screen. And this way the Start menu kind of blends in and looks stunning. But that is completely subjective. Maybe you will like this or not. This can be a great Start customization if you do not generally use the all applications list and search for applications instead.
Hide App list from Windows 10 Start Menu
You just need to tweak a few settings to get this done, and it is very easy. Follow the steps below to hide the app list from the Start menu.
Step 1: Go to ‘Start’, and open ‘Settings’.
Step 2: Now select ‘Personalization’. Then from the left menu choose ‘Start’.
Step 3: Find the setting that says “Show app list in Start menu” and turn it off to hide the app list from the Start menu.
That is it – it is so simple to get this done!
Now that the app list is gone from the Start menu, the Start would appear less broad and visually aesthetic. Not that you have completely lost the app list, it is still accessible from the Start menu itself. You might have noticed the addition of two new icons in the top left corner of the Start menu. The bottom-most one opens the same application list that you just disabled. So technically you have not disabled it, you’ve just hidden it. And the top icon takes you back to the Tiles. Thus you can switch back and forth easily between the the App list and the Tiles.
You can easily revert back the changes if you do not like your new Start menu. To revert the changes, simply switch back the settings you changed while following the above steps.
If you are using the Start in full-screen mode, then you may not be able to see any noticeable changes after tweaking that setting. The app list will remain as it is and no changes will visible as such.
This is how you can hide the App list from Windows 10 Start Menu.
Date: April 10, 2018 Tags: Start Menu
Related Posts
How to restart StartMenuExperienceHost.exe using Command Prompt or PowerShell on Windows 10
How to customize Windows 10 Start layout by replacing the .xml file
How to enable Windows 10 Full screen Start Menu using REGEDIT or GPEDIT
[email protected]
Lavish loves to follow up on the latest happenings in technology. He loves to try out new Windows-based software and gadgets and is currently learning JAVA. He loves to develop new software for Windows. Creating a System Restore Point first before installing a new software is always recommended, he feels.
Registry Hacks for Start Menu and Taskbar in Windows 10
In this article, we are going to discuss Registry Hacks for Start Menu and Taskbar in Windows 10. Microsoft always tries to bring out the best features and in this consequence the old are replaced by modern ones. Few users don’t like the changes and want to enable the previous look for a help like Registry Editor.
In addition, you can supersede the Windows Settings and Control panel options through registry hacks. This way lets you make some useful changes in Windows 10 even sometimes as a lifesaver.
Microsoft keeps few features hidden from the users and you can easily enable or disable those via Registry key manipulations. Let’s see how you can reverse their status by using these superb registry hacks for Start Menu and Taskbar in Windows 10.
But before starting we warn you for 2 things – 1. Go with the methods if you have a proper knowledge for the modifications, and 2. make sure to backup. You may take help from the instructions here – How to Import and Export Registry Editor on Windows 10.
Registry Hacks for Start Menu and Taskbar in Windows 10
Registry Hacks for Start Menu in Windows 10
Lots of people complained about the inability to customize Start Menu in various ways. Actually, Microsoft did not provide any built-in options to manage most of the settings of Start Menu. However, Registry Hacks for Start Menu and Taskbar will allow you to handle plenty of important things.
You can do some changes in Start Menu such as disable “Windows Live Tiles” permanently, remove “recently added apps” group, etc. Here, we will derive about all these.
Disable Windows 10 Live Tiles Permanently
Windows 10 provides Live tiles in the Start Menu that changes after every few seconds in order to show relevant information such as latest news, weather and so on. Moreover, the Photos tile also displays a slideshow of images.
The “Start Menu” of Windows 10 gives you a provision to disable Live Tiles feature. But a substantial number of users prefer to disable all the Live Tiles permanently in one go.
Step-1: At first press the Windows Key and start typing regedit. When the same command is visible on the top, click on it.
Step-2: Once Registry Editor opens up, look out for the below path.
Step-3: Right-click on PushNotifications and hover the cursor over New. Select DWORD (32-bit) Value and give the identification name as NoTileApplicationNotification.
Step-4: Double-click the newly created DWORD and set its Value as 1.
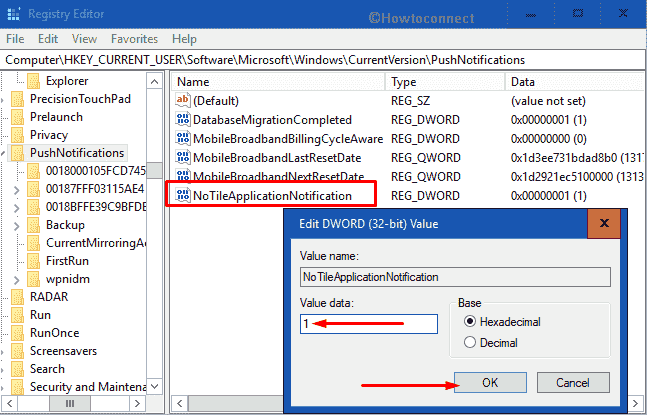
Doing this will disable the push notifications. However, to experience this, ensure to restart Explorer from Task Manager.
Remove Recently added Apps on Start Menu
Another interesting Registry Hack for Start Menu and Taskbar is to remove recently added apps list. Windows 10 Start Menu is continuously developing with various new features. One such amazing feature is its Recently Added apps section on the top left. The list displays Store as well as classic apps you have installed in the Start Menu.
The good thing is that the OS provides you various ways to disable this feature. Most users do not prefer the Start Menu to display the new applications that were recently installed in the system.
At first, open the Registry Editor using any of your preferred methods. However, executing the regedit command on Run will fetch you the tool pretty easily.
Navigate to the following key:
Note: If you don’t see Explorer key, just create a new one. Simply, make a right-click on Windows and choose New followed by Key. Name this as Explorer.
Now, switch to the right-pane of Explorer, right-click somewhere on an empty space. Select New, pick up DWORD (32-bit) Value and name it as HideRecentlyAddedApps.
It doesn’t matter whether you are using a 32-bit system or 64-bit system. In both cases, you should go ahead with DWORD (32-bit).
Do a double-click on HideRecentlyAddedApps and set its value as 1.
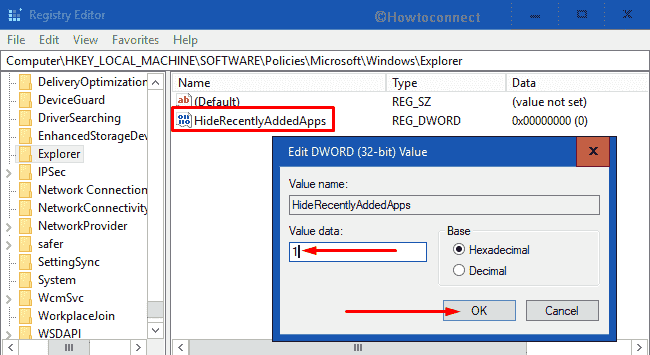
Finally, restart Explorer to disable Recently added apps section in the Start Menu.
Note: If you prefer to revert back to the original settings, simply delete the newly created DWORD HideRecentlyAddedApps.
Just restart your PC to experience the changes.
Disable context menu in Start Menu in Windows 10
Usually start menu apps come with a unique feature that allows users to perform different activities like “Uninstall”, “Pin to taskbar” etc. Whenever you perform a right-click on any app or tile, you get to see a context menu. Here, we will tell you the procedure to disable “context menu” feature of Start Menu in the latest version of Windows 10.
• Open Registry Editor by typing regedit on Cortana.
• Next, browse to the below-given path:
• Right click on Explorer and create a new “DWORD (32-bit) Value”. Name it as DisableContextMenusInStart.
• Make a double-click on DisableContextMenusInStart and set the value to “1” from “0” to disable the context menu.

• Finally, either Restart your PC or the Explorer to see the changes.
Note: If you wish to revert back the changes made so far, all you have to do is to either set the value to “0” or just delete the entire DWORD.
Remove All Programs List from Start Menu
This is a simple Registry Hacks for Start Menu and Taskbar. You will clear out all the programs that Start Menu displays on the left side by applying the procedure. However, not preferable by everyone, but still, most of them choose to do so.
Launch Registry Editor and navigate to the given paths one after another on the left-hand side.
On the corresponding right pane of Explorer on both the paths, generate a new DWORD with a name NoStartMenuMorePrograms.
Right-click on it and select Modify. Now, input its value data as 1 and click OK.

As the last step, restart Windows Explorer on “Task Manager” and then open Start Menu. You will no more see the list of programs on the left side.
Collapse Windows 10 Start Menu
When you collapse Windows 10 Start Menu, only one portion will be visible to you. You can either view all programs or choose to display the Live Tiles only.
After collapsing the Start Menu, you will see two icons – Pinned tiles and All Apps on the extreme top left. So, let us now see how to make this option possible through Registry.
Get access to the Registry Editor and head to the below-given paths one after another.
Now, shift to the adjacent right pane of Explorer on both the paths and create a new DWORD with a name NoStartMenuMorePrograms.

Make a double-click on it and assign its value as 2. Click OK to save the changes and restart Explorer to see the collapsable Start Menu.
Registry Hacks for Taskbar in Windows 10
By dint of Registry Hacks for Start Menu and Taskbar, you can choose not to display custom toolbars, seconds display in the Clock, taskbar previews as well as make it completely Black.
Enable Seconds in Taskbar Clock
One of the Registry Hacks for Taskbar in Windows 10 is to enable seconds display in the Clock located in the notification area. Here is the procedure:
Make a joint press of “Win+R” to open Run dialog box in Windows 10.
To access Registry Editor, type Regedit in the provided text field of Run and press Enter. A UAC popup will appear, click Yes to continue.
When Registry Editor comes into the view, go to the following address on the left-hand side.
Shift to the corresponding pane and make a right-click in empty space and select DWORD (32-bit) Value. Name it as ShowSecondsInSystemClock and hit Enter to save it.
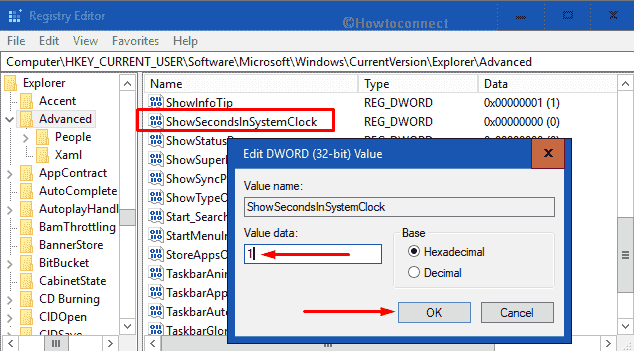
Perform a double-click on the newly formed ShowSecondsInSystemClock DWORD and when its edit box will appear, set its value to 1.
Click OK to implement the changes. Finally, Restart Explorer to make the modifications visible.
Now you will see seconds in Taskbar Clock. If you don’t like it, simply delete the DWORD ShowSecondsInSystemClock from Registry Editor to disable it again.
Remove People App Icon from the Taskbar
Windows 10 taskbar displays People icon which facilitates users to easily view their contacts. However, many users do not find this icon to be useful in Taskbar and thus prefers to remove it. So, let us explore the registry way to remove People app icon from the taskbar.
Launch Cortana search box and write regedit here.
Pressing Enter will guide you to the Registry Editor. Now navigate to the following path:
Move aside to the right side and perform a right click on void space. Hover the cursor over New and select DWORD (32-bit) Value. Give this DWORD a name PeopleBand.
Double-click on PeopleBand and set its Value data to 0.
In the end, Restart File Explorer. It will save the changes you just made.
By following this Registry Hacks for Taskbar in Windows 10, you can pretty easily Remove People App icon from the taskbar. Moreover, if you want to bring back the People icon, set 1 as the value of DWORD PeopleBand.
Disable Thumbnail Preview in the Taskbar
Whenever you place your cursor over any running folder or program in the taskbar, it shows a “thumbnail preview”. If you don’t find any use of this feature, you can disable it by the following Registry tweak.
Make a combined press of “WIN+R” to launch Run dialog. Type in regedit in the dialog box and hit Enter to continue.
Once the Registry Editor appears, browse through this given path
On the adjacent right pane, conduct a right-click on a vacant area. Hover over New, pick up “DWORD (32-bit) Value” and name it as ‘ExtendedUIHoverTime’.
Perform double click on it and thereafter set the value to 10000. Here 10000 refer to milliseconds which mean it will stop the thumbnail for long period of time.
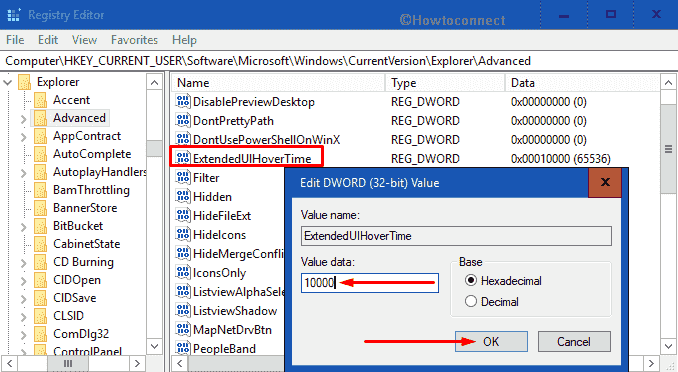
Finally, restart Explorer and then hover the cursor over an active program on the taskbar. You will no longer see the thumbnail preview of those programs.
Increase Size of Preview Thumbnail on the Taskbar
You can also Increase Size of Preview thumbnail on the taskbar with a simple registry hack. Let’s see how:
Launch Start Menu, type regedit and click the same command when it appears as the Best match.
Upon opening the Registry Editor, reach out to the following path:
Move to the right side, create a new DWORD and name it “MinThumbSizePx”. Next, perform a double click on it and set the value under 500. For example – 300.
Note – The maximum value to increase the size of thumbnail preview is 500.
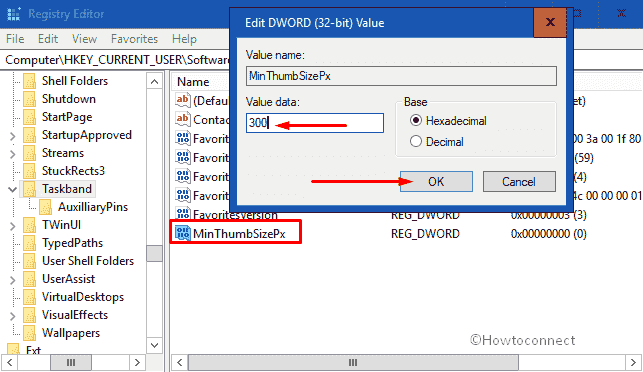
This time you will see that the thumbnails size has been changed. However, don’t forget to Restart Explorer to view the changes.
Remove System Tray from the Taskbar
• Type regedit in Cortana box and when the same displays as the final result, click on it to open Registry Editor.
• Go to the following path on the left column of the Registry –
• Shift aside to the right pane and make a new DWORD called “NoTrayItemsDisplay”. Double-tap on the new DWORD and set the value to 1.

This tweak will Remove system tray from the taskbar and if you wish you bring it back, delete the DWORD NoTrayItemsDisplay.
Do not Display Custom Toolbar on Taskbar
This is applicable for the users who prefer to keep their system tray neat and clean. Moreover, who also like to prevent others from adding a custom toolbar on the taskbar.
Go to Registry Editor using any of your convenient methods.
On its left column, browse to the given below path:
Switch to the other side of Explorer key and generate a DWORD with a name NoToolbarsOnTaskbar.
Double-click on it, input its value as 1. Click OK, restart Explorer and then the custom toolbar will not appear on the taskbar anymore.

That’s all for today and hopefully, with these Registry Hacks for Start Menu and Taskbar in Windows 10, you can customize your PC accordingly.


