- Hiding files from other users on Windows 10 Home
- Replies (3)
- How to Hide Files on Your Computer
- Level 1: Use Hidden Folders
- On Windows
- On Mac
- Level 2: Use Apps to Hide Files from Search and History
- Hide Folders with My Lockbox for Windows
- Use Skedaddle or Obscurity for Mac
- How to hide files and folders on Windows 10
- How to hide files and folders using File Explorer
- How to hide files and folders using Command Prompt
- Making hidden files and folders visible again
- More Windows 10 resources
- The Dell XPS 15 is our choice for best 15-inch laptop
- Halo: MCC’s live service elements make it better, not worse
- Microsoft’s Surface Duo is not ‘failing up’
- These are the best PC sticks when you’re on the move
- How to Hide Files & Folders from Search in Windows 10
- Hide Files & Folders from Search Results in Windows 10
- Modify Included Locations
- Rebuild the Index
Hiding files from other users on Windows 10 Home
I’ve got multiple users with unique logins on my home PC, which has a second drive for file storage. I’d like to keep my files on the file storage drive hidden/private from other users, but currently, any user can see those files.
Is there a way to have my files private to me and other users files private to them on the same PC?
Replies (3)
1 person found this reply helpful
Was this reply helpful?
Sorry this didn’t help.
Great! Thanks for your feedback.
How satisfied are you with this reply?
Thanks for your feedback, it helps us improve the site.
How satisfied are you with this reply?
Thanks for your feedback.
Was this reply helpful?
Sorry this didn’t help.
Great! Thanks for your feedback.
How satisfied are you with this reply?
Thanks for your feedback, it helps us improve the site.
How satisfied are you with this reply?
Thanks for your feedback.
Hi Paul. I’m Greg, an installation specialist and 9 year Windows MVP, here to help you.
You would give only your account permission to access an entire drive or specific folders, like this: https://www.online-tech-tips.com/computer-tips/.
I hope this helps. Feel free to ask back any questions and let us know how it goes. I will keep working with you until it’s resolved.
________________________________________________________
Standard Disclaimer: There are links to non-Microsoft websites. The pages appear to be providing accurate, safe information. Watch out for ads on the sites that may advertise products frequently classified as a PUP (Potentially Unwanted Products). Thoroughly research any product advertised on the sites before you decide to download and install it.
Windows MVP 2010-20
Over 100,000 helped in forums in 10 years
I do not quit for those who are polite and cooperative.
I will walk you through any steps and will not let you fail.
10 people found this reply helpful
Was this reply helpful?
Sorry this didn’t help.
Great! Thanks for your feedback.
How satisfied are you with this reply?
Thanks for your feedback, it helps us improve the site.
How to Hide Files on Your Computer
Sometimes, you need to keep files on your computer that you just don’t want other people to see. Whether it’s a gift list or that porn stash, hiding files is easy. Here’s how to do it.
Level 1: Use Hidden Folders
If you just need to tuck some files away from prying eyes then using your computer’s built-in hidden folders is an easy way to do it. This won’t really hide files from someone who knows what they’re doing, but it will make them invisible so people don’t stumble across them. Think of it as the digital equivalent of hiding things under your mattress.
On Windows
Hiding files in Windows is pretty easy:
- Select the files or folders you want to hide
- Right-click and choose Properties
- Click the General tab
- Click the checkbox next to Hidden in the Attributes section
- Click Apply
Now the files you chose are hidden away and people won’t see them when they’re looking through your folders. When you need to find those files again, just turn Hidden Items on .
Navigate Files Like a Pro with These Windows Explorer Tips and Tricks
Thinking about Windows Explorer may make you yawn, but you spend a lot of time in it every day.…
On Mac
On Mac, you’ll use a quick Terminal command to hide folders. Just type this into Terminal, replacing /path/to/folder with the folder you want to hide:
chflags hidden /path/to/file-or-folder
To unhide it, type in:
chflags nohidden /path/to/file-or-folder
If you don’t know the full path of the folder you want to hide, type the command then drag that file or folder into the Terminal window. Alternately, you can just tuck that folder away inside your Library folder .
Instantly Hide Any File in OS X by Putting It In Your Library Folder
Still trying to find the best way to hide your porn? Uh, I mean. «Sensitive Documents?» Macworld…
Level 2: Use Apps to Hide Files from Search and History
If messing around with hidden folders is too much for you, you can use a third-party app to hide files. Again, these apps don’t really protect your data, but they do make it so nobody casually comes across files you don’t want them to.
Hide Folders with My Lockbox for Windows
My Lockbox tucks your personal files inside the app and requires a password to unlock them. Nothing inside My Lockbox will show up in search, so you don’t need to worry about anyone coming across your files. There’s no encryption here, so while it’s not super secure, it is fast and easy to use.
Use Skedaddle or Obscurity for Mac
On Mac, you have two solid options to hide folders using apps. The first is the previously mentioned Skedaddle ($2.99). With Skedaddle, you get a hidden space on your desktop that you can put folders on. The files here won’t show up in Spotlight searches or in Finder. That said, anyone who figures out the keyboard shortcut that pulls up Skedaddle can access them easily.
Skedaddle Hides a Secret, Password-Protected File Drawer Underneath Your Mac’s Desktop
Mac OS X: There are lots of ways to hide your files, but Skedaddle offers one that both useful and…
Another trick is to use an app like the previously mentioned Obscurity . Although, calling Obscurity an app isn’t exactly right. It’s actually just a dummy app that you can put files inside. Just right-click Obscurity and select «Show Package Contents.» Here, you can dump all your files into the app container. These files won’t show up in searches or in Finder. This isn’t really secure since anyone can access it, but chances are nobody is going to just dig around in your computer’s applications folder right-clicking every single app.
Obscurity Hides Files in OS X in Plain Sight
Mac: If you’re worried less about encrypting your folders, and more about someone accidentally…
How to hide files and folders on Windows 10

No matter what kind of content you keep on your computer, you’ll always find reasons to hide certain files and folders. Perhaps you have important documents and videos that you want to keep under wraps, or you simply want to prevent users from accidentally deleting certain files if you’re sharing your PC with other people.
For whatever the reason it might be, on Windows 10, you can quickly hide a file or folder in two different ways, including using File Explorer or using the attrib command using Command Prompt.
In this Windows 10 guide, we’ll walk you through the easy steps to hide a file and folder on your computer. In addition, you’ll learn the steps to access those hidden items as needed.
How to hide files and folders using File Explorer
The easiest way to keep content hidden is using File Explorer.
- Open File Explorer.
- Navigate to the file or folder you want to hide.
Right-click the item and click on Properties.

Click Apply.

Click OK.

Once you’ve completed the steps, the hidden items will not be visible anymore, because by default Windows 10 doesn’t show hidden files.
If you want to access your hidden items you’ll have to type the complete path to the hidden folder or file you want to open and press Enter. For example: C:\Users\admin\Desktop\Files\Secret Files\Great Secret.txt.
Or you can open File Explorer, click on the View tab and make sure to check the Hidden items option. Then you can browse your hidden items as you would normally do with other content.

At any time, you can make the files and folders visible again by using the same steps mentioned above, but this time on step 4 make sure to clear the Hidden option.
How to hide files and folders using Command Prompt
Alternatively, you can also use Command Prompt to hide files and folders on your computer.
- Open Start.
- Do a search for Command Prompt and click the result.
Type the following command to navigate to the items you want to hide and press Enter:
In the command replace the path after cd with the path to your file or folder.
Type the following command to hide a folder or file and press Enter:
attrib +h «Secret Files»
In the command replace «Secret Files» with the name of your folder or file. Quotation marks are only necessary when there are spaces in the name.
If you’re trying to hide a folder with files and subfolders, which you also want to keep hidden, then you’ll need to use these steps as well.
While in Command Prompt type the following command to navigate inside the hidden folder and press Enter:
cd «Secret Files»
In the command replace «Secret Files» with the name of your hidden folder.
Type the following command to hide all files and folders inside the hidden folder and press Enter:
After completing the steps, the items with the hidden attribute will no longer be visible.
Making hidden files and folders visible again
If you change your mind, you can use the following steps to remove the hidden attribute for files and folders.
- Open Start.
- Do a search for Command Prompt and click the result.
Type the following command to navigate to the hidden items location and press Enter:
In the command replace the path after cd with the path to your file or folder.
Type the following command to make the items visible again and press Enter:
attrib -h «Secret Files»
In the command replace «Secret Files» with the name of your folder or file. Quotation marks are only necessary when there are spaces in the name.
In the case you also set the hidden attribute for files and subfolders inside of a folder, then do the following to remove the attribute.
While in Command Prompt type the following command to navigate inside the hidden folder and press Enter:
cd «Secret Files»
In the command replace «Secret Files» with the name of your hidden folder.
Type the following command to remove the hidden attribute from all files and folders inside the folder and press Enter:
Which method do you prefer to hide files and folders on Windows 10? Tell us in the comments below.
More Windows 10 resources
For more help articles, coverage, and answers on Windows 10, you can visit the following resources:
![]()
The Dell XPS 15 is our choice for best 15-inch laptop
For a lot of people, a 15-inch laptop is a perfect size that offers enough screen for multitasking, and in a lot of cases, some extra performance from powerful hardware. We’ve rounded up the best of the best at this size.
![]()
Halo: MCC’s live service elements make it better, not worse
Halo: The Master Chief Collection is more popular than ever, but some fans don’t agree with the live service approach 343 Industries has taken with it. Here’s why those elements are, at the end of the day, great for the game and for Halo overall.
![]()
Microsoft’s Surface Duo is not ‘failing up’
Microsoft announced this week that it was expanding Surface Duo availability to nine new commercial markets. While Surface Duo is undoubtedly a work in progress, this is not a sign of a disaster. It’s also doesn’t mean that Surface Duo is selling a ton either. Instead, the reason for the expansion is a lot more straightforward.
![]()
These are the best PC sticks when you’re on the move
Instant computer — just add a screen. That’s the general idea behind the ultra-portable PC, but it can be hard to know which one you want. Relax, we have you covered!
How to Hide Files & Folders from Search in Windows 10


In Windows 10, the Cortana box or the Windows Search box can search for files and folders on your PC. By default, the search includes files and folders in your profile folder (C:\Users\[user name]) like the Desktop, documents, pictures, and downloads.
You may not want all your files and folders to be included in the search. Maybe you have some private files and you don’t want them appearing in the search results. Preventing a folder from appearing in the search results is referred to as deindexing it.
Today, we’ll show you how to deindex a folder so it won’t appear in the search results in File Explorer or in the Cortana box or Search box on the Taskbar.
Hide Files & Folders from Search Results in Windows 10
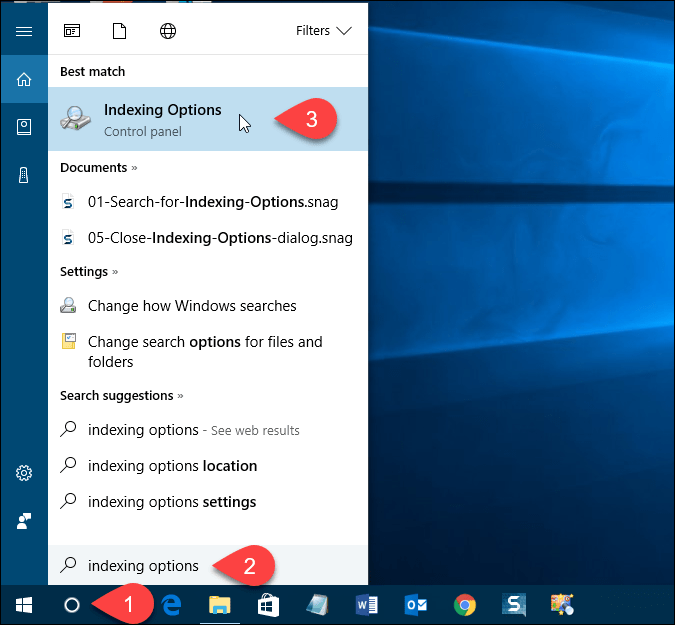
To begin, click the Cortana or the Search icon on the Taskbar and type “indexing options”. Click Indexing Options under Best match.
Modify Included Locations
The Included Locations are listed on the Indexing Options dialog box. To hide files and folders from search, click Modify.

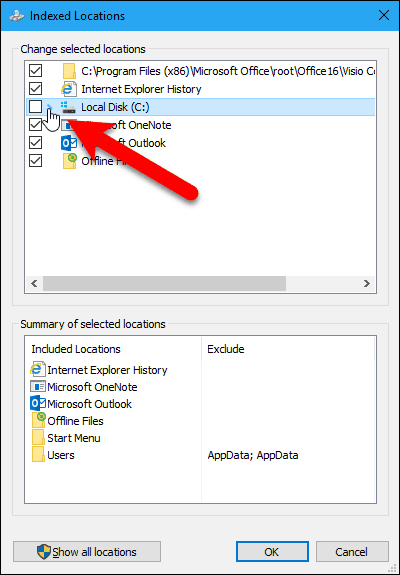
All the folders that are included in the search are checked in the Change selected locations box on the Indexed Locations dialog box.
To find the folder you want to hide from the search, click the arrow next to the Local Disk (C:), or other drive.
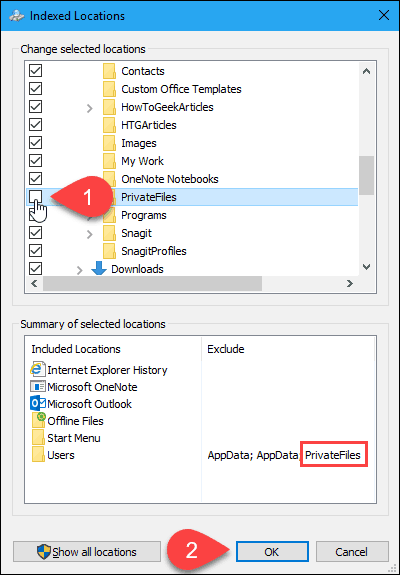
In the folder tree, navigate to the folder you want to hide and uncheck the box for that folder.
NOTE: You can only hide a file by unchecking the folder that contains it. So, if you have specific files you want to hide that may be in the same folder as other files you don’t want to hide, move that file to a new folder. You may want to create a folder to contain all the files you want to hide, so you can just hide that folder.
The folder you unchecked is added to the Users folders in the Summary of selected locations box.
Click OK.
Rebuild the Index
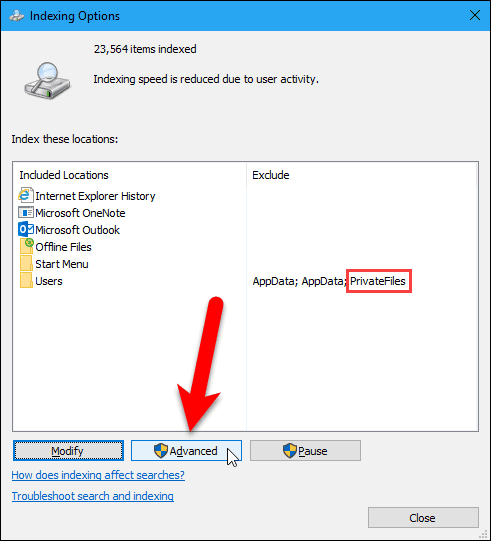
Now, we need to rebuild the index to exclude the selected folder. Back on the Indexing Options dialog box, click Advanced.
NOTE: Notice that the folder you chose to hide is listed in the Exclude column on the Indexing Options dialog box.
You need administrative rights to access advanced indexing options. So, enter your account password if prompted.
On the Advanced Options dialog box, click Rebuild in the Troubleshooting section.
Note that rebuilding the index can also fix problems with Windows search.

A dialog box displays warning you that rebuilding the index might take a long time to complete. Click OK.
While the index is rebuilding, you might see the folder you chose to hide show up in the search results. You may have to wait a while depending on how many files and folders you have on your hard drive.

Click Close on the Indexing Options dialog box.

And that’s all there is to it! Your folders will now be excluded from search results. This includes when you have Windows 10 search through file contents.


