- Windows hide files starting with
- How to show hidden files in Windows 7
- Users who read this also read:
- How to hide files and folders on Windows 10
- How to hide files and folders using File Explorer
- How to hide files and folders using Command Prompt
- Making hidden files and folders visible again
- More Windows 10 resources
- Halo: MCC’s live service elements make it better, not worse
- Microsoft’s Surface Duo is not ‘failing up’
- Here’s what you can do if Windows 10 update KB5001330 is causing issues
- These are the best PC sticks when you’re on the move
- Have something to hide? Here’s how to make it disappear in Windows
- How to hide any file or folder in Windows
- How to encrypt a file or folder with 7Zip
- Throw people off by renaming a file with the wrong extension
- Encrypt your entire hard drive
Windows hide files starting with

- Home
- Tutorials & Tech Support Guides
- Windows 7 Tutorials
- How to show hidden files in Windows 7
How to show hidden files in Windows 7
Lawrence Abrams
- February 1, 2009
- Read 3,679,998 times
Windows 7 hides certain files so that they are not able to be seen when you exploring the files on your computer. The files it hides are typically Windows 7 System files that if tampered with could cause problems with the proper operation of the computer. It is possible, though, for a user or piece of software to set make a file hidden by enabling the hidden attribute in a particular file or folder’s properties. Due to this it can be beneficial at times to be able to see any hidden files that may be on your computer. This tutorial will explain how to show all hidden files in Windows 7.
To enable the viewing of hidden and protected system files in Windows 7 please follow these steps:
- Close all programs so that you are at your desktop.
- Click on the Start button. This is the small round button ( ) in the lower left corner of your screen that has a Windows flag on it.
- Click on the Control Panel menu option.
- When the control panel opens you will see a screen similar to Figure 1 below.
Now click on the Show hidden files and folders option as shown by the red arrow in Figure 2 above.
Once this is done, your Folder Options screen should look similar to the following image.
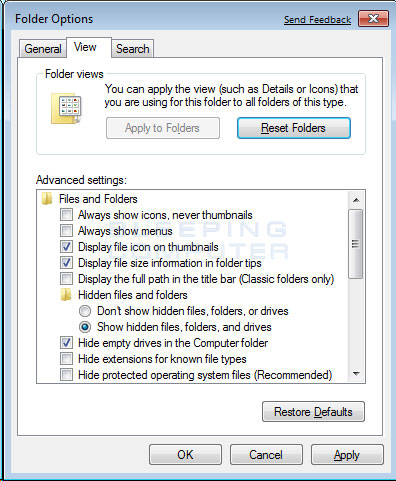
Figure 3. Folder Options screen
You will now be at your desktop and Windows 7 will be configured to show all hidden files.
If you have any questions about this tutorial please feel free to post them in our Windows 7 forums.
Users who read this also read:
How to see hidden files in Windows
By default Windows hides certain files from being seen with Windows Explorer or My Computer. This is done to protect these files, which are usually system files, from accidentally being modified or deleted by the user. Unfortunately viruses, spyware, and hijackers often hide there files in this way making it hard to find them and then delete them.
How to remove a Trojan, Virus, Worm, or other Malware
If you use a computer, read the newspaper, or watch the news, you will know about computer viruses or other malware. These are those malicious programs that once they infect your machine will start causing havoc on your computer. What many people do not know is that there are many different types of infections that are categorized in the general category of Malware.
How to see hidden files in Windows 8
Windows 8 hides certain files so that you are not able to view them while exploring the files and folders on your computer. Windows has two types of files that Windows will classify as hidden and hide from the user. The first type are actually hidden files, which are ones that are given the +H attribute or specified as Hidden in a file or folder’s properties. The second type of file are System .

How to create a new user account in Windows 7 and Windows Vista
Windows 7 allows you to have multiple users sharing the same computer under their own individual accounts. This allows each individual user to have their own location on the computer where they can store their personal documents, pictures, videos, saved games, and other personal data. This also allows the owner of the computer to assign certain accounts the ability to perform administrative tasks .

How to start Windows in Safe Mode
Windows Safe Mode is a way of booting up your Windows operating system in order to run administrative and diagnostic tasks on your installation. When you boot into Safe Mode the operating system only loads the bare minimum of software that is required for the operating system to work. This mode of operating is designed to let you troubleshoot and run diagnostics on your computer. Windows Safe Mode .
How to hide files and folders on Windows 10

No matter what kind of content you keep on your computer, you’ll always find reasons to hide certain files and folders. Perhaps you have important documents and videos that you want to keep under wraps, or you simply want to prevent users from accidentally deleting certain files if you’re sharing your PC with other people.
For whatever the reason it might be, on Windows 10, you can quickly hide a file or folder in two different ways, including using File Explorer or using the attrib command using Command Prompt.
In this Windows 10 guide, we’ll walk you through the easy steps to hide a file and folder on your computer. In addition, you’ll learn the steps to access those hidden items as needed.
How to hide files and folders using File Explorer
The easiest way to keep content hidden is using File Explorer.
- Open File Explorer.
- Navigate to the file or folder you want to hide.
Right-click the item and click on Properties.

Click Apply.

Click OK.

Once you’ve completed the steps, the hidden items will not be visible anymore, because by default Windows 10 doesn’t show hidden files.
If you want to access your hidden items you’ll have to type the complete path to the hidden folder or file you want to open and press Enter. For example: C:\Users\admin\Desktop\Files\Secret Files\Great Secret.txt.
Or you can open File Explorer, click on the View tab and make sure to check the Hidden items option. Then you can browse your hidden items as you would normally do with other content.

At any time, you can make the files and folders visible again by using the same steps mentioned above, but this time on step 4 make sure to clear the Hidden option.
How to hide files and folders using Command Prompt
Alternatively, you can also use Command Prompt to hide files and folders on your computer.
- Open Start.
- Do a search for Command Prompt and click the result.
Type the following command to navigate to the items you want to hide and press Enter:
In the command replace the path after cd with the path to your file or folder.
Type the following command to hide a folder or file and press Enter:
attrib +h «Secret Files»
In the command replace «Secret Files» with the name of your folder or file. Quotation marks are only necessary when there are spaces in the name.
If you’re trying to hide a folder with files and subfolders, which you also want to keep hidden, then you’ll need to use these steps as well.
While in Command Prompt type the following command to navigate inside the hidden folder and press Enter:
cd «Secret Files»
In the command replace «Secret Files» with the name of your hidden folder.
Type the following command to hide all files and folders inside the hidden folder and press Enter:
After completing the steps, the items with the hidden attribute will no longer be visible.
Making hidden files and folders visible again
If you change your mind, you can use the following steps to remove the hidden attribute for files and folders.
- Open Start.
- Do a search for Command Prompt and click the result.
Type the following command to navigate to the hidden items location and press Enter:
In the command replace the path after cd with the path to your file or folder.
Type the following command to make the items visible again and press Enter:
attrib -h «Secret Files»
In the command replace «Secret Files» with the name of your folder or file. Quotation marks are only necessary when there are spaces in the name.
In the case you also set the hidden attribute for files and subfolders inside of a folder, then do the following to remove the attribute.
While in Command Prompt type the following command to navigate inside the hidden folder and press Enter:
cd «Secret Files»
In the command replace «Secret Files» with the name of your hidden folder.
Type the following command to remove the hidden attribute from all files and folders inside the folder and press Enter:
Which method do you prefer to hide files and folders on Windows 10? Tell us in the comments below.
More Windows 10 resources
For more help articles, coverage, and answers on Windows 10, you can visit the following resources:
![]()
Halo: MCC’s live service elements make it better, not worse
Halo: The Master Chief Collection is more popular than ever, but some fans don’t agree with the live service approach 343 Industries has taken with it. Here’s why those elements are, at the end of the day, great for the game and for Halo overall.
![]()
Microsoft’s Surface Duo is not ‘failing up’
Microsoft announced this week that it was expanding Surface Duo availability to nine new commercial markets. While Surface Duo is undoubtedly a work in progress, this is not a sign of a disaster. It’s also doesn’t mean that Surface Duo is selling a ton either. Instead, the reason for the expansion is a lot more straightforward.
![]()
Here’s what you can do if Windows 10 update KB5001330 is causing issues
In this guide, we’ll show you the steps to get rid of the update KB5001330 to fix profile, gaming, and BSoD problems with the Windows 10 October 2020 Update and May 2020 Update.
![]()
These are the best PC sticks when you’re on the move
Instant computer — just add a screen. That’s the general idea behind the ultra-portable PC, but it can be hard to know which one you want. Relax, we have you covered!
Have something to hide? Here’s how to make it disappear in Windows
 Greg Mombert/Digital Trends Is there a file or folder on your computer that you’d like to hide? Perhaps you share a computer, and want to keep some documents under wraps. Maybe there’s a file you want to keep on your computer, but don’t want to see every day. Or maybe, just maybe, you’re worried about keeping a particular file from prying eyes.
If you want to hide something around your house, you’ve got two options. First off, you can hide it somewhere insecure — like under the rug — and hope that no one thinks to look there. Or, secondly, you can lock it up in a safe where people can’t get in without some serious effort. The same is true for your files. You can make them harder to find with obscurity, or you can protect them with encryption. Let’s go over some tips both methods, starting with how to hide your files.
How to hide any file or folder in Windows
Hiding a file or a folder in Windows only takes a few clicks. Open the File Explorer in Windows, then select the files or folders you’d like to hide (you can select multiple files by holding the CTRL key and clicking them). Then, click View at the top of the window to reveal that section of the ribbon, where you’ll Hide selected items.

Click that button to instantly hide your files. You won’t see the file(s) — assuming the computer is set not to show hidden files, that is — and other users won’t have any way of knowing they exist. This isn’t foolproof, however. Right beside the button we used to hide our files is an option called Hidden files, which, when clicked, shows the hidden files. Click that and the files you thought were hidden files will be revealed.

Hiding files in Windows isn’t intended to be a security function, but more so a convenience. You can leave a file or folder on your computer without having to see it, which is useful for configuration files that programs occasional leave behind. It’s good that these files exist, but not necessary that you see them. If there are files you’ve created that you feel the same way about, hiding them might be a good idea. If there’s something on your computer you don’t want other people to access, though, you need another level of protection.
How to encrypt a file or folder with 7Zip
One simple way to protect a file or folder from being seen by other users is to store it in a password-protected archive. We’ve previously explained how to do this using 7Zip, a free program for opening and creating compressed files, but below is a quick overview for those not looking for a full tutorial.
Launch 7Zip, then locate the file or folder you’d like to hide inside an encrypted archive. Select your files, then click Add.

Afterward, create a ZIP file or 7Zip file and add a password in the encryption section. Click Okay when you’re done, and rest assured know that you’ve created a password-protected archive containing your files. Your files cannot be opened without the password, which provides better protection than if you had simply hidden them. Of course, there’s nothing stopping you from also hiding the encrypted archive. And you can make things a little more complicated, if you want.
Throw people off by renaming a file with the wrong extension
Here’s another quick trick if you really want to keep people from opening your files. Rename the extension.
You could rename a text (.txt) file so that it looks like a JPG (.jpg), for instance, leaving anyone who tries to open it with an error message. Just rename the file to something incorrect, but instead of changing the name before the period, change the file extension following it. You’ll be warned not to do this, of course.

Encrypt your entire hard drive
If you’re still concerned about someone finding a particular file or files on your computer, you can go a step further by encrypting your entire computer. There are several options to do so, but if you’re using Windows 7 or later, we recommended using the built-in BitLocker service. You can find it by searching for “BitLocker” in the Start Menu, or by browsing the Control Panel.

You can use BitLocker to encrypt your entire hard drive, which will require users to enter a password in order to access any file. Even if an expert pulls your hard drive out of your computer and tries to examine the files, they probably won’t get far without your password. System-wide encryption is the only way to go if you want to keep your files truly hidden. Just don’t lose your password!


