- Что такое файл hosts. Как ограничить доступ к сайтам стандартными способами windows
- File Mapping
- How to Lock, Manage, Edit Hosts File in Windows 10
- Hosts File in Windows 10
- Host file location
- Lock Hosts file to prevent hijacking
- Block website using the Hosts file
- Edit Hosts file
- HostsMan
- Creating a File Mapping Object
- File Mapping Size
Что такое файл hosts. Как ограничить доступ к сайтам стандартными способами windows
Для чего нужен файл Hosts?
Предназначение этого системного файла — присвоение определенным адресам сайтов определенного IP.
Этот файл очень любят всякого рода вирусы и зловреды для того, чтобы прописать в него свои данные или попросту его заменить.
Результатом этих действий могут быть признаки «вставки» сайта в браузеры, который будет просить отправить смс при открытии браузера или блокировка различных сайтов, на усмотрение создателей вируса.
Где находится файл hosts в windows?
Для различных версий ОС Windows расположение файла hosts немного разное:
Причем окончание hosts, это уже и есть конечный файл, а не папка. У него нет расширения.
Как должен выглядеть правильный файл hosts?
«Содержимое» файла hosts так же немного отличается для разных версий windows, но не особо. В нем «написано» на английском языке для чего он нужен и как делать исключения с приведением одного примера. Все строчки, начинающиеся со знака # , означают что они закомментированы и не влияют на файл.
Содержание оригинального файла hosts для Windows XP:
# Copyright (c) 1993-2009 Microsoft Corp.
#
# This is a sample HOSTS file used by Microsoft TCP/IP for Windows.
#
# This file contains the mappings of IP addresses to host names. Each
# entry should be kept on an individual line. The IP address should
# be placed in the first column followed by the corresponding host name.
# The IP address and the host name should be separated by at least one
# space.
#
# Additionally, comments (such as these) may be inserted on individual
# lines or following the machine name denoted by a ‘#’ symbol.
#
# For example:
#
# 102.54.94.97 rhino.acme.com # source server
# 38.25.63.10 x.acme.com # x client host
# localhost name resolution is handled within DNS itself.
# 127.0.0.1 localhost
# ::1 localhost
Как Вы можете убедиться, в содержании файла host для разных версий windows, особых отличий нет.
Как открыть и изменить файл hosts?
Файл hosts можно открыть с помощью стандартного Блокнота Windows.
Вот здесь, наверное, самая интересная часть статьи.
Прежде всего нужно понять, а зачем вообще изменять этот файл? Да для того, чтобы запретить доступ к определенным сайтам. Таким образом, изменив данный файл и прописав в него адрес сайта, пользователь не сможет зайти на него ни через какой браузер.
Для того, чтобы изменить файл hosts, желательно открыть его от имени администратора (Как запустить файл или программу от имени администратора) щелкнув ПКМ на файле и выбрав «Запуск от имени администратора». Либо открыть таким образом Блокнот и уже в нём открыть файл.
Для быстроты действий можно просто нажать кнопку Пуск и выбрать пункт Выполнить (win+r) (Что делать, если в Пуск нет Выполнить) и ввести в строку:

В результате чего откроется этот файл в Блокноте.
Для того, чтобы заблокировать доступ к сайту (предположим, он будет test.ru ), нужно просто добавить строку с этим сайтом в самый низ:
# Copyright (c) 1993-1999 Microsoft Corp.
#
# This is a sample HOSTS file used by Microsoft TCP/IP for Windows.
#
# This file contains the mappings of IP addresses to host names. Each
# entry should be kept on an individual line. The IP address should
# be placed in the first column followed by the corresponding host name.
# The IP address and the host name should be separated by at least one
# space.
#
# Additionally, comments (such as these) may be inserted on individual
# lines or following the machine name denoted by a ‘#’ symbol.
#
# For example:
#
# 102.54.94.97 rhino.acme.com # source server
# 38.25.63.10 x.acme.com # x client host
# This HOSTS file created by Dr.Web Anti-rootkit API
# 127.0.0.1 localhost
# ::1 localhost
127.0.0.1 test.ru
Каждый новый сайт, который хотите заблокировать, нужно начинать с новой строки и прописывать, не забывая локальный IP адрес 127.0.0.1
Так же, для редактирования файла hosts, существует программа HOSTS EDITOR, скачать которую и почитать описание можно с официального сайта .
Принцип работы у неё заключается в том, что она помогает отредактировать файл hosts.
Из скрина ниже понятен принцип её работы, всё делается в пару кликов. Добавление осуществляется путем нажатия на + .
После редактирования не забудьте нажать на кнопку сохранения (2 кнопка «Save changes» слева от кнопки «+»).
Так же изменить этот файл можно и для хороших целей, например ускорить загрузку сайта.
Как это работает?
При заходе на сайт, Вы видите его доменное имя, которое имеет буквы. Но все сайты в интернете имеют IP адрес, а названия уже присваиваются с использованием DNS. Я не буду вдаваться в подробности этого процесса, статья не об этом. Но здесь нужно знать то, что файл hosts имеет приоритет при обращении к сайтам, и только после него идет запрос к DNS.
Для того, чтобы ускорить загрузку сайта, нужно знать его IP адрес и домен.
IP адрес сайта можно узнать с помощью различных сервисов, например этого или этого .
Домен — это название сайта.
Для примера, ускорим загрузку этого сайта, на котором Вы читаете статью, явно указав файлу IP адрес и домен.
Тогда добавляемая строчка будет:
Это ускоряет загрузку страницы в пару секунд, а иногда может дать доступ, если стандартными средствами Вы не можете зайти на сайт.
Ещё с можно перенаправить на другой сайт с помощью файла hosts.
Для этого нужно знать IP адрес сайта и его домен (как и в вышеописанном случае), тогда добавляемая строка будет такая:
И теперь, после ввода в адресную строку браузера сайта test.ru , Вы будете перенаправлены на сайт, указанный в IP адресе. В данном случае на сайт vindavoz.ru .
Если хотите почистить файл hosts, то можете это сделать, просто удалив содержимое и вставить в него оригинальный текст, из описания выше (под спойлерами).
Некоторые нюансы в файле hosts:
Таким образом Вы можете легко и бесплатно заблокировать доступ к сайтам в Windows путем правки файла hosts.
File Mapping
File mapping is the association of a file’s contents with a portion of the virtual address space of a process. The system creates a file mapping object (also known as a section object) to maintain this association. A file view is the portion of virtual address space that a process uses to access the file’s contents. File mapping allows the process to use both random input and output (I/O) and sequential I/O. It also allows the process to work efficiently with a large data file, such as a database, without having to map the whole file into memory. Multiple processes can also use memory-mapped files to share data.
Processes read from and write to the file view using pointers, just as they would with dynamically allocated memory. The use of file mapping improves efficiency because the file resides on disk, but the file view resides in memory. Processes can also manipulate the file view with the VirtualProtect function.
The following illustration shows the relationship between the file on disk, a file mapping object, and a file view.
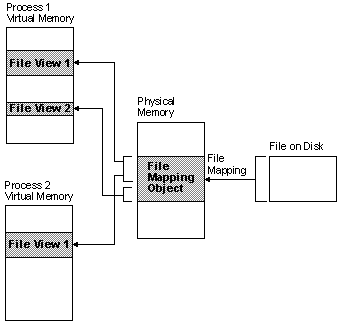
The file on disk can be any file that you want to map into memory, or it can be the system page file. The file mapping object can consist of all or only part of the file. It is backed by the file on disk. This means that when the system swaps out pages of the file mapping object, any changes made to the file mapping object are written to the file. When the pages of the file mapping object are swapped back in, they are restored from the file.
A file view can consist of all or only part of the file mapping object. A process manipulates the file through the file views. A process can create multiple views for a file mapping object. The file views created by each process reside in the virtual address space of that process. When the process needs data from a portion of the file other than what is in the current file view, it can unmap the current file view, then create a new file view.
When multiple processes use the same file mapping object to create views for a local file, the data is coherent. That is, the views contain identical copies of the file on disk. The file cannot reside on a remote computer if you want to share memory between multiple processes.
For more information, see the following topics:
How to Lock, Manage, Edit Hosts File in Windows 10
The Hosts file in Windows 10/8/7, is used to map hostnames to IP addresses. This Hosts file is located deep down in the Windows folder. It is a plain text file, and the size of the original default Hosts file is around 824 bytes.
Hosts File in Windows 10
In this post, we will see its location and also how to manage, lock, or edit the Hosts file.
Host file location
The Hosts file in Windows is located at the following location:
Lock Hosts file to prevent hijacking
Imagine clicking on www.thewindowsclub.com and seeing a completely different website load in your browser. Malware can redirect Web addresses on your computer by altering your Hosts file. This is referred to as the Host File Hijack.
To prevent Host file hijacks, you may navigate to it, right-click on it, select Properties and make it a Read-only file. This will lock down your Hosts file and prevent anyone or any malware from writing to it.
Block website using the Hosts file
To block a website using the Hosts File, simply add the following entry:
Although I do not do it, many users like to manually add entries to it in order to block the opening of one or more particular websites. Others, like to download and use List from well-known sources like mvps.org, to add entries which block malware sites from opening.
Edit Hosts file
If you need to edit the Hosts file, navigate to the following folder location:
Here you will see the Hosts file. Right-click on it and select Notepad. Make the changes and Save.
But sometimes, even when you are logged on with administrative credentials, you may receive the following error message:
Access to C:\Windows\System32\drivers\etc\ hosts was denied
Cannot create the C:\Windows\System32\drivers\etc\hosts file. Make sure that the path and file name are correct.
In this case, type Notepad in Start search and right-click on the Notepad result. Select Run as administrator. Open the Hosts file, make the necessary changes, and then click Save.
HostsMan
While you can always manually manage or edit Hosts file manually, I would like to suggest that you use a third-party freeware tool like HostsMan to do it.
HostsMan is a feature-rich tool that lets you add, remove, edit entries in the Hosts file. It also lets you easily add third-party Hosts lists that help in blocking malware sites and lets you easily enable or disable the hosts file. It includes a built-in hosts file updater & a hosts editor. It lets you scan the hosts file for errors, duplicates, and possible hijacks – and also lets you create an Exclusion list. One more useful feature it offers is the Hosts file backup manager. Backup your Hosts file to a safe place and use it to restore it, should the need arise.
Hostman also lets you Flush DNS cache, open Hosts with a text editor, count the number of hosts, find duplicates, replace IP, scan hosts for malicious entries, rearrange hosts, manage DNS Client Service and more. In short, its the only Hosts Manager that you will even need. You can download it from its home page. SysMate Hosts File Manager is another tool that lets you do so.
How to manually reset Hosts file back to default in Windows may also interest you.
If your browser has been hijacked, you might find this post on Browser Hijacking and Free Browser Hijacker Removal Tools helpful.
Date: December 23, 2018 Tags: Hosts, Security
Creating a File Mapping Object
The first step in mapping a file is to open the file by calling the CreateFile function. To ensure that other processes cannot write to the portion of the file that is mapped, you should open the file with exclusive access. In addition, the file handle should remain open until the process no longer needs the file mapping object. An easy way to obtain exclusive access is to specify zero in the fdwShareMode parameter of CreateFile. The handle returned by CreateFile is used by the CreateFileMapping function to create a file mapping object.
The CreateFileMapping function returns a handle to the file mapping object. This handle will be used when creating a file view so that you can access the shared memory. When you call CreateFileMapping, you specify an object name, the number of bytes to be mapped from the file, and the read/write permission for the mapped memory. The first process that calls CreateFileMapping creates the file mapping object. Processes calling CreateFileMapping for an existing object receive a handle to the existing object. You can tell whether or not a successful call to CreateFileMapping created or opened the file mapping object by calling the GetLastError function. GetLastError returns NO_ERROR to the creating process and ERROR_ALREADY_EXISTS to subsequent processes.
The CreateFileMapping function fails if the access flags conflict with those specified when the CreateFile function opened the file. For example, to read and write to the file:
- Specify the GENERIC_READ and GENERIC_WRITE values in the fdwAccess parameter of CreateFile.
- Specify the PAGE_READWRITE value in the fdwProtect parameter of CreateFileMapping.
Creating a file mapping object does not commit physical memory, it only reserves it.
File Mapping Size
The size of the file mapping object is independent of the size of the file being mapped. However, if the file mapping object is larger than the file, the system expands the file before CreateFileMapping returns. If the file mapping object is smaller than the file, the system maps only the specified number of bytes from the file.
The dwMaximumSizeHigh and dwMaximumSizeLow parameters of CreateFileMapping allow you to specify the number of bytes to be mapped from the file:
When you do not want the size of the file to change (for example, when mapping read-only files), call CreateFileMapping and specify zero for both dwMaximumSizeHigh and dwMaximumSizeLow. Doing this creates a file mapping object that is exactly the same size as the file. Otherwise, you must calculate or estimate the size of the finished file because file mapping objects are static in size; once created, their size cannot be increased or decreased. An attempt to map a file with a length of zero in this manner fails with an error code of ERROR_FILE_INVALID. Programs should test for files with a length of zero and reject such files.
The size of a file mapping object that is backed by a named file is limited by disk space. The size of a file view is limited to the largest available contiguous block of unreserved virtual memory. This is at most 2 GB minus the virtual memory already reserved by the process.
The size of the file mapping object that you select controls how far into the file you can «see» with memory mapping. If you create a file mapping object that is 500 Kb in size, you have access only to the first 500 Kb of the file, regardless of the size of the file. Since it does not cost you any system resources to create a larger file mapping object, create a file mapping object that is the size of the file (set the dwMaximumSizeHigh and dwMaximumSizeLow parameters of CreateFileMapping both to zero) even if you do not expect to view the entire file. The cost in system resources comes in creating the views and accessing them.
If you want to view a portion of the file that does not start at the beginning of the file, you must create a file mapping object. This object is the size of the portion of the file that you want to view plus the offset into the file.


