- How to use WPS in Windows 10 to connect to Wi-Fi networks
- Step 1: Select the Wi-Fi network to which you want to connect through WPS in Windows 10
- Step 2: Connect through WPS instead of typing the Wi-Fi password (using the WPS button on the router)
- Can I connect through WPS in Windows 10 using a client PIN code?
- Did you manage to successfully connect through WPS in Windows 10?
- How to connect WiFi in Windows 7 [Solved]
- Follow theses steps
- Step 1: Make sure your computer has a wireless adapter
- Step 2: If you’re using a laptop, verify the WiFi switch is toggled on
- Step 3: Connect WiFi in Windows 7 (Laptops & Desktops)
- WiFi Connector
- Load the project in Visual Studio
- Connecting your WiFi adapter
- Deploy your app
- Test your app
- Let’s look at the code
- Required device capabiity
- Scenario Code
- Requesting access
- Scanning for WiFi networks
- Connecting to a WiFi network
- To summarize:
How to use WPS in Windows 10 to connect to Wi-Fi networks
Did you know that, if you have a Windows 10 laptop, tablet, or 2-in-1 device such as a Surface Pro, you can use the WPS standard to make quick connections to Wi-Fi networks without having to type in the passwords of wireless networks? Here’s a complete guide for how to connect to Wi-Fi through WPS in Windows 10, on any PC, laptop, or device with a wireless network card:
NOTE: If you need a refresh on what WPS (Wi-Fi Protected Setup) is, we recommend that you read: What is WPS (Wi-Fi Protected Setup)?. For this procedure to work, you need WPS enabled on the wireless router or access point that broadcasts the Wi-Fi signal in your area. Both the device emitting the wireless signal and the one receiving it must have support for WPS.
Step 1: Select the Wi-Fi network to which you want to connect through WPS in Windows 10
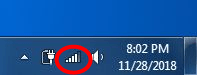
First of all, on your Windows 10 device, open the list of available wireless networks. One easy way is to click or tap the wireless icon from the system tray.
The list that pops up shows all the Wi-Fi networks available near you. Find the wireless network that you want to connect through WPS and click or tap on its name. Then, press Connect.
NOTE: Before you press Connect, you can also select whether you want to connect automatically to the selected network each time you are in its coverage area. Choose the behavior that you prefer.
Step 2: Connect through WPS instead of typing the Wi-Fi password (using the WPS button on the router)
Windows 10 asks you to enter the password for the Wi-Fi to which you want to connect. Don’t do it just yet! If WPS is enabled on the router that broadcasts the Wi-Fi network, right under the password field, Windows 10 tells you that “You can also connect by pushing the button on the router.”
Walk to the wireless router or access point. On it, push the WPS button for a couple of seconds. You should find this button on the back of the router or one of its sides.
On some wireless routers and access points, such as those made by Linksys, the WPS button is not labeled, but it has a WPS symbol like the one highlighted below.
After a couple of seconds, Windows 10 automatically receives the wireless settings from the router (or access point) and connects to the Wi-Fi network by itself, without you entering the password.
You are now connected to the wireless network using WPS in Windows 10. The next time you connect to this network from the same Windows 10 computer or device, you shouldn’t have to push the WPS button again.
That’s because the router has already transferred all the required settings to Windows 10, including the security password. Windows 10 stores these details and uses them automatically each time it has to make future connections to the same network.
If you want to share files, folders, and devices with the other users and devices connected to the same network, you might have to change the network profile settings in Windows 10. To learn more, read this guide: How to change the Windows 10 network location to private (or public).
Can I connect through WPS in Windows 10 using a client PIN code?
The WPS standard also allows devices to connect using a PIN code. One eight-digit PIN code is generated by the wireless router (or access point) and another by the client that wants to connect to the Wi-Fi network using WPS. Unfortunately, Windows 10 does not generate a client PIN code that you can use for WPS connections. You can get the client PIN only if your wireless network card has a specialized application that generates it for you. Unfortunately, on the systems that we are using, we do not have such apps, so we cannot demonstrate how this method works.
Did you manage to successfully connect through WPS in Windows 10?
As you can see from this guide, using WPS in Windows 10 to connect to wireless networks is both easy and fast. Anyone can do it, and you only need to read this guide the first time you do it. If you have any questions or problems, don’t hesitate to leave a comment in the section below.
How to connect WiFi in Windows 7 [Solved]
Last Updated: 2 months ago
If you’ve got the password to a wireless network and want to connect WiFi on your Windows 7 computer, follow the steps below to connect WiFi, quickly and easily!
Follow theses steps
Step 1: Make sure your computer has a wireless adapter
Most laptops can connect to WiFi, but some desktop computers may not be able to use the wireless network. In order to connect to WiFi, make sure your computer has a wireless adapter. To check for it, you can:
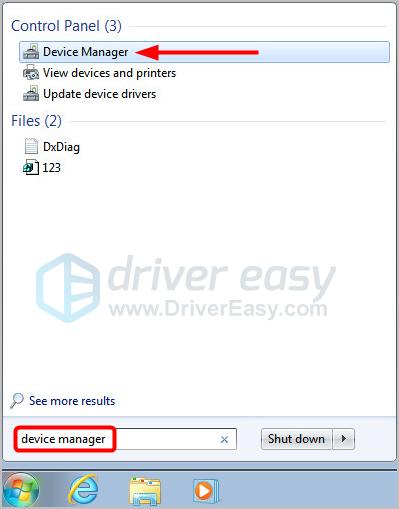
- Click the Start button, type device manager in the search box, and select Device Manager.
Expand Network adapters, and check if there’s any device with the words Wireless Adapter or WiFi as its name. If there is, follow the steps below to connect WiFi in Windows 7. If your computer has no wireless adapter, you need to use the wired network. 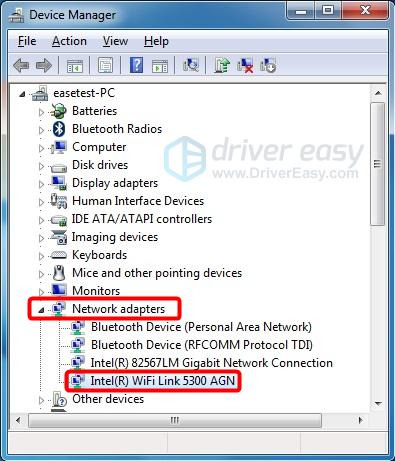
Step 2: If you’re using a laptop, verify the WiFi switch is toggled on
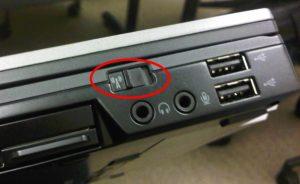
On laptop, there’s usually a switch or button for WiFi connection. To connect WiFi on your laptop, you should turn on the WiFi switch.
The switch may be on the front, left or right-hand side of your laptop.
Unplug the network cable, which is for the wired network, and if the WiFi switch is toggled on, the WiFi icon on the bottom right of your screen should appear like this:
Step 3: Connect WiFi in Windows 7 (Laptops & Desktops)
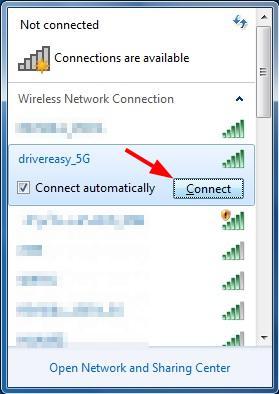
- Click the network icon on the right side of the taskbar, and click on a wireless network you want to connect to. If you want to automatically reconnect to this network the next time you start your computer at the same place, check the box beside Connect automatically. Then, click the Connect button.

Enter your WiFi password, and click OK. Your computer should remember your password from now on. 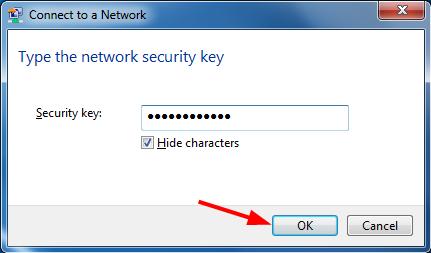
There are two ways to update your wireless adapter driver: manually and automatically.
Update your wireless adapter driver manually — You can update your driver manually by going to the hardware manufacturer’s website, and searching for the latest driver for your wireless adapter. But if you take this approach, be sure to choose the driver that’s compatible with the exact model number of your hardware, and your version of Windows.
Update your wireless adapter driver automatically — If you don’t have the time, patience or computer skills to update your driver manually, you can, instead, do it automatically with Driver Easy. You don’t need to know exactly what system your computer is running, you don’t need to risk downloading and installing the wrong driver, and you don’t need to worry about making a mistake when installing. Driver Easy handles it all.
- Download and install Driver Easy.
- Run Driver Easy and click Scan Now. Driver Easy will then scan your computer and detect any problem drivers.
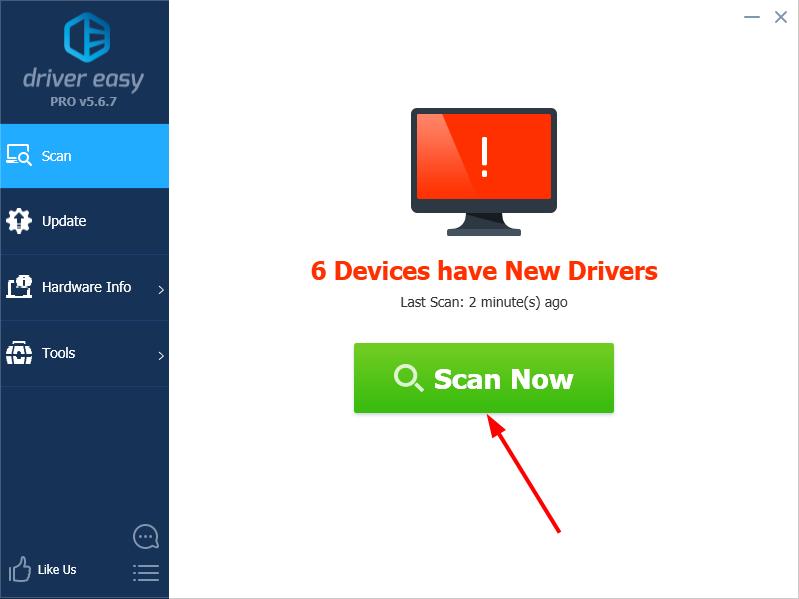
Click Update next to any flagged devices to automatically download the correct version of their drivers, then you can install them manually. Or click Update All to automatically download and install them all automatically. (This requires the Pro version – you’ll be prompted to upgrade when you click Update All. You get full support and a 30-day money back guarantee.) 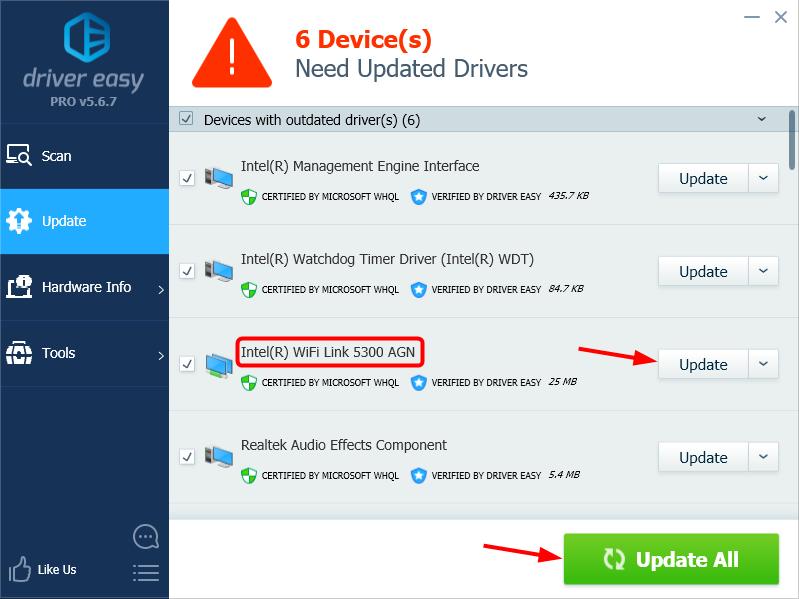
Hopefully this can help you out.
If you have any question or suggestion, please leave a comment below.
WiFi Connector
We’ll learn how to find and connect to WiFi networks using a Universal Windows Platform (UWP) app that makes use of the Windows.Devices.WiFi.WiFiAdapter API.
This is a headed sample. To better understand what headed mode is and how to configure your device to be headed, follow the instructions on the Headed and Headless mode site.
Load the project in Visual Studio
You can find the source code for this sample in our git repository. Clone the project to your machine and open the project from Visual Studio.
The code for the WiFi Connect sample can be found under: \WiFiConnector\CS
Connecting your WiFi adapter
- A Windows 10 IoT Core capable board with onboard WiFi, such as the Raspberry Pi 3 or DragonBoard 410c or
- A USB WiFi adapter. For a list of supported WiFi adapters see the Ecosystem Compatibility List
Deploy your app
If you’re building for Minnowboard Max, select x86 as the architecture. If you’re building for Raspberry Pi 2 or 3 or DragonBoard , select ARM .
Select Remote Machine to point to IoT device and hit F5 to deploy to your device. Go back to the basic ‘Hello World’ sample. if you need guidance
Test your app
The sample app when deployed displays a screen similar to the one below.

If you have a WiFi adapter connected to your board, click on the «Scan Available WiFi Networks» button to start scanning and displaying the list of WiFi networks in the vicinity.
Each WiFi network is identified by its SSID along with an icon showing the signal strength.

The selected network shows some information about the SSID including the signal strength, channel frequency and authentication mode. The connection status is also shown for each.
You can connect to the your SSID by clicking on the one you need. If a security key (password) is needed, a dialog will be displayed asking for it. Also, a checkbox asking if the WiFi service should attempt to reconnect to the particular SSID automatically such as at boot time.
If WiFi Protected Setup (WPS) is supported a WPS button is shown. To use this button first click on the WPS button on your router and then on the WPS button in the application.

For networks that support Extensible Authentication Protocol (EAP), also known as Enterprise WiFi authentication, a password checkbox will be shown. If your enterprise network device is configured with the required certificates, you can simply click Connect.

If you must enter a user name and password to connected your network then select the Password checkbox and then enter the User and Password. The Domain is optional and only needs to be entered on networks that require it.

A message on the status bar will indicate if the connection has been successful, or if not the reason the connection could not be made.
Because some networks, like WiFi hotspots, may require additional information that can only be provided through a browser, the app will open a browser control to enable users to complete a connection as needed. Or, if Internet access is already available, the Bing.com page will be displayed.
Selecting the currently connected network also displays a Disconnect button that can be used to disconnect from the network.

Let’s look at the code
The code for this sample makes use of the Windows.Devices.WiFi.WiFiAdapter API.
The WiFiAdapter class can be used to scan, find and connect to both open and secure WiFI networks by making use of the Wlan service running on Windows devices.
Required device capabiity
Accessing the WiFi adapter from your code requires a device capability for WiFi devices added to the manifest. The wifiControl DeviceCapability is the one we need. So, we should add it to the AppX manifest, Package.appxmanifest file:
NOTE: While you can add other capabilities directly by double clicking and opening the Package.appxmanifest file in the UI editor, the wifiControl can only be added via the XML editor (Right Click on the file -> Open with -> XML (Text) Editor) and adding the device capability below:
Scenario Code
The code of this sample is mostly contained within WiFiConnect_Scenario.xaml and .cs files. Values that are bound to properties in ListView items can be found in DisplayHelper.cs.
Requesting access
The first step to access the device is to request access using the static WiFiAdapter.RequestAccessAsync() method.
Note, in a headed app, the method must be called from the UI thread. However, in an IOT headless app (Background Application), which doesn’t have a UI thread, the method can be called from any thread.
When access is granted, any of the WiFiAdapter methods can now be used. So, we start by trying to find a WiFi adapter on the current device, using the WiFiAdapter device selector.
Alternatively, WiFiAdapter.FindAllAdaptersAsync() can be used to find all WiFi adapters to achieve the same.
Scanning for WiFi networks
The next step is to scan for available WiFi networks, this can be achieved using the WiFiAdapter.ScanAsync() method.
When the scan is complete, the WiFiAdapter.NetworkReport property is updated which can then be used to get and display information to identify each of the WiFi networks found using a read-only collection of WiFiAvailableNetwork s. We add each to the result collection, so it can then be mapped to Xaml UI using properties of the WiFiNetworkDisplay helper class.
Connecting to a WiFi network
When a WiFi network is selected from the ones displayed, we need to determine if we want to collect the password credential. The WiFi network authentication type is what we need to determine that:
To determine if the network supports WPS we can check if the current network supports WiFiWpsKind.PushButton.
And finally, to determine if EAP network support is available we can check to see if the authentication type is Rsna or Wpa.
Finally, to connect to the selected network, an overload of WiFiAdapter.ConnectAsync() need to be used. The method’s overloads allow specifying the available network to connect to, password if needed and whether or not to automatically reconnect to this network when in range.
The status returned in the async result indicates whether the connection was successful or. Only WiFiConnectionStatus.Success indicates success. Other returned values indicates the connection failure reason.
If you need to disconnect, WiFiAdapter.Disconnect() can be used.
To summarize:
To enable WiFi device access, add the wifiControl DeviceCapability to the AppX manifest


