- Installing Test Certificates
- Installing security certificates
- Requesting and installing a certificate
- Installing certificates for use with SDN Manager
- Assigning a server certificate to a port
- Client certificate provisioning
- Authenticating Dialog Listener connections using client certificates
- Authenticating the Server Certificate on the DL
- Installing certificates for the Dialog Listener
- Installing the trusted root certificate
- Installing a trusted root certificate
- Adding certificate snap-ins
- Install certificates required for Visual Studio offline installation
- How to refresh certificates when offline
- Option 1 — Manually install certificates from a layout folder
- Option 2 — Distribute trusted root certificates in an enterprise environment
- Option 3 — Install certificates as part of a scripted deployment of Visual Studio
- What are the certificates files in the Certificates folder?
- Why are the certificates from the Certificates folder not installed automatically?
- Checking if certificates are already installed
- Install Visual Studio
- Get support
Installing Test Certificates
To successfully install a test-signed driver package on a test computer, the computer must be able to verify the signature. To do that, the test computer must have the certificate for the certificate authority (CA) that issued the package’s test certificate installed in the computer’s Trusted Root Certification Authorities certificate store
The CA certificate must be added to the Trusted Root Certification Authorities certificate store only once. Once added, it can then be used to verify the signature of all drivers or driver packages, which were digitally signed with the certificate, before the driver package is installed on the computer.
The simplest way to add a test certificate to the Trusted Root Certification Authorities certificate store is through the CertMgr tool. This topic will describe the procedure for installing the test certificate, Contoso.com(test). This certificate is stored within the ContosoTest.cer file. For more information about how this certificate was created, see Creating Test Certificates.
The following command-line uses Certmgr.exe to install, or add, the Contoso.com(test) certificate to the test computer’s Trusted Root Certification Authorities certificate store:
The /add option specifies that the certificate in the ContosoTest.cer file is to be added to the specified certificate store.
The /s option specifies that the certificate is to be added to a system store.
The /r option specifies the system store location, which is either currentUser or localMachine.
Root specifies the name of the destination store for the local computer, which is either root to specify the Trusted Root Certification Authorities certificate store or trustedpublisher to specify the Trusted Publishers certificate store.
A successful run produces the following output:
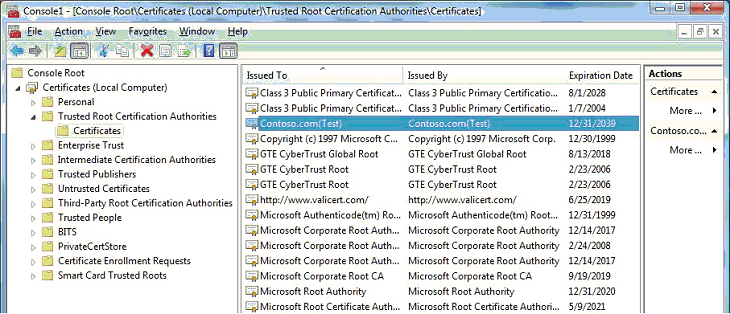
After the certificate is copied to the Trusted Root Certification Authorities certificate store (the local machine’s root store, not the user store), you can view it through the Microsoft Management Console (MMC) Certificates snap-in, as described in Viewing Test Certificates.
The following screenshot shows the Contoso.com(Test) certificate in the Trusted Root Certification Authorities certificate store.
You can also view the certificate at the command prompt:
Or, from PowerShell:
The Certmgr.exe tool is part of the Windows SDK and is typically installed to C:\Program Files (x86)\Windows Kits\10\bin\ \x86\certmgr.exe .
For more information about CertMgr and its command-line arguments, see CertMgr.
For more information about how to install test certificates, see Installing a Test Certificate on a Test Computer.
Installing security certificates
Applies to: Lync Server 2013 | Skype for Business 2015 | Skype for Business 2019
To ensure secure message transport and client authentication, the Skype for Business SDN Interface components support mutual transport layer security (TLS). But for this to work, you must request certificates from an appropriate certification authority. These certificates are needed for the SDN Manager, the Dialog Listener, and for subscribers. You might also have to install a root certificate of the certification authority (CA), if it is not trusted.
You will need to use a client certificate on each front-end server in the Dialog Listener and a server certificate on each SDN Manager for the SDN Manager pool fully qualified domain name. In addition, you must install a server certificate on the subscribers, and also an appropriate client certificate on the SDN Manager host computers so you can authenticate it to the subscribers. Finally, you need to ensure that the Windows communication foundation (WCF) configuration of the SDN Manager validates the client certificates set on the Dialog Listeners.To install certificates, you will follow this general approach:
Request a certificate from a certificate server of the correct type
Install the server certificate on a server for each SDN Manager and subscriber.
Install client certificates on all clients which are Dialog Listeners so they can talk with the SDN Manager, as well as on all SDN Manager instances so they can talk with subscribers acting as a server (if that subscriber requires authentication via client certificate).
Install a trusted root certificate on computers where the certificate authority reports it as not trusted. For instructions, see Installing the trusted root certificate.
You can verify that the SSL and client authentication works independently of Skype for Business SDN Interface by using a general purpose test tool, such as wfetch.exe.
Detailed instructions for the specific certificate installations are found in the following procedures. In each, assume that a Microsoft Certification Authority is being used. For detailed explanation and instructions on how to create a certificate request for Microsoft Certificate Services, see Managing Certificate Services and SSL.
Requesting and installing a certificate
The following example demonstrates how to request a certificate from a Windows Certificate Server and your security policies and available templates at your certificate service may be different.
In your web browser, navigate to your certification server (for example, http:// /certsrv ). This should be the same certificate authority that is used to generate certificates for the client.
Choose the Request a certificate link.
Choose the Advanced certificate request link.
Choose the Create and submit a request to this CA link.
In the Certificate Template dropdown, select the Exportable Server Cert option for a server certificate or appropriate template for the client certificate.
When creating the server certificate, specify the fully qualified domain name as the certificate Name, as well as its Friendly Name. Other fields can remain blank or retain their default values.
Choose Submit.
Choose the Install this Certificate link. The certificate will be installed to the Certificates-Current User\Personal\Certificates folder.
Start MMC and add the certificate snap-ins shown in step 8 of the Installing the trusted root certificate section in the Appendix.
Move the certificate from the Certificates-Current User\Personal\Certificates folder to the Certificates Local computer\Personal\Certificates folder.
Ensure that the processes have access to the entire certificate, including its private key. This might require adding the network service (or other credential that runs the service) to the certificate as shown in figures 1 and 2.
Figure 1. Adding a service to the certificate, part 1
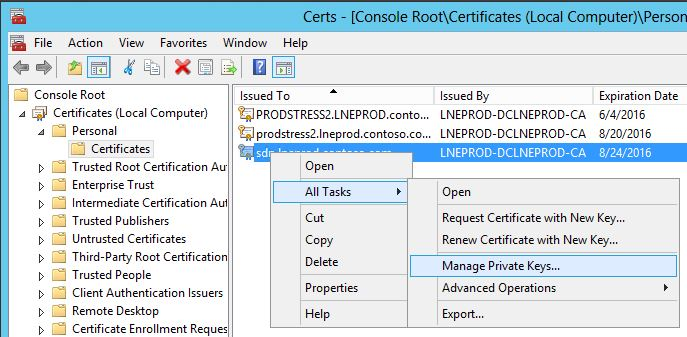
Figure 2. Adding a service to the certificate, part 2

Installing certificates for use with SDN Manager
You must install certificates on the SDN Manager in order to do the following:
Authenticate and secure communications between possibly multiple Dialog Listeners and a SDN Manager. (Applies to server certificates.)
Authenticate and secure communications from SDN Manager to possibly multiple subscribers (for example, network controllers, network management systems, ITPro tools, and so forth). (Applies to client certificates.)
Each server certificate must contain the fully qualified domain name of the receiving system. You cannot use an IP address, host name or local addresses (*.local). The certificate must be installed in the local computer store. When client authentication is required by a subscriber system, the client certificate on the SDN Manager might need to contain the fully qualified domain name of the computer that is hosting SDN Manager, depending on how the subscriber third-party system authenticates a client. The certificates must be signed by a certification authority that is trusted by all involved parties. If the certification authority is not trusted, the root certificate of the certification authority must be installed on all involved computers.
You should follow the standard WCF certificate validation mechanism to configure the settings to validate the client certificates
Make sure when using a pool of SDN Managers, the certificate contains the entire pool fully qualified domain name (for example, «sdnpool.contoso.com»). This name should have at least one period delimiter («.»).
Assigning a server certificate to a port
To activate and assign the server certificate to the port used to receive SSL traffic on the SDN Manager, you will need to run the following command:
Replace the
Client certificate provisioning
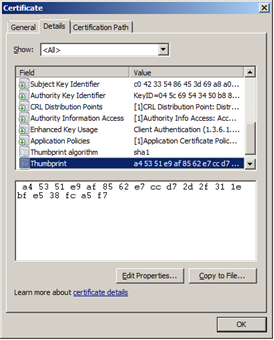
When provisioning subscribers, you can specify the thumbprint of the client certificate in the configuration settings for the specified subscriber.
This procedure is necessary only if a subscriber requires client authentication. In this case, the subscriber must be configured to validate and accept the client certificate. When generating the client certificate, you must set the parameters and fields according to the certificate validation policy of the subscriber system.
To install the client certificate, follow the steps listed in the Requesting and Installing a certificate procedure earlier in this article. The thumbprint of a client certificate must be specified in the clientcertificateid property of the subscriber configuration.
You can obtain the thumbprint by using the Certificate dialog, as shown in Figure 1.
Figure 3. Certificate dialog box
Authenticating Dialog Listener connections using client certificates
For the SDN Manager to authorize client certificates from the Dialog Listener, you must configure the client certificate validation logic in the SDNManager.exe.config file as specified by the Windows Communication Framework (WCF).
By default, the SDN Manager uses a simple custom validator for client certificates that it receives from the Dialog Listener. The current SDNManager.exe.config file contains the configuration for this custom accept-and-log client certificate validator. WCF then ensures that a certificate is consistent and valid before the validator is called. This validator ( AcceptAndLogValidator) logs information from the certificate and always accepts it.
For an increased security, you must configure a different validator for client certificates by using standard WCF configuration mechanisms. The following example shows the WCF configuration for the AcceptAndLogValidator:
Authenticating the Server Certificate on the DL
For increased security you may want to activate server certificate revocation list checking. Per WCF, you can configure this by adding the following configuration file parameters in the DialogListener.exe.config file:
Installing certificates for the Dialog Listener
You must install a certificate on the Dialog Listener to authenticate and secure communication between the Dialog Listener and the SDN Manager. This applies to the client certificate. To install the client certificate, follow the steps listed in the «Requesting and installing a certificate,» earlier in this article.
Installing the trusted root certificate
Applies to: Lync Server 2013 | Skype for Business 2015
Installing a trusted root certificate is necessary only if you are notified that the certificate of authority is not trusted on any machine. This can occur when you use a private or custom certificate server instead of acquiring certificates from an established public certificate of authority.
Installing a trusted root certificate
On the machine that requires a certificate, in your web browser, navigate to your local certification server. This should be the same certificate of authority used for generating the server and, optionally, client certificates.
Choose Download a CA certificate, certificate chain, or CRL link, as needed.
Select the appropriate certificate of authority from the list and choose the Base 64 Encoding method.
Choose the Download CA certificate link and then choose Open option when prompted to open or save the certificate.
When the certificate window opens, choose Install Certificate…. The Certificate Import wizard appears.
In the wizard, choose Next. Then, when you are prompted for the Certificate Store, choose Place all certificates in the following store. Select the Trusted Root Certification Authorities store.
Complete the remaining steps of the wizard and click Finish.
Upon completing the wizard, you next want to add the certificate snap-ins using the Microsoft Management Console (MMC).
Adding certificate snap-ins
Launch MMC (mmc.exe).
Choose File > Add/Remove Snap-ins.
Choose Certificates, then choose Add.
Choose My user account.
Choose Add again and this time select Computer Account.
Move the new certificate from the Certificates-Current User > Trusted Root Certification Authorities into Certificates (Local Computer) > Trusted Root Certification Authorities.
Install certificates required for Visual Studio offline installation
Visual Studio is primarily designed to be installed on an internet-connected machine, since many components are updated regularly. However, with some extra steps, it’s possible to deploy Visual Studio in an environment where a working internet connection is unavailable.
The Visual Studio setup engine installs only content that is trusted. It does this by checking Authenticode signatures of the content being downloaded and verifying that all content is trusted before installing it. This keeps your environment safe from attacks where the download location is compromised. Visual Studio setup therefore requires that several standard Microsoft root and intermediate certificates are installed and up-to-date on a user’s machine. If the machine has been kept up to date with Windows Update, signing certificates usually are up to date. If the machine is connected to the internet, during installation Visual Studio may refresh certificates as necessary to verify file signatures. If the machine is offline, the certificates must be refreshed another way.
How to refresh certificates when offline
There are three options for installing or updating certificates in an offline environment.
Option 1 — Manually install certificates from a layout folder
When you create a network layout or a local offline cache, the necessary certificates are downloaded to the Certificates folder. You can then manually install the certificates by double-clicking each of the certificate files, and then clicking through the Certificate Manager wizard. If asked for a password, leave it blank.
Update: For Visual Studio 2017 version 15.8 Preview 2 or later, you can manually install the certificates by right-clicking each of the certificate files, selecting Install Certificate, and then clicking through the Certificate Manager wizard.
When you create a network layout or a local offline cache, the necessary certificates are downloaded to the Certificates folder. You can manually install the certificates by right-clicking each of the certificate files, selecting Install Certificate, and then clicking through the Certificate Manager wizard. If asked for a password, leave it blank.
Option 2 — Distribute trusted root certificates in an enterprise environment
For enterprises with offline machines that do not have the latest root certificates, an administrator can use the instructions on the Configure Trusted Roots and Disallowed Certificates page to update them.
Option 3 — Install certificates as part of a scripted deployment of Visual Studio
If you are scripting the deployment of Visual Studio in an offline environment to client workstations, you should follow these steps:
Copy the Certificate Manager Tool (certmgr.exe) to the network layout or local cache installation location. Certmgr.exe is not included as part of Windows itself, but is available as part of the Windows SDK.
Create a batch file with the following commands:
Alternatively, create a batch file that uses certutil.exe, which ships with Windows, with the following commands:
Deploy the batch file to the client. This command should be run from an elevated process.
What are the certificates files in the Certificates folder?
- manifestRootCertificate.cer contains:
- Root certificate: Microsoft Root Certificate Authority 2011
- manifestCounterSignRootCertificate.cer and vs_installer_opc.RootCertificate.cer contain:
- Root certificate: Microsoft Root Certificate Authority 2010
The Visual Studio Installer requires only the root certificates to be installed on the system. All of these certificates are required for Windows 7 Service Pack 1 systems that do not have the latest Windows Updates installed.
Why are the certificates from the Certificates folder not installed automatically?
When a signature is verified in an online environment, Windows APIs are used to download and add the certificates to the system. Verification that the certificate is trusted and allowed via administrative settings occurs during this process. This verification process cannot occur in most offline environments. Installing the certificates manually allows enterprise administrators to ensure the certificates are trusted and meet the security policy of their organization.
Checking if certificates are already installed
One way to check on the installing system is to follow these steps:
Run mmc.exe.
a. Click File, and then select Add/Remove Snap-in.
b. Double-click Certificates, select Computer account, and then click Next.
c. Select Local computer, click Finish, and then click OK.
d. Expand Certificates (Local Computer).
e. Expand Trusted Root Certification Authorities, and then select Certificates.
- Check this list for the necessary root certificates.
f. Expand Intermediate Certification Authorities, and then select Certificates.
- Check this list for the required intermediate certificates.
Click File, and then select Add/Remove Snap-in.
a. Double-click Certificates, select My user account, click Finish, and then click OK.
b. Expand Certificates – Current User.
c. Expand Intermediate Certification Authorities, and then select Certificates.
- Check this list for the required intermediate certificates.
If the certificates names were not in the Issued To columns, they must be installed. If an intermediate certificate was only in the Current User Intermediate Certificate store, then it is available only to the user that is logged in. You might need to install it for other users.
Install Visual Studio
After you install the certificates on the client machine, then you are ready to install Visual Studio from the local cache, or deploy Visual Studio from the network layout share to the client machine.
Get support
Sometimes, things can go wrong. If your Visual Studio installation fails, see Troubleshoot Visual Studio installation and upgrade issues for step-by-step guidance.
We also offer an installation chat (English only) support option for installation-related issues.
Here are a few more support options:
- Report product issues to us via the Report a Problem tool that appears both in the Visual Studio Installer and in the Visual Studio IDE.
- Suggest a feature, track product issues, and find answers in the Visual Studio Developer Community.
- Use your GitHub account to talk to us and other Visual Studio developers in the Visual Studio conversation in the Gitter community.


