- Create file from command line
- To create file using echo
- To create file using fsutil
- Limitations
- Create an ISO File from a Folder in Windows
- Use AnyBurn To Create ISO From The Folders On Your PC
- Create An ISO In Windows 10 Using WinCDEmu
- Use ImgBurn To Create ISO Files From Folders On Windows
- Use a Portable Tool To Create An ISO From Folders
- How to install and use “make” in Windows?
- 10 Answers 10
- How to run a makefile in Windows?
- 17 Answers 17
Create file from command line
We can create files from command line in two ways. The first way is to use fsutil command and the other way is to use echo command. If you want to write any specific data in the file then use echo command. If you are not bothered about the data in the file but just want to create a file of some specific size then you can use fsutil command.
To create file using echo
To create file using fsutil
Limitations
Fsutil can be used only by administrators. For non-admin users it throws up below error.
Thank you for the quick and dirty method since windows seems to lack the “touch” command.
How can we use these commands to ‘touch’ a file. Could anyone provide the exact command that can work as linux ‘touch’ for any type of file?
Windows does not lack “touch”. It is echo. As the post describes? type: echo “” Blah.cpp
dude, this isnt working on our school’s computers, can you tell another method that works on windows 8 computers please?
lmao it works at school PC
Make sure that you are typing in the code the right way. It happened to me when I typed in “echo This is a sample text file sample.txt”.
If you want to create a file with NO text in it do this:
at the CLI type “Echo.”: Your output should look like this:
C:\Temp>echo.
To write to a file:
C:\Temp> Echo. >test.txt
This will create a file with single space in the file.
Create an ISO File from a Folder in Windows
A great tool for distribution or backups
If you don’t already know, an ISO file is a container that can hold a number of files in it. It’s usually used to create backups of your CD and DVD discs. However, you can create an ISO from the folders on your Windows PC as well. There are actually multiple apps that help you do it on your machine.
There are many reasons why you may want to create an ISO on your Windows 10 PC. Maybe you want to keep all of your folders in a single place. Or maybe you want to keep some of your folders handy ready to burn to your discs.

Regardless of the reasoning, it’s pretty easy to create an ISO from folders on a Windows computer. Also, check out the video from our sister site where we walk you through the steps in a short video.
Use AnyBurn To Create ISO From The Folders On Your PC
One of the free apps you can use to create an ISO from your folders is AnyBurn. It’s actually an app that helps you burn your data to your discs but you can use it to create ISO files as well. It has an option on the main interface that helps add your chosen folders to an ISO which you can then save anywhere on your computer.
- Download, install, and launch AnyBurn on your computer.
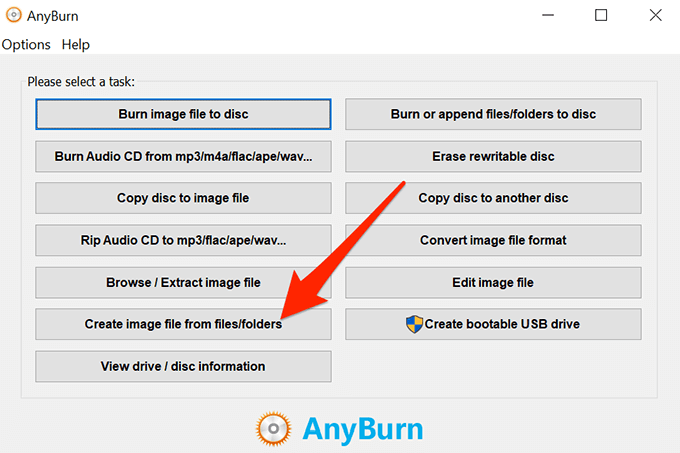
- You’ll find several options regarding creating ISOs on the main interface. Find the one that says Create image file from files/folders and click on it.
- The following screen will let you choose the folders that you want to add to your ISO. Click on the Add button at the top to add your folders.

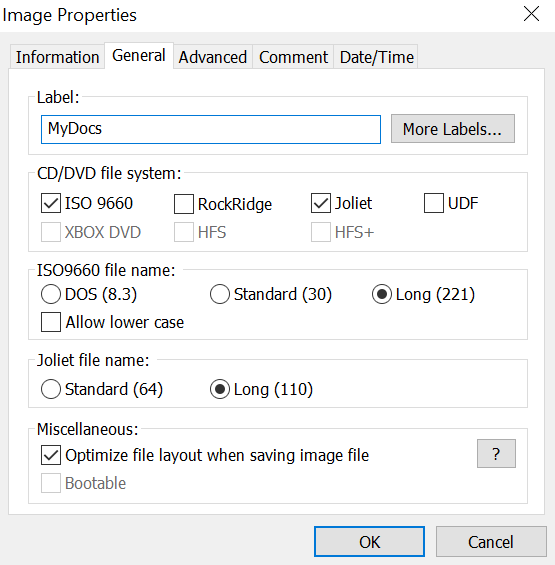
- If you want to specify any custom settings for your file, click on the Properties button at the top. It’ll then let you modify options like the file system for your ISO, file naming standard, compression level, and so on. Click on OK when you’ve configured them.
- Click on the Next button to go to the next screen of the ISO creation process.
- On the following screen, click on the folder icon to choose the folder where you want to save your ISO. You can also enter a name for your file on the same screen.
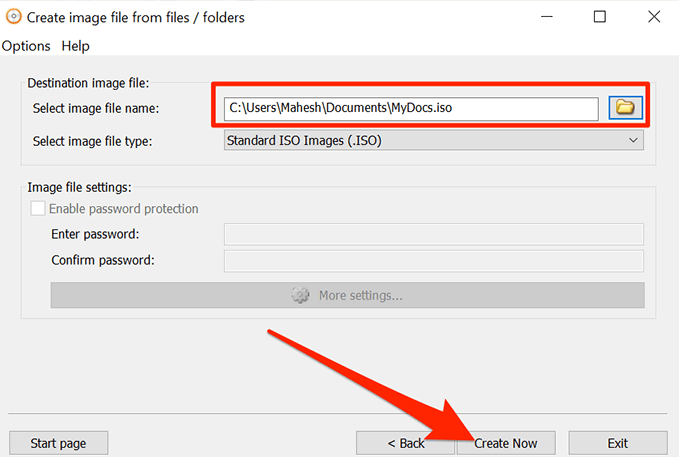
- Finally, click on Create Now to start creating an ISO out of your chosen folders.
Create An ISO In Windows 10 Using WinCDEmu
WinCDEmu is an open-source tool that lets you create virtual drives out of various image file formats on your computer. If you have downloaded an ISO file and you want to view its contents, this app can help you mount that as a drive on your machine.
You can use the app to create ISO files from folders in Windows as well, and it actually provides you with the easiest way to make an ISO from your folders. All you basically need to do is install the app and it’ll add an option to your context menu. You can then use that option to generate an ISO from your folders.
- Download and install the WinCDEmu app on your PC.
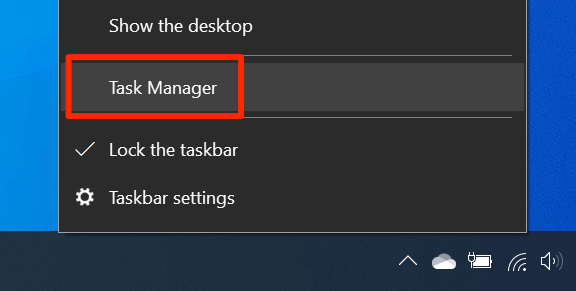
- Right-click on your taskbar and select Task Manager.
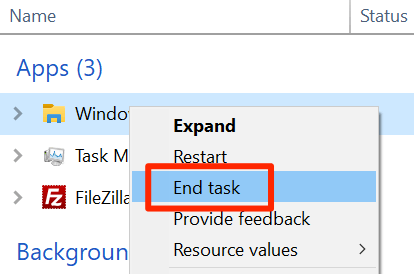
- Right-click on the process that says Windows Explorer and select End task. You need to close the Explorer before you can see the newly added item in the context menu.
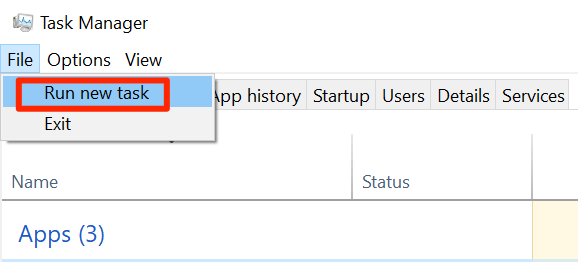
- Click on the File menu in Task Manager and select Run new task.
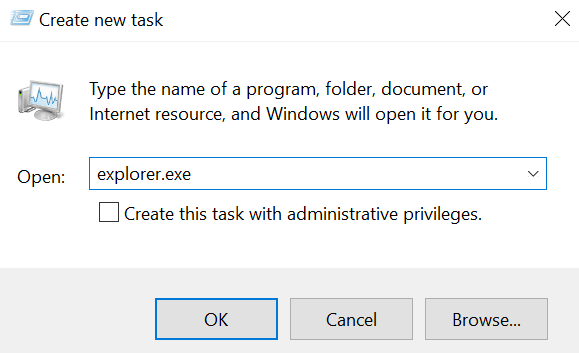
- Type in explorer.exe and hit Enter. It’ll relaunch the Windows File Explorer.
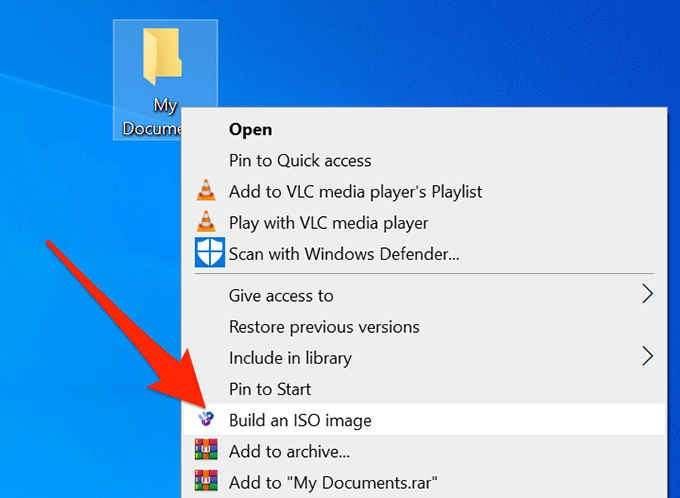
- Find the folder that you want to create an ISO for, right-click on it, and select Build an ISO image.
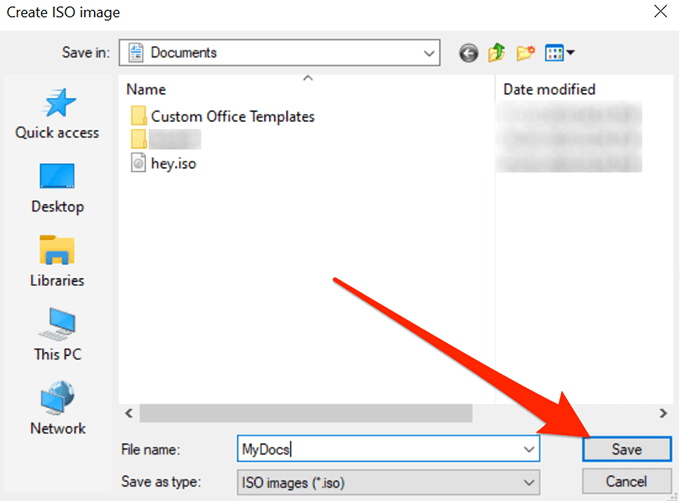
- It’ll ask you to enter a name for your ISO and the location where you want to save it. Enter these details and click on Save.
- It’ll quickly create the ISO for you and let you know when it’s fully built.
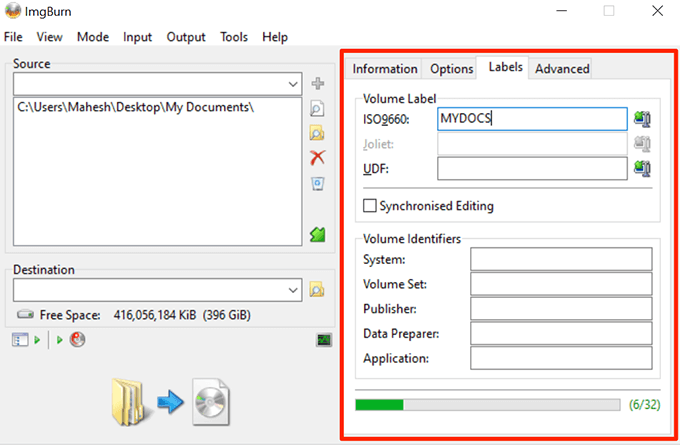
Use ImgBurn To Create ISO Files From Folders On Windows
ImgBurn has been a popular app to create and burn image files for a long time. If you’ve ever created a backup of your discs or you’ve burned a disc, you’ll likely recognize the app.
The app can be used to create ISO files from your folders as well.
- Download, install, and open the ImgBurn app on your computer.
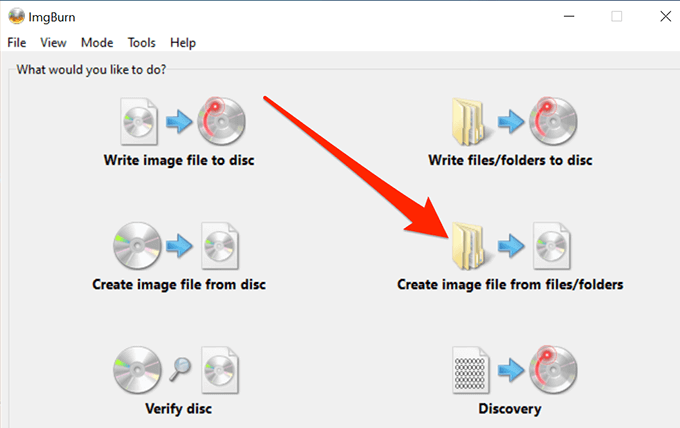
- On the main interface, find and click on the option that says Create image file from files/folders.
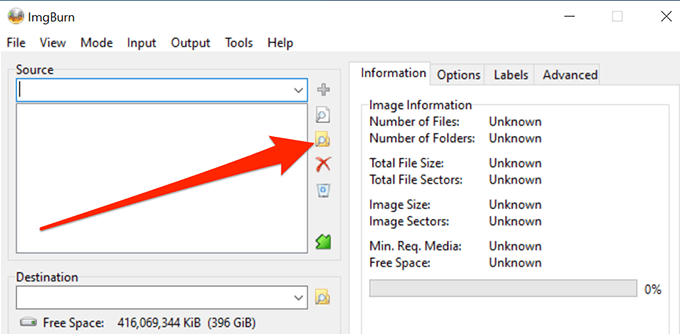
- You’ll see a screen that lets you add the folders you want to include in your ISO. Click on the little folder icon and add the folders for your ISO file.
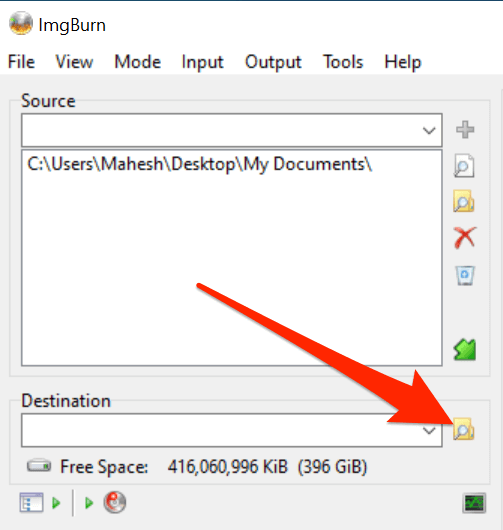
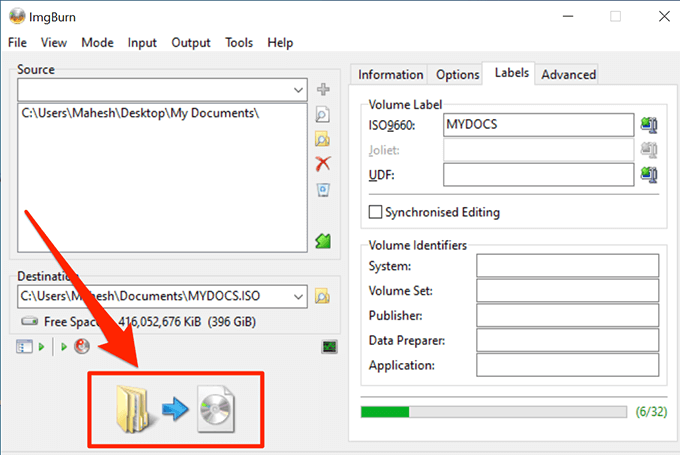
- Click on the tiny folder icon next to where it says Destination and select a name and target folder for your ISO file.
- On the right-hand side pane, you’ll find various options to configure for your ISO. With these options, you can change your image type, enter a label for your image, specify restrictions, and do a few other things.
- Finally, click on the large Build button on your screen to start building an ISO file out of your selected folders.
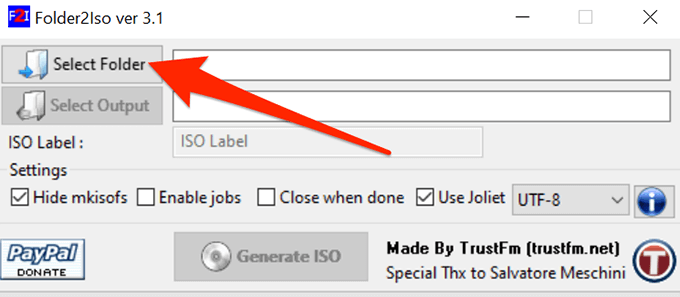
Use a Portable Tool To Create An ISO From Folders
If it’s just a single ISO that you’ll be making and you don’t think you’ll be doing it again anytime soon, you might prefer something that doesn’t require an installation. Folder2Iso can actually help you out as it’s a free and portable tool that helps quickly create ISOs without any hassle.
It works on many versions of Windows including Windows 7, 8, 10, and Linux.
- Download the Folder2Iso app and double-click on it to extract the actual app contents.
- Run the executable file that you extracted from the archive.
- You’ll see a simple interface with only a few options on it. Click on the Select Folder option and select the folder you want to add to your ISO.
- Click on the Select Output button and choose the folder where you’d like to save your ISO file. Remember you can’t choose the folder that you’ve chosen to include in your ISO.
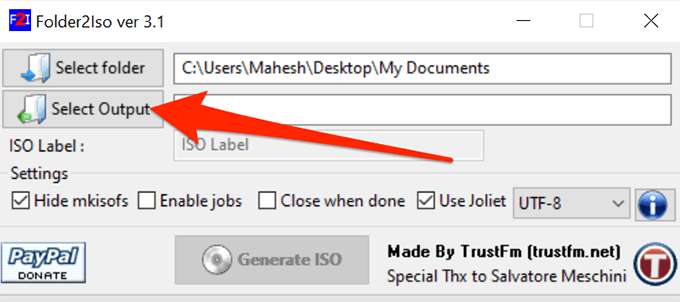
- You can then specify the extra options available on your screen, if you want.
- Click on the Generate ISO button to make an ISO out of your chosen folders.

- The progress bar will go all green when the ISO has been generated.
It’s a good idea to create an ISO from your folders in Windows so you can mount them all as a single drive on your PC. If you have done it on your computer already, let us know what app you chose to do it and why. We await your response in the comments below!
Mahesh has been obsessed with technology since he got his first gadget a decade or so ago. Over the last few years, he’s written a number of tech articles on various online publications including but not limited to MakeTechEasier and Android AppStorm. Read Mahesh’s Full Bio
How to install and use “make” in Windows?
I’m following the instructions of someone whose repository I cloned to my machine. What I want is simple: to be able to use the make command as part of setting up the code environment. But I’m using Windows, and I searched online only to find a make.exe file to download, a make-4.1.tar.gz file to download (I don’t know what to do with it next), and things about downloading MinGW (for GNU; but after installing it I didn’t find any mention of «make»).
I don’t want a GNU compiler or related stuff; I only want to use «make» in Windows. Please tell me what I should do to accomplish that.
Thanks in advance!
10 Answers 10
make is a GNU command so the only way you can get it on Windows is installing a Windows version like the one provided by GNUWin32. Anyway, there are several options for getting that:
The most simple choice is using Chocolatey. First you need to install this package manager. Once installed you simlpy need to install make (you may need to run it in an elevated/admin command prompt) :
Other recommended option is installing a Windows Subsystem for Linux (WSL/WSL2), so you’ll have a Linux distribution of your choice embedded in Windows 10 where you’ll be able to install make , gcc and all the tools you need to build C programs.
For older Windows versions (MS Windows 2000 / XP / 2003 / Vista / 2008 / 7 with msvcrt.dll) you can use GnuWin32.
An outdated alternative was MinGw, but the project seems to be abandoned so it’s better to go for one of the previous choices.
How to run a makefile in Windows?
I have some demos that I downloaded and they come with a Makefile.win and a Makefile.sgi. How can I run these in Windows to compile the demos?
17 Answers 17
If you have Visual Studio, run the Visual Studio Command prompt from the Start menu, change to the directory containing Makefile.win and type this:
You can also use the normal command prompt and run vsvars32.bat (c:\Program Files (x86)\Microsoft Visual Studio 9.0\Common7\Tools for VS2008). This will set up the environment to run nmake and find the compiler tools.
You can install GNU make with chocolatey, a well-maintained package manager, which will add make to the global path and runs on all CLIs (powershell, git bash, cmd, etc…) saving you a ton of time in both maintenance and initial setup to get make running.
Install the chocolatey package manager for Windows
compatible to Windows 7+ / Windows Server 2003+
Run choco install make
I am not affiliated with choco, but I highly recommend it, so far it has never let me down and I do have a talent for breaking software unintentionally.
Check out cygwin, a Unix alike environment for Windows
Check out GnuWin’s make (for windows), which provides a native port for Windows (without requiring a full runtime environment like Cygwin)
If you have winget, you can install via the CLI like this:
Also, be sure to add the install path to your system PATH :

Here is my quick and temporary way to run a Makefile
- download make from SourceForge: gnuwin32
- install it
- go to the install folder
- copy the all files in the bin to the folder that contains Makefile
- open the cmd(you can do it with right click with shift) in the folder that contains Makefile and run
Plus, you can add arguments after the command, such as

If you install Cygwin. Make sure to select make in the installer. You can then run the following command provided you have a Makefile.
With Visual Studio 2017 I had to add this folder to my Windows 10 path env variable:
There’s also HostX86
If it is a «NMake Makefile», that is to say the syntax and command is compatible with NMake, it will work natively on Windows. Usually Makefile.win (the .win suffix) indicates it’s a makefile compatible with Windows NMake. So you could try nmake -f Makefile.win .
Often standard Linux Makefiles are provided and NMake looks promising. However, the following link takes a simple Linux Makefile and explains some fundamental issues that one may encounter. It also suggests a few alternatives to handling Linux Makefiles on Windows.
I use MinGW tool set which provides mingw32-make build tool, if you have it in your PATH system variables, in Windows Command Prompt just go into the directory containing the files and type this command:

Firstly, add path of visual studio common tools ( c:\Program Files (x86)\Microsoft Visual Studio 14.0\Common7\Tools ) into the system path. To learn how to add a path into system path, please check this website: http://www.computerhope.com/issues/ch000549.htm. You just need to this once.
After that, whenever you need, open a command line and execute vsvars32.bat to add all required visual studio tools’ paths into the system path.
Then, you can call nmake -f makefile.mak
PS: Path of visual studio common tools might be different in your system. Please change it accordingly.

I tried with cygwin & gnuwin, and didn’t worked for me, I guess because the makefile used mainly specific linux code.
What it worked was use Ubuntu Bash for Windows 10. This is a Marvel if you come from MAC as it is my case:
- To install the Ubuntu Bash: https://itsfoss.com/install-bash-on-windows/
- Once in the console, to install make simply type «make» and it gives the instructions to download it.
Extras:
- Useful enable copy / paste on bash: Copy Paste in Bash on Ubuntu on Windows
- In my case the make called Maven, so I have to install it as well: https://askubuntu.com/questions/722993/unable-to-locate-package-maven
- To access windows filesystem C: drive, for example: «cd /mnt/c/»
I tried all of the above. What helps me:
- Download the mingw-get.
- Setup it.
- Add something like this C:\MinGW\bin to environment variables.
- Launch (!important) git bash. Power shell, developer vs cmd, system cmd etc didn’t help.
- Type mingw-get into the command line.
- After type mingw-get install mingw32-make .
Done! Now You might be able to use make-commands from any folder that contains Makefile.

- Download from https://sourceforge.net/projects/gnuwin32/
- Set the variable path in advance setting for recognize in command prompt (C:\Program Files (x86)\GnuWin32\bin)

Install msys2 with make dependency add both to PATH variable. (The second option is GNU ToolChain for Windows. MinGW version has already mingw32-make included.)
Install Git Bash. Run mingw32-make from Git Bash.

I am assuming you added mingw32/bin is added to environment variables else please add it and I am assuming it as gcc compiler and you have mingw installer.
First step: download mingw32-make.exe from mingw installer, or please check mingw/bin folder first whether mingw32-make.exe exists or not, else than install it, rename it to make.exe .
After renaming it to make.exe , just go and run this command in the directory where makefile is located. Instead of renaming it you can directly run it as mingw32-make .
After all, a command is just exe file or a software, we use its name to execute the software, we call it as command.


