- Using Device Manager to Uninstall Devices and Driver Packages
- Top 3 Ways to Uninstall/Remove a Driver on Windows 10/8.1/8/7/XP/Vista
- Part 1. Why You Need to Uninstall a Driver on Laptop, Notebook or Desktop PC
- Part 2. How to Remove Drivers on Windows 10/8.1/8/7/XP/Vista – Top 3 Methods
- Method 1. Uninstall Drivers with Professional Driver Uninstaller Driver Talent
- How to Remove Old and Useless Drivers in Windows 10
- For Graphics and Sound Drivers, Use DDU
- Force Old Drivers to Appear
- Uninstall Old Drivers in Windows
- How to Uninstall Drivers in Windows
- Roll Back to a Previous Driver
- Uninstall a Driver
- How to Completely Remove/Uninstall Drivers on Windows 10
- Common Methods to Remove Drivers on Windows 10
- Way 1. Uninstall Drivers from Programs and Features
- Way 2. Download Driver Talent to get a one-click solution
- Way 3. Remove Windows Drivers with Device Manager
- To solve such a «failed driver uninstallation» issue or to completely delete unnecessary drivers, you can follow the steps below.
- Completely Remove a Device Driver: Step 1
- Completely Remove a Device Driver: Step 2
- Completely Remove a Device Driver: Step 3
- Completely Remove a Device Driver: Step 4
Using Device Manager to Uninstall Devices and Driver Packages
This page describes how to uninstall a device or driver package on Windows 10. Before uninstalling a device, it is recommended that the device is unplugged from the system. If the device is uninstalled before it is unplugged, the operating system may rediscover the device and give it new settings in the time between the uninstall and unplugging the device.
First, open Settings (you can do this using the Windows+I keyboard shortcut) and type Remove. Select Add or remove programs. If the device or driver package that you wish to remove appears in the list of programs, select uninstall.
If your device or driver package does not appear in the list, then the device can be uninstalled via Device Manager. If that device is the only device using the driver package, then the driver package can also be removed via Device Manager. To launch Device Manager, click the Start button, type Device Manager, and press Enter.
Then follow these steps:
- Click on the View menu and turn on «Show Hidden Devices»
- Expand the node that represents the type of device that you want to uninstall, right-click the device entry for the device you want to uninstall, and select Uninstall.
- On the Confirm Device Removal dialog box, if you wish to remove the driver package in addition to uninstalling the device, select the Delete the driver software for this device option. When ready to complete the operation, select OK.
With some devices, if the device is still plugged in when it is uninstalled, the device might continue to function until the system has been restarted.
For more information about uninstalling driver and driver packages, see How Devices and Driver Packages are Uninstalled.
Top 3 Ways to Uninstall/Remove a Driver on Windows 10/8.1/8/7/XP/Vista
Want to uninstall Nvidia, AMD, or printer drivers from your computer? It’s easy to uninstall/remove old drivers and clean all the driver packages in Windows 10, Windows 8.1, Windows 8, Windows 7, Windows XP and Windows Vista. In this post, you will learn why it is important to uninstall a driver, top 3 methods on how to remove a driver and what to do after you uninstall the driver.
Part 1. Why You Need to Uninstall a Driver on Laptop, Notebook or Desktop PC
Normally it’s not recommended to uninstall a driver that is working properly, because drivers are the must-have software to make Windows Operating System communicate with hardware and devices and ensure the hardware and devices work properly on your computer.
However, drivers can go wrong and they will even crash your entire computer. If you manually install an incorrect driver from the manufacturer’s website, your hardware or device will surely get issues. If the drivers on your computer are out-of-date, corrupted, damaged, broken, missing or incompatible, then yes, you will have lots of problems, such as no wifi, no internet connection, no Bluetooth, display driver stopped responding, black screen, no audio/sound, etc. This is not in the alarmist. When Microsoft’s Windows Vista came out in 2007, it’s slow and crashed a lot and this issue affected large amount of users. Finally Microsoft found that the crashes were mainly caused by driver issues.
If you find problematic drivers and they are causing issues and errors on your computer, uninstall the drivers. What’s more, it’s necessary to remove old drivers after updating to new hardware.
Part 2. How to Remove Drivers on Windows 10/8.1/8/7/XP/Vista – Top 3 Methods
It’s very easy to uninstall and remove a driver and all the driver related files on your computer. There are 3 best workable solutions: Driver Talent (professional driver removal utility and driver uninstaller), Uninstall Programs windows, and Device Manager. All work for laptops, notebooks, desktop PCs, including Asus, Acer, Dell, HP, Sony, Lenovo, Samsung, Toshiba, IBM, Alienware, Compaq, Gateway, LG, Microsoft, MSI, etc.
If you prefer one-click and also one-stop to uninstall drivers totally and clearly without residual files, try Method 1.
Method 1. Uninstall Drivers with Professional Driver Uninstaller Driver Talent
Uninstalling drivers totally and clearly without residual files is necessary. This helps to install new drivers successfully (If you try to uninstall driver files with residual driver package files left in the registry, it will cause issues for newly-installed drivers, such as the new drivers won’t work properly).
Driver Talent helps you to remove drivers and the driver packages clearly.
Free download and install Driver Talent on your computer in 64 bit or 32 bit Windows OS.
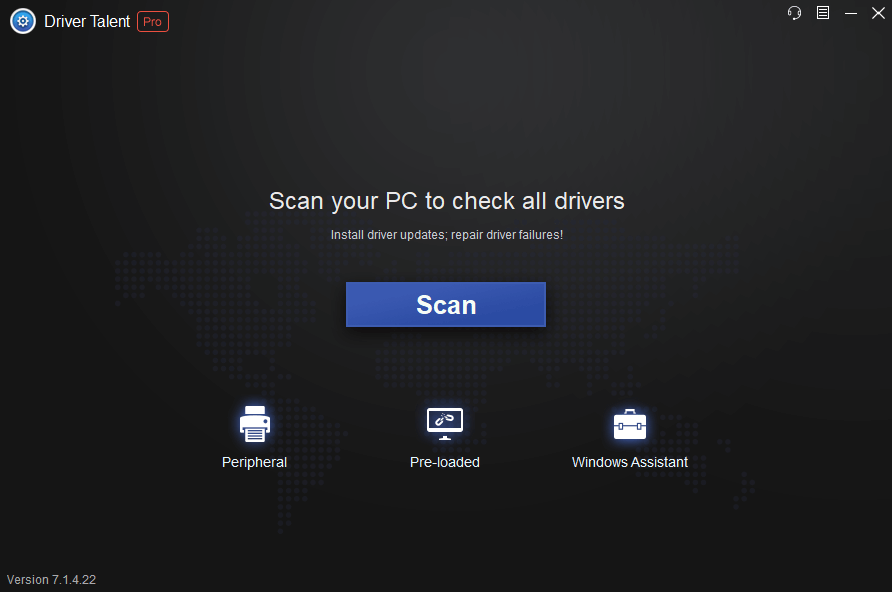
Step 1. Launch Driver Talent and click “Tools” to enter the main interface.
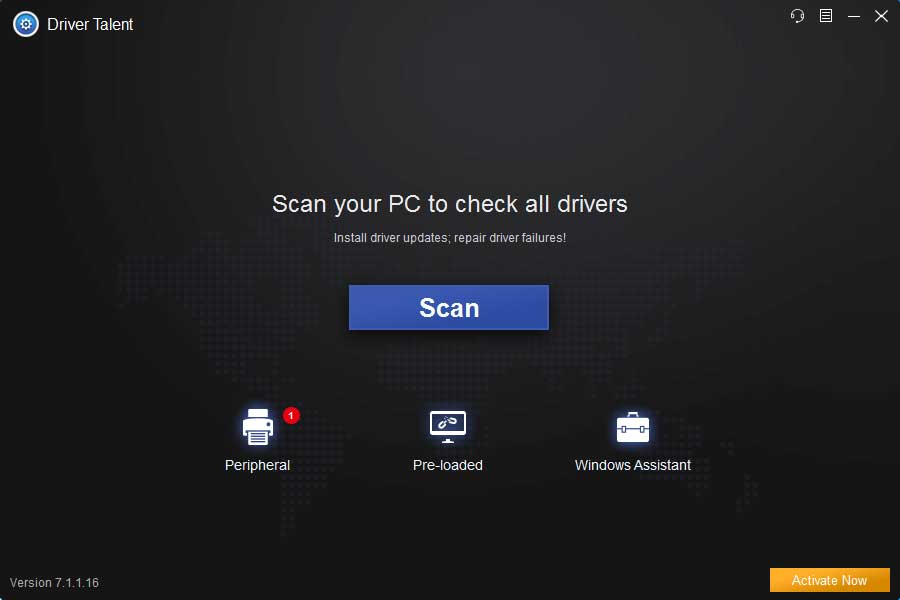
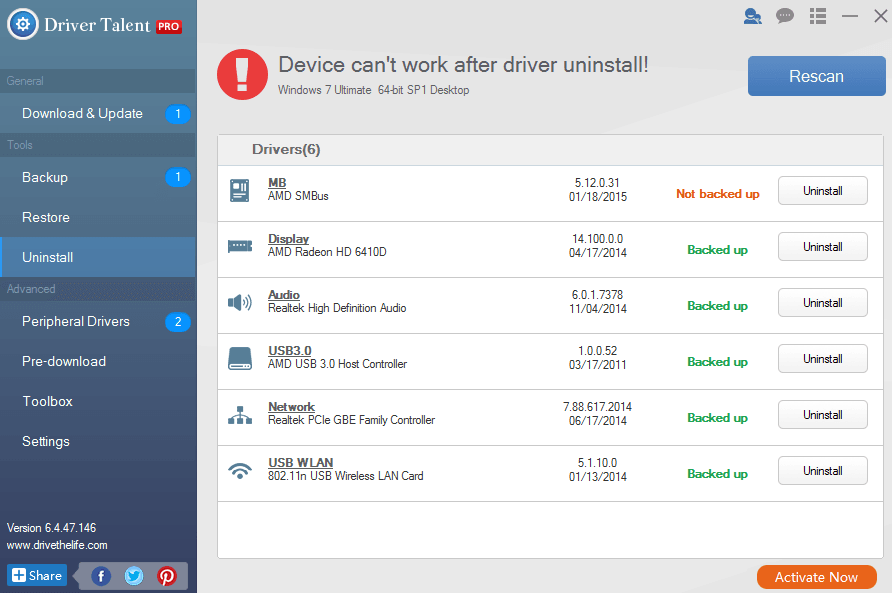
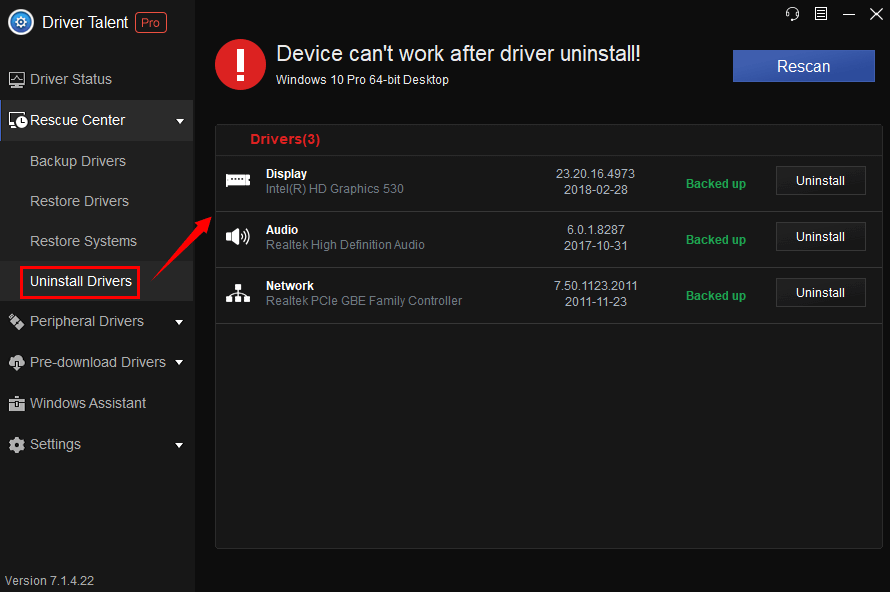
Step 2. Click “Uninstall” on the left menu. This utility will help to scan and list all the drivers that you can uninstall. Select the ones you want to remove and click “Uninstall”.
Step 3. Restart your computer for changes to take effect.
Driver Talent can remove all drivers, including:
How to Remove Old and Useless Drivers in Windows 10

For every device you have in your Windows PC, you will need a driver for that device to work properly. The problem with this is that as time passes, your Windows machine will be bogged down with lots of unnecessary and old drivers, which eventually may result in problems on your PC.
Surely, you can easily uninstall any device driver using Windows’s built-in tools. The problem is that Windows device manager only shows currently connected devices, and there is no option to see hidden or old drivers. Here we show you how to force hidden drivers to appear and how to remove old drivers in Windows 10.
Note: this article is based on Windows 10, but it should work with any other previous versions, like Windows 7 and Windows 8, as well.
For Graphics and Sound Drivers, Use DDU
Graphics cards are complex things, and if you’ve either bought a new graphics card or have updated your old one, then you may find that it doesn’t work properly due to driver conflicts. (It may not work altogether or may be prone to crashes and restarts.)
If that happens, you should use the free Guru 3D tool DDU (or Display Driver Uninstaller) to completely uninstall your old graphics card drivers before installing the new ones.

Once you’ve extracted the tool, you’ll need to open Windows 10 in Safe Mode, then open DDU and select your device type (GPU or Audio) from the drop-down menu. Once you’ve made your selection, click “Clean and restart” for your drivers to be completely uninstalled.
Once you’re back in regular Windows 10, you can install new GPU or audio drivers without any conflicts or interference from the old ones.
Force Old Drivers to Appear
Before uninstalling old drivers, we need to force the old drivers to show up in the list.
1. To do that, press Win + X and select “Command Prompt (Admin)” from the list of options.

2. Type the following command and press the Enter button to execute the command:

What the above command does is force all the non-present or old and invisible drivers to show up in the Device Manager list. Once you have done this, you can proceed with the uninstallation.
Uninstall Old Drivers in Windows
1. To uninstall the old drivers, press Win + X and select “Device Manager” from the list of options.

2. Go to “view” and select the option “show hidden devices” to reveal all the hidden and old drivers.

The good thing about this feature is that all the old drivers are faded out, so you can easily identify the old or non-present drivers from current drivers.
3. Select the old driver you want to uninstall, right-click and select the Uninstall option.

That’s all there is to do. Using this tip, you can easily find and uninstall any old and hidden drivers. Always be careful not to remove any current device driver, as this may cause problems with your connected hardware device. Also, always check twice before uninstalling any device driver.
If you still have problems that need solving with your Windows 10 graphics, see our guide on fixing a faulty graphics card or check out our list of the latest Windows 10 update problems to see if you’ve been affected.
Related:
Content Manager at Make Tech Easier. Enjoys Android, Windows, and tinkering with retro console emulation to breaking point.
How to Uninstall Drivers in Windows


By Michael King
Today’s Best Tech Deals
Picked by PCWorld’s Editors
Top Deals On Great Products
Picked by Techconnect’s Editors
Installing drivers can be a hair-raising adventure, even on today’s modern operating systems. These finicky pieces of code act as the middleman between your PC’s hardware and its operating system. Although they install with ease just like any other software, they integrate deeply into the OS, sinking their teeth into areas most other software doesn’t go near. Most of the time the driver installation process is simple, seamless, and transparent to you, as it should be.
On those occasions when things go wrong, however, they can go really wrong, and even crash your entire computer. For example, when Microsoft’s Windows Vista came out in 2007, critics lambasted it for being slow and prone to crashing; Microsoft investigated the causes and found that a majority of crashes were due to driver issues.
Thankfully, when you prepare yourself for battle with a problematic driver, you have a couple of tricks that can help. Microsoft has introduced an easy way to roll back to a previous (and, you hope, more stable) version of the driver, or remove it from the system altogether, giving you a clean slate to try again or install a different version.
Roll Back to a Previous Driver
- Click Start, type Device Manager, and press Enter.
- Find and double-click the category of device causing the issue (for instance, the graphics card would be listed under Display Adapters).
- Double-click the problematic device to bring up the Properties window.
- Click the Driver tab.
- Click the Roll Back Driver button.
- A dialog box will ask you to confirm your decision to roll back to a previous driver. Click Yes to begin the roll-back process. Use the Properties menu to uninstall your driver software or roll back to a previous version.
At this point Windows will automatically remove the current driver for the device and reinstall the previous driver. You may then receive a notification that the system settings have changed, and Windows will ask you to reboot. If you see that message, you should reboot your computer as soon as possible.
Uninstall a Driver
When you need to uninstall a driver completely, the best and safest method is to use the device’s uninstaller program (if it has one). If you added the device to your system through an installer (as is the case with most graphics card and sound card drivers, for instance), you can uninstall it just as you would any other program.
- Click Start, type Uninstall Program, and press Enter.
- In the Uninstall window that appears, go through the list and find your device or drivers. Double-click the entry to begin the uninstallation process.
Sometimes devices won’t have an uninstaller, or the uninstaller will not appear in the list. In those instances, you can use the Device Manager to remove the driver completely.
- Click Start, type Device Manager, and press Enter.
- Find and double-click the category of device whose driver you wish to uninstall (for example, the graphics card would be listed under Display Adapters).
- Right-click the device, and click Uninstall.
- Windows will prompt you to confirm the device’s removal. Click OK to remove the driver.
- After the uninstallation is complete, reboot your computer as soon as possible. In a pinch you can use the Windows Device Manager to uninstall troublesome driver software.
After you roll back or uninstall a problematic driver, you can try downloading and installing the latest version from the manufacturer’s website, or try a specific version that previously worked to get your computer back on its feet.
How to Completely Remove/Uninstall Drivers on Windows 10
Dec. 11, 2020 / Updated by Bessie Shaw to Windows 10
Windows 10 users often come across the Windows driver removal problem. Due to the automatic backup feature, Windows 10 will prevent users from completely removing drivers and will restore the driver installations when the drivers are deleted or broken. This may trigger a failure of uninstalling problematic drivers.
That’s why it seems there are no problems with the device drivers in Device Manager or the drivers are in the latest versions, but the computer is still stuck on no sound issue, no Wi-Fi available hitch, display problems, etc..
Common Methods to Remove Drivers on Windows 10
There are two known ways to uninstall drivers on Windows 10, but sometimes, the methods cannot remove the programs clearly due to the Windows 10 features we’ve mentioned above. Here we still show you the methods:
Way 1. Uninstall Drivers from Programs and Features
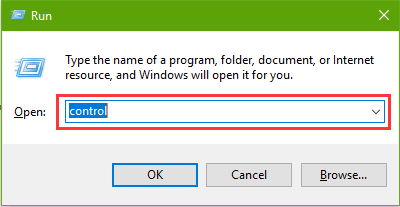
Step 1. Open Run with Windows shortcut keysWin + R.
Step 2. Type into control and hit the Enter key.
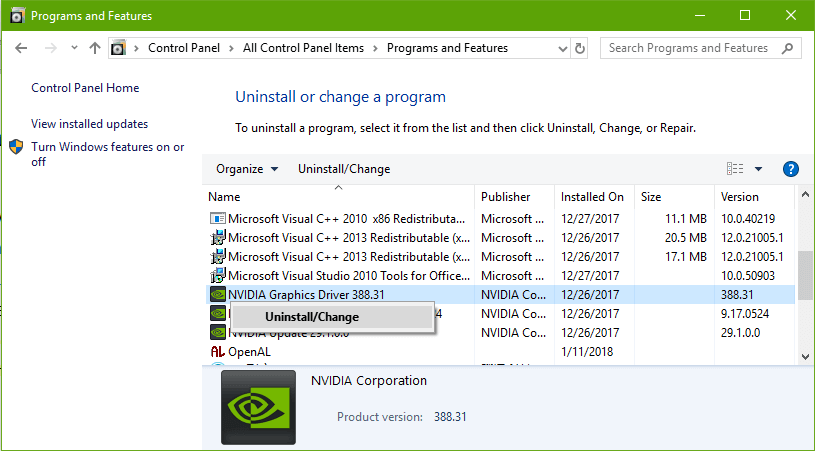
Step 3. In Control Panel, go to Programs and Features.
Step 4. Right-click the driver and select Uninstall.
Step 5. Restart the PC.
Way 2. Download Driver Talent to get a one-click solution
If you find it time-consuming to search proper driver downloads, or if you prefer a one-click solution, you can use Driver Talent. It is a reliable and professional Windows drivers download and update utility.
You can get and install the best-matched and safe driver updates you need in seconds. Also, you can use the software to quickly uninstall device drivers. Click the button above to save your time.
Step 1. Click the Scan button after you launch Driver Talent. It will automatically detect those missing, outdated or broken drivers.
Step 2. If you are going to update drivers, click the Update button directly after the scanning. The utility will download the compatible driver version for your machine.
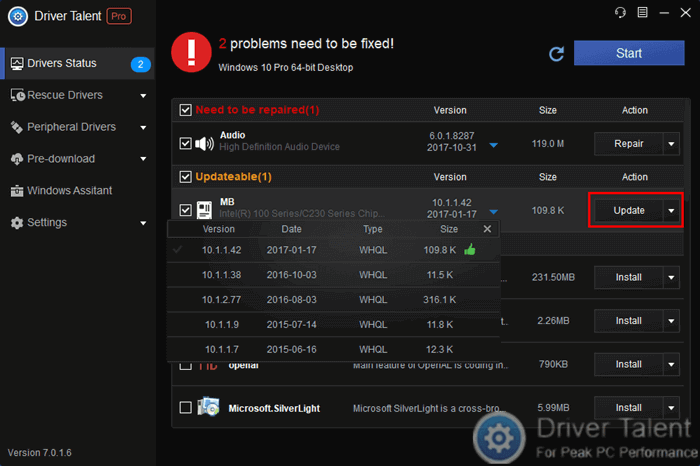
If you want to remove some drivers, go to the Uninstall menu. Highlight the device and click the Uninstall button to delete the driver.
Step 3. Reboot to make the newly driver download or the driver change take effect.
Note: You’d better back up your drivers before any driver changes in case other system problems occur suddenly.
Way 3. Remove Windows Drivers with Device Manager
Step 1. Use shortcut keys Win + X on Windows 10.
Step 2. Select Device Manager.
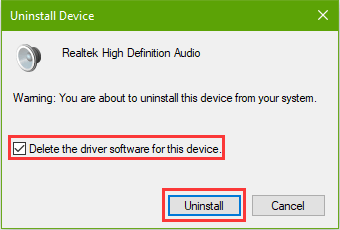
Step 3. Expand the entry. Right-click the problematic device and select Uninstall device.
Step 4. You may need to check the option Delete the driver software for this device, and then click the Uninstall button.
Step 5. Reboot the computer.
The three solutions above can help to delete a certain device, but you cannot completely remove the driver when you improperly install the program, especially with the first method. After you restart the machine, Windows 10 will still recognize the broken, incorrectly configured or incompatible driver, even if you’ve installed the appropriate one.
Windows 10 will detect drivers stored in C:\Windows\System32\Drivers during the PC startup, which has not been removed actually. Besides, if there is a damaged driver, Windows 10 will restore the working one from a backup folder during the restart.
To solve such a «failed driver uninstallation» issue or to completely delete unnecessary drivers, you can follow the steps below.
Before we begin, let’s learn about some important driver-related folders in your drive (C:).
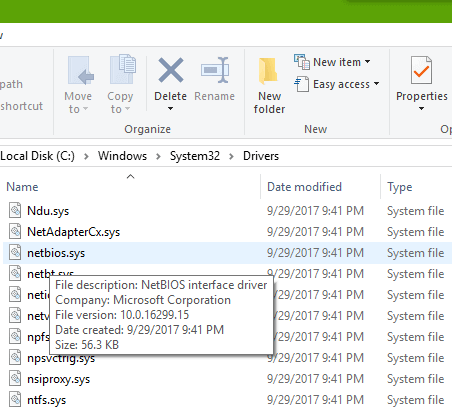
1. C:\Windows\System32\Drivers
You can find the .sys files of the exact device driver in the folder Drivers.
2. C:\Windows\System32\Inf
Some .inf files are saved in the folder Inf. The file names are not the original names of the driver package but are called in forms of oem#.inf or oem#.pnf (# stands an appropriate number).
3. C:\Windows\System32\DriverStore\FileRepository
This folder FileRepository stores all the driver package backups.
4. C:\Windows\System32
You have those .dll components of the drivers in the folder System32.
Here we’ll take the sound card device as an example to help you understand how to clearly delete a device driver from Windows 10 computer.
Completely Remove a Device Driver: Step 1
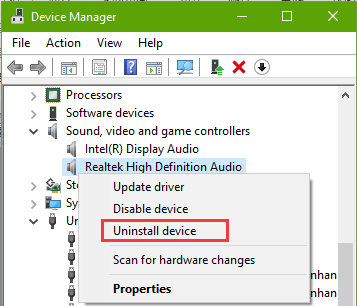
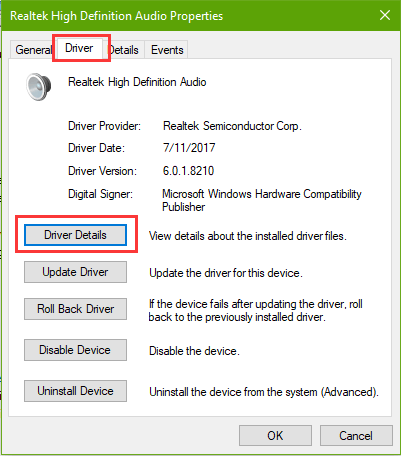
1. Open Device Manager and go to the sound device whose driver you need to uninstall.
2. Double-click the device to open the device Properties, and click Driver tab. Then click Details button to open the Driver File Details box.
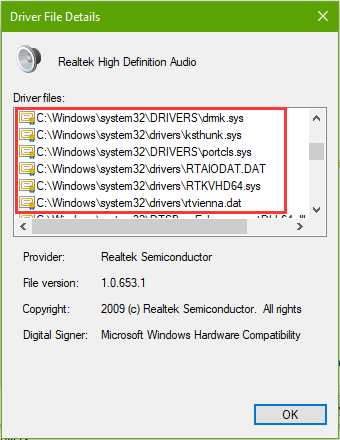
3. Check those driver file details. Write down those file names in .sys format in c:\windows\system32\drivers. For example, here we have drmk.sys, ksthunk.sys, portcls.sys and RTKVHD64.sys on the list.
4. Back to the Properties of the device and go to Details tab.
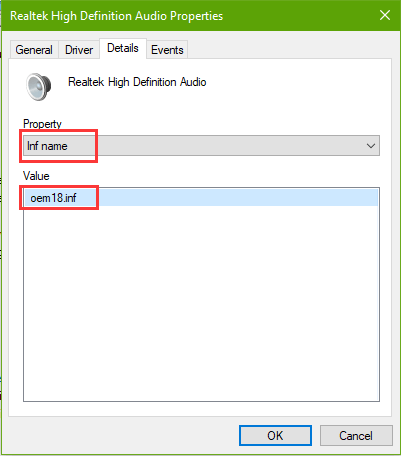
5. Select Inf name from the drop-down menu of Property. Then write down the information displays in Value. Here we have oem18.inf in the box.
Then you need to find out the corresponding folder that stores the driver backup in C:\Windows\System32\DriverStore\FileRepository. Let’s go to Step 2.
Completely Remove a Device Driver: Step 2
If you received an error message after your driver installation, you can easily find out the backup folder in Device Manager: device Properties >Events tab >Information. But if there’s no such content in the box, you can use a command to check the corresponding folder.
1. Use shortcut keys Win + S (or directly use your search bar on Taskbar). Type into cmd and press the Enter key.
2. Right-click the icon and select Run as administrator.
3. Type into the command: pnputil /enum-drivers > c:\drivers.txt. Hit the Enter key.
4. Then go to your C: drive and open the .txt file generated just now. Scroll down and navigate to the device whose driver runs into a problem. Here we can see the Published Name of the sound card, namely oem18.inf, which is what we’ve recorded in Step 1.
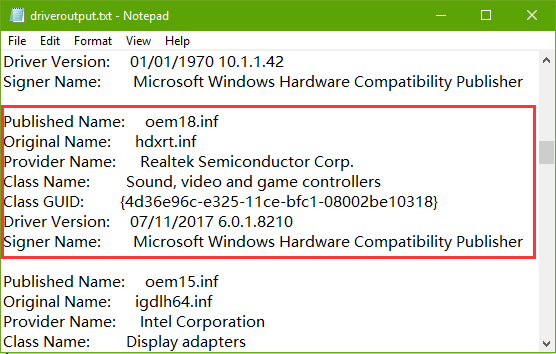
5. Then you need to take down the Original Name, hdxrt.inf, and look for the folder in C:\Windows\System32\DriverStore\FileRepository that starts with the same name.
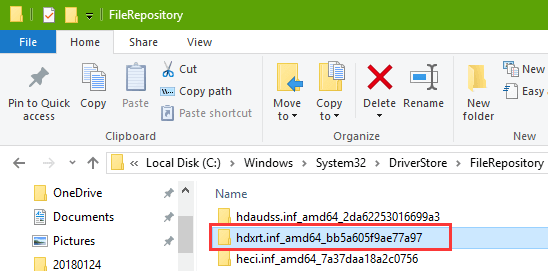
Open the folder and you will see all the driver backup files of the device. You can group the files in Date modified. Then find out the exact driver installer stored in this folder.
Completely Remove a Device Driver: Step 3
We’ve had those .sys files, .inf files and driver backups we need in the three folders. Now we need to delete those driver-related files from the folders in this step.
Note: If you don’t want the backup anymore, you can delete it. To prevent sudden system issues, like «display driver stopped responding and has recovered» error, WiFi adapter not working problem, mouse and keyboard not working, etc., we recommend you transfer the file to other drives.
If you have no access to change the files in the three folders, you can change to your administrator account, or do the following to unlock the access permissions.
1. Right-click the folder, for example, FileRepository. Select Properties.
2. Go to Security tab and click the Advanced button.

3. Click Change beside Owner. Type into your current Windows account and click OK. Then you’ll see the account change.
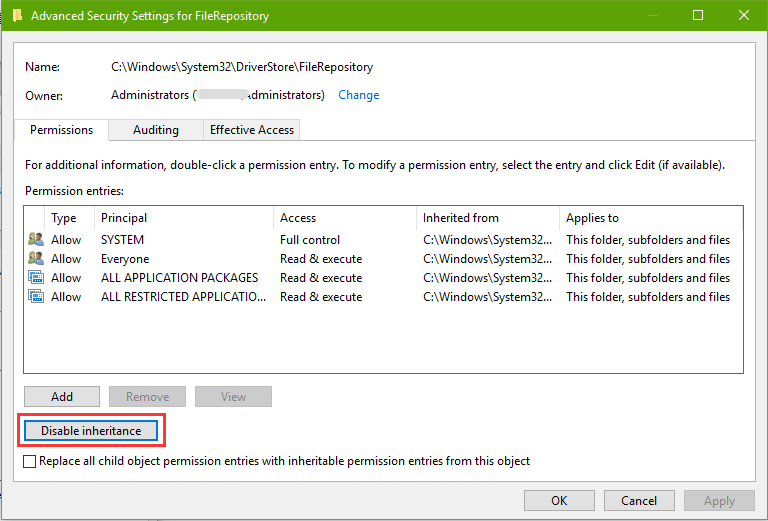
4. Click OK of the Advanced Security Settings for FileRepository. Click OK on the Properties box. Then repeat 1 — 2. Click the Change permissions button.
5. Click the Disable inheritance button.
6. Click Remove all inherited permissions from this object.
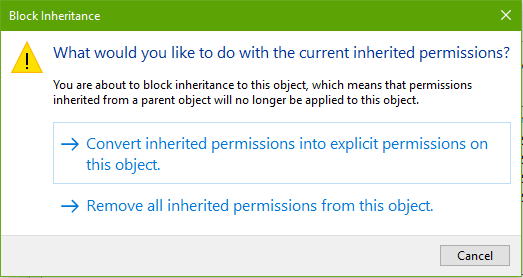
7. Then click the Add button above the Disable inheritance button.
8. Click Select a principal. Then type into your current account and click OK.

9. Check the option Full control and the option Only apply these permissions to objects and/or containers within this container.
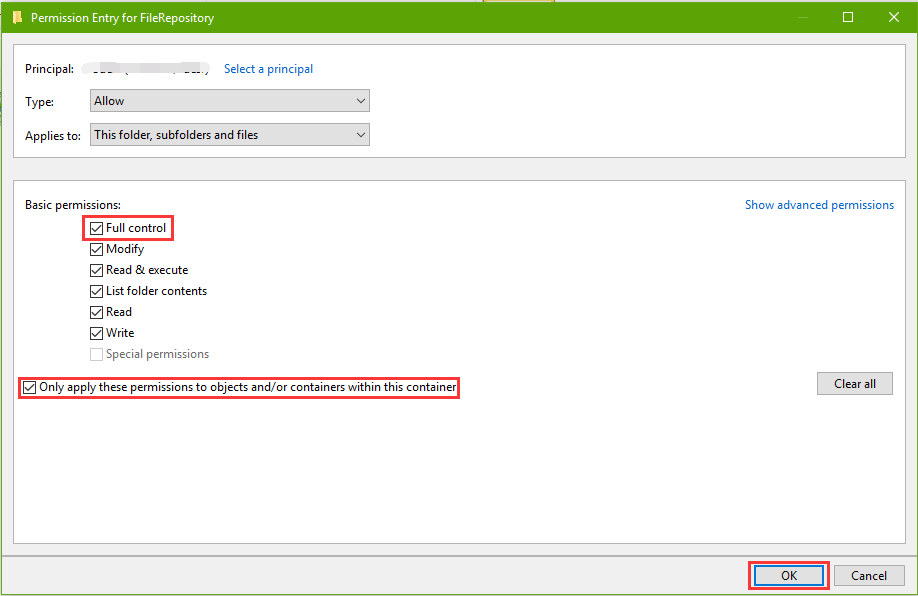
10. Click OK to get the full control of FileRepository.
After that, you can remove the driver installer or other driver-related files in the folder.
Completely Remove a Device Driver: Step 4
The last step is to clean those driver registry entries that feature in automatic driver recover in Windows Registry.
Note: Registry Editor is a database storing important Windows data. You’d better backup registry before any changes in case other serious computer crashes occur, such as black screen issue, boot loop glitch, blue screen error, etc..
1. Open Run with shortcuts Win + R.
2. Type into regedit and press the Enter.
3. Expand the entries in Registry with the following path:
HKEY_LOCAL_MACHINE\SOFTWARE\Microsoft\Windows\CurrentVersion\Setup\PnpLockdownFiles
4. On the left side, scroll down and look for those entries that contain related information of the device driver you are going to delete. For example, we will remove Realtek sound card driver and we have the entries:
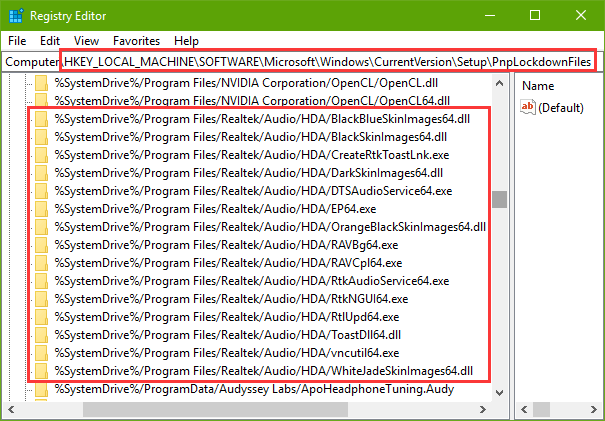
So we need to right-click to delete all of the corresponding .sys files and .dll files.
5. Then go to HKEY_LOCAL_MACHINE\SYSTEM to check if there is the services entry. If so, delete related driver keys under the entry.
After all of the 4 steps above, now you have completely removed the device driver from Windows 10. Restart the computer to make the changes take effect, and then you can download and install a new driver version to keep your Windows device up-to-date.
That’s it. All of the above are possibly the best ways to remove drivers completely from a Windows 10 computer. If you still fail to uninstall or delete the unnecessary/bad drivers, you can drop a line below in the comment section, or click the left menu on this page for more technical support. If you have any other Windows 10-related issues, see Windows 10 section on this site.


