- Записки IT специалиста
- Установка Ubuntu Server на Hyper-V
- Supported Ubuntu virtual machines on Hyper-V
- Table legend
- Notes
- Ubuntu Wiki
- Hyper-V
- What is Hyper-V?
- Why Hyper-V?
- Enabling Hyper-V
- Windows Editions
- Hyper-V System Requirements
- Hyper-V Graphical Install
- Hyper-V PowerShell Install
- Hyper-V Admin Center (Windows 10 Server)
- Installing Ubuntu on Hyper-V
- Using Quick Create
- Using an Ubuntu CD image (.ISO)
Записки IT специалиста
Технический блог специалистов ООО»Интерфейс»
- Главная
- Установка Ubuntu Server на Hyper-V
Установка Ubuntu Server на Hyper-V

Несколько дней назад нам потребовалось развернуть сервер на Ubuntu в виртуальной среде. Так как на выделенном под проект сервере уже стоял Windows Server 2008, выбор пал на Hyper-V, бесплатный гипервизор от Microsoft. В тоже время установка имеет ряд особенностей, о которых мы и поговорим в этой статье.
Первоначально мы не собирались публиковать этот материал, есть отличная статья Андрея Бешкова, где данный вопрос довольно подробно рассматривается. Однако в процессе установки мы столкнулись с рядом особенностей, не описанных в статье и тем, что в нашем случае у системы отсутствует графический интерфейс, для опытного администратора это не представляет сложности, но у начинающих может вызвать затруднения.
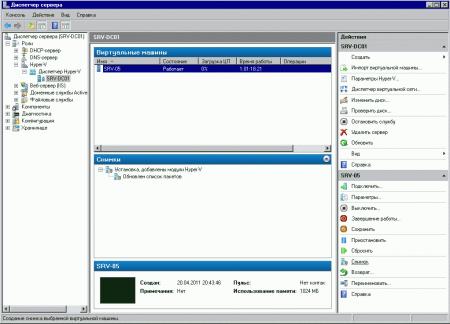
Итак, у нас имеется Windows Server 2008 SP2 c добавленной ролью Hyper-V и Ubuntu Server 10.04.1 LTS. В Hyper-V создаем стандартную виртуальную машину и начинаем установку системы с образа или диска. Одна неприятная особенность — в текстовом режиме перерисовка каждого экрана занимает 15-20 секунд, неприятно, но на процесс установки это никак не влияет.
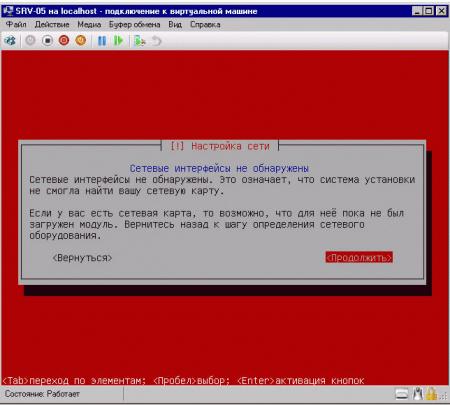
Первое серьезное предупреждение в процессе установки сообщит вам, что установщик не смог обнаружить сетевые интерфейсы. Это нормально, по умолчанию Ubuntu не поддерживает виртуальное оборудование Hyper-V, спокойно продолжаем установку.
 При установке откажитесь от автоматической установки обновлений, это очень важный момент, почему — поясним ниже.
Установив систему следует включить загрузку необходимых для полноценной работы в Hyper-V модулей, которые входят в ядро системы, но не включены. Учитывая что сети нет, и поставить даже mc вы не сможете, будем довольствоваться простым редактором nano. Для включения модулей необходимо отредактировать /etc/initramfs-tools/modules
В открывшийся файл добавляем следующие строки:
Выходим по Ctrl+X утвердительно отвечая на предложение сохранить изменения.
За что отвечают и для чего нужны эти модули?
- hv_vmbus — шина Hyper-V, основной модуль
- hv_storvsc — поддержка виртуального хранилища (виртуальный жесткий диск)
- hv_blkvsc — поддержка блочных устройств, требуется для хранилища.
- hv_netvsc — поддержка синтетической сетевой карты
- hv_utils — поддержка расширенных возможностей Hyper-V, таких как управление питанием гостевой системы и т.п.
Теперь обновим образ начальной загрузки системы (initramfs):
Изменения будут применены при следующей загрузке системы, а пока настроим сетевые интерфейсы, для этого отредактируем /etc/network/interfaces:
Добавим интерфейс eth0 и настроим его, например у нас это выглядит так:
Также на забудьте указать DNS сервера в /etc/resolv.conf
нашем случае для DNS серверов 192.168.0.100 и 192.168.0.101 и домена example.com записи будут выглядеть так:
Сохраняем изменения и перезагружаемся:
После перезагрузки проверяем, сеть и доступ в интернет должны работать.
 На этом нашу статью можно было бы и закончить, если бы не один неприятный момент: если вы попытаетесь обновить систему, то при обновлении получите ошибку и система больше не загрузится. Чтобы избежать этого, отключите все модули initramfs, кроме hv_vmbus и hv_netvsc (не забудьте перезагрузиться). После обновления включите модули обратно. В любом случае перед обновлением и прочим потенциально опасными операциями стоит сделать снимок системы, что позволит в любой момент времени быстро вернуться к ее текущему состоянию.
Вообще в процессе настройки мы советуем делать снимки как можно чаще. Установили пакет, настроили — сделайте снимок. Это позволит, при необходимости, возвращаться на нужное количество шагов назад, а также реализовать и опробовать несколько вариантов настройки, чтобы окончательно выбрать лучший из них.
В заключение стоит отметить, что установка Ubuntu Server на Hyper-V, хоть и требует некоторых дополнительных действий, довольно проста и не вызывает проблем. Работа системы в виртуальной среде не вызывает нареканий, стабильна и может быть рекомендована к применению в производственных условиях.
Supported Ubuntu virtual machines on Hyper-V
Applies To: Azure Stack HCI, version 20H2; Windows Server 2019, Hyper-V Server 2019, Windows Server 2016, Hyper-V Server 2016, Windows Server 2012 R2, Hyper-V Server 2012 R2, Windows 10, Windows 8.1
The following feature distribution map indicates the features in each version. The known issues and workarounds for each distribution are listed after the table.
Table legend
Built in — LIS are included as part of this Linux distribution. The Microsoft-provided LIS download package doesn’t work for this distribution, so don’t install it. The kernel module version numbers for the built in LIS (as shown by lsmod, for example) are different from the version number on the Microsoft-provided LIS download package. A mismatch doesn’t indicate that the built in LIS is out of date.
вњ” — Feature available
(blank) — Feature not available
| Feature | Windows Server operating system version | 20.04 LTS | 18.04 LTS | 16.04 LTS | 14.04 LTS |
|---|---|---|---|---|---|
| Availability | Built-in | Built-in | Built-in | Built-in | |
| Core | 2019, 2016, 2012 R2 | вњ” | вњ” | вњ” | вњ” |
| Windows Server 2016 Accurate Time | 2019, 2016 | вњ” | вњ” | вњ” | |
| Networking | |||||
| Jumbo frames | 2019, 2016, 2012 R2 | вњ” | вњ” | вњ” | вњ” |
| VLAN tagging and trunking | 2019, 2016, 2012 R2 | вњ” | вњ” | вњ” | вњ” |
| Live migration | 2019, 2016, 2012 R2 | вњ” | вњ” | вњ” | вњ” |
| Static IP Injection | 2019, 2016, 2012 R2 | вњ” Note 1 | вњ” Note 1 | вњ” Note 1 | вњ” Note 1 |
| vRSS | 2019, 2016, 2012 R2 | вњ” | вњ” | вњ” | вњ” |
| TCP Segmentation and Checksum Offloads | 2019, 2016, 2012 R2 | вњ” | вњ” | вњ” | вњ” |
| SR-IOV | 2019, 2016 | вњ” | вњ” | вњ” | |
| Storage | |||||
| VHDX resize | 2019, 2016, 2012 R2 | вњ” | вњ” | вњ” | вњ” |
| Virtual Fibre Channel | 2019, 2016, 2012 R2 | вњ” Note 2 | вњ” Note 2 | вњ” Note 2 | вњ” Note 2 |
| Live virtual machine backup | 2019, 2016, 2012 R2 | вњ” Note 3, 4, 5 | вњ” Note 3, 4, 5 | вњ” Note 3, 4, 5 | вњ” Note 3, 4, 5 |
| TRIM support | 2019, 2016, 2012 R2 | вњ” | вњ” | вњ” | вњ” |
| SCSI WWN | 2019, 2016, 2012 R2 | вњ” | вњ” | вњ” | вњ” |
| Memory | |||||
| PAE Kernel Support | 2019, 2016, 2012 R2 | вњ” | вњ” | вњ” | вњ” |
| Configuration of MMIO gap | 2019, 2016, 2012 R2 | вњ” | вњ” | вњ” | вњ” |
| Dynamic Memory — Hot-Add | 2019, 2016, 2012 R2 | вњ” Note 6, 7, 8 | вњ” Note 6, 7, 8 | вњ” Note 6, 7, 8 | вњ” Note 6, 7, 8 |
| Dynamic Memory — Ballooning | 2019, 2016, 2012 R2 | вњ” Note 6, 7, 8 | вњ” Note 6, 7, 8 | вњ” Note 6, 7, 8 | вњ” Note 6, 7, 8 |
| Runtime Memory Resize | 2019, 2016 | вњ” | вњ” | вњ” | вњ” |
| Video | |||||
| Hyper-V specific video device | 2019, 2016, 2012 R2 | вњ” | вњ” | вњ” | вњ” |
| Miscellaneous | |||||
| Key/value pair | 2019, 2016, 2012 R2 | вњ” Note 5, 9 | вњ” Note 5, 9 | вњ” Note 5, 9 | вњ” Note 5, 9 |
| Non-Maskable Interrupt | 2019, 2016, 2012 R2 | вњ” | вњ” | вњ” | вњ” |
| File copy from host to guest | 2019, 2016, 2012 R2 | вњ” | вњ” | вњ” | вњ” |
| lsvmbus command | 2019, 2016, 2012 R2 | вњ” | вњ” | вњ” | вњ” |
| Hyper-V Sockets | 2019, 2016 | вњ” | вњ” | вњ” | вњ” |
| PCI Passthrough/DDA | 2019, 2016 | вњ” | вњ” | вњ” | вњ” |
| Generation 2 virtual machines | |||||
| Boot using UEFI | 2019, 2016, 2012 R2 | вњ” Note 10, 11 | вњ” Note 10, 11 | вњ” Note 10, 11 | вњ” Note 10, 11 |
| Secure boot | 2019, 2016 | вњ” | вњ” | вњ” | вњ” |
Notes
Static IP injection may not work if Network Manager has been configured for a given Hyper-V-specific network adapter on the virtual machine. To ensure smooth functioning of static IP injection please ensure that Network Manager is turned off completely or has been turned off for a specific network adapter through its ifcfg-ethX file.
While using virtual fiber channel devices, ensure that logical unit number 0 (LUN 0) has been populated. If LUN 0 has not been populated, a Linux virtual machine might not be able to mount fiber channel devices natively.
If there are open file handles during a live virtual machine backup operation, then in some corner cases, the backed-up VHDs might have to undergo a file system consistency check ( fsck ) on restore.
Live backup operations can fail silently if the virtual machine has an attached iSCSI device or direct-attached storage (also known as a pass-through disk).
On long term support (LTS) releases use latest virtual Hardware Enablement (HWE) kernel for up to date Linux Integration Services.
To install the Azure-tuned kernel on 16.04, 18.04 and 20.04, run the following commands as root (or sudo):
Dynamic memory support is only available on 64-bit virtual machines.
Dynamic Memory operations can fail if the guest operating system is running too low on memory. The following are some best practices:
Startup memory and minimal memory should be equal to or greater than the amount of memory that the distribution vendor recommends.
Applications that tend to consume the entire available memory on a system are limited to consuming up to 80 percent of available RAM.
If you are using Dynamic Memory on Windows Server 2019, Windows Server 2016 or Windows Server 2012/2012 R2 operating systems, specify Startup memory, Minimum memory, and Maximum memory parameters in multiples of 128 megabytes (MB). Failure to do so can lead to Hot-Add failures, and you might not see any memory increase on a guest operating system.
In Windows Server 2019, Windows Server 2016 or Windows Server 2012 R2, the key/value pair infrastructure might not function correctly without a Linux software update. Contact your distribution vendor to obtain the software update in case you see problems with this feature.
On Windows Server 2012 R2, Generation 2 virtual machines have secure boot enabled by default and some Linux virtual machines will not boot unless the secure boot option is disabled. You can disable secure boot in the Firmware section of the settings for the virtual machine in Hyper-V Manager or you can disable it using Powershell:
Before attempting to copy the VHD of an existing Generation 2 VHD virtual machine to create new Generation 2 virtual machines, follow these steps:
Log in to the existing Generation 2 virtual machine.
Change directory to the boot EFI directory:
Copy the ubuntu directory in to a new directory named boot:
Change directory to the newly created boot directory:
Ubuntu Wiki
Hyper-V
What is Hyper-V?
Hyper-V is a native type 1 hypervisor developed by Microsoft for the Windows family of operating systems, similar to Xen or VMWare ESXi.
Hyper-V was first released for Windows Server 2008, and is available without additional charge since Windows Server 2012 and Windows 8.
For more information on the difference between type 1 and type 2 hypervisors, click here.
Why Hyper-V?
Hyper-V allows Ubuntu to be run in parallel or in isolation on Windows operating systems. There are several use-cases for running Ubuntu on Hyper-V:
- To introduce Ubuntu in a Windows-centric IT environment.
- To have access to a complete Ubuntu desktop environment without dual-booting a PC.
To use Linux software on Ubuntu that is not yet supported on the Windows Subsystem for Linux.
Enabling Hyper-V
Windows Editions
Ubuntu on Hyper-V can be enabled on the following Windows operating systems:
- Windows 10 Pro
- Windows 10 Enterprise
- Windows 10 Education
- Windows 10 Server
Hyper-V is not included in Windows 10 Home, which can be upgraded to Windows 10 Pro.
Hyper-V System Requirements
The following are additional system requirements for Hyper-V:
- A 64-bit processor with Second Level Address Translation (SLAT)
- CPU support for virtualization extensions and virtualization enabled in the system BIOS/EFI
- Minimum of 4 GB of memory, recommended 8 GB
- Minimum of 5 GB of disk space, recommended 15 GB
Hyper-V Graphical Install
Right click on the Windows Start button and select ‘Apps and Features’
Select ‘Programs and Features’ on the right under Related Settings
Select ‘Turn Windows Features on or off’
Select ‘Hyper-V’ and click OK
Restart when prompted
Hyper-V PowerShell Install
Open a PowerShell console as Administrator
Run the following command: Enable-WindowsOptionalFeature -Online -FeatureName Microsoft-Hyper-V -All
Hyper-V Admin Center (Windows 10 Server)
Installing Ubuntu on Hyper-V
There are different methods for installing Ubuntu on Hyper-V depending on your use-case. Read each of the descriptions of the following methods and then determine the best for your needs
Using Quick Create
The recommended method for installing Ubuntu on Hyper-V is to use the curated Ubuntu image from the Hyper-V Quick Create Gallery. This method is ideal for desktop development on Ubuntu and for users interested in running a complete Ubuntu desktop environment. The Ubuntu image from the Quick Create Gallery includes pre-configured features, such as clipboard sharing, dynamic resolution display, and shared folders.
Enable Hyper-V as described above.
Open ‘Hyper-V Manager’ by:
- Click on the Windows Start button, expand the ‘Windows Administrative Tools’ folder, and click ‘Hyper-V Manager’, or
- Click the Windows key and type ‘Hyper-V’ and click ‘Hyper-V Manager’ or select with your keyboard arrow keys and press ‘Enter’
In the future, the Quick Create tool can be accessed directly using the above methods, but it is useful to know where Hyper-V Manager is because it is where you will come back to manage your Ubuntu VM.
On the ‘Actions’ pane click ‘Quick Create’ and the Quick Create tool will open.
Select a version of Ubuntu from the versions on the left. A build of the most recent LTS version of Ubuntu and the most recent interim release are provided. If you are developing for Ubuntu server or an enterprise environment, the LTS version is recommended. If you would like to use the latest versions of software in Ubuntu, the interim release is recommended.
Click ‘Create Virtual Machine’ and wait for the VM image to be downloaded.
Click ‘Connect’ to open a connection to your VM.
Click ‘Start’ to run your VM.
Complete the final stages of Ubuntu install, including selection of a username.
Using an Ubuntu CD image (.ISO)
It is also possible to install Ubuntu on Hyper-V using a CD image .ISO. This is useful if you are running Ubuntu Server and do not require an enhanced desktop experience. Note that the enhanced features of the Quick Create images are not enabled by default when you perform a manual install from an ISO.
Download an Ubuntu ISO from an official Ubuntu source.
Enable Hyper-V as described above.
Open ‘Hyper-V Manager’ by:
- Click on the Windows Start button, expand the ‘Windows Administrative Tools’ folder, and click ‘Hyper-V Manager’, or
Click the Windows key and type ‘Hyper-V’ and click ‘Hyper-V Manager’ or select with your keyboard arrow keys and press ‘Enter’
On the ‘Actions’ pane click ‘Quick Create’ and the Quick Create tool will open.
Click ‘Change installation source’ and select the ISO file you downloaded before. If you want to give your virtual machine a more descriptive name, click the ‘More options’ down arrow on the bottom right and change ‘New Virtual Machine’ to something more useful, such as ‘Ubuntu Server 18.04 LTS’.
Click ‘Create Virtual Machine’ and wait for the virtual machine to be created.
Click ‘Connect’ to open a connection to your VM.
Click ‘File’ in the menu bar, chose ‘Settings’, click the ‘Security’ tab and under Secure Boot select ‘Microsoft UEFI Certificate Authority’, then ‘Apply’ and ‘OK’ to return to your VM.
Click ‘Start’ to run your VM.
Complete the manual installation of Ubuntu.
Hyper-V (последним исправлял пользователь haydenb 2020-11-04 14:13:39)


