- Очистка (сброс) поврежденного кэша иконок в Windows 10
- Сброс кэша иконок в Windows с помощью утилиты ie4uinit
- Скрипт удаления файлов с кэшем иконок в Windows
- Сброс кэша иконок и миниатюр в Windows 10
- Icon Cache Rebuilder: Repair & rebuild corrupt icon cache in Windows 7/8
- Icon Cache Rebuilder
- Related Posts
- Download Ultimate Windows Tweaker 4 for Windows 10
- Can’t move desktop icons in Windows 10
- Customize Folder icons, Change color, Add Emblems with CustomFolders for Windows 10
- [email protected]
- Primary Sidebar
- Purge & rebuild the Icon Cache in Windows 8/7
- Rebuild The Icon Cache
- Thumbnail and Icon Cache Rebuilder for Windows 10
- Thumbnail and Icon Cache Rebuilder
Очистка (сброс) поврежденного кэша иконок в Windows 10
При отображении иконок различных программ или типов файлов в проводнике File Explorer, Windows вместо обращения к исходным файлам с иконками, получает копии картинок значков из специальных файлов с кэшем иконок. За счет того, что операционной системе не нужно каждый раз загружать оригинальные файлы иконок, ускоряется работа и прорисовка объектов в проводнике Windows.
В некоторых случаях, при повреждении файла с кэшем иконок, в проводнике (и на рабочем столе) могут отображаться белые иконки ярлыков и файлов, или вместо иконок приложений отображаются стандартные иконки Windows. В этом случае рекомендуется выполнить сброс системного кэша иконок.
На скриншоте ниже видно, что в макете стартового меню Windows 10 вместо значков некоторых приложений отображаются стандартные иконки папок.
Кэш иконок в различных версиях Windows представляет собой один или несколько db файлов, хранящихся в профиле пользователя.
- В Windows7 это файл IconCache.db в каталоге %userprofile%\AppData\Local
- В Windows10 и Windows8.1 – это множество файлов, имя которых начинается с iconcache_ (iconcache_16.db, iconcache_32.db, iconcache_48.db и т.д. в соответствии с размерами иконки в пикселях) и хранятся в каталоге %userprofile%\AppData\Local\Microsoft\Windows\Explorer
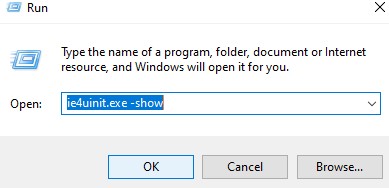
Сброс кэша иконок в Windows с помощью утилиты ie4uinit
В Windows есть специальная встроенная утилита ie4uinit (IE Per-User Initialization Utility), которую можно использовать для быстрого сброса кэша иконок.
- В Windows 10: ie4uinit.exe -show
- Для Windows 7: ie4uinit.exe -ClearIconCache
Эту команду нужно выполнить через меню Win+R -> команда -> Enter.
Команды абсолютно безопасные, но помогают восстановить нормальное состояние кэша иконок далеко не во всех случаях.
Скрипт удаления файлов с кэшем иконок в Windows
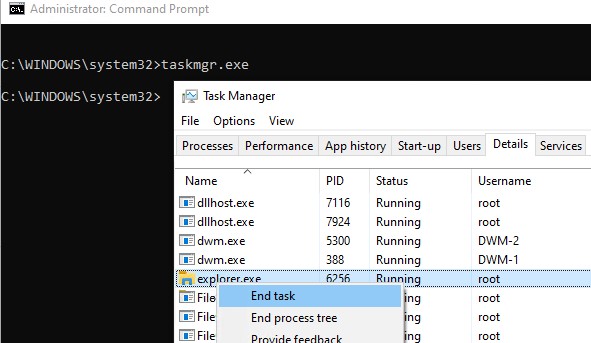
Чтобы сбросить кэш иконок, достаточно удалить db файлы с кэшем. Но предварительно нужно завершить процесс проводника File Explorer, чтобы он не блокировал доступ к файлам iconcache. Рассмотрим, как сбросить базу данных кэша иконок без перезагрузки Windows.
- Закройте все запущенные приложения;
- Откройте окно командной строки ( cmd.exe или powershell.exe ) с правами администратора;
- Запустите диспетчер задач taskmgr.exe
- В окне Task Manager перейдите на вкладку Details, найдите процесс explorer.exe и завершите его (End Task);

- Также вы можете завершить процесс из командной строки: taskkill /f /im explorer.exe
- Затем последовательно выполните следующие команды для удаления кэша иконок в профиле пользователя (в зависимости от версии ОС):
Для Windows 10/ 8.1 (просто скопируйте этот код в окно командной строки или сохраните как текстовый файл reset_icon_windows.bat).
Сброс кэша иконок и миниатюр в Windows 10
Любители кастомизировать ярлыки наверняка сталкивались с повреждением изображений иконок как на рабочем столе, так и в проводнике Windows.
Решить данную проблему можно буквально за минуту с помощью сброса кэша через командную строку операционный системы.
Запускаем командную строку (cmd.exe) от имени администратора и построчно вводим следующее:
taskkill /f /im explorer.exe
Таким нехитрым способом мы завершаем процесс «Проводник». Это необходимо для удаления файлов кэша, в противном случае система не даст удалить используемые файлы.
Следующая строка — переход к каталогу с файлами кэша:
cd /d %userprofile%\AppData\Local\Microsoft\Windows\Explorer
del /f /a s iconcache*
del /f /a s thumbcache*
Стоит отметить, что файлы iconcache есть иконки, а thumbcache — миниатюры, создаваемые проводником.
После очистки снова запускаем процесс explorer.exe:
Если данные действия показались сложными, то их можно автоматизировать. Для этого необходимо в блокнот вставить следующие строки:
taskkill /f /im explorer.exe
cd /d %userprofile%\AppData\Local\Microsoft\Windows\Explorer
del /f /a s iconcache*
del /f /a s thumbcache*
explorer
pause
Cохранить с любым названием, но с расширением .cmd и запустить получившийся файл от имени администратора.
Если все верно то на выходе мы получим следующее окно:
Кэш успешно очищен, а значит все иконки ярлыков на рабочем столе и в проводнике снова выглядят красиво.
Вышеописанные действия проводились на Windows 10 1803 (17134.254) x64. Применимо к Windows 8, 8.1, 10.
Icon Cache Rebuilder: Repair & rebuild corrupt icon cache in Windows 7/8
We are pleased to release the Icon Cache Builder. While one can always rebuild the icon cache manually in Windows, our Icon Cache Rebuilder lets you do so in a click!
Icon Cache Rebuilder
If you are having problems with icons not displaying correctly. Run Icon Cache Rebuilder, click Rebuild, wait for Explorer to refresh itself, and hit Restart to restart your computer. Once your computer restarts it will build a new Icon Cache.
Do note that ending Icon Cache Rebuilder before it finishes can result in Windows giving you an error for your user profile as it needs to refresh Explorer and restart your computer to rebuild the Icon Cache.
If a user runs into the problem of icons displaying incorrectly or icons corrupted, the easiest fix is to remove the IconCache. db file from your local file, restarting explorer then rebooting your computer to make the changes.
With Icon Cache Rebuilder, a user simply loads the application and once the IconCache.db is located will allow a user to click Rebuild to remove the file and restart Explorer.
Once this is done will allow a user to Restart their computer and once logged on the IconCache.db will be re-created.
Icon Cache Rebuilder has been created by TWCF Member Lee Whittington for The Windows Club, on a request from TWCF member Bamajon197, and has been tested on Windows 7, but may work on Windows 8.1/8 too.
If you have any questions or wish to give feedback, you may do so at TWCF.
Windows 10 users may want to use Thumbnail and Icon Cache Rebuilder, which lets you purge and rebuild Thumbnail & Icon Cache in a click.
Date: August 20, 2010 Tags: Icons, TWC App
Related Posts
Download Ultimate Windows Tweaker 4 for Windows 10
Can’t move desktop icons in Windows 10
Customize Folder icons, Change color, Add Emblems with CustomFolders for Windows 10
[email protected]
Anand Khanse is the Admin of TheWindowsClub.com, a 10-year Microsoft MVP (2006-16) & a Windows Insider MVP. Please read the entire post & the comments first, create a System Restore Point before making any changes to your system & be careful about any 3rd-party offers while installing freeware.
Primary Sidebar
 report this ad
Purge & rebuild the Icon Cache in Windows 8/7
If you find that one or more of your icons are not displaying correctly, or that your Icon Cache is corrupted, you might want to rebuild the Icon Cache. The Icon Cache or IconCache.db is a special database file that Windows utilizes to keep copies of each icon handy. When Windows needs to draw an icon, it uses the copy from the cache instead of retrieving the icon image from the original application file. This helps in making Windows draw the icons faster.
Rebuild The Icon Cache
In Windows 8, Windows 7 and Windows Vista, this IconCache.db file is located at:
Whereas, it is different in the older version of Windows i.e. Windows XP.
If you find your Windows displaying icons on the desktop in the wrong manner you can purge & rebuild the Icon Cache In Windows.
If you need to rebuild the Icon cache, Open File Explorer > Folder Options > Views to show Hidden System Files. Next, go to C:\Users\Username\AppData\Local folder and delete the hidden IconCache.db file. Reboot. This action will purge and rebuild the icon cache.
There is also another way to do it, should the above method not work for you.
Kill Explorer.exe process. In Windows 7, click Start button > Hold down Ctrl+Shift & Right Click on an empty area in the Start Menu > Click “Exit Explorer”. In Windows 8, you may do so via the Task Manager.
Open the command prompt window, type each of the following and after every command, hit the Enter button:
Your Windows Icon Cache would have been rebuilt.
You may also want to check out our freeware Icon Cache Rebuilder Tool to automate the entire process of repairing icon cache.
Thumbnail and Icon Cache Rebuilder for Windows 10
Thumbnail and Icon Cache Rebuilder for Windows 10 is a portable freeware that will purge, clear, and delete your Thumbnail and Icon Cache in a click.
If your icons appear blank or look corrupted or do not refresh correctly, when they should, then it is quite possible that your icon cache database may have become corrupted on your Windows 10 PC. The same thing applies to Thumbnails too. If they do not display correctly then they may have become corrupted. In such a scenario, you may need to delete the cache files in order to rebuild the Icon cache and clear the Thumbnail cache. We have already seen how to rebuild Icon cache in Windows 10 manually – but if-if you prefer to automate the process, use our Icon cache Rebuilder 2 for Windows 10.
Thumbnail and Icon Cache Rebuilder
Once you have downloaded the zip file, extract its contents, and run the .exe file. You might want to create a system restore point first.
If you are having problems with Thumbnails or Icons not displaying correctly, open Thumbnail and Icon Cache Rebuilder.
You need to be signed in as admin to use this tool. Right-click on the exe file and select Run as administrator.
Check the delete Icon cache or Delete Thumbnail Cache or both, depending on your requirement.
Next click Rebuild, wait for Explorer to refresh itself.
Restart your computer. Once your computer restarts it will build a new Cache.
Do note that ending Icon Cache Rebuilder before it finishes can result in Windows giving you an error for your user profile as it needs to refresh Explorer and restart your computer to rebuild the Icon Cache.
Thumbnail and Icon Cache Rebuilder has been created by TWC Author Lavish Thakkar for TheWindowsClub. You may have to Run this tool as an administrator to get the best results.
If you have any questions or wish to give feedback, you may do so in the comments section.
NOTE: Windows 7/8 users can use Icon Cache Rebuilder v1.


