- Windows icons open with
- Windows 10 icons. Where are they located? In which files and folders?
- How are Windows 10 icons stored?
- Where are Windows 10’s default icons located?
- How to use the icons stored inside a .DLL file
- Do you know any other DLL files with icons from Windows 10?
- App icons and logos
- Icon types, locations, and scale factors
- Microsoft Store listing image
- Managing app icons with the Visual Studio Manifest Designer
- Generating all assets at once
- More about app icon assets
- Target-size app icon assets
- Unplated assets
- Unplated assets and themes
- Target and unplated sizing
- More about splash screen assets
- More about badge logo assets
- Customizing asset padding
- Tile padding recommendations
- Optimizing for specific themes, languages, and other conditions
Windows icons open with
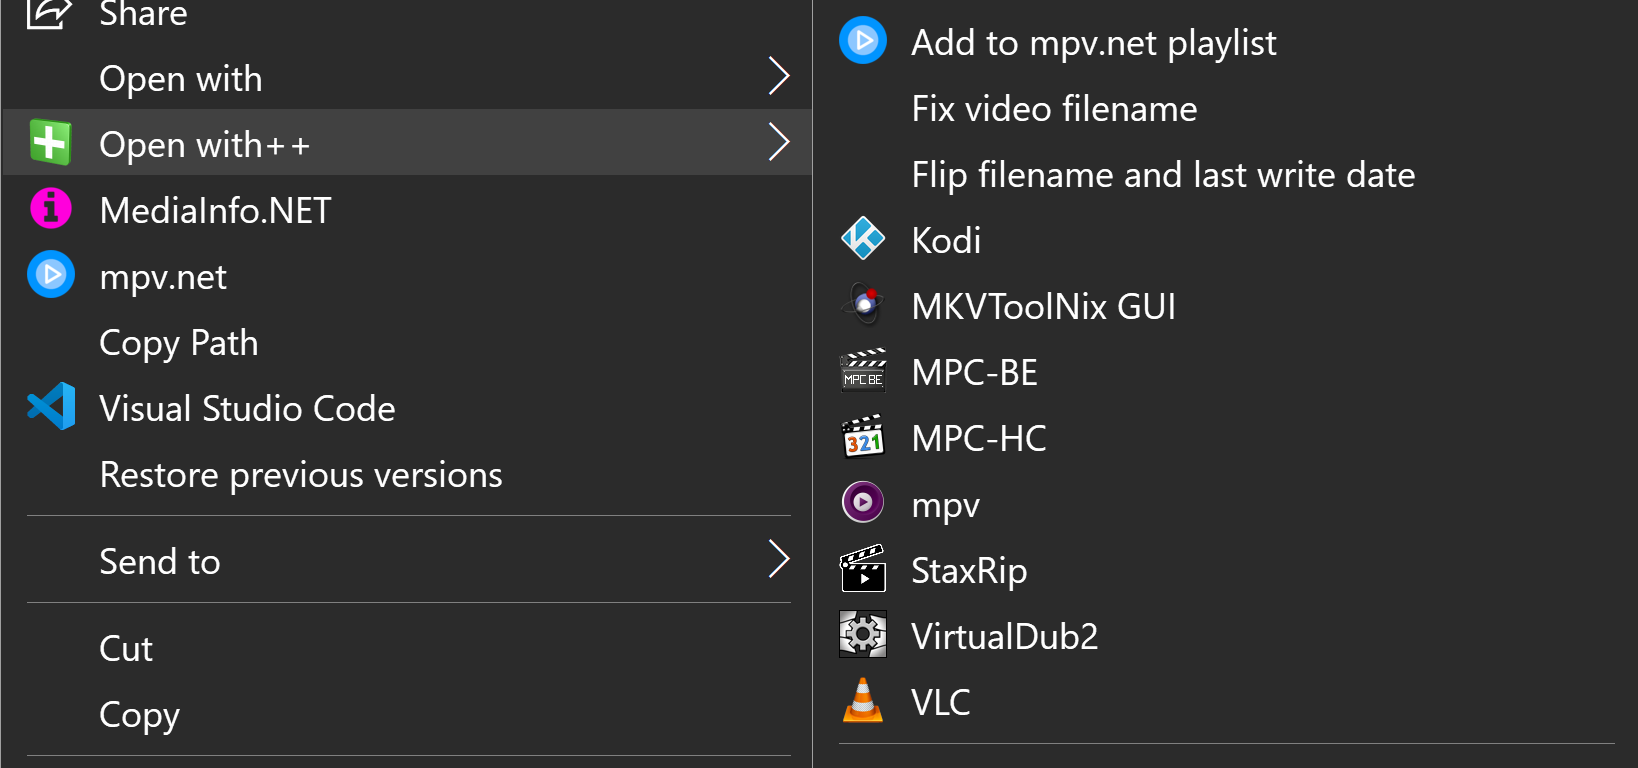
Open with++ is a shell extension that allows to add command line driven custom menu items to the Windows File Explorer context menu.
Start the application and click on the Install button in the toolbar.
Adds a new command to Open with++ menu.
Removes the selected command from Open with++ menu.
Dublicates the selected command.
Allows to define a custom settings folder and macros that are usable in the File Type property.
Installs/Uninstalls the shell extension. Uninstall requires a reboot, logout or restarting the relevant processes manually, Windows File Explorer can be restarted with the task manager. Common processes which load context menu shell extensions are Windows File Explorer and Everything.
Specifies the name of the command.
Specifies for which file types the menu is shown.
All files: *.*
txt and md: txt md
The options dialog defines macros for common file types:
W Media files: %audio% %video% %image%
Macros are only supported in the File Types property.
Specifies the program to be used for opening the selected files or folders.
Environment variables get expanded.
Specifies the arguments that are passed to the program when the command is executed. You can use the predefined variable %paths% which expands to the paths of the selected files or folders. Do not enclose the %paths% macro in quotes as Open with++ adds them automatically when the macro is expanded, each path is enclosed in double quotation marks and separated by a space.
Environment variables get expanded.
The working directory the process will use, if not specified the working directory will be set to the directory of the selected files or folders.
Environment variables get expanded.
Supported file types are ICO, EXE and DLL. EXE and DLL files can contain different icons, Open with++ will show a dialog that allows to choose which icon in the EXE or DLL file to use.
Environment variables get expanded.
IrfanView can be used to create icons.
Here is an article that shows which Windows DLLs contain icon resources.
Show in sub menu
Specifies if the menu is created on top level or as sub menu.
Show for directories
Specifies that the menu command is shown when folders or the folder background is selected.
Show only if Ctrl key is pressed
The menu item is only visible if the Control key is pressed.
Specifies that the command executes with elevated privilegs. When disabled commands can still be executed with elevated privilegs by holding down Shift key while selecting the menu command.
Runs the process with hidden window. Useful to hide terminal tools like PowerShell.
Holding down the Shift key while selecting a command from the Open with++ menu will execute the command with elevated privileges.
Path, Arguments, Working Directory and Icon support the usage of environment variables.
The location of Open with++ is available as environment variable %OpenWithPPDir%.
Visual Studio Code
Open files or a directory with Visual Studio Code.
Name: Visual Studio Code
File Types: *.*
Path: C:\Program Files\Microsoft VS Code\Code.exe
Arguments: %paths%
Show for directories: checked
Icon: C:\Program Files\Microsoft VS Code\Code.exe,0
Show media info using MediaInfo.NET.
Name: MediaInfo.NET
File Types: %audio% %video% %subtitle% %image%
Path: D:\your path here\MediaInfoNET.exe
Arguments: %paths%
Icon: D:\your path here\MediaInfoNET.exe,0
Start PowerShell at the given folder.
Name: PowerShell
Path: powershell.exe
Arguments: -nologo
Icon: C:\Windows\System32\WindowsPowerShell\v1.0\powershell.exe,0
Start CMD at the given folder.
Name: Command Prompt
Path: cmd.exe
Show in submenu: checked
Icon: cmd.exe,0
Start Windows Terminal at the given folder.
In the Windows Terminal profile settings define:
Name: Windows Terminal
Path: wt.exe
Show for directories: checked
Icon: %OpenWithPPDir%\Icons\Windows Terminal.ico
Open with++ includes a Windows Terminal ICO file, this icon can be used to create a shortcute in order to pin it to the start menu, in the shortcut settings the working directory can be set, something the original UWP start menu entry does not allow.
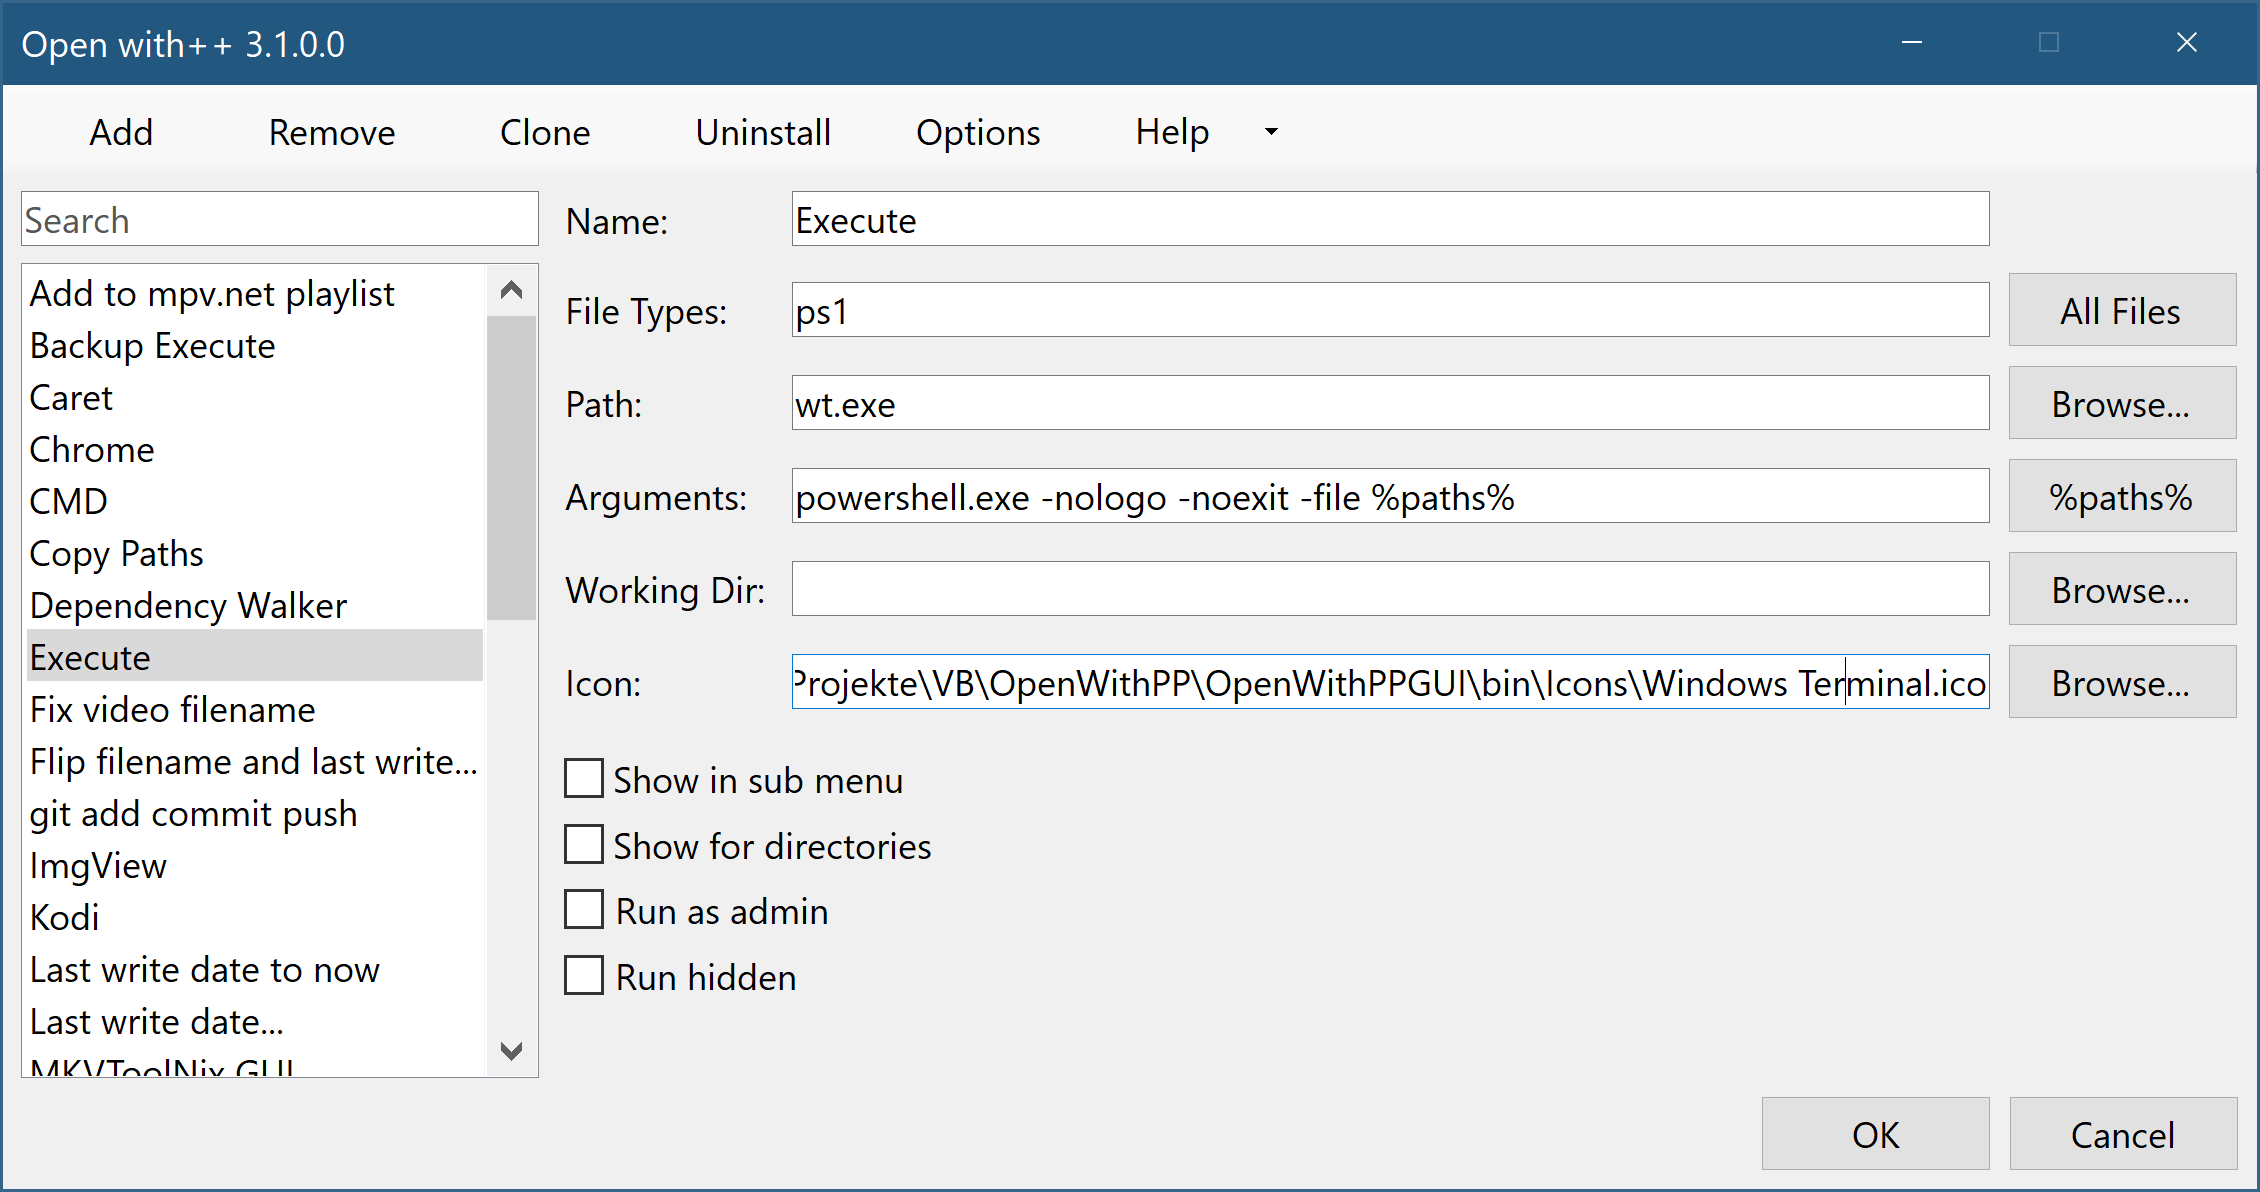
Execute PowerShell script using Windows Terminal
Name: Execute
File Types: ps1
Path: wt.exe
Arguments: — powershell.exe -NoLogo -NoExit -ExecutionPolicy Unrestricted -File %paths%
Icon: D:\Apps\OpenWithPlusPlus\Icons\Windows Terminal.ico
Copy the paths of selected files and folders to the clipboard, it can be achieved with a PowerShell one-liner:
Windows 10 icons. Where are they located? In which files and folders?
Whether you want to change the default icon of a certain folder or the icon of a shortcut you have created, you might wonder where you could find new icons. While there are lots of websites that offer custom made icon sets, you might, however, prefer to use icons that are already found on your Windows 10 computer or device. In this article, we show you where the icons are stored in Windows 10. If you want to find all the default Windows 10 icon files, read on:
How are Windows 10 icons stored?
Icons are usually stored inside ICO files. However, ICO files have a big disadvantage: they can hold only one icon. Windows 10 has lots of applications, folders, files, and shortcuts, and many of them have their unique icons. If Windows had an ICO file for each icon it uses, that would make for a considerable number of icon files.
To resolve this problem, instead of using ICO files to store icons, Windows uses DLL files. The main advantage of a DLL file is the fact that it can hold multiple icons inside. As a matter of fact, you could compare an icon DLL file with a library of icons. When you want to change the icon of a particular file, folder or shortcut, you can just set its icon location to point to a specific DLL file, and a specific icon from it.
Most icons from Windows 10 are stored inside DLL files. In the next section, we show you where these DLLs with icons are found in Windows 10.
Where are Windows 10’s default icons located?
We tried to organize our list of default Windows 10 icons, both by their DLL files location and by taking into consideration the primary purpose of the icons found inside the DLL files. Next, you can see our list of locations from Windows 10 where you find .DLL files containing icons:
The imageres.dll file contains many icons, used almost everywhere in Windows 10. It has icons for different types of folders, hardware devices, peripherals, actions, and so on.
The shell32.dll file also has lots of icons used in various parts of Windows 10. Together with imageres.dll, shell32.dll hosts one of the largest icon collections. Inside it, you can find icons for internet, devices, networks, peripherals, folders and so on.
Pifmgr.dll contains some old-style icons that were found in older versions of Windows, like Windows 95 and Windows 98. In it, you can find funny icons that depict things such as a window, a trumpet, a ball, a wizard hat, and others. 🙂
Explorer.exe has a few icons used by File Explorer and its older versions. The first icon is the default icon used by File Explorer, but the next ones were used in older Windows versions for things like printers, folders, actions, messenger apps, mail, and others.
Accessibilitycpl.dll has a set of icons that are used mainly for the accessibility features in Windows 10. It has icons with people, mouse cursors, a magnifying glass, a mouse and a keyboard, and so on.
Ddores.dll contains icons for hardware devices and resources, such as speakers, headphones, screens, computers, remotes, and gaming pads, mice and keyboards, cameras, printers and so on.
Moricons.dll is another file that contains old-style icons, used by Microsoft in old Windows versions. Most of the icons here are about MS-DOS programs, but you also have icons for old programming languages such as Turbo Pascal or FoxPro.
Mmcndmgr.dll is yet another file with vintage icons, which we believe were designed mainly for computer management related settings. Among others, it includes icons for networks, folders, authentication, time, computers, and servers.
Mmres.dll has a few icons with various audio resources, like speakers, headphones, microphones, and a webcam.
Netcenter.dll has a few icons for network related settings and features.
Netshell.dll contains icons for all kinds of network connections and associated hardware or technologies.
For instance, inside it, you can find icons for Bluetooth, wireless routers, and network connections.
Networkexplorer.dll another .dll file with a few peripherals such as phone, router, a printer or a fax machine, and some network-related icons.
Pnidui.dll has icons for network related settings (Ethernet or wireless status, network locations, etc.). Most of the icons here are transparent white, so you have to select them to see what they look like.
Sensorscpl.dll has a few icons for different kinds of sensors. While most of them look similar, their details indicate things like temperature, power, wind etc.
Setupapi.dll has icons used for the setup wizards of various hardware devices. It has screens, peripherals, hardware components, connectors and plugs, gaming pads, and others.
Wmploc.dll contains multimedia icons used for media devices, music and video files, folders, CD and DVD discs, and so on.
Wpdshext.dll has icons for some portable devices such as cameras, phones or mp3 players, and a few battery indicators.
Comstui.dll includes various classic icons from older versions of Windows.
It has icons with light bulbs, mail, printers, documents, telephones, fax machines and so on.
Ieframe.dll contains the icons used by Internet Explorer for its shortcuts, buttons and menus.
Dmdskres.dll contains icons only used for disk management.
Dsuiext.dll includes icons for network services. It has icons with servers, people, printers, office buildings, authentication services and so on.
Mstscax.dll stores just a few icons used for remote desktop connections, with computers, notifications, and security certificates.
Wiashext.dll has a few icons for various imaging hardware devices, like scanners, cameras, photo and video cameras, and a few similar icons.
Comres.dll contains a few icons that depict a user, a folder, a pencil, and some actions.
Mstsc.exe holds a few other network related icons but also includes other icons like a speaker, a microphone, and a Windows 8 logo.
26. actioncentercpl.dll, aclui.dll, autoplay.dll, comctl32.dll, xwizards.dll, ncpa.cpl, url.dll (all in %systemroot%\system32)
All these files contain icons; however, many have only one icon inside or just a few, so we decided to mention them all together. They have icons used in Windows 10’s Action Center, some error and info icons, an autoplay icon, some user icons, and websites icons.
How to use the icons stored inside a .DLL file
Icons stored inside .DLL files cannot be copied and saved elsewhere, at least not unless you use a special app that can extract icons from .DLL files. However, you can use any icon stored inside such a file, to set it as the icon used by a folder, a library or a shortcut. If you need guidance on how to change the icons associated with your shortcuts, this tutorial helps: How to change the icon of any shortcut in Windows. Just copy and paste the path we provided for the DLL that interests you, in the field named “Look for icons in this file.”
If you are not satisfied with the icons found in Windows 10, then you might want to look at other places to find icons: 7 sites where you can download free desktop icons for Windows 10.
Do you know any other DLL files with icons from Windows 10?
As you have seen, Windows 10 has lots of icon sets that are built-in. Depending on what kind of icon you need, it is a good chance that you’ll find it inside one of the DLL files that we have listed. Do you know other built-in icon locations from Windows 10? If you do, do not hesitate to share them with us, and we promise to update this article as soon as possible.
App icons and logos
Every app has an icon/logo that represents it, and that icon appears in multiple locations in the Windows shell:
This article covers the basics of creating app icons, how to use Visual Studio to manage them, and how manage them manually, should you need to.
(This article is specifically for icons that represent the app itself; for general icon guidance, see the Icons article.)
Icon types, locations, and scale factors
By default, Visual Studio stores your icon assets in an assets subdirectory. Here’s a list of the different types of icons, where they appear, and what they’re called.
| Icon name | Appears in | Asset file name |
|---|---|---|
| Small tile | Start menu | SmallTile.png |
| Medium tile | Start menu, Microsoft Store listing* | Square150x150Logo.png |
| Wide tile | Start menu | Wide310x150Logo.png |
| Large tile | Start menu, Microsoft Store listing* | LargeTile.png |
| App icon | App list in start menu, task bar, task manager | Square44x44Logo.png |
| Splash screen | The app’s splash screen | SplashScreen.png |
| Badge logo | Your app’s tiles | BadgeLogo.png |
| Package logo/Store logo | App installer, Partner Center, the «Report an app» option in the Store, the «Write a review» option in the Store | StoreLogo.png |
To ensure these icons look sharp on every screen, you can create multiple versions of the same icon for different display scale factors.
The scale factor determines the size of UI elements, such as text. Scale factors range from 100% to 400%. Larger values create larger UI elements, making them easier to see on high-DPI displays.
Windows automatically sets the scale factor for each display based on its DPI (dots-per-inch) and the viewing distance of the device. (Users can override the default value by going to the Settings > Display > Scale and layout page.)
Because app icon assets are bitmaps and bitmaps don’t scale well, we recommend providing a version each icon asset for each scale factor: 100%, 125%, 150%, 200%, and 400%. That’s a lot of icons! Fortunately, Visual Studio provides a tool that makes it easy to generate and update these icons.
Microsoft Store listing image
«How do I specify images for my app’s listing in the Microsoft Store?»
By default, we use some of the images from your packages in the Store, as described in the table at the top of this page (along with other images that you provide during the submission process). However, you have the option to prevent the Store from using the logo images in your app’s packages when displaying your listing to customers on Windows 10 (including Xbox), and instead have the Store use only images that you upload. This gives you more control over your app’s appearance in various displays throughout the Store. (Note that if your product supports earlier OS versions, those customers may still see images from your packages, even if you use this option.) You can do this in the Store logos section of the Store listing step of the submission process.
When you check this box, a new section called Store display images appears. Here, you can upload 3 image sizes that the Store will use in place of logo images from your app’s packages: 300 x 300, 150 x 150, and 71 x 71 pixels. Only the 300 x 300 size is required, although we recommend providing all 3 sizes.
Managing app icons with the Visual Studio Manifest Designer
Visual Studio provides a very useful tool for managing your app icons called the Manifest Designer.
If you don’t already have Visual Studio 2019, there are several versions available, including a free version, (Visual Studio 2019 Community Edition), and the other versions offer free trials. You can download them here: https://developer.microsoft.com/windows/downloads
To launch the Manifest Designer:
- Use Visual Studio to open a UWP project.
- In the Solution Explorer, double-click the Package.appmxanifest file.
Visual Studio displays the Manifest Designer.
- Click the Visual Assets tab.
Generating all assets at once
The first menu item in the Visual Assets tab, All Visual Assets, does exactly what its name suggests: generates every visual asset your app needs with the press of a button.
All you need to do is supply a single image, and Visual Studio will generate the small tile, medium tile, large tile, wide tile, large tile, app icon, splash screen, and package logo assets for every scale factor.
To generate all assets at once:
Click the . next to the Source field and select the image you want to use. If you’re using a bitmap image, make sure it’s at least 400 by 400 pixels so that you get sharp results. Vector-based images work best; Visual Studio lets you use AI (Adobe Illustrator) and PDF files.
(Optional.) In the Display Settings section, configure these options:
a. Short name: Specify a short name for your app.
b. Show name: Indicate whether you want to display the short name on medium, wide, or large tiles.
c. Tile background: Specify the hex value or a color name for the tile background color. For example, #464646 . The default value is transparent .
d. Spash screen background: Specify the hex value or color name for the spash screen background.
Click Generate.
Visual Studio generates your image files and adds them to project. If you want to change your assets, simply repeat the process.
Scaled icon assets follow this file naming convention:
Square150x150Logo-scale-100.png, Square150x150Logo-scale-200.png, Square150x150Logo-scale-400.png
Notice that Visual Studio doesn’t generate a badge logo by default. That’s because your badge logo is unique and probably shouldn’t match your other app icons. For more info, see the Badge notifications for Windows apps article.
More about app icon assets
Visual Studio will generate all the app icon assets required by your project, but if you’d like to customize them, it helps to understand how they’re different from other app assets.
The app icon asset appears in a lot of places: the Windows taskbar, the task view, ALT+TAB, and the lower-right corner of Start tiles. Because the app icon asset appears in so many places, it has some additional sizing and plating options the other assets don’t have: «target-size» assets and «unplated» assets.
Target-size app icon assets
In addition to the standard scale factor sizes («Square44x44Logo.scale-400.png»), we also recommend creating «target-size» assets. We call these assets target-size because they target specific sizes, such as 16 pixels, rather than specific scale factors, such as 400. Target-size assets are for surfaces that don’t use the scaling plateau system:
- Start jump list (desktop)
- Start lower corner of tile (desktop)
- Shortcuts (desktop)
- Control Panel (desktop)
Here’s the list of target-size assets:
| Asset size | File name example |
|---|---|
| 16×16* | Square44x44Logo.targetsize-16.png |
| 24×24* | Square44x44Logo.targetsize-24.png |
| 32×32* | Square44x44Logo.targetsize-32.png |
| 48×48* | Square44x44Logo.targetsize-48.png |
| 256×256* | Square44x44Logo.targetsize-256.png |
| 20×20 | Square44x44Logo.targetsize-20.png |
| 30×30 | Square44x44Logo.targetsize-30.png |
| 36×36 | Square44x44Logo.targetsize-36.png |
| 40×40 | Square44x44Logo.targetsize-40.png |
| 60×60 | Square44x44Logo.targetsize-60.png |
| 64×64 | Square44x44Logo.targetsize-64.png |
| 72×72 | Square44x44Logo.targetsize-72.png |
| 80×80 | Square44x44Logo.targetsize-80.png |
| 96×96 | Square44x44Logo.targetsize-96.png |
* At a minimum, we recommend providing these sizes.
You don’t have to add padding to these assets; Windows adds padding if needed. These assets should account for a minimum footprint of 16 pixels.
Here’s an example of these assets as they appear in icons on the Windows taskbar:

Unplated assets
By default, Windows uses a target-based asset on top of a colored backplate by default. If you want, you can provide a target-based unplated asset. «Unplated» means the asset will be displayed on a transparent background. Keep in mind that these assets will appear over a variety of background colors.

Here are the surfaces that use unplated app icon assets:
- Taskbar and taskbar thumbnail (desktop)
- Taskbar jumplist
- Task view
- ALT+TAB
Unplated assets and themes
The user’s selected theme determines the color of the taskbar. If the unplated asset isn’t specifically qualified for the current theme, the system checks the asset for contrast. If it has enough contrast with taskbar, the system uses it. Otherwise, the system looks for a high-contrast version of the asset. If it can’t find one, the system draws the plated form of the asset instead.
Target and unplated sizing
Here are the size recommendations for target-based assets, at 100% scale:

More about splash screen assets
For more info about splash screens, see Windows app splash screens.
More about badge logo assets
When you use the asset generator to generate all the assets you need, there’s a reason why it doesn’t generate badge logos by default: they’re very different from other app assets. The badge logo is a status image that appears in notifications and on the app’s tiles.
Customizing asset padding
By default, Visual Studio asset generator applies recommended padding to whatever image. If your images already contain padding or you want full bleed images that extend to the end of the tile, you can turn this feature off by unchecking the Apply recommended padding check box.
Tile padding recommendations
If you want to provide your own padding, here are our recommendations for tiles.
There are 4 tile sizes: small (71 x 71), medium (150 x 150), wide (310 x 150), and large (310 x 310).
Each tile asset is the same size as the tile on which it is placed.
If you don’t want your icon to extend to the edge of the tile, you can use transparent pixels in your asset to create padding.

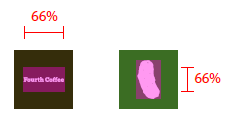
For small tiles, limit the icon width and height to 66% of the tile size:
For medium tiles, limit the icon width to 66% and height to 50% of tile size. This prevents overlapping of elements in the branding bar:

For wide tiles, limit the icon width to 66% and height to 50% of tile size. This prevents overlapping of elements in the branding bar:

For large tiles, limit the icon width to 66% and height to 50% of tile size:

Some icons are designed to be horizontally or vertically oriented, while others have more complex shapes that prevent them from fitting squarely within the target dimensions. Icons that appear to be centered can be weighted to one side. In this case, parts of an icon may hang outside the recommended footprint, provided it occupies the same visual weight as a squarely fitted icon:

With full-bleed assets, take into account elements that interact within the margins and edges of the tiles. Maintain margins of at least 16% of the height or width of the tile. This percentage represents double the width of the margins at the smallest tile sizes:

In this example, margins are too tight:

Optimizing for specific themes, languages, and other conditions
This article described how to create assets for specific scale factors, but you can also create assets for a wide variety of conditions and combinations of conditions. For example, you can can create icons for high contrast displays or for the light themes and dark themes. You can even create assets for specific languages.


