- Preview: Azure Image Builder overview
- Preview features
- Regions
- OS support
- How it works
- Move Support
- Permissions
- Costs
- Hyper-V generation
- Next steps
- Image Builder Wizard
- Предварительная версия: создание виртуальной машины Windows с помощью Azure Image Builder с использованием PowerShell Preview: Create a Windows VM with Azure Image Builder using PowerShell
- Предварительные требования Prerequisites
- Использование Azure Cloud Shell Use Azure Cloud Shell
- Регистрация функций Register features
- Определение переменных Define variables
- Создание группы ресурсов Create a resource group
- Создание удостоверений пользователей и задание разрешений роли Create user identity and set role permissions
- Назначение разрешений удостоверению для распространения образов Assign permissions for identity to distribute images
- Создание Общей коллекции образов. Create a Shared Image Gallery
- Создание образа Create an image
- Запуск сборки образа Start the image build
- Создание виртуальной машины Create a VM
- Проверка настроек Verify the customizations
- Очистка ресурсов Clean up resources
- Удаление шаблона построителя образов Delete the image builder template
- Удаление группы ресурсов образа Delete the image resource group
- Дальнейшие действия Next steps
Preview: Azure Image Builder overview
Standardized virtual machine (VM) images allow organizations to migrate to the cloud and ensure consistency in the deployments. Images typically include predefined security and configuration settings and necessary software. Setting up your own imaging pipeline requires time, infrastructure and setup, but with Azure VM Image Builder, just provide a configuration describing your image, submit it to the service, and the image is built, and distributed.
The Azure VM Image Builder (Azure Image Builder) lets you start with a Windows or Linux-based Azure Marketplace image, existing custom images and begin to add your own customizations. Because the Image Builder is built on HashiCorp Packer you will see some similarities, but have the benefit of a managed service. You can also specify where you would like your images hosted, in the Azure Shared Image Gallery, as a managed image or a VHD.
Azure Image Builder is currently in public preview. This preview version is provided without a service level agreement, and it’s not recommended for production workloads. Certain features might not be supported or might have constrained capabilities. For more information, see Supplemental Terms of Use for Microsoft Azure Previews.
Preview features
For the preview, these features are supported:
- Creation of baseline images, that includes your minimum security and corporate configurations, and allow departments to customize it further.
- Integration of core applications, so VM can take on workloads after creation, or add configurations to support Windows Virtual Desktop images.
- Patching of existing images, Image Builder will allow you to continually patch existing custom images.
- Connect image builder to your existing virtual networks, so you can connect to existing configuration servers (DSC, Chef, Puppet etc.), file shares, or any other routable servers/services.
- Integration with the Azure Shared Image Gallery, allows you to distribute, version, and scale images globally, and gives you an image management system.
- Integration with existing image build pipelines, just call Image Builder from your pipeline, or use the simple Preview Image Builder Azure DevOps Task.
- Migrate an existing image customization pipeline to Azure. Use your existing scripts, commands, and processes to customize images.
- Creation of images in VHD format to support Azure Stack.
Regions
The Azure Image Builder Service will be available for preview in these regions. Images can be distributed outside of these regions.
- East US
- East US 2
- West Central US
- West US
- West US 2
- North Europe
- West Europe
OS support
AIB will support Azure Marketplace base OS images:
- Ubuntu 18.04
- Ubuntu 16.04
- RHEL 7.6, 7.7
- CentOS 7.6, 7.7
- SLES 12 SP4
- SLES 15, SLES 15 SP1
- Windows 10 RS5 Enterprise/Enterprise multi-session/Professional
- Windows 2016
- Windows 2019
How it works
The Azure VM Image Builder is a fully managed Azure service that is accessible by an Azure resource provider. Provide a configuration to the service that specifies the source image, customization to perform and where the new image is to be distributed to, the diagram below shows a high level workflow:

Template configurations can be passed using PowerShell, Az CLI, ARM templates and using the Azure VM Image Builder DevOps task, when you submit it to the service we will create an Image Template Resource. When the Image Template Resource is created you will see a staging resource group created in your subscription, in the format: IT_ (GUID). The staging resource group contains files and scripts referenced in the File, Shell, PowerShell customization in the ScriptURI property.
To run the build you will invoke Run on the Image Template resource, the service will then deploy additional resources for the build, such as a VM, Network, Disk, Network Adapter etc. If you build an image without using an existing VNET Image Builder will also deploy a Public IP and NSG, the service connects to the build VM using SSH or WinRM. If you select an existing VNET, then the service will deploy using Azure Private Link, and a Public IP address is not required, for more details on Image Builder networking review the details.
When the build finishes all resources will be deleted, except for the staging resource group and the storage account, to remove these you will delete the Image Template resource, or you can leave them there to run the build again.
There are multiple examples and step by step guides in this documentation, which reference configuration templates and solutions in the Azure Image Builder GitHub repository.
Move Support
The image template resource is immutable and contains links to resources and the staging resource group, therefore the resource type does not support being moved. If you wish to move the image template resource, ensure you have a copy of the configuration template (extract the existing configuration from the resource if you don’t have it), create a new image template resource in the new resource group with a new name and delete the previous image template resource.
Permissions
When you register for the (AIB), this grants the AIB Service permission to create, manage and delete a staging resource group (IT_*), and have rights to add resources to it, that are required for the image build. This is done by an AIB Service Principal Name (SPN) being made available in your subscription during a successful registration.
To allow Azure VM Image Builder to distribute images to either the managed images or to a Shared Image Gallery, you will need to create an Azure user-assigned identity that has permissions to read and write images. If you are accessing Azure storage, then this will need permissions to read private and public containers.
Permissions are explained in more detail for PowerShell, and AZ CLI.
Costs
You will incur some compute, networking and storage costs when creating, building and storing images with Azure Image Builder. These costs are similar to the costs incurred in manually creating custom images. For the resources, you will be charged at your Azure rates.
During the image creation process, files are downloaded and stored in the IT_ _ resource group, which will incur a small storage costs. If you do not want to keep these, delete the Image Template after the image build.
Image Builder creates a VM using a D1v2 VM size, and the storage, and networking needed for the VM. These resources will last for the duration of the build process, and will be deleted once Image Builder has finished creating the image.
Azure Image Builder will distribute the image to your chosen regions, which might incur network egress charges.
Hyper-V generation
Image Builder currently only natively supports creating Hyper-V generation (Gen1) 1 images to the Azure Shared Image Gallery (SIG) or Managed Image.
Next steps
To try out the Azure Image Builder, see the articles for building Linux or Windows images.
Image Builder Wizard
To create an image:
1. Specify an image file name.
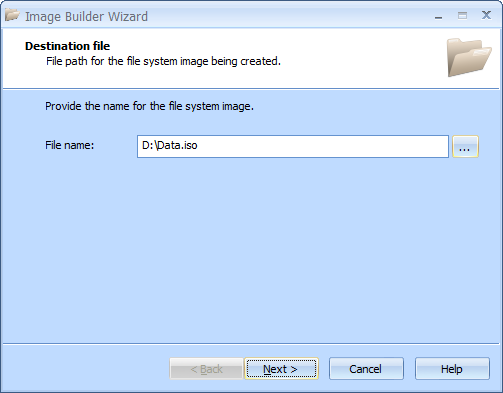
2. Click Next to continue.
3. Select a type of the file system. The default file system type is ISO9660 + Joliet extensions . Other available file systems are ISO 9660 Level 1 , ISO 9660 Level 2 and UDF .
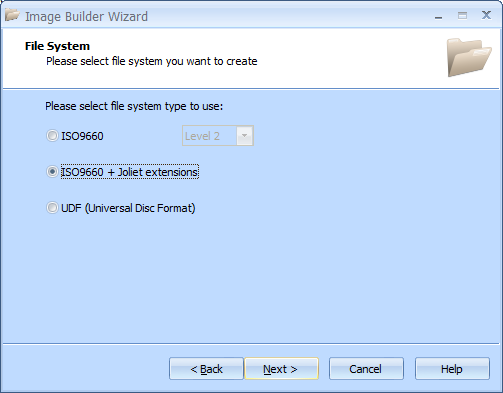
4. Click Next to continue.
5. If you need to create a bootable disc, select the appropriate checkbox and provide the required data.
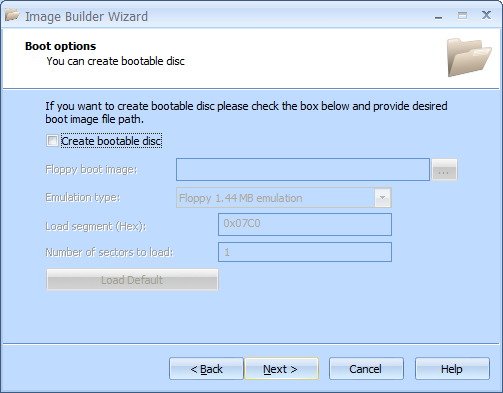
6. Click Next to continue.
7. Create a list of files and directories to burn using the drag-and-drop method.
Note: The default disc label is New . To change a disc label, either right-click the disc root and select Rename, or click the disc root and then click F2 .
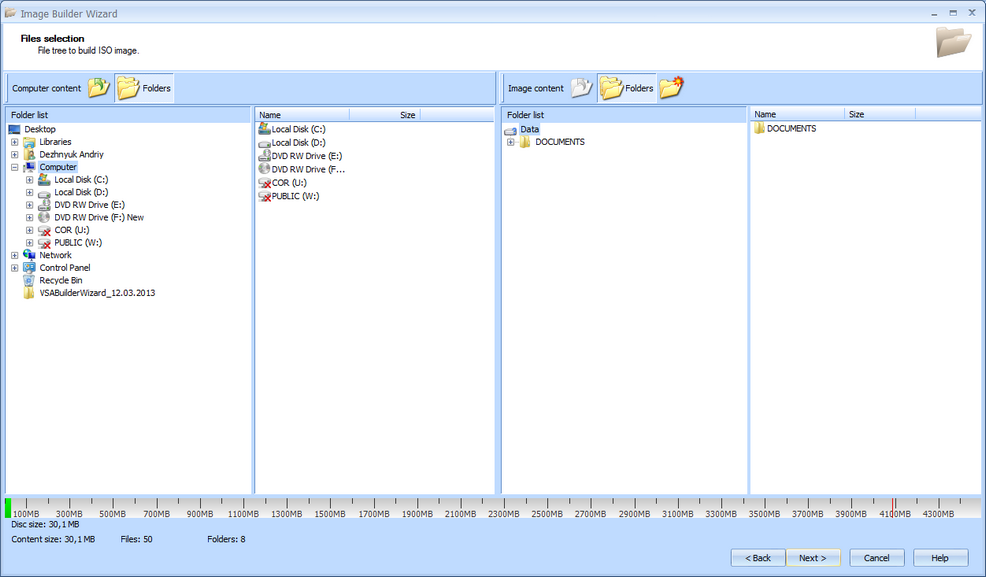
8. Click Next to continue.
9. Review the Options Summary page and make sure all options are correct. Click Back to make any changes on previous pages.

10. Click Next to start creation an image file.
11. Wait until image file creation is completed.
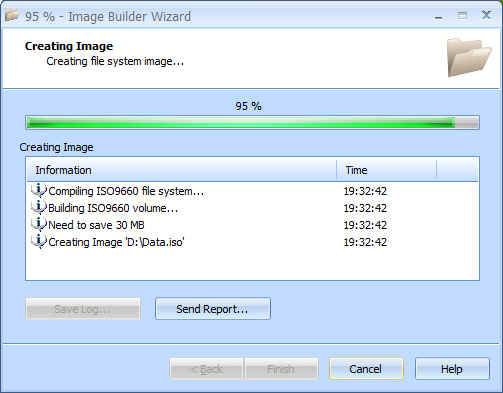
12. When the image file is created, you can save the log if needed.
Note: Click Save Log to save the current operation log. If there are any burning problems, use the Send Report options to send a failed operation log to the support team.
Предварительная версия: создание виртуальной машины Windows с помощью Azure Image Builder с использованием PowerShell Preview: Create a Windows VM with Azure Image Builder using PowerShell
В этой статье показано, как создать настраиваемый образ Windows с помощью модуля PowerShell для сборщика образов виртуальных машин Azure. This article demonstrates how you can create a customized Windows image using the Azure VM Image Builder PowerShell module.
Конструктор образов Azure сейчас поддерживается в общедоступной предварительной версии. Azure Image Builder is currently in public preview. Эта предварительная версия предоставляется без соглашения об уровне обслуживания. This preview version is provided without a service level agreement. Эта версия не рекомендуется для использования с рабочими нагрузками в производственной среде. It’s not recommended for production workloads. Некоторые функции могут не поддерживаться или их возможности могут быть ограничены. Certain features might not be supported or might have constrained capabilities. Дополнительные сведения см. в статье Дополнительные условия использования предварительных выпусков Microsoft Azure. For more information, see Supplemental Terms of Use for Microsoft Azure Previews.
Предварительные требования Prerequisites
Если у вас еще нет подписки Azure, создайте бесплатную учетную запись Azure, прежде чем начинать работу. If you don’t have an Azure subscription, create a free account before you begin.
Если вы решили использовать PowerShell локально, для работы с этой статьей установите модуль PowerShell Az и подключитесь к учетной записи Azure с помощью командлета Connect-AzAccount. If you choose to use PowerShell locally, this article requires that you install the Az PowerShell module and connect to your Azure account using the Connect-AzAccount cmdlet. См. сведения об установке модуля Azure PowerShell. For more information about installing the Az PowerShell module, see Install Azure PowerShell.
Хотя модули PowerShell AZ. имажебуилдер и AZ. манажедсервицеидентити доступны в предварительной версии, их необходимо установить отдельно с помощью Install-Module командлета с AllowPrerelease параметром. While the Az.ImageBuilder and Az.ManagedServiceIdentity PowerShell modules are in preview, you must install them separately using the Install-Module cmdlet with the AllowPrerelease parameter. После того как эти модули PowerShell станут общедоступными, они становятся частью будущих выпусков AZ PowerShell и доступны в рамках Azure Cloud Shell. Once these PowerShell modules become generally available, they become part of future Az PowerShell module releases and available natively from within Azure Cloud Shell.
Использование Azure Cloud Shell Use Azure Cloud Shell
В Azure есть Azure Cloud Shell, интерактивная оболочка среды, с которой можно работать в браузере. Azure hosts Azure Cloud Shell, an interactive shell environment that you can use through your browser. Для работы со службами Azure можно использовать Bash или PowerShell с Cloud Shell. You can use either Bash or PowerShell with Cloud Shell to work with Azure services. Для запуска кода из этой статьи можно использовать предварительно установленные команды Cloud Shell. Ничего дополнительного в локальной среде устанавливать не нужно. You can use the Cloud Shell preinstalled commands to run the code in this article without having to install anything on your local environment.
Начало работы с Azure Cloud Shell To start Azure Cloud Shell:
| Параметр Option | Пример и ссылка Example/Link |
|---|---|
| Нажмите кнопку Попробовать в правом верхнем углу блока с кодом. Select Try It in the upper-right corner of a code block. При нажатии кнопки Попробовать код не копируется в Cloud Shell автоматически. Selecting Try It doesn’t automatically copy the code to Cloud Shell. |  |
| Перейдите по адресу https://shell.azure.com или нажмите кнопку Запуск Cloud Shell, чтобы открыть Cloud Shell в браузере. Go to https://shell.azure.com, or select the Launch Cloud Shell button to open Cloud Shell in your browser. |  |
| Нажмите кнопку Cloud Shell в строке меню в правом верхнем углу окна портала Azure. Select the Cloud Shell button on the menu bar at the upper right in the Azure portal. |  |
Чтобы выполнить код из этой статьи в Azure Cloud Shell, выполните следующие действия: To run the code in this article in Azure Cloud Shell:
Запустите Cloud Shell. Start Cloud Shell.
В блоке кода нажмите кнопку Копировать, чтобы скопировать код. Select the Copy button on a code block to copy the code.
Вставьте код в окно сеанса Cloud Shell, нажав клавиши CTRL+SHIFT+V в Windows и Linux или CMD+SHIFT+V в macOS. Paste the code into the Cloud Shell session by selecting Ctrl+Shift+V on Windows and Linux or by selecting Cmd+Shift+V on macOS.
Нажмите клавишу ВВОД, чтобы выполнить код. Select Enter to run the code.
Если вы используете несколько подписок Azure, выберите ту, за ресурсы в которой будут выставляться счета. If you have multiple Azure subscriptions, choose the appropriate subscription in which the resources should be billed. Выберите требуемую подписку с помощью командлета Set-AzContext. Select a specific subscription using the Set-AzContext cmdlet.
Регистрация функций Register features
Если вы впервые используете Azure Image Builder во время предварительной версии, зарегистрируйте новую функцию виртуалмачинетемплатепревиев . If this is your first time using Azure image builder during the preview, register the new VirtualMachineTemplatePreview feature.
Проверьте состояние регистрации функции. Check the status of the feature registration.
RegistrationState может находиться в состоянии в Registering течение нескольких минут до перехода на Registered . The RegistrationState may be in the Registering state for several minutes before changing to Registered . Прежде чем продолжить, подождите, пока состояние не будет зарегистрировано . Wait until the status is Registered before continuing.
Зарегистрируйте следующие поставщики ресурсов для использования с подпиской Azure, если они еще не зарегистрированы. Register the following resource providers for use with your Azure subscription if they aren’t already registered.
- Microsoft.Compute; Microsoft.Compute
- Microsoft.KeyVault Microsoft.KeyVault
- Microsoft.Storage; Microsoft.Storage
- Microsoft.Network. Microsoft.Network
- Microsoft.VirtualMachineImages Microsoft.VirtualMachineImages
Определение переменных Define variables
Некоторый фрагменты данных будут многократно использоваться. You’ll be using several pieces of information repeatedly. Создайте переменные для хранения информации. Create variables to store the information.
Создайте переменную для идентификатора подписки Azure. Create a variable for your Azure subscription ID. Чтобы убедиться, что subscriptionID переменная содержит идентификатор подписки, можно выполнить вторую строку в следующем примере. To confirm that the subscriptionID variable contains your subscription ID, you can run the second line in the following example.
Создание группы ресурсов Create a resource group
Создайте группу ресурсов Azure с помощью командлета New-AzResourceGroup. Create an Azure resource group using the New-AzResourceGroup cmdlet. Группа ресурсов — это логический контейнер, в котором ресурсы Azure развертываются и администрируются как группа. A resource group is a logical container in which Azure resources are deployed and managed as a group.
В следующем примере создается группа ресурсов на основе имени в переменной $imageResourceGroup в регионе, указанном в переменной $location . The following example creates a resource group based on the name in the $imageResourceGroup variable in the region specified in the $location variable. Эта группа ресурсов используется для хранения артефакта шаблона конфигурации образа и образа. This resource group is used to store the image configuration template artifact and the image.
Создание удостоверений пользователей и задание разрешений роли Create user identity and set role permissions
Предоставьте разрешения Azure Image Builder для создания образов в указанной группе ресурсов, используя следующий пример. Grant Azure image builder permissions to create images in the specified resource group using the following example. Без этого разрешения процесс сборки образа не будет выполнен успешно. Without this permission, the image build process won’t complete successfully.
Создайте переменные для определения роли и имен удостоверений. Create variables for the role definition and identity names. Эти значения должны быть однозначными. These values must be unique.
Создайте удостоверение пользователя. Create a user identity.
Сохраните идентификаторы ресурса удостоверения и субъекта в переменных. Store the identity resource and principal IDs in variables.
Назначение разрешений удостоверению для распространения образов Assign permissions for identity to distribute images
Скачайте файл конфигурации. JSON и измените его в соответствии с параметрами, определенными в этой статье. Download .json config file and modify it based on the settings defined in this article.
Создайте определение роли. Create the role definition.
Предоставьте определение роли для субъекта-службы Image Builder. Grant the role definition to the image builder service principal.
Если появится сообщение об ошибке: «New-азроледефинитион: превышен предел определения роли. Невозможно создать дополнительные определения ролей. см. раздел Устранение неполадок в Azure RBAC. If you receive the error: «New-AzRoleDefinition: Role definition limit exceeded. No more role definitions can be created.«, see Troubleshoot Azure RBAC.
Создание Общей коллекции образов. Create a Shared Image Gallery
Создайте галерею. Create the gallery.
Создайте определение галереи. Create a gallery definition.
Создание образа Create an image
Создайте исходный объект построителя образов Azure. Create an Azure image builder source object. Допустимые значения параметров см. в статье Поиск образов виртуальных машин Windows в Azure Marketplace с помощью Azure PowerShell . See Find Windows VM images in the Azure Marketplace with Azure PowerShell for valid parameter values.
Создайте объект распространителя Azure Image Builder. Create an Azure image builder distributor object.
Создайте объект настройки построителя образов Azure. Create an Azure image builder customization object.
Создайте второй объект настройки построителя образов Azure. Create a second Azure image builder customization object.
Создайте шаблон Azure Image Builder. Create an Azure image builder template.
По завершении возвращается сообщение и создается шаблон конфигурации построителя изображений в $imageResourceGroup . When complete, a message is returned and an image builder configuration template is created in the $imageResourceGroup .
Чтобы определить успешность процесса создания шаблона, можно использовать следующий пример. To determine if the template creation process was successful, you can use the following example.
В фоновом режиме построитель образов также создает промежуточную группу ресурсов в подписке. In the background, image builder also creates a staging resource group in your subscription. Эта группа ресурсов используется для сборки образа. This resource group is used for the image build. Он имеет формат: IT_ _ . It’s in the format: IT_ _ .
Не удаляйте промежуточную группу ресурсов напрямую. Do not delete the staging resource group directly. Удаление артефакта шаблона образа приведет к удалению промежуточной группы ресурсов. Delete the image template artifact, this will cause the staging resource group to be deleted.
Если служба сообщает о сбое во время отправки шаблона конфигурации образа: If the service reports a failure during the image configuration template submission:
- См. раздел Устранение неполадок сборки образа виртуальной машины Azure (AIB). See Troubleshooting Azure VM Image Build (AIB) Failures.
- Удалите шаблон, используя следующий пример, прежде чем повторять попытку. Delete the template using the following example before you retry.
Запуск сборки образа Start the image build
Отправьте конфигурацию образа в службу «Построитель образов виртуальных машин». Submit the image configuration to the VM image builder service.
Дождитесь завершения процесса сборки образа. Wait for the image build process to complete. Этот шаг может занять до часа. This step could take up to an hour.
Создание виртуальной машины Create a VM
Сохраните в переменной учетные данные входа для виртуальной машины. Store login credentials for the VM in a variable. Пароль должен быть сложным. The password must be complex.
Создайте виртуальную машину с помощью созданного образа. Create the VM using the image you created.
Проверка настроек Verify the customizations
Подключитесь к виртуальной машине через подключение к удаленному рабочему столу, используя имя пользователя и пароль, заданные при создании виртуальной машины. Create a Remote Desktop connection to the VM using the username and password you set when you created the VM. В виртуальной машине откройте PowerShell и выполните команду Get-Content , как показано в следующем примере: Inside the VM, open PowerShell and run Get-Content as shown in the following example:
Вы должны увидеть выходные данные на основе содержимого файла, созданного в процессе настройки образа. You should see output based on the contents of the file created during the image customization process.
В том же сеансе PowerShell убедитесь, что вторая настройка успешно завершена, проверив наличие файла, c:\buildArtifacts\index.html как показано в следующем примере: From the same PowerShell session, verify that the second customization completed successfully by checking for the presence of the file c:\buildArtifacts\index.html as shown in the following example:
Результатом должно быть список каталогов, в котором показан файл, скачанный в процессе настройки образа. The result should be a directory listing showing the file downloaded during the image customization process.
Очистка ресурсов Clean up resources
Если созданные при работе с этой статьей ресурсы не нужны, их можно удалить с помощью команды из следующего примера. If the resources created in this article aren’t needed, you can delete them by running the following examples.
Удаление шаблона построителя образов Delete the image builder template
Удаление группы ресурсов образа Delete the image resource group
Следующий пример удаляет указанную группу ресурсов и все содержащиеся в ней ресурсы. The following example deletes the specified resource group and all resources contained within it. Если в указанной группе ресурсов существуют другие ресурсы, кроме созданных для этой статьи, они также будут удалены. If resources outside the scope of this article exist in the specified resource group, they will also be deleted.
Дальнейшие действия Next steps
Дополнительные сведения о компонентах JSON, использованных в этой статье, см. в разделе Справочник по шаблонам для Image Builder. To learn more about the components of the .json file used in this article, see Image builder template reference.


