Для демонстрации возможностей поиска в базе Animal-ID, вы можете ввести тестовый номер чипа: 643094100156084.
В данном разделе Вы можете скачать драйверы необходимые для корректной работы локальной программы Animal-id, а так же других програмных продуктов поставляемых торговлй группой Globalvet.
Обращаем Ваше внимание на то, что предоставляемый инсталлятор локальной программы при установке автоматически запросит все необходимые файлы, драйвера, надстройки и оболочки.
Пожалуйста, если Вы не уверены, либо не знаете точно какие из ниже предложенных файлов Вам нужны — обратитесь в службу технической поддержки портала Animal-ID.RU по e-mail: info@animal-id.ru
Microsoft .NET Framework 4 (веб-установщик)
Пакет веб-установщика клиентского профиля Microsoft .NET Framework 4 загружает и устанавливает компоненты .NET Framework, необходимые для выполнения на приложения с учетом архитектуры процессора и ОС, для которых оно предназначено. В течение установки необходимо наличие подключения к Интернету. .NET Framework 4 требуется для выполнения и разработки приложений, предназначенных для .NET Framework 4.
Сведения:
Версия: 4
Дата выпуска: 21.02.2011
Имя файла: dotNetFx40_Full_setup.exe
Размер файла: 869 KB
Требования к системе:
Поддерживаемая операционная система Windows 7; Windows 7 Service Pack 1; Windows Server 2003 Service Pack 2; Windows Server 2008; Windows Server 2008 R2; Windows Server 2008 R2 SP1; Windows Vista Service Pack 1; Windows XP Service Pack 3;
Поддерживаемая архитектура х86; х64; ia64 (некоторые возможности не поддерживаются на ia64, например WPF);
Аппаратные требования Рекомендуемый минимум: процессор Pentium с тактовой частотой 1 ГГц или выше, 512 МБ оперативной памяти или больше; Минимальное место на диске: x86 – 850 МБ; x64 – 2 ГБ;
Предварительные требования Установщик Windows 3.1 или более поздней версии; Internet Explorer 5.01 или более поздней версии
Компонент Windows Imaging (WIC) обеспечивает работу приложений с функциями WIC, предназначенных для отображения и редактирования любых форматов изображений, для которых установлен WIC-совместимый кодек, а также записывать метаданные в файлы изображений и читать их.
Сведения:
Версия: 1.0
Дата выпуска: 23.11.2009
Имя файла: wic_x86_rus.exe (для х86); wic_x64_rus.exe (для х64);
Размер файла: 1.2 MB (для х86); 1.8 MB (для х64);
Требования к системе:
Поддерживаемая операционная система (для х86) Windows Server 2003; Windows Server 2003 R2 Datacenter Edition (32-Bit x86); Windows Server 2003 R2 Enterprise Edition (32-Bit x86); Windows Server 2003 R2 Standard Edition (32-bit x86); Windows XP Service Pack 2; (для х64) Windows Server 2003 R2 Datacenter x64 Edition; Windows Server 2003 R2 Enterprise x64 Edition; Windows Server 2003 R2 Standard x64 Edition ; Windows Server 2003 x64 editions; Windows XP 64-bit; Windows XP Professional x64 Edition;
Поддерживаемая архитектура х86; х64;
Компонент Windows Imaging поддерживает обнаружение новых особых форматов изображений (например, RAW). Любое приложение, которое использует компонент WIC, может использовать новые форматы изображений, пока на компьютере для них установлены кодеки (кодировщики / декодеры). Компонент WIC включает в себя кодеки для форматов JPEG, TIFF, GIF, PNG и BMP, более надежные, чем предыдущие версии кодеков для этих форматов, а также поддерживает высокопроизводительный формат Windows Media Photo. Кроме этого, компонент WIC содержит средства чтения и записи метаданных, а также позволяет приложениям сохранять свои собственные метаданные в файлах изображений, чтобы не создавать дополнительных файлов.
Обеспечивает корректную передачу данных от ручного сканера ANIMAL-ID FX-PET к компьютеру через USB порт. Поставляется в составе программного обеспечения со сканером.
Сведения:
Версия: 1.16
Дата выпуска: 08.04.2010
Имя файла: PL2303_Prolific_DriverInstaller_v1210.exe;
Размер файла: 3.02 MB;
Требования к системе:
Поддерживаемая операционная система Windows Server 2003; Windows XP Service Pack 3;
Поддерживаемая архитектура х86; х64;
Драйвер COM порта Universal II
Обеспечивает корректную передачу данных от ручного сканера ANIMAL-ID Universal II к компьютеру через COM порт. Поставляется в составе программного обеспечения со сканером.
Windows imaging service download
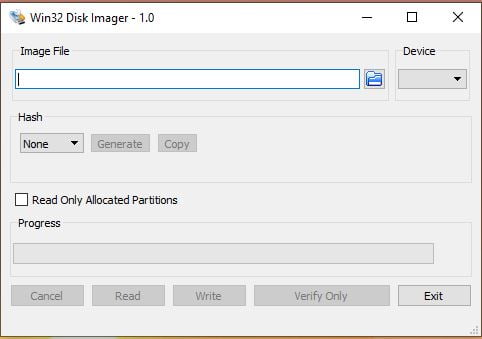
Win32 Disk Imager is a program which write a raw disk image to a removable device. Download it and follow step by step file to write ISO File to your USB Drive !
CREATE A BOOTABLE USB DRIVE USING WIN32 DISK IMAGER
DOWNLOAD FILES
To create a bootable drive all you need is ISO file (Which you wants to write) and Win32 Disk Imager (Which you can download from here)
FORMAT THE REMOVABLE DRIVE
Before you perform writing it is always a good practice to plug and format the removable drive / USB Stick. (You can skip this step as the tool will automatically perform this step)
SELECT THE ISO IMAGE
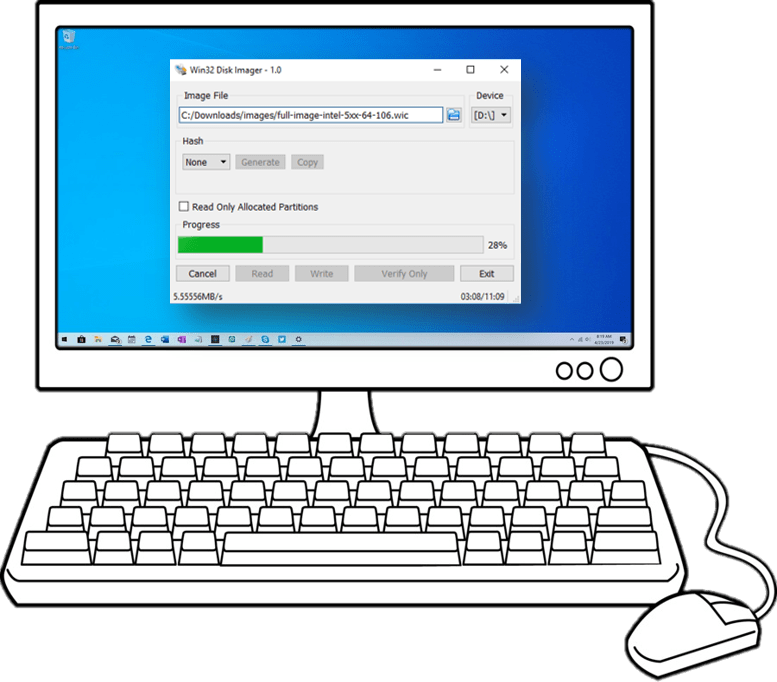
Now Open the Win32 Disk Imager and select the ISO file which you want to write also select the Drive (USB Stick) from the option.
WRITING THE ISO IMAGE
After selecting file path, click on the ‘Write’ button. A pop-up will appears simply click on ‘Yes’. After completing file transfer a Success pop up will appear and you will able to remove the USB Stick, Done!
STEP – 1: Getting your ISO File.
This is a very first and important step. In order to write any ISO Image file you have get a copy of it first. basically we require to write any OS like windows XP or Windows 10 so all you need is an ISO image of that OS. You must be take care that it should not be corrupted.
Getting a copy of windows in ISO file is very is as its available on internet. However if you don’t know where you can get Windows 10 ISO image to make it bootable i will help you here!
Simply follow these steps to get a fresh copy of any OS like Windows 10:
Before you download the tool make sure you have:
An internet connection (internet service provider fees may apply).
Sufficient data storage available on a computer, USB or external drive for the download.
A blank USB flash drive with at least 8GB of space or blank DVD (and DVD burner) if you want to create media. We recommend using a blank USB or blank DVD, because any content on it will be deleted.
When burning a DVD from an ISO file, if you are told the disc image file is too large you will need to use Dual Layer (DL) DVD Media.
Check a few things on the PC where you want to install Windows 10:
64-bit or 32-bit processor (CPU). You’ll create either a 64-bit or 32-bit version of Windows 10. To check this on your PC, go to PC info in PC settings or System in Control Panel, and look for System type.
System requirements. Make sure the PC meets the system requirements for Windows 10. We also recommend going to the PC manufacturer’s website for additional info about updated drivers and hardware compatibility.
Language in Windows. You’ll need to choose the same language when you install Windows 10. To see what language you’re currently using, go to Time and language in PC settings or Region in Control Panel.
Edition of Windows. You should also choose the same edition of Windows. To check what edition you’re currently running, go to PC info in PC settings or System in Control Panel, and look for Windows edition.
Step -2 Format your Flash Drive
In this step you need to make your pendrive/ flash drive writable you need to format it first. To perform a quick format Insert your Flash drive in USB Port then go to my computer and right click on Flash drive and click on format
Now click on start and it will be formatted!
Step-3: Writing the ISO image on flash drive
Now the most important step! First of all Open the Win32 Disk Imager and click on folder icon and navigate the folder where you have downloaded the ISO image; in most of the time it will check for download folder and by default it will pick only ISO file type. So you easily select it.
The simple interface of Win32 Disk Imager ISO allow you to easily understand and simplify the file transfer process. After selecting the ISO Image which you want to write and USB Drive all you need to hit the ‘Write’ button.
Just after clicking on Write button a pop-up will display, for confirmation to continue. After selecting ‘Yes’, a progress bar will show, along with the transfer speed, so that you can monitor the progress until completion. On the Completion of transfer, A Success massage will display which means it perfectly Written the ISO File to USB Drive!
After successful writing the ISO Image file to pendrive you will be able to remove it!
Windows Desktop App Converter Base Images
Windows – Desktop App Converter Base Images
From this download page you can download the latest Windows 10 Base Images (.WIM) for use with the Desktop App Converter. The Desktop App Converter is now available in the Store. Please visit the store at https://aka.ms/converter for future updates.
Desktop App Converter is a tool that enables developers to bring their existing desktop apps written for .NET 4.6.1 or Win32 to the Universal Windows Platform. The developers can run their desktop installers through the converter in an unattended (silent) mode and obtain a Windows app package that can be installed via the Add-AppXPackage PowerShell cmdlet on their development machine.
The converter runs the desktop installer in an isolated Windows environment using a clean base image provided in this download. It captures any registry and file system I/O made by the desktop installer and packages as part of the output. A Windows app package with unique identity and an ability to call a vast range of WinRT APIs is outputted by the converter.
The software may collect information about you and your use of the software and send that to Microsoft. You can learn more about Microsoft’s data collection and use in the product documentation and the Microsoft Privacy Statement. You agree to comply with all applicable provisions of the Microsoft Privacy Statement.
You can learn about how to disable telemetry in the product documentation available on MSDN.
To find out what’s new in this release of the converter, visit the product documentation on MSDN.
Supported Operating System
Windows 10 Anniversary Update (10.0.14393.0) and later – Pro or Enterprise edition.
Required Hardware Configuration Your computer must have the following minimum capabilities.
64 bit (x64) processor.
Hardware-assisted virtualization.
Second Level Address Translation (SLAT).
Required Resources
Microsoft Windows 10 SDK from here.
Please ensure that you have the latest Windows 10 Anniversary Update OS (Build 14393 or newer).
Please see the product documentation available on MSDN for further instructions on how to use the Desktop App Converter.
Download Windows 10
Before updating, please refer to the Windows release information status for known issues to confirm your device is not impacted.
Windows 10 October 2020 Update
The Update Assistant can help you update to the latest version of Windows 10. To get started, click Update now.
Create Windows 10 installation media
To get started, you will first need to have a license to install Windows 10. You can then download and run the media creation tool. For more information on how to use the tool, see the instructions below.
Here’s when to use these instructions:
You have a license to install Windows 10 and are upgrading this PC from Windows 7 or Windows 8.1.
You need to reinstall Windows 10 on a PC you’ve already successfully activated Windows 10.
If you are installing Windows 10 on a PC running Windows XP or Windows Vista, or if you need to create installation media to install Windows 10 on a different PC, see Using the tool to create installation media (USB flash drive, DVD, or ISO file) to install Windows 10 on a different PC section below.
Note: Before you install Windows 10, check to make sure your PC meets the system requirements for Windows 10. We also recommend going to the PC manufacturer’s website for any additional info about updated drivers and hardware compatibility.
Select Download tool, and select Run. You need to be an administrator to run this tool.
On the License terms page, if you accept the license terms, select Accept.
On the What do you want to do? page, select Upgrade this PC now, and then select Next.
After downloading and installing, the tool will walk you through how to set up Windows 10 on your PC. All Windows 10 editions are available when you select Windows 10, except for Enterprise edition. For more information on Enterprise edition, go to the Volume Licensing Service Center.
If you don’t have a license to install Windows 10 and have not yet previously upgraded to it, you can purchase a copy here: https://www.microsoft.com/en-us/windows/get-windows-10.
If you previously upgraded to Windows 10 on this PC and you’re reinstalling it, you don’t need to enter a product key. Your copy of Windows 10 will automatically activate later using your digital license.
When Windows 10 is ready to install, you’ll see a recap of what you’ve chosen, and what will be kept through the upgrade. Select Change what to keep to set whether you would like to Keep personal files and apps, or Keep personal files only, or choose to keep Nothing during the upgrade.
Save and close any open apps and files you may be running, and when you’re ready, select Install.
It might take some time to install Windows 10, and your PC will restart a few times. Make sure you don’t turn off your PC.
Follow these steps to create installation media (USB flash drive or DVD) you can use to install a new copy of Windows 10, perform a clean installation, or reinstall Windows 10.
Before you download the tool make sure you have:
An internet connection (internet service provider fees may apply).
Sufficient data storage available on a computer, USB or external drive for the download.
A blank USB flash drive with at least 8GB of space or blank DVD (and DVD burner) if you want to create media. We recommend using a blank USB or blank DVD, because any content on it will be deleted.
When burning a DVD from an ISO file, if you are told the disc image file is too large you will need to use Dual Layer (DL) DVD Media.
Check a few things on the PC where you want to install Windows 10:
64-bit or 32-bit processor (CPU). You’ll create either a 64-bit or 32-bit version of Windows 10. To check this on your PC, go to PC info in PC settings or System in Control Panel, and look for System type.
System requirements. Make sure the PC meets the system requirements for Windows 10. We also recommend going to the PC manufacturer’s website for additional info about updated drivers and hardware compatibility.
Language in Windows. You’ll need to choose the same language when you install Windows 10. To see what language you’re currently using, go to Time and language in PC settings or Region in Control Panel.
Edition of Windows. You should also choose the same edition of Windows. To check what edition you’re currently running, go to PC info in PC settings or System in Control Panel, and look for Windows edition. Windows 10 Enterprise isn’t available in the media creation tool. For more info, go to the Volume Licensing Service Center.
Microsoft Office products. If you just purchased a new device that includes Office 365, we recommend redeeming (installing) Office before upgrading to Windows 10. To redeem your copy of Office, please see Download and install Office 365 Home, Personal, or University on your PC. For more information, check How to upgrade to Windows 10 on new devices that include Office 365.
If you have Office 2010 or earlier and choose to perform a clean install of Windows 10, you will need to locate your Office product key. For tips on locating your product key, check Find your Office 2010 product key or Enter the product key for your Office 2007 program.
Using the tool to create installation media:
Select Download tool now, and select Run. You need to be an administrator to run this tool.
If you agree to the license terms, select Accept.
On the What do you want to do? page, select Create installation media for another PC, and then select Next.
Select the language, edition, and architecture (64-bit or 32-bit) for Windows 10. This table will help you decide which edition of Windows 10 you’ll choose:
Your current edition of Windows
Windows 10 edition
Windows 7 Starter Windows 7 Home Basic Windows 7 Home Premium Windows 7 Professional Windows 7 Ultimate Windows 8/8.1 Windows 8.1 with Bing Windows 8 Pro Windows 8.1 Pro Windows 8/8.1 Professional with Media Center Windows 8/8.1 Single Language Windows 8 Single Language with Bing Windows 10 Home Windows 10 Pro
Windows 10
Windows 8/8.1 Chinese Language Edition Windows 8 Chinese Language Edition with Bing
Windows 10 Home China
Select which media you want to use:
USB flash drive. Attach a blank USB flash drive with at least 8GB of space. Any content on the flash drive will be deleted.
ISO file. Save an ISO file to your PC, which you can use to create a DVD. After the file is downloaded, you can go to location where the file is saved, or select Open DVD burner, and follow the instructions to burn the file to a DVD. For more info about using an ISO file, see Additional methods for using the ISO file to install Windows 10 section below.
After the installation media is created, follow the steps below to use it.
After completing the steps to install Windows 10, please check that you have all the necessary device drivers installed. To check for updates now, select the Start button, and then go to Settings > Update & Security > Windows Update, and select Check for updates. You may also wish to visit your device manufacturer’s support site for any additional drivers that may be needed.
Note: Drivers for Surface devices may be found on the Download drivers and firmware for Surface page.
Before you install Windows 10, it’s a good idea to save any work and back up your PC before you start. If you used the media creation tool to download an ISO file for Windows 10, you’ll need to burn it to a DVD before following these steps.
Attach the USB flash drive or insert the DVD on the PC where you want to install Windows 10.
Restart your PC.
If your PC does not automatically boot to the USB or DVD media, you might have to open a boot menu or change the boot order in your PC’s BIOS or UEFI settings. To open a boot menu or change the boot order, you’ll typically need to press a key (such as F2, F12, Delete, or Esc) immediately after you turn on your PC. For instructions on accessing the boot menu or changing the boot order for your PC, check the documentation that came with your PC or go to the manufacturer’s website. If you do not see the USB or DVD media device listed within the boot options, you may need to reach out to the PC manufacturer for instructions for temporarily disabling Secure Boot in your BIOS settings.
If changing the boot menu or order doesn’t work, and your PC immediately boots into the OS you want to replace, it is possible the PC had not fully shut down. To ensure the PC fully shuts down, select the power button on the sign-in screen or on the Start menu and select Shut down.
On the Install Windows page, select your language, time, and keyboard preferences, and then select Next.
Select Install Windows.
If you downloaded an ISO file for Windows 10, the file is saved locally at the location you selected. If you have a third-party DVD burning program installed on your computer that you prefer to use for creating the installation DVD, that program might open by going to the location where the file is saved and double-clicking the ISO file, or right-click the ISO file, select Open with and choose your preferred DVD burning software.
If you want to use the Windows Disk Image Burner to create an installation DVD, go to the location where the ISO file is saved. Right-click the ISO file and select Properties. On the General tab, click Change and select Windows Explorer for the program you would like to use to open ISO files and select Apply. Then right-click the ISO file and select Burn disc image.
If you want to install Windows 10 directly from the ISO file without using a DVD or flash drive, you can do so by mounting the ISO file. This will perform an upgrade of your current operating system to Windows 10.