- Fixed: Startup Repair Loop in Windows 7 [4 Solutions]
- The issue: Windows 7 Startup Repair Loop
- How to fix Startup Repair infinite loop in Windows 7?
- Solution 1: Disable Automatic Restart
- Solution 2: Run chkdsk on the boot volume
- Solution 3: Manually attempt to rebuild the BCD
- Solution 4. Perform system restore
- Tutorial: Create system repair disc for Windows 7
- Conclusion
- Stuck in startup loop «failure configuring windows updates reverting changes do not turn off your computer» windows 7.
- Stuck in startup loop «failure configuring windows updates reverting changes do not turn off your computer» windows 7
- How to Fix Windows Startup Repair Infinite Loop
- 7 Fixes to Stuck in Windows 7 Startup Repair Loop
- 1 — Windows 7 Startup Repair Infinite Loop Error Details
- Windows Error Recovery
- 2 — Startup Repair Error Symptoms
- 3 — Troubleshoot Windows Automatic Startup Repair Infinite Loop Error with 7 Fixes
- Fix 1. Disable Automatic Startup Repair to Fix Startup Repair Loop
- Fix 2. Run CHKDSK Command to Check and Repair Drive Errors
- Fix 3. Run Bootrec to Fix Damaged or Corrupted BCD Settings
- Fix 4. Perform System Restore to SolveВ Windows Startup Repair Loop
- Fix 5. Delete the Problematic File to Resolve Startup Repair
- Fix 6. Restore Windows 10 Registry to Fix Repair Loop
- Fix 7. Check Device Partition and Osdevice Partition
- Additional Fix — Boot into Safe Mode in Windows 7/8/10
- How to Recover Data After Fixing Startup Repair Infinite Loop
Fixed: Startup Repair Loop in Windows 7 [4 Solutions]
How to fix start repair loop Windows 7? This article offers you 4 solutions to solve Windows 7 stuck in start repair infinite loop safely.

By AOMEI  / Last Updated September 14, 2020
The issue: Windows 7 Startup Repair Loop
Windows 7 continuously runs into Startup Repair and fails to repair windows. Windows 7 boot again and again into Startup Repair without loading the normal Windows 7. This is called Startup Repair loop.
If you encounter startup repair loop, reinstalling Windows 7 can certainly fix this problem. If you do mind the time wasted on installing and configuring Windows and programs, you can use the methods in the following to solve this problem. Since the cause of this problem varies on different situation, you may need to try more than one solutions to get it right.
How to fix Startup Repair infinite loop in Windows 7?
Most solutions will require the use of the Windows setup CD or DVD. If you no longer have the installation media, a system repair disc can also help you make it. You can scroll down to access the tutorial to learn how to create system repair disc.
Solution 1: Disable Automatic Restart
This first thing you should try is to disable Automatic Restart to see if it can load Windows 7 successfully. If something is broken, then this cannot fix the problem but it will give you more information about how this problem is caused.
If you can see the Advanced Boot Options during the Startup Repair loop, you can simply select the option “Disable automatic restart on system failure” and then wait for your PC to reboot.
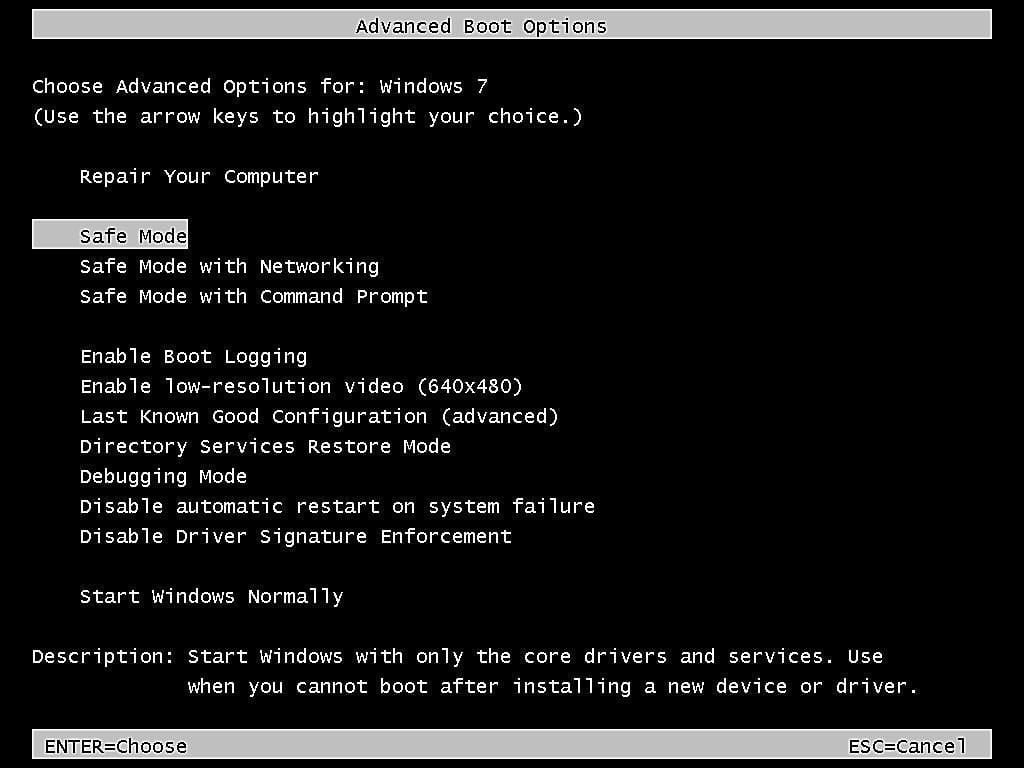
If you do not see the Advanced Boot Options screen, you can restart your computer, and repeatedly press F8 when the computer manufacturer logo shows to enter Advanced Boot Options menu. even if you still cannot load Windows normally after this, you can have a close look at the error message which system fails to boot.
Solution 2: Run chkdsk on the boot volume
Another method to fix the Windows 7 Startup Repair loop problem is to check the boot volume and fix errors. If your drive has filesystem corruption, it may lead to system failure. You need a command prompt to run chkdsk command.
1. Insert the Windows 7 installation disc and boot your computer from it.
2. Press any key when you see “Press any key to boot from CD or DVD.”
3. Choose Repair your computer > select your OS from the list when the Startup Repair finishes scanning your PC.
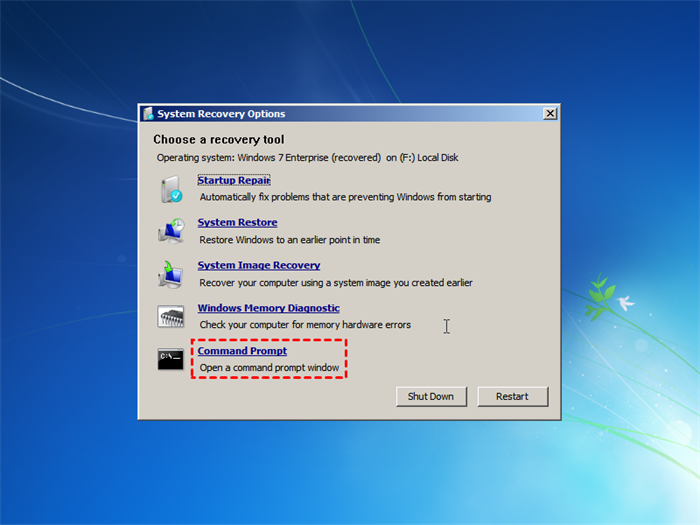
4. Select Command Prompt from System Recovery Options window.
5. In the command prompt, type this command “chkdsk c: /f” (without quotes). Then wait for the process to complete.
Solution 3: Manually attempt to rebuild the BCD
The third methods you should try is to fix bootloader. Erorrs in bootloader installation or configuration can also cause the problem that Windows 7 fails to boot normally and always goes to startup repair.
1. Boot your computer from Windows system repair disc and then bring up a commad prompt as you do in the second method.
2. Then you can type the following command to rebuild master boot record (MBR), partition bootsectors, and boot configuration data (BCD) to the startup issue.
These are three commands. You should press Enter to run it for each command. after that, your Windows 7 should not go into startup repair loop.
Solution 4. Perform system restore
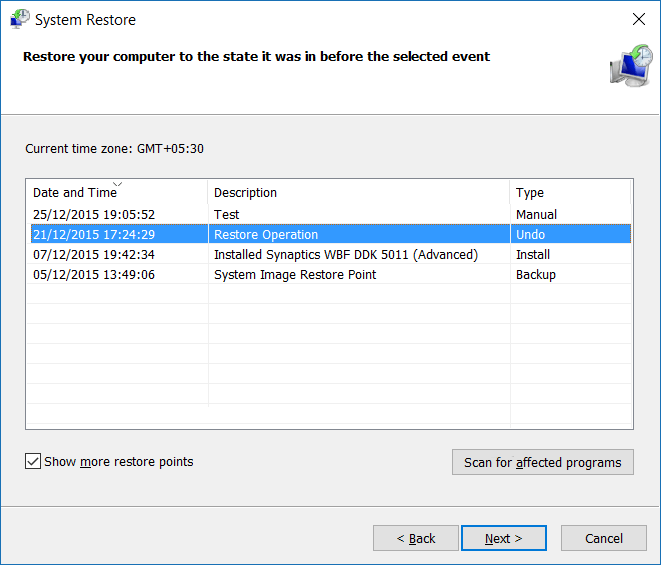
By default, System Protection is on, so you probably have multiple restore points that you can use to restore your Windows 7 to earlier state. Therefore, you can run System Restore to your Windows 7 to any of the working states under Windows Recovery Environment.
1. Enter the System Recovery Options screen from system repair disc or installation disc. Just like the same steps in the second method.
2. From there, click on the option System Restore.
3. Choose the appropriate restore point from the list. It is recommended to view the affected programs before starting system restore.
4. Click Finish to start the system restore.
Sometimes, you may find no system restore points available or it fails to work. System restore points are stored in the corresponding volume, so the restore points become invalid if the volume corrupts.
If you have created system image backup in advance, you can use the option System Image Recovery to restore your computer. This can definitely fix Windows 7 Startup repair loop. If, unluckily, none of these methods works, you may consider reinstalling Windows from scratch. Therefore, it is very important to create a system image backup in case situations like this.
Tutorial: Create system repair disc for Windows 7
To access System Recovery Option, a Windows installation is needed. However, you may no longer have it for various reasons. Fortunately, you can still create a bootable disc and use it to boot your computer. It can also help you restore your computer from a system image or restore point.
AOMEI Backupper Standard, one free PC backup software can help you create bootable rescue media using DVD/CD or USB drive. You can also create the repair disc from another healthy computer and use it to boot the computer that stuck in Startup Repair loop. This bootable media is able to boot all versions of Windows 10/8/7.
You can refer to the steps below to make it:
1. Download and install this Windows backup and restore tool.
2. Click Tools and then choose Create Bootable Media.

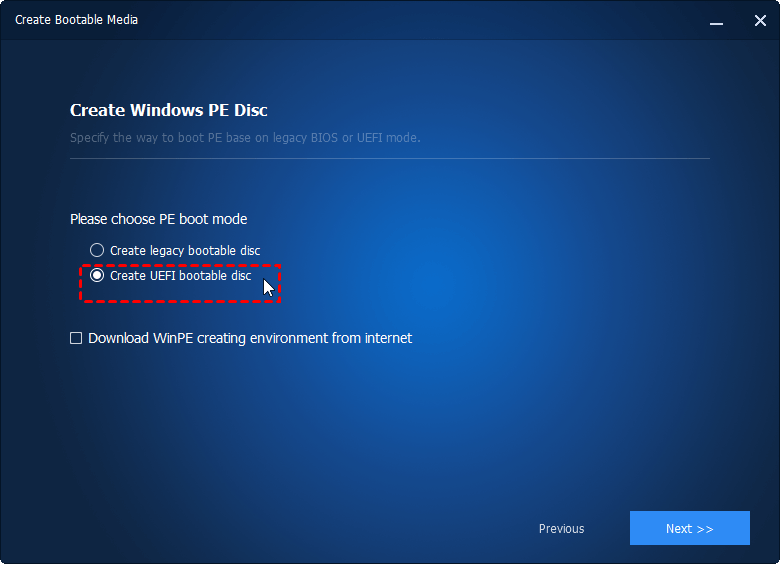
3. Select a type of bootable media you want to create and click Next to continue. For better performance, the Windows PE bootable disc is recommended.

4. Choose Create legacy bootable disc or Create UEFI bootable disc and then click Next to continue. The two options enable the bootable media to boot from legacy MBR mode or GPT/UEFI. Please view your motherboard user manual for information on choosing boot options at PC startup.
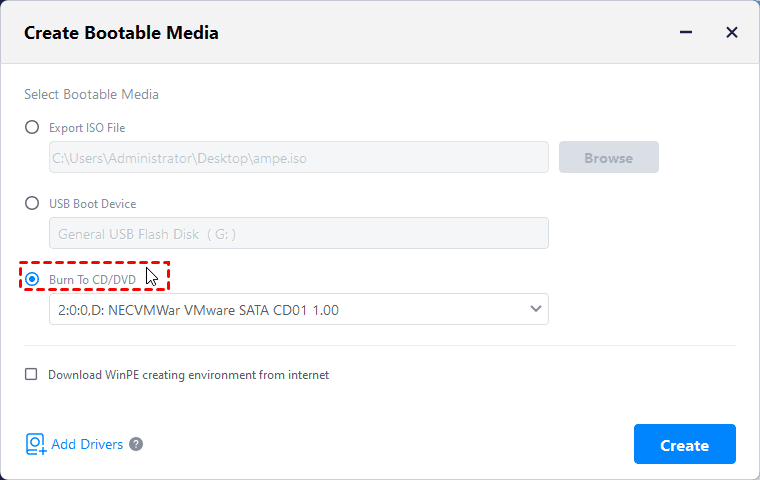
5. Select the CD, DVD or USB drive where you want to export the ISO file, and then click Next to start. Wait for the process to complete and click Finish.
Conclusion
That’s all for how to fix Windows 7 Start Repair loop problem. Hope one of the solutions can help you get out of your trouble. To fix the Startup Repair loop issue, you need to access System Recovery Options. If you do not have Windows 7 installation disc, you can create a bootable media via AOMEI Backupper Standard to help you make it.
In addition, you can also create a system image backup for your computer. In this way, when you meet Windows 7 Startup Repair infinite loop or any other issue next time, you can boot your computer from the AOMEI bootable media and use the image backup to fix all issues without affecting all your files and installed programs.
If you want to protect unlimited computers within your company, you can pick AOMEI Backupper Technician. With the inbuilt AOMEI Image Deploy tool, you are also allowed to deploy/restore system image file on server-side computer to multiple client-side computers over network.
Stuck in startup loop «failure configuring windows updates reverting changes do not turn off your computer» windows 7.
OriginalTitle: Failure configuring Windows Updates.. Reverting Changes.. Screen does not get to restart. Plus, System restore failed to extract C:/ when I manually shut down computer to repair any errors
Hello, and thanks in advance for any solutions to my problem.
- I have a recovery disc (not an installation disc) and I ran the chkdsk /r to see if that will help. The chkdsk found several registry entries that were disconnected and fixed several errors. I thought that would fix my update problem somehow. But I stupidly went back and restarted to see whether the screen (error) pops up again. It did. It also tried to configure updates again and then tried to revert changes.
- I am not up to date with the In Place upgrade, nor do I have an installation disc so I did not look into that remedy. But if it is absolutely necessary I will get the disc.
To resolve this issue, you will need a Windows 7 DVD since going through the installed recovery options have failed. Once you receive a DVD, follow the steps to use the dism tool. this option allows you to delete pending updates.
***Win RE***
Boot from the Windows 7 DVD, select your keyboard and language options, select Repair your computer, then select the Command Prompt. From the Command Prompt run the following command:
Dism /image:c:\ /get-packages
This will produce a list of installed updates and packages. They will look like this:
Package Identity : Package_for_KB978262
6.1.1.0
State : Installed
Release Type : Security Update
Install Time : 2/11/2010 1:01 PM
Find the most recent one and then make a note of the package identity.
dism /image:c:\ /remove-package /PackageName:Package_for_KB978262
6.1.1.0 (name of update from previous step)
You will get a status of the removal until it is complete. Then reboot your PC.
You will want to start with the most recent and remove them one at a time to find the problem update.
3 people found this reply helpful
Was this reply helpful?
Sorry this didn’t help.
Great! Thanks for your feedback.
How satisfied are you with this reply?
Thanks for your feedback, it helps us improve the site.
Stuck in startup loop «failure configuring windows updates reverting changes do not turn off your computer» windows 7
Windows 7 (Professional 32-bit) recently applied (auto) updates — sorry I don’t know which no’s
Now when machine re-boots I get:
Prepairing to configure Windows
Do not turn off your computer«
«Failure configuring windows updates
Do not turn off your computer«
pc then re-bootsand whole process starts over again.
http://support.microsoft.com/kb/949358 — «Repair your computer» and running a system restore, however this gives a 0x80071a91 error.
From «Repair your computer» command prompt, running
chkdsh /f /r
re-booting and running
Booting to Safe Mode command line, but this just restarts «Stage 3 of 3
Prepairing to configure Windows. « etc
As none of the above have worked, can anyone offer any other advice — all suggestions gladly recieved!
I have a working solution:-)
Here’s my solution (expanded from the original, but the key actions are the same):
1. Boot to «Repair your Computer», either from [F8] menu, or from recovery disk.
2. Select «Command Prompt» from the recovery choices.
3. Check the drive Windows is installed on, at command prompt type:
dir c:
if this fails to list the Windows directory, try
dir d:
etc . keep going untill you find the drive with the problem Windows folder
4. At the command prompt change to your Windows drive eg:
d:
change your directory to:
cd Windows\WinSxS
5. Type:
ren pending.xml pending-xml.old
6. Exit and reboot
7. Allow Windows to re-start, and login as an administrator
8. Change update options to disable autoupdates
9 Review update history and begin investigation into your initial failure.
(10. Remember to re-set Auto-dates to your prefered setting once complete).
Hope this helps anyone else findinng the same problem:-)
88 people found this reply helpful
Was this reply helpful?
Sorry this didn’t help.
Great! Thanks for your feedback.
How satisfied are you with this reply?
Thanks for your feedback, it helps us improve the site.
How to Fix Windows Startup Repair Infinite Loop
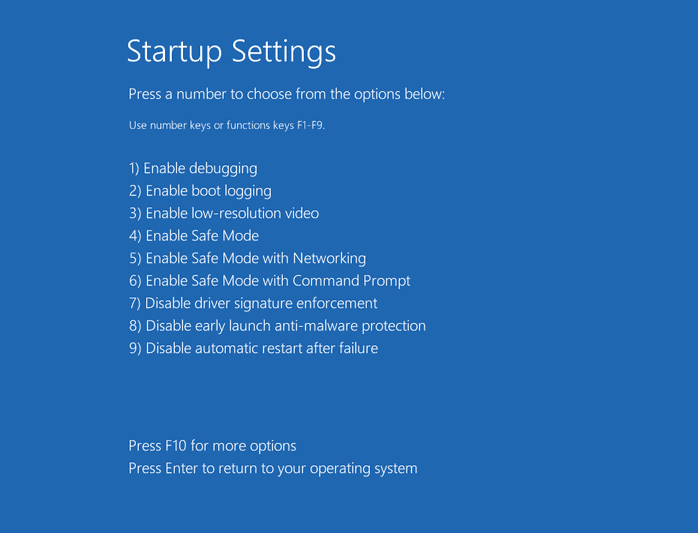
Fix: Boot into Safe Mode
- 1. Insert the disc and reboot the system.
- 2. Press any key to boot from the DVD.
- 3. Choose your keyboard layout.
- 4. Click Repair your computer at the Install now screen.
- 5. Click Troubleshoot.
- 6. Click Advanced options.
- 7. Click Startup Settings.
- 8. Click Restart.
7 Fixes to Stuck in Windows 7 Startup Repair Loop
«My computer keeps running Startup Repair during every startup and I can’t boot it normally. I tried running Startup Repair multiple times but I’m still getting the same problem. Startup Repair won’t seriously automate repair at all. I got stuck in an infinite loop.»
Follow the fixes to troubleshoot your Windows Startup Repair loop.
| Workable Solutions | Step-by-step Troubleshooting |
|---|---|
| Fix 1. Disable Startup Repair | Restart your computer > wait for your BIOS to complete POST > tapping F8. Full steps |
| Fix 2. Run CHKDSK Command | Boot Windows from the bootable device > navigate to «Repair your computer» option. Full steps |
| Fix 3. Run Bootrec | Open Command Prompt > type those following commands. Full steps |
| Fix 4. Perform System Restore | Boot Windows from the bootable device > click «Troubleshoot > System Restore». Full steps |
| Fix 5. Delete Problematic File | Access Command Prompt again and enter the following command: cd C:\Windows\. Full steps |
| Fix 6. Restore Windows Registry | In the Windows Boot Options menu, choose «Troubleshoot >Advanced Options». Full steps |
| Fix 7. Check Device Partition | In Command Prompt, type bcdedit and press «Enter». Find device partition and..Full steps |
1 — Windows 7 Startup Repair Infinite Loop Error Details
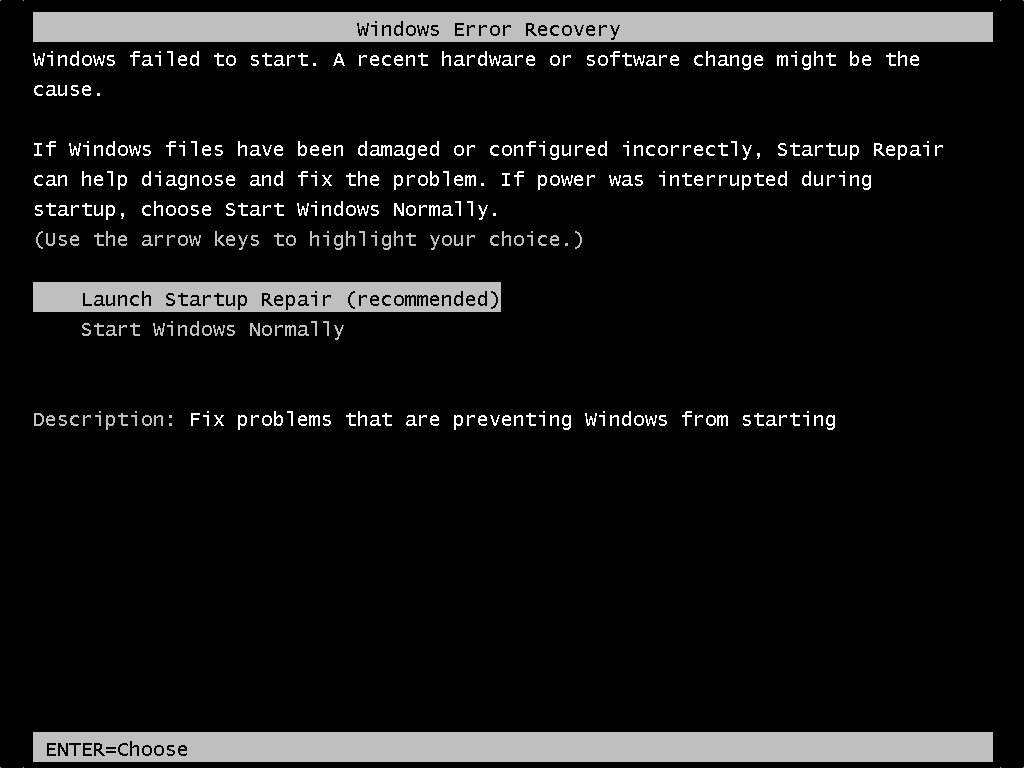
Windows Error Recovery
Windows failed to start. A recent hardware or software change might be the cause.
If Windows files have been damaged or configured incorrectly, Startup Repair can help diagnose and fix the problem. If power was interruptedВ during startup, choose Start Windows Normally.
(Use the arrow keys to highlight your choice.)
Launch Startup Repair (recommended)
Start Windows Normally
Description: Fix problems that are preventing Windows from starting
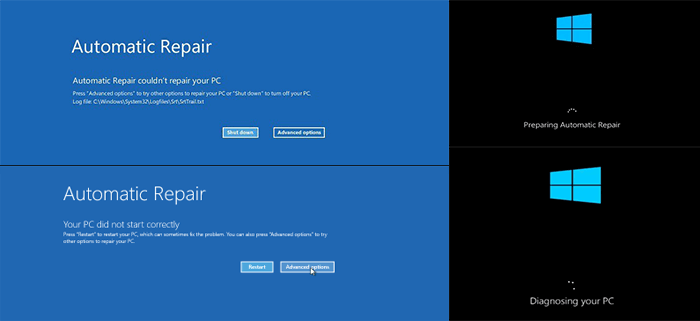
Startup Repair will fail to load, launch but fail to repair, or run and claim repairs have been executed. Your PC will continue to attempt to endlessly start Startup Repair each boot. In Windows 8, Windows 8.1 and Windows 10 this is called Automatic Repair:
2 — Startup Repair Error Symptoms
Unexpected PC shutdown, virus, malware, driver issues, damaged BDC settings, corrupted boot partition, blue screen of death as well as aВ black screen of death on reboot, all those factors account for Windows startup problems.В
As the ‘Windows error recovery’ suggests, Start Repair should automatically fix the abnormal Windows startup. However, when you choose the recommended option, you’ll only confront 2 facts:
1. Startup Repair takes a fairly long time to load or launch.
2. Startup Repair immediately runs but the repairing process never finishes.
In both situations, on each reboot, your PC will continuously attempt to call Startup Repair for the fix, meanwhile, getting stuck in a Startup Repair loop that never ends
3 — Troubleshoot Windows Automatic Startup Repair Infinite Loop Error with 7 Fixes
A clean Windows installation is a guaranteed fix for Windows Startup Repair taking forever, but it costs a complete data loss. So, is there another option to recover from an infinitely looping Startup Repair without reinstalling Windows?
We gave the possible fixes from easy to complex, from safe to risky. You’d better try them sequentially.
Fix 1. Disable Automatic Startup Repair to Fix Startup Repair Loop
You should try to disable automatic restart, although it could not solve the boot error, it can stop the endless restart.
Step 1. Restart your computer.
Step 2. Wait for your BIOS to complete POST (the screen with your manufacturer logo and/or system information).
Step 3. Quickly begin tapping F8 repeatedly, until you see the list of boot options.
Step 4. Choose «Disable automatic restart on system failure».
Step 5. Press «Enter» and wait for your PC to boot.

Fix 2. Run CHKDSK Command to Check and Repair Drive Errors
This helps check or even repair the drives to tackle file system corruption.
Step 1. Boot Windows from the bootable device. (If you cannot boot, use Window 7 installation CD.)
Step 2. Navigate to the «Repair your computer» option and select «Command Prompt».
Step 3. In the Command Prompt window, type chkdsk /r c: and press «Enter». (c represents the drive where Windows is installed)
Step 4. Click «Y» so that the next time the system restarts, the CHKDSK utility can check the disk errors and try to fix them. Restart the system and let CHKDSK check hard drive errors and repair.
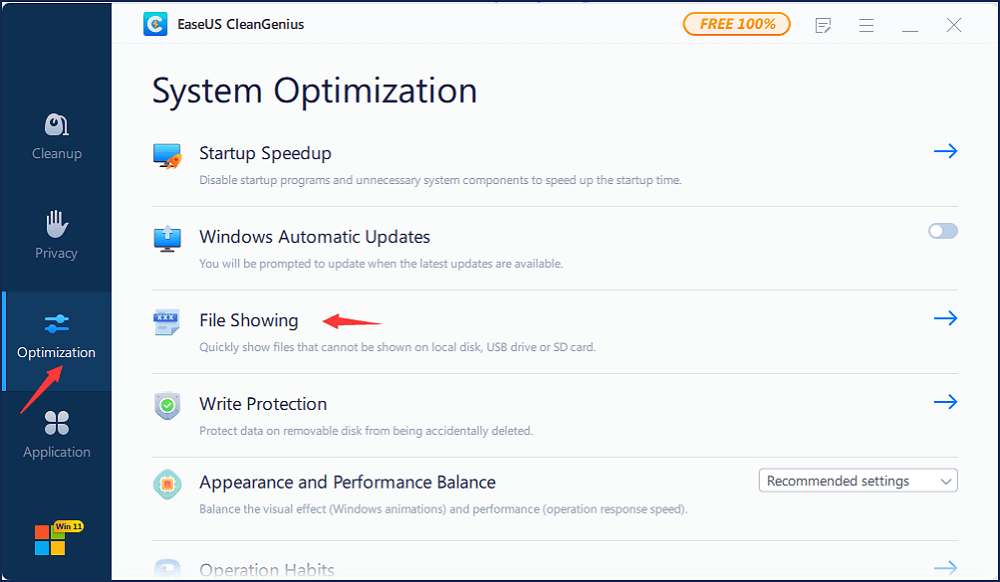
If you don’t have any technical know-how and want to minimize data risks, using third-party software could be a better choice. The Command line is suitable for computer professionals since wrong commands can cause severe problems. Therefore, we strongly recommend you try an automatic command line alternative.
EaseUS Tools M is a practical computer fixing tool that is safe and light-weighted. It’s a perfect alternative to CHKDSK command. Use this one-click tool to solve your computer issues.
To fix file system error or disk error:
Step 1: оњљ DOWNLOADВ EaseUS Tools M forВ Free and install it.
Step 2: Open the software and select the «File showing» option.В
Step 3: Choose the drive and wait for repairing. After the operation completes, click the «View» button to check the drive.В
Fix 3. Run Bootrec to Fix Damaged or Corrupted BCD Settings
If the bootloader installation or configuration comes with some errors, the startup repair loop could happen as well. You could solve this error by following the steps below.
Step 1. In the same way to open Command Prompt as the second fix did.
Step 2. In the Command Prompt window, type those following commands and press «Enter».
bootrec /fixmbr
bootrec /fixboot
bootrec /rebuildbcd
Step 3. Restart the system and let bootrec repair MBR.
Fix 4. Perform System Restore to SolveВ Windows Startup Repair Loop
The System Protection is enabled by default, you can use it to restore your computer to an earlier state to fix your problem.В
Step 1. Boot Windows from the bootable device.
Step 2. Click «Troubleshoot > System Restore».
Step 3. Follow the wizard instructions to continue the process. Choose a restore point before the date when the Automatic Startup Repair loop error happened.
Fix 5. Delete the Problematic File to Resolve Startup Repair
Step 1. Access Command Prompt again and enter the following command:
cd C:\Windows\System32\LogFiles\Srt
SrtTrail.txt
Step 2. Then, you could see «Boot critical file c:\windows\system32\drivers\tmel.sys is corrupt.» Type the following command:
cd c:windowssystem32drivers
delvsock.sys
Restart your PC. If these steps can not help, try the following troubleshooting steps.
Fix 6. Restore Windows 10 Registry to Fix Repair Loop
Step 1. In the Windows Boot Options menu, choose «Troubleshoot >Advanced Options>Command Prompt».
Step 2. In Command Prompt, type the following command in Command Prompt and then hit «Enter».
cd C:\windows\system32\logfiles\srt\
Change your drive letter according to your needs.
Step 3. Type txt to open the file in notepad.
Step 4. Press «Ctrl + O». Select «All files» from file type and navigate to C:\windows\system32.
Step 5. Right-click CMD and select «Run as administrator». Type the following command and press «Enter».
cd C:\windows\system32\config
Step 6. Backup those files by renaming Default, Software, SAM, System and Security files to .bak. Type the following command one by one and hit «Enter»:
rename DEFAULT DEFAULT.bakrename SAM SAM.bak
rename SECURITY SECURITY.bak
rename SOFTWARE SOFTWARE.bak
rename SYSTEM SYSTEM.bak
copyc:\windows\system32\config\RegBack c:\windows\system32\config
Step 7. Restart your PC to check if you have solved the error.
Fix 7. Check Device Partition and Osdevice Partition
Sometimes, if your device partition values aren’t correct, you will get stuck in the startup repair loop. Follow the steps below to check the device partition and os device partition and fix your error.
Step 1. In Command Prompt, type bcdedit and press «enter».
Step 2. Find device partition and os device partition values. Make sure their values are correct and set to the correct partition.В
Windows is preinstalled on C partition only, and the correct value is C. Enter the following commands and press «Enter» after each one if the value isn’t set to C.
bcdedit /set
bcdedit /set
After that, reboot the PC and fix the Windows startup repair loop.
Additional Fix — Boot into Safe Mode in Windows 7/8/10
Often booting into Safe Mode and uninstall recently install device drivers or software may fix the Automatic Repair loop error. To boot into Safe Mode of a Windows 7, 8, 8.1, or 10 system, you need to have the original DVD or USB.В If you do not have the installation disc, follow the guide from Microsoft to create a Windows Installation Media. Then enter Safe Mode:
Step 1. Insert the disc and reboot the system.
Step 2. Press any key to boot from the DVD.
Step 3. Choose your keyboard layout.
Step 4. Click Repair your computer at the Install now screen.В Choose «Troubleshoot > Advanced options > Startup Settings«.
Choose a Safe Mode option (Safe Mode, Safe Mode with Networking, and Safe Mode with Command Prompt) to enter.
How to Recover Data After Fixing Startup Repair Infinite Loop
Besides a clean install of the Windows operating system, the fixes for users to get rid of an endless startup repair loop including system restore and PC factory resetting will also result in part of computer data loss.
It’s not the end of the day and a third-party data recovery tool perhaps can salvage your data. For example, EaseUS Data Recovery Wizard is able to recover data after formatting, deleting, PC resetting, system refreshing, and more. And You deserve a try for its data recovery softwareВ and see if the software really helps find your lost data.
Step 1. Select a location and start scanning.
Launch EaseUS Data Recovery Wizard, hover on the location(hard drive partition, external HDD, Card devices) where you lost data, then click «Scan».

Step 2. Preview and select the files.
Wait until the scanning completes. If you need to double-click the item to preview the file, then select the data you attempt to recover.

Step 3. Recover lost data.
Click «Recover», choose a location to save the recovered data, then click «OK». You should store the data in another place instead of the original one.

You get 7 ways to get rid of the Startup Repair Windows 7 loop, no matter whether you have an installation disc or not. Don’t worry if the windows 7/8/10 startup repair is taking forever and you cannot stop or cancel it. Also, you can get back lost data after you have fixed the error with EaseUS data recovery software.


