- Using SERVA to Install Windows over your Home Network
- Required Items
- Section 1 — On the Host Computer
- Step 1 — Install SERVA
- Step 2 — Configure SERVA
- Step 3 — Move the Windows Install Files
- How to Install Windows 10 from Network Boot (Via WDS Server)
- Introduction
- Steps to Install Windows 10 from Network
- Install and Configure Windows Deployment Services (WDS) Server
- Install Windows 10 from Network Boot (Via WDS)
- Conclusion
- How to Install Any Version of Windows from Other Network Computers
- VERY IMPORTANT Prerequisites
- Step 1 – Run Serva & Make Its Initial Configuration
- Step 2 – Copy the Windows Installation Files
- Step 3 – Start Serva
- Step 4 – Copy the Network Card Driver(s)
- Step 5 – Share WIA_WDS Folder with the Network
- Step 6 – Start Serva
- Step 7 – On the Target PC – Enable Lan Booting & Boot from the Network
- Step 8 – Install Windows Over the Network
- Troubleshooting Problems with Serva
- Conclusion
Using SERVA to Install Windows over your Home Network

Have you ever wondered how IT Professionals install Windows on many computers with ease? You might think that they must use CDs or Flash Drives with the Windows installer on it; however, that takes far too much time. The problem with using a CD or Flash Drive to install Windows is that you can only use it on one computer at a time, and you must carry the CD or Flash Drive around with you — it could get lost!
IT Professionals install Windows on many computers at once by using the network. As long as the computer is connected to the network with an ethernet cable, it can download the Windows installer. Additionally, multiple computers can install Windows at the same time!
But how do they do this? The bigger businesses and schools use tools like WAIK (Windows Automated Install Kit), but if you only want to install Windows on a couple of computers, WAIK is overkill. Instead, we will use a program called SERVA. This will let you install Windows on a remote computer without any CDs or flash drives! Let’s get started!
Required Items
- A computer running Windows, connected to the network, that you will use as the Host computer. This computer will run SERVA and will have the Windows install files on it.
- The Host computer cannot have a blank password.
- A computer that you would like to install Windows on, which we will call the Target computer. This computer can be a laptop, but it needs to have an ethernet jack, and be connected to the same network as the Host computer.
- A Windows install disk or ISO file.
- A DHCP server on your network — This is most likely running on your Router. If you can access the internet through your Host computer, then you already have a DHCP server and can ignore this.
Section 1 — On the Host Computer
Step 1 — Install SERVA
- First, go to the SERVA download page and download the right version of SERVA for your system. Make sure to get the “Community” version. If you are running on a 64 bit computer, get the 64 bit installer; if you are on a 32 bit computer, get the 32 bit installer.
- Extract the downloaded file to a folder you’d like to keep your SERVA program files in. I chose J:\SERVA. You can then make a shortcut to the SERVA executable file if you’d like to keep it on your desktop or taskbar.
- Create a folder somewhere easily accessible with no spaces in the path to store your Windows install files in. For example: J:\SERVA_ROOT.
Step 2 — Configure SERVA
- Open up SERVA. You will be greeted by a nag message which requires you to wait for a few seconds before you can continue. Yes, this happens every time. Just continue when the timer is up.
- Click on “Settings.” If this button isn’t showing up, right click on the icon in the taskbar and click “Settings.”
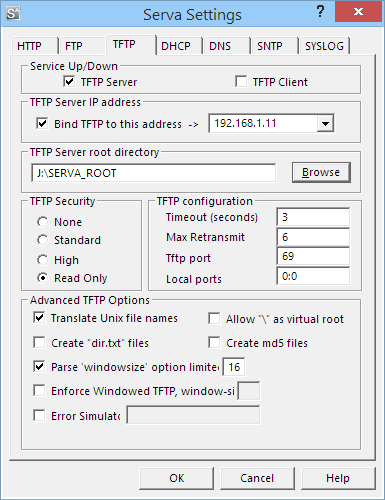
- Click on the TFTP tab and check the box next to “TFTP Server.”
- Check the box next to “Bind TFTP to this address,” and make sure that it is the correct IP given to you by your router. (Usually looks like 192.168.xxx.xxx)
- Under “TFTP Server root directory” click “Browse” and navigate to the SERVA_ROOT folder you created earlier. Open the folder, then click “Select.” Make sure the path shown is correct.
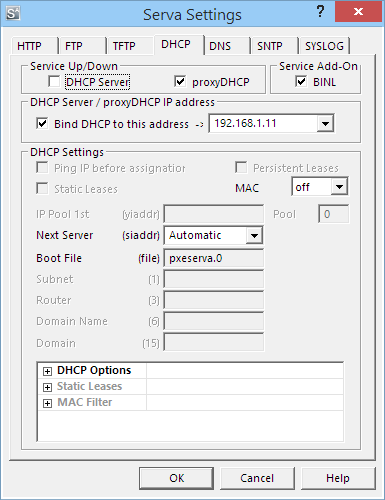
- Click on the DHCP tab and check the box next to “proxyDHCP.”
- Check the box next to “BINL.”
- Check the box next to “Bind DHCP to this address,” and, again, make sure the IP is correct.
- Click “OK.”
- Close SERVA and re-open it. SERVA has to restart to create proper files and such after changing settings.

Step 3 — Move the Windows Install Files
Open up the SERVA_ROOT folder you created earlier. You will see that it is now populated with some folders and files. Our next step is to move the Windows install files from either a CD or ISO file into the WIA_WDS folder, where the Target computer will be able to access them.
If you have a Windows CD:
- Insert the Windows CD into the Host computer.
- Create a folder inside SERVA_ROOT/WIA_WDS and name it something that describes the Windows install type. For example: WINDOWS_8_x64.
- Open “My Computer” or “This PC” if you are on Windows 8, then right-click on the Windows CD and choose “Open.”
- Select all the files inside the CD (Ctrl + A) and copy them into the new folder you created.
If you have a Windows ISO File:
- Extract the ISO file into a folder using 7-zip or another extraction utility.
- Copy the extracted folder into SERVA_ROOT/WIA_WDS.
- Rename the folder to something that describes the Windows install type, with no spaces. For example: WINDOWS_8_x64.
The new folder you have created should have a structure similar to this:
If everything looks correct, move on to the next step. If you are lost, post a comment below!
Note: Windows 7 and 8 install files should be placed in WIA_WDS. Windows XP install files should be placed in WIA_RIS. Linux install files should be placed in NWA_PXE.
How to Install Windows 10 from Network Boot (Via WDS Server)
Browse Post Topics
Introduction
This guide demos how to install Windows 10 from network boot.
The steps discussed in this guide is for Windows admins. If you are a home user, use the steps in How to Install Windows 10 from USB.
Steps to Install Windows 10 from Network
There are two high-level steps in this guide:
- Install and Configure Windows Deployment Services (WDS) Server
- Install Windows 10 from Network Boot (Via WDS)
Install and Configure Windows Deployment Services (WDS) Server

Before you can install Windows 10 from Network boot, you need a server with Windows 10 image. One way to make this available is to install and Configure a WDS Server.
Install Windows 10 from Network Boot (Via WDS)
Here are the steps to install Windows 10 from network:
- Boot your PC to BIOS and modify the boot sequence to boot from Network first. Save your changes and restart your PC.

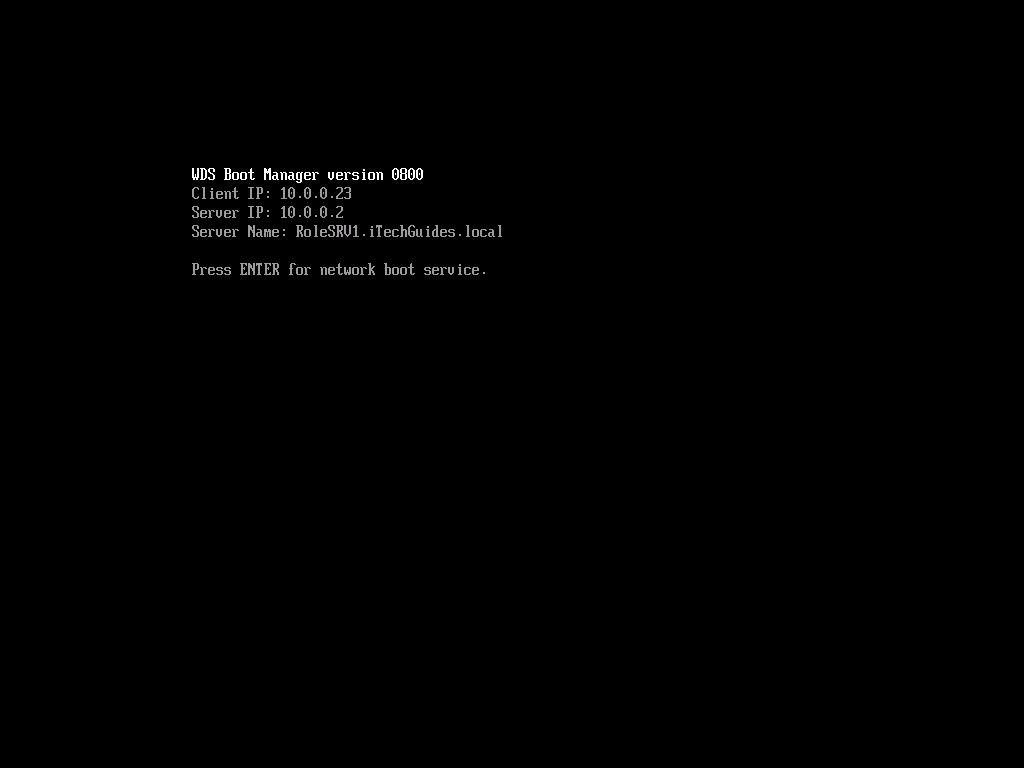
- Depending on how the WDS server is configured, you will either receive this prompt – press Enter for network boot. Or the PC will boot straight to PXE. If you receive the prompt, click Enter.

- Your computer will initiate Windows 10 install via Windows Deployment Services. Confirm that the Locale and Keyboard layouts are correct. Then click Next.

- You will then be promoted to provide credentials to logon to the WDS Server. Enter the credentials in the DomainName\UserName format. Then type your password and click OK.

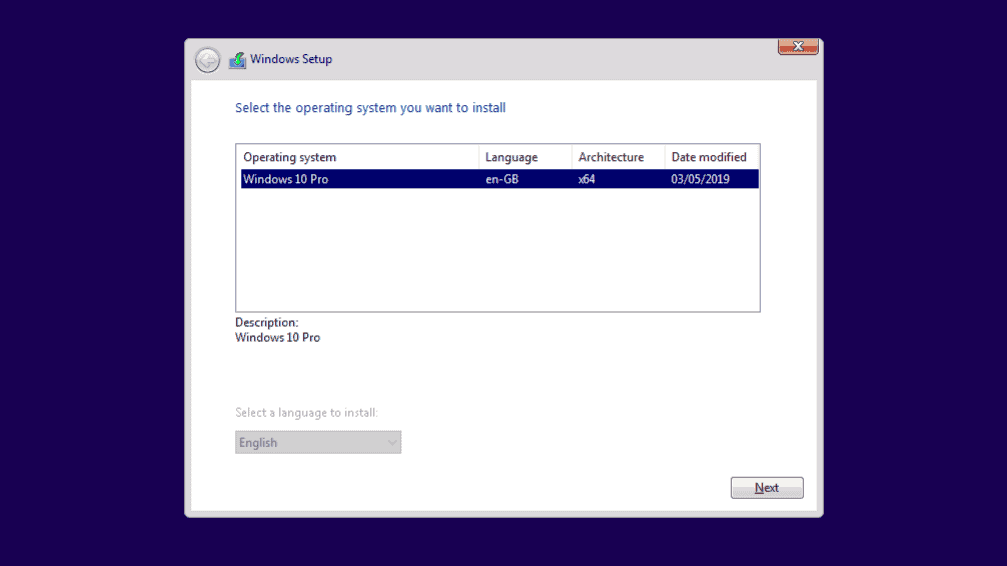
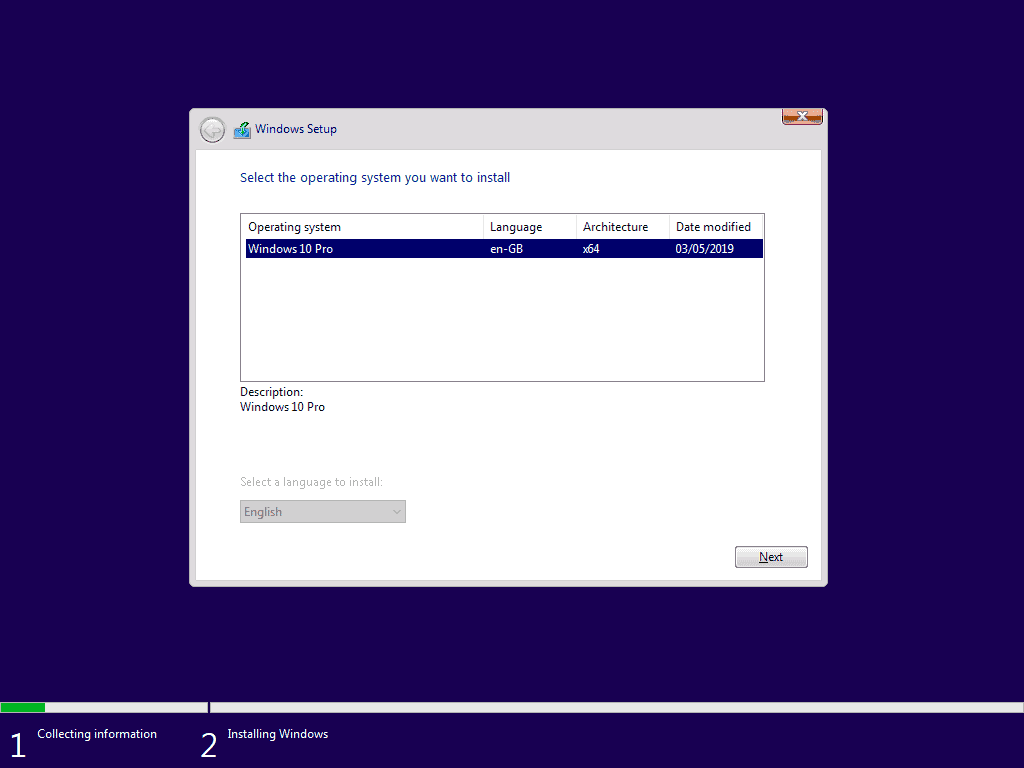
- If your credentials are correct, you will receive the option to select an Operating System to install. This is the list of the WDS install images configured on the Install Image node. Select one and click Next.
- To install windows 10 from network, select a hard drive to install Windows. Then click Next.

- The installation will start. Wait for Windows 10 setup to complete this phase.

- When setup completes this installation phase, your PC will restart.

- Then it will initiate the next install phase. The installer will stay on the Getting Ready screen for some time (See the second image below)..


- When the screen below loads, confirm the options are okay. Then click Next.

- If you receive this message, click Next.

- From this point, the installation is very straightforward.

Conclusion
I hope this guide was helpful. If you have a question or comment, use the “Leave a Reply” form found at the end of this guide.
For more Windows guides visit our Windows How To page.
How to Install Any Version of Windows from Other Network Computers
Talk about a complex thing to do: installing Windows over the network. Even installing it via a USB drive is simpler. However, this doesn’t mean it cannot be done. Using a free tool named Serva and a bit of time and attention, anyone can set up his/her network environment so that Windows installations are performed with ease, from one network computer. Here’s how the whole process works!
VERY IMPORTANT Prerequisites
There are many things you need to prepare beforehand, so that everything works smoothly. Please don’t skip any of these elements or the likelihood of failure will be high:
- You need to download and extract a little tool named Serva. Download the appropriate version for your operating system (32-bit or 64-bit). You will notice that there are a “Non-Supporter” version and a “Supporter” version. The free one is the “Non-Supporter” version. It includes a small annoyance when you start it, plus a few limitations that won’t impact you unless you are a network admin or IT professional who needs to install lots of operating systems on many network computers. If you are such a professional, go ahead and purchase the “Supporter” version which costs a fair $29.99.
- This software is a bit finicky. It doesn’t like long folder structures and installation folders, spaces and special characters. Therefore, extract it in a folder with a short name, directly on the root of one of your computer’s partitions. For example, I extracted it at “D:SERVA”. Choose a similar path on your computer.
Step 1 – Run Serva & Make Its Initial Configuration
Run Serva as administrator. The free version will ask you to wait for 7 seconds before you can use it. Once the wait is over, click “Thanks, not today”.
Its window is now open. Click Settings.
First, go to the DHCP tab. If your computers are part of the same network and the management of IP Addresses is taken care of by your router, enable these settings: proxyDHCP and BINL.
BINL is a special add-on that acts as a DHCP protocol extension and it is used by Serva during its preparation and maintenance procedures. proxyDHCP is a special setting that tells Serva that it doesn’t need to act as a DCHP server in order to provide IP addresses to the computers connecting to it.
Even though Serva’s developers don’t recommending enabling this setting, we have learned in our testing that it helps eliminate some issues. Therefore, also enable the box which says “Bind DHCP to this address” and leave the default IP address that is provided.
There is no need to modify other settings in this tab. Next, go to the TFTP tab.
TFTP comes from Trivial File Transfer Protocol and it is the protocol used by Serva to transfer files over the network. This protocol needs a bit of configuration as well.
First, check the box near TFTP Server. Then, you need to specify the so called “root” directory. This is the directory where you plan to store the Windows installation files. This folder can be the same folder where you extracted Serva or a new one. Keep in mind that you should use short paths and avoid using spaces and special characters (*, &, “, etc) in the directory name or its path.
To help eliminate problems in some networking environments, you might want to also check the box near “Bind TFTP to this address” and leave the default IP address unchanged.
Press OK to save your settings. Then close Serva and start it again (as administrator). During the restart, it will create a special folder structure in the root folder you specified.
Amongst those folders, you must find one named WIA_WDS and another named WIA_RIS. If they are not found inside the root folder you specified, something went wrong with Serva’s configuration. If all is well, go ahead and read the next section in this article.
Step 2 – Copy the Windows Installation Files
Go to the root folder you specified. Here, you need to copy the Windows installation files, as they are, without any modifications from your side.
If you want to install older versions of Windows like Windows XP or Windows 2000, you need to copy those files in the WIA_RIS folder. Since these operating systems are very old and we don’t recommend using them, we won’t provide specific instructions for them.
If you plan to install Windows Vista, Windows 7 or Windows 8, then open the WIA_WDS folder. There, create a new folder named according to the Windows version you want to copy. Use simple folder names, with no spaces or special characters. For example, I used Windows_7.
Create separate folders, with different names for all the Windows versions you plan to install over the network, using Serva.
Inside that folder, copy and paste all the installation files for the Windows version you want to install over the network. Simply go to the root of the installation disc, and copy its entire file and folder structure.
Step 3 – Start Serva
Start Serva again, as administrator and wait for it to detect the installation files you added. It will create its special folder structure, required to distribute the installation files over the network.
Then, close Serva and go to the next step.
Step 4 – Copy the Network Card Driver(s)
Next, you need to copy the network card drivers for the computer(s) on which you want to install Windows.
Go the folder where you copied the installation files. In my case it was “D:serva” (both the root and Serva installation folder), followed by “WIA_WDSWindows_7”.
There, go to “$OEM$$1DriversNIC”. If you can’t find these folders, create them yourself.
Then, extract the network card drivers and place them inside. If your drivers come as a setup.exe or as a self-extractable archive, extract it first. Make sure the driver’s “.inf” and “.cat” files are stored directly in the NIC folder.
Step 5 – Share WIA_WDS Folder with the Network
In order for Serva to distribute the Windows installation files over the network, they need to be shared with the network, so that other computers can access them. Unfortunately, Serva requires you to share the WIA_WDS folder (and not its subfolders or other folders) using a very specific share name: WIA_WDS_SHARE. Using any other share name means that the installation procedure is likely to fail.
To share this folder with the name we mentioned, you first need to enable advanced sharing in Windows and then share it. Here’s how advanced sharing works in Windows: Share Libraries or Folders Using Advanced Sharing.
You must give the user Everyone read-only permissions. You can also share this folder with specific user accounts, whose login details you will use later on, during the network installation process. Again, read-only permissions are enough.
Step 6 – Start Serva
Start Serva again, using administrator permissions. It will detect the network drivers you added and make a few changes, so that the drivers are distributed correctly when you launch the installation process on other computers. You can now leave it open and waiting for network connections.
Next, go to the computer(s) where you want to install Windows.
Step 7 – On the Target PC – Enable Lan Booting & Boot from the Network
Go to the computer where you want to install Windows and enter its BIOS. Make sure networking booting is enabled. This setting can be named “Boot from the network” or “Boot from PXE”.
Then, start the computer and press the required key to bring up the Boot Menu. On most computers, you need to press F12 or F8, depending on the BIOS version. Select Network or PXE (again, this depends on your computer’s BIOS), to boot from the network, using Serva.
If all is well, you should see a screen similar to the one below, where the computer’s MAC is displayed and the network card requests an IP address via DHCP.
When the computer is connected to the network, Serva loads and displays a screen with the operating systems available for installation. Pick the one you want and press ENTER.
The installation files are loaded and a small window named ServaPENet is shown. At this step, Serva installs the network driver you added earlier, loads network resources and connects to the Windows installation folder. Depending on how you shared the WIA_WDS folder, it will ask you to provide a username and password to access it. Type the details of the user account you shared it with and connect.
If all went well, the Windows installation process is now started.
Step 8 – Install Windows Over the Network
Next, continue with the Windows installation, as usual. If you plan to install Windows 8, check this installation guide: How to Install Windows 8 RTM on Your Computer.
Troubleshooting Problems with Serva
If you don’t pay attention to all the steps in this procedure, some things are likely to fail. Here are some things we learned while experimenting with this tool:
- If ServaPENet returns this error: “Failed No NIC/Driver, Aborting!”, it means that you forgot to copy the network card drivers as instructed at Step 4. If you copied them and you still get the error, double check that you have the correct driver for the network card of the computer where you want to install Windows, for the Windows version you are about to install. Also, double check that you copied it to the correct folder. Then, restart Serva to make sure it detects the driver before the network installation procedure starts.
- If, on the target computer, Serva is not able to load at all over the network, consider enabling the “Bind DHCP to this address” and “Bind TFTP to this address” settings in the DHCP and TFTP tabs.
- If you connected two computers directly, with a crossover cable, you need to set Serva as DHCP server, in order for everything to work. This means setting the 1st address available in the IP pool, the pool size, and the subnet mask to be used when Serva assigns IP addresses.
Another good tip is to restart Serva every time you change any of its settings and every time you add something to its root folder.
Since we are not the developers of this software, we cannot provide support for it and help you with all the issues you might encounter. If our guide does not help you, then double check Serva’s documentation – Serva PXE/BINL – AN01: Windows Install and advanced configuration guide – Advanced Topics on TFTP.
Conclusion
As you can see from this guide, setting things up with Serva requires quite a bit of time and attention. However, it is the simplest way of installing any modern version of Windows over the network. It works great both for home networks and small or medium sized business networks.
If you know other useful tools for installing Windows over the network, don’t hesitate to share them using the comments form below.


