Use PowerShell to Quickly Find Installed Software

November 13th, 2011
Summary: Learn how to use Windows PowerShell to quickly find installed software on local and remote computers.
Microsoft Scripting Guy Ed Wilson here. Guest Blogger Weekend concludes with Marc Carter. The Scripting Wife and I were lucky enough to attend the first PowerShell User Group meeting in Corpus Christi, Texas. It was way cool, and both Marc and his wife Pam are terrific hosts. Here is what Marc has to say about himself.
I am currently a senior systems administrator with the Department of the Army. I started in the IT industry in 1996 with DOS and various flavors of *NIX. I was introduced to VBScript in 2000, and scripting became a regular obsession sometime in 2005. In 2008, I made the move to Windows PowerShell and have never looked back. My daily responsibilities keep me involved with Active Directory, supporting Microsoft Exchange, SharePoint, and various ASP.NET applications. In 2011, I founded the Corpus Christi PowerShell User Group and try to help bring others up to speed on Windows PowerShell.
Take it away, Marc!
One of the life lessons I have learned over the years working in the IT field as a server administrator is that there are often several different valid responses to a situation. It’s one of the things that makes work interesting. Finding the “best” solution to a problem is one of the goals that I think drives many people who are successful at what they do. Occasionally, the best solution is the path of least resistance.
This is one things I love most about working with Windows PowerShell (and scripting in general) is that most problems have more than one solution. Sometimes the “right” way to do something comes down to a matter of opinion or preference. However, sometimes the best solution is dictated by the environment or requirements you are working with.
For instance, let us talk about the task of determining which applications are installed on a system. If you’re familiar with the Windows Management Instrumentation (WMI) classes and the wealth of information that can be gathered by utilizing the Get-WmiObject cmdlet, an obvious choice might be referencing the Win32_product class . The Win32_Product represents products as they are installed by Windows Installer. It is a prime example of many of the benefits of WMI. It contains several useful methods and a variety of properties. At first glance, Win32_Product would appear to be one of those best solutions in the path of least resistance scenario. A simple command to query Win32_Product with the associated output is shown in the following image.
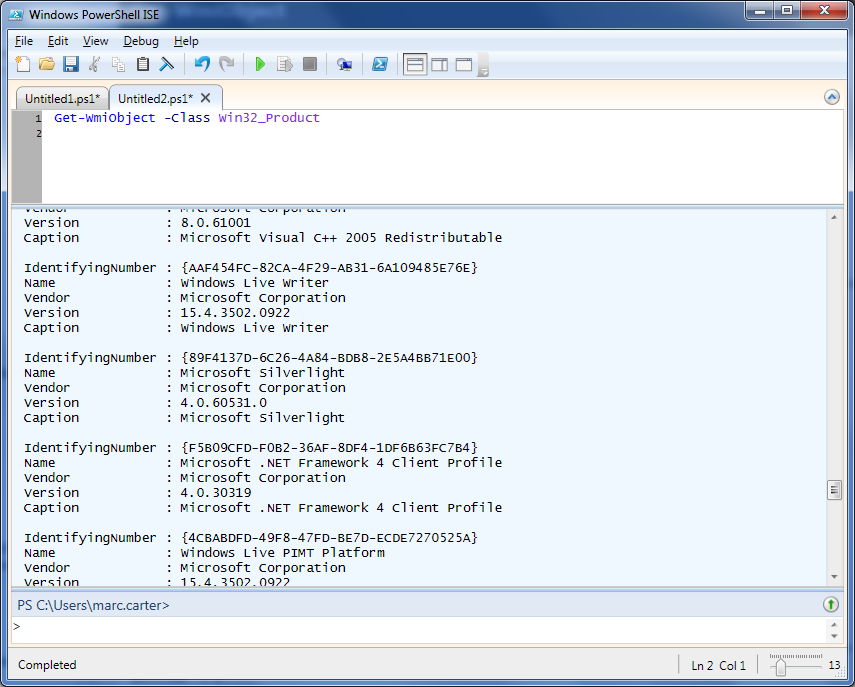
The benefits of this approach are:
- This is a simple and straightforward query: Get-WmiObject -Class Win32_Product.
- It has a high level of detail (for example, Caption, InstallDate, InstallSource, PackageName, Vendor, Version, and so on).
However, because we are talking about alternative routes, let us look at another way to get us to arrive at the same location before we burst the bubble on Win32_Product. Remember, we are simply looking for what has been installed on our systems, and because we have been dealing with WMI, let’s stay with Get-WmiObject, but look at a nonstandard class, Win32Reg_AddRemovePrograms.
What is great about Win32Reg_AddRemovePrograms is that it contains similar properties and returns results noticeably quicker than Win32_Product. The command to use this class is shown in the following figure.

Unfortunately, as seen in the preceding figure, Win32Reg_AddRemovePrograms is not a standard Windows class. This WMI class is only loaded during the installation of an SMS/SCCM client. In the example above, running this on my home laptop, you will see the “Invalid class” error if you try querying against it without an SMS/SCCM client installation. It is possible (as Windows PowerShell MVP Marc van Orsouw points out) to add additional keys to WMI using the Registry Provider, and mimic what SMS/SCCM does behind the scenes. Nevertheless, let us save that for another discussion.
One other possibly less obvious and slightly more complicated option is diving into the registry. Obviously, monkeying with the registry is not always an IT pro’s first choice because it is sometimes associated with global warming. However, we are just going to query for values and enumerate subkeys. So let’s spend a few moments looking at a method of determining which applications are installed courtesy of another Windows PowerShell MVP and Honorary Scripting Guy Sean Kearney (EnergizedTech). In a script that Sean uploaded to the Microsoft TechNet Script Center Repository , Sean references a technique to enumerate through the registry where the “Currently installed programs” list from the Add or Remove Programs tool stores all of the Windows-compatible programs that have an uninstall program. The key referred to is HKEY_LOCAL_MACHINE\SOFTWARE\Microsoft\Windows\CurrentVersion\Uninstall. The script and associated output are shown in the following figure.
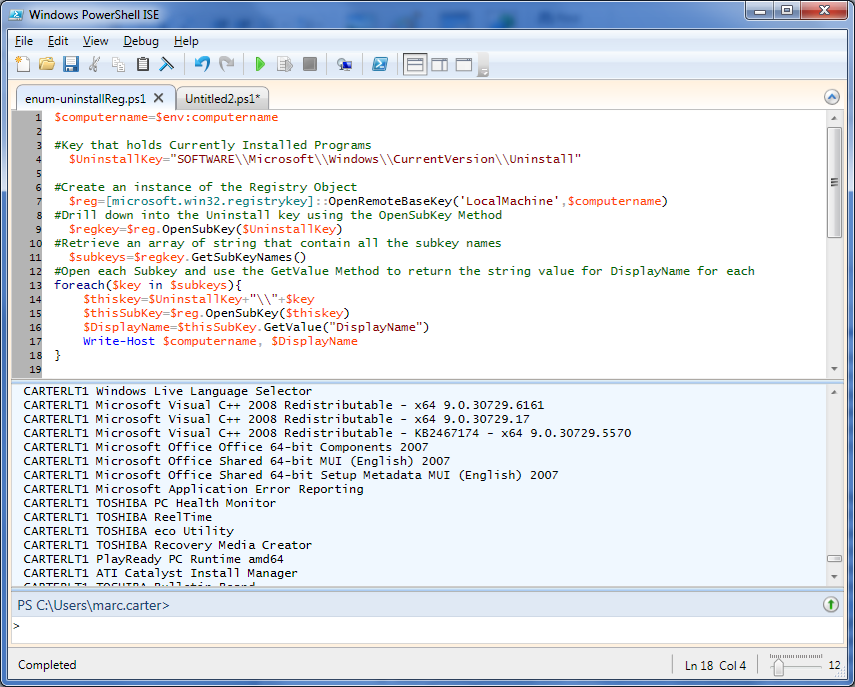
Here are the various registry keys:
#Define the variable to hold the location of Currently Installed Programs
$UninstallKey=”SOFTWARE\\Microsoft\\Windows\\CurrentVersion\\Uninstall”
#Create an instance of the Registry Object and open the HKLM base key
$reg=[microsoft.win32.registrykey]::OpenRemoteBaseKey(‘LocalMachine’,$computername)
#Drill down into the Uninstall key using the OpenSubKey Method
$regkey=$reg.OpenSubKey($UninstallKey)
#Retrieve an array of string that contain all the subkey names
$subkeys=$regkey.GetSubKeyNames()
#Open each Subkey and use the GetValue Method to return the string value for DisplayName for each
At this point, if you are anything like me, you are probably thinking, “I’ll stick with a one-liner and use Win32_Product.” But this brings us back to why we started looking at alternatives in the first place. As it turns out, the action of querying Win32_Product has the potential to cause some havoc on your systems . Here is the essence of KB974524.
The Win32_product class is not query optimized. Queries such as “select * from Win32_Product where (name like ‘Sniffer%’)” require WMI to use the MSI provider to enumerate all of the installed products and then parse the full list sequentially to handle the “where” clause:,
- This process initiates a consistency check of packages installed, and then verifying and repairing the installations.
- If you have an application that makes use of the Win32_Product class, you should contact the vendor to get an updated version that does not use this class.
On Windows Server 2003, Windows Vista, and newer operating systems, querying Win32_Product will trigger Windows Installer to perform a consistency check to verify the health of the application. This consistency check could cause a repair installation to occur. You can confirm this by checking the Windows Application Event log. You will see the following events each time the class is queried and for each product installed:
Event ID: 1035
Description: Windows Installer reconfigured the product. Product Name:
. Product Version: . Product Language: . Reconfiguration success or error status: 0.

Event ID: 7035/7036
Description: The Windows Installer service entered the running state.

Windows Installer iterates through each of the installed applications, checks for changes, and takes action accordingly. This would not a terrible thing to do in your dev or test environment. However, I would not recommend querying Win32_Product in your production environment unless you are in a maintenance window.
So what is the best solution to determine installed applications? For me, it is reading from the registry as it involves less risk of invoking changes to our production environment. In addition, because I prefer working with the ISE environment, I have a modified version of Sean’s script that I store in a central location and refer back to whenever I need an updated list of installed applications on our servers. The script points to a CSV file that I keep up to date with a list of servers from our domain.
$computers = Import-Csv “D:\PowerShell\computerlist.csv”
foreach($pc in $computers)<
#Define the variable to hold the location of Currently Installed Programs
#Create an instance of the Registry Object and open the HKLM base key
#Drill down into the Uninstall key using the OpenSubKey Method
#Retrieve an array of string that contain all the subkey names
#Open each Subkey and use GetValue Method to return the required values for each
foreach($key in $subkeys)<
$obj = New-Object PSObject
$obj | Add-Member -MemberType NoteProperty -Name “ComputerName” -Value $computername
$obj | Add-Member -MemberType NoteProperty -Name “DisplayName” -Value $($thisSubKey.GetValue(“DisplayName”))
$obj | Add-Member -MemberType NoteProperty -Name “DisplayVersion” -Value $($thisSubKey.GetValue(“DisplayVersion”))
$obj | Add-Member -MemberType NoteProperty -Name “InstallLocation” -Value $($thisSubKey.GetValue(“InstallLocation”))
$obj | Add-Member -MemberType NoteProperty -Name “Publisher” -Value $($thisSubKey.GetValue(“Publisher”))
$array | Where-Object < $_.DisplayName >| select ComputerName, DisplayName, DisplayVersion, Publisher | ft -auto
My modified version of Sean’s script creates a PSObject to hold the properties I am returning from each registry query, which then get dumped into an array for later use. When I am done, I simply output the array and pass it through a Where-Object to display only those entries with something in the DisplayName. This is handy because I can then refer back to just the array if I need to supply different output. Say I want to only report on a specific server. I’d change Where-Object to something like this:
In conclusion, if you have added Windows PowerShell to your IT tool belt, you have plenty of go-to options when someone asks you, “What’s the best solution to a problem?”
Thank you, Marc, for writing this post and sharing with our readers
rcmdnk / install.vbs
| ‘ Set basic objects |
| Set wssh = WScript.CreateObject( «WScript.Shell» ) |
| Set fs = WScript.CreateObject( «Scripting.FileSystemObject» ) |
| Set nw = WScript.CreateObject( «WScript.Network» ) |
| Set sh = CreateObject( «Shell.Application» ) |
| ‘ Basic Values |
| progFiles = «C:\Program Files» |
| startMenu = wssh.SpecialFolders( «AllUsersPrograms» ) |
| defRoot = «C:\Users\» & nw.UserName & «\Downloads» |
| ‘ Pathes |
| sName = Wscript.ScriptName |
| pPath = «» |
| pName = «» |
| ‘ Set Folder to install |
| Set objFolder = sh.BrowseForFolder( 0 , «Choose Program Folder to be installed.» , 1 , defRoot) |
| ‘ Check Folder |
| If objFolder is Nothing then |
| WScript.Quit |
| Else |
| pPath = objFolder.Items.Item.Path |
| pName = objFolder.Items.Item.Name |
| End If |
| If Not fs.FolderExists(pPath) then |
| MsgBox pPath & » is not found!» ,,sName |
| WScript.Quit |
| End If |
| If fs.FolderExists(progFiles & «\» & pName) then |
| MsgBox pName & » is already installed in » & progFiles & «.» ,,sName |
| WScript.Quit |
| End If |
| If fs.FolderExists(startMenu & «\» & pName) then |
| MsgBox pName & » exists in » & startMenu & «, but not in » & progFiles & «, please check.» ,,sName |
| WScript.Quit |
| End If |
| ‘ Copy Folder to progFiles |
| fs.CopyFolder pPath,progFiles & «\» & pName |
| ‘ Make symbolic links to startMenu |
| Set objExec = wssh.Exec( «cmd /C mklink /D «»» & startMenu & «\» & pName & «»» «»» _ |
| & progFiles & «\» & pName & «»»» ) |
| Do Until objExec.StdErr.AtEndOfStream |
| strLine = objExec.StdErr.ReadLine |
| MsgBox strLine |
| Loop |
You can’t perform that action at this time.
You signed in with another tab or window. Reload to refresh your session. You signed out in another tab or window. Reload to refresh your session.
Add a Custom Script to Windows Setup
Windows Setup scripts: Setupcomplete.cmd and ErrorHandler.cmd are custom scripts that run during or after the Windows Setup process. They can be used to install applications or run other tasks by using cscript/wscript scripts.
- %WINDIR%\Setup\Scripts\SetupComplete.cmd: This script runs immediately after the user sees the desktop. This setting is disabled when using OEM product keys. It runs with local system permission.
- %WINDIR%\Setup\Scripts\ErrorHandler.cmd: This script runs automatically when Setup encounters a fatal error. It runs with local system permission.
Windows Unattend scripts: Create an Unattend.xml file with one of these settings to run during the Windows Setup process. This can be used with OEM product keys.
To run services or commands that can start at the same time, use RunAsynchronousCommands. To run commands that need to finish before other commands can start, use RunSynchronousCommands.
NoteВ В As of WindowsВ 10, Microsoft-Window-Shell-Setup\LogonCommands\AsynchronousCommand now works like LogonCommands\AsynchronousCommand: all commands using these unattend settings are now started at the same time, and no longer wait for the previous command to finish.
Some of these settings run in the user context, others run in the system context depending on the configuration pass.
Add Microsoft-Windows-Setup\RunAsynchronousCommand or RunSynchronousCommand to run a script as Windows Setup starts. This can be helpful for setting hard disk partitions.
Add Microsoft-Windows-Deployment\RunAsynchronousCommand or RunSynchronousCommand to the auditUser configuration pass to run a script that runs when the PC enters audit mode. This can be helpful for tasks like automated app installation or testing.
Add Microsoft-Windows-Shell-Setup\LogonCommands\AsynchronousCommand or FirstLogonCommands\SynchronousCommand to run after the Out of Box Experience (OOBE) but before the user sees the desktop. This can be especially useful to set up language-specific apps or content after the user has already selected their language.
Use these scripts sparingly because long scripts can prevent the user from reaching the Start screen quickly. For retail versions of Windows, additional restrictions apply to these scripts. For info, see the Licensing and Policy guidance on the OEM Partner Center.
NoteВ В When you add a script using FirstLogonCommands, it will be triggered on the next boot, even if you boot into audit mode using Ctrl+Shift+F3. To boot to audit mode without triggering these scripts, add the setting: Microsoft-Windows-Deployment\Reseal\Mode = Audit.
Run a script after setup is complete (SetupComplete.cmd)
Order of operations
After Windows is installed but before the logon screen appears, WindowsВ Setup searches for the SetupComplete.cmd file in the %WINDIR%\Setup\Scripts\ directory.
If a SetupComplete.cmd file is found, Windows Setup runs the script. WindowsВ Setup logs the action in the C:\Windows\Panther\UnattendGC\Setupact.log file.
Setup does not verify any exit codes or error levels in the script after it executes SetupComplete.cmd.
WarningВ В You cannot reboot the system and resume running SetupComplete.cmd. You should not reboot the system by adding a command such as shutdown -r. This will put the system in a bad state.
If the computer joins a domain during installation, the Group Policy that is defined in the domain is not applied to the computer until Setupcomplete.cmd is finished. This is to make sure that the Group Policy configuration activity does not interfere with the script.
Run a script if WindowsВ Setup encounters a fatal error (ErrorHandler.cmd)
This script is useful when you’re installing many systems at the same time. This helps you detect when an error occurs during WindowsВ Setup. When it does, Setup automatically runs a script that can contain custom commands or actions to address the cause of the error.
If WindowsВ Setup encounters a fatal error and is prevented from completing the installation, WindowsВ Setup searches for a command script in the following directory: %WINDIR%\Setup\Scripts\ErrorHandler.cmd. One of two actions will occur, depending on whether the script is found.
- If the script is not found, a dialog box is displayed with the error text. A user must dismiss the dialog box before WindowsВ Setup exits.
- If the script is found, the script executes synchronously. No dialog box or error text is displayed. After the ErrorHandler.cmd script has finished running, WindowsВ Setup exits.
Depending on the phase of WindowsВ Setup, the computer will return to the environment from which WindowsВ Setup was executed, such as an earlier version of the operating system or Windows Preinstallation Environment (WindowsВ PE), for example.


