- Roadmap for Device and Driver Installation
- Device Installation Files
- System-Provided Device Installation Components
- Add Device Drivers to Windows During Windows Setup
- Add Drivers to New Installations (windowsPE)
- How to properly update device drivers on Windows 10
- How to update drivers on Windows 10 using Windows Update
- How to update drivers on Windows 10 using Device Manager
- How to update graphics drivers on Windows 10
- Download graphics driver manually
- Download graphics driver automatically
- How to determine if a driver updated successfully on Windows 10
- More Windows 10 resources
- The Dell XPS 15 is our choice for best 15-inch laptop
- Halo: MCC’s live service elements make it better, not worse
- Microsoft’s Surface Duo is not ‘failing up’
- These are the best PC sticks when you’re on the move
Roadmap for Device and Driver Installation

To install a device and driver in the WindowsВ operating system, follow these steps:
Step 1: Learn the fundamentals of device and driver installation in Windows.
You must understand the fundamentals of device and driver installation in the Windows family of operating systems. This will help you to make appropriate design decisions and will allow you to streamline your development process. For more information, see Overview of Device and Driver Installations.
Step 2: Learn about driver packages and their components.
A driver package consists of all the components that you must supply to install your device and support it under Windows.
To install a device or a driver, you must have system-supplied and vendor-supplied components. The system provides generic installation software for all device classes. Vendors must supply one or more device-specific components within the driver package.
For more information, see Driver Packages.
Step 3: Learn about information (INF) files.
An INF file contains the information and device settings which the system-provided device installation components use to install your driver package, such as the driver for the device and any device-specific applications.
For more information, see INF Files.
Step 4: Create a driver package for your device and drivers.
Your driver package must provide an INF file, the device’s driver files, as well as optionally provide additional software components. You may refer to the sample Toaster driver package to determine which components are needed for your driver package.
For more information about the components of a driver package, see Creating a Driver Package.
For more information about driver packages, see the Toaster Sample.
Step 5: Test-sign your driver package during development and testing.
Test-signing refers to using a test certificate to sign a prerelease version of a driver package for use on test computers. In particular, this allows developers to sign driver packages by using self-signed certificates, such as those the MakeCert tool generates. This capability allows developers to install and test driver packages in Windows with driver signature verification enabled.
Step 6: Release-sign your driver package for distribution.
After you have tested and verified your driver package, you should release-sign the driver package. Release-signing identifies the publisher of a driver package. While this step is optional, driver packages should be release-signed for the following reasons:
Ensure the authenticity, integrity, and reliability of driver packages. Windows uses digital signatures to verify the identity of the publisher and to verify that the driver has not been altered since it was published.
Provide the best user experience by facilitating automatic driver installation.
Run kernel-mode drivers on 64-bit versions of Windows Vista and later versions of Windows.
Playback certain types of next-generation premium content.
Driver packages are release-signed through either:
A WHQL Release Signature obtained through the Windows Hardware Compatibility Program (for Windows 10), or the Windows Hardware Certification Program (for Windows 8/8.1 and older operating systems).
A release signature created through a Software Publisher Certificate (SPC).
Step 7: Distribute your driver package.
The final step is to distribute the driver package. If your driver package meets the quality standards that are defined in the the Windows Hardware Compatibility Program (for Windows 10), or the Windows Hardware Certification Program (for Windows 8/8.1 and older operating systems), you can distribute it through Microsoft Windows Update program. For more information, see Publishing a driver to Windows Update.
These are the basic steps. Additional steps might be necessary based on the installation needs of your individual device and driver.
Device Installation Files
The software that is required to support a particular device depends on the kind of device and the ways in which the device is used. Typically, a vendor provides the following software in a driver package to support a device:
A device setup information file (INF file)
An INF file contains information that the system Windows components use to install support for the device. Windows copies this file to the %SystemRoot%\inf directory when it installs the driver. This file is required.
For more information, see Creating an INF File.
One or more drivers for the device
A .sys file is the driver’s image file. Windows copies this file to the %SystemRoot%\system32\drivers directory when the driver is installed. Drivers are required for most devices.
Digital signatures for the driver package (a driver catalog file)
A driver catalog file contains digital signatures. All driver packages should be signed.
A vendor obtains digital signatures by submitting its driver package to the Windows Hardware Quality Lab (WHQL) for testing and signing. WHQL returns the package with a catalog file (.cat file).
Other files
A driver package can contain other files, such as a custom device installation application, a device icon, or a driver library file (such as for video drivers).
Also, see the device-type-specific documentation in the WDK.
The WDK includes various sample installation files. For more information, see Sample Device Installation Files
System-Provided Device Installation Components
The following list describes the device installation components that are provided by the Windows operating system:
Plug and Play (PnP) Manager
The Plug and Play (PnP) manager provides the following support for PnP functionality within Windows:
- Device detection and enumeration while the system is booting
- Adding or removing devices while the system is running
For more information, see PnP Manager.
SetupAPI
The Setup application programming interface (SetupAPI) includes the general setup functions (SetupXxx) and the device installation functions (SetupDiXxx and DiXxx). These functions perform many device installation tasks such as searching for INF files, building a potential list of drivers for a device, copying driver files, writing information to the registry, and registering device co-installers. Most of the other device installation components call these functions.
For more information, see SetupAPI.
Configuration Manager API
The PnP configuration manager API provides basic installation and configuration operations that are not provided by SetupAPI. The PnP configuration manager functions perform low-level tasks such as obtaining the status of a device node (devnode) and managing resource descriptors. These functions are primarily called by SetupAPI but can also be called by other device installation components.
Driver Store
The driver store is a trusted collection of in-box and third-party driver packages. The operating system maintains this collection in a secure location on the local hard disk. Only the driver packages in the driver store can be installed for a device.
For more information, see Driver Store.
Device Manager
With Device Manager, you can view and manage the devices on a system. For example, you can view device status and set device properties.
For more information, see Using Device Manager. Also, see the Help documentation in Device Manager.
Add Device Drivers to Windows During Windows Setup
To install Windows on some hardware designs, you may need to add device drivers to WindowsВ Setup. You can add drivers to Windows Setup by using an answer file that specifies the path to the driver files. To do this in new installations, you add the Microsoft-Windows-PnpCustomizationWinPE component during the windowsPE configuration pass, add the driver paths, and then specify the answer file.
You can also modify existing images and add and remove drivers. You can service offline images in several ways. For example, you can add the Microsoft-Windows-PnpCustomizationsNonWinPE component during the offlineServicing configuration pass, add or remove the driver paths, and then specify the name of the answer file. For more information about how to modify drivers on an offline Windows image by using an answer file, and also other methods of adding drivers to and removing drivers from an existing image, see Add and Remove Drivers to an Offline Windows Image.
Add Drivers to New Installations (windowsPE)
For new installations, you add drivers during the windowsPE configuration pass.
This method initializes Windows Preinstallation Environment (WindowsВ PE) and processes WindowsВ PE settings from the answer file, as follows:
Windows stages the Windows PE drivers in the RAM driver store.. Windows loads boot-critical drivers that WindowsВ PE requires to access the local disk and network. When you right-click DevicePaths and select Insert New PathAndCredentials into WindowsВ PE, Windows PE processes other WindowsВ PE customizations that the answer file specifies.
The WindowsВ Setup process applies the Windows image. Boot-critical drivers appear on the Windows image before Setup installs that image. Other drivers that you added to the WindowsВ PE driver store appear in the Windows image driver store. When Windows Setup processes the offlineServicing pass, Windows Setup also adds any drivers that the driver path specifies to the Windows image driver store.
To add a device driver during the windowsPE pass
Use Windows System Image Manager (WindowsВ SIM) to create an answer file that contains the paths to the device drivers that you intend to install.
Add the Microsoft-Windows-PnpCustomizationsWinPE component to your answer file in the windowsPE configuration pass.
Expand the Microsoft-Windows-PnpCustomizationsWinPE node in the answer file. Right-click DevicePaths, and then select Insert New PathAndCredentials.
A new PathAndCredentials list item appears.
For each location that you access, add a separate PathAndCredentials list item.
You can include multiple device driver paths by adding multiple PathAndCredentials list items. If you add multiple list items, you must increment the Key value for each path. For example, if you add two separate driver paths, the first path uses the Key value of 1 , and the second path uses the Key value of 2 .
Save the answer file, and then close WindowsВ SIM. The answer file must resemble the following example:
Boot to WindowsВ PE.
At a command prompt, run WindowsВ Setup. Specify the name of the answer file. For example:
Windows Setup adds the device drivers in the \\server\share\drivers path to the system during the setup process.
For more information about drivers, see Device Drivers and Deployment Overview and Add a Driver Online in Audit Mode. For more information about Windows components, see Unattended Windows Setup Reference.
How to properly update device drivers on Windows 10
 Source: Windows Central
On Windows 10, a device driver is an essential piece of code, which allows the system to interact with a specific hardware (such as graphics card, storage driver, network adapter, Bluetooth, etc.), as well as peripherals, including mice, keyboards, printers, monitors, and many others.
Usually, the detection and installation of device drivers happen automatically using the built-in driver library and the Windows Update service. However, sometimes, you may still need to update some devices manually for a number of reasons. For example, when Windows 10 cannot recognize a component. The device stops working after an upgrade. Windows Update installs a generic package, or you have to apply a critical fix or access a new feature quickly.
Whatever the reason it might be, Windows 10 comes with several options to manually update a device driver, including using Windows Update, Device Manager, and auto-update assistants from device manufacturers.
In this Windows 10 guide, we’ll walk you through three different methods to properly update hardware drivers on your computer. Also, we outline the steps to determine if the driver was updated successfully.
How to update drivers on Windows 10 using Windows Update
Usually, it takes time for manufacturers to make newer drivers available through Windows Update. However, it’s still the best option to download and install drivers manually. The reason is that only the packages compatible with your system configuration will be listed on this page, minimizing the chances of adding the wrong update. Also, the drivers in this channel have been tested, verified, and signed by Microsoft.
To quickly update device drivers using Windows Update, use these steps:
- Open Settings.
- Click on Update & Security.
- Click on Windows Update.
- Click the Check for updates button (if applicable).
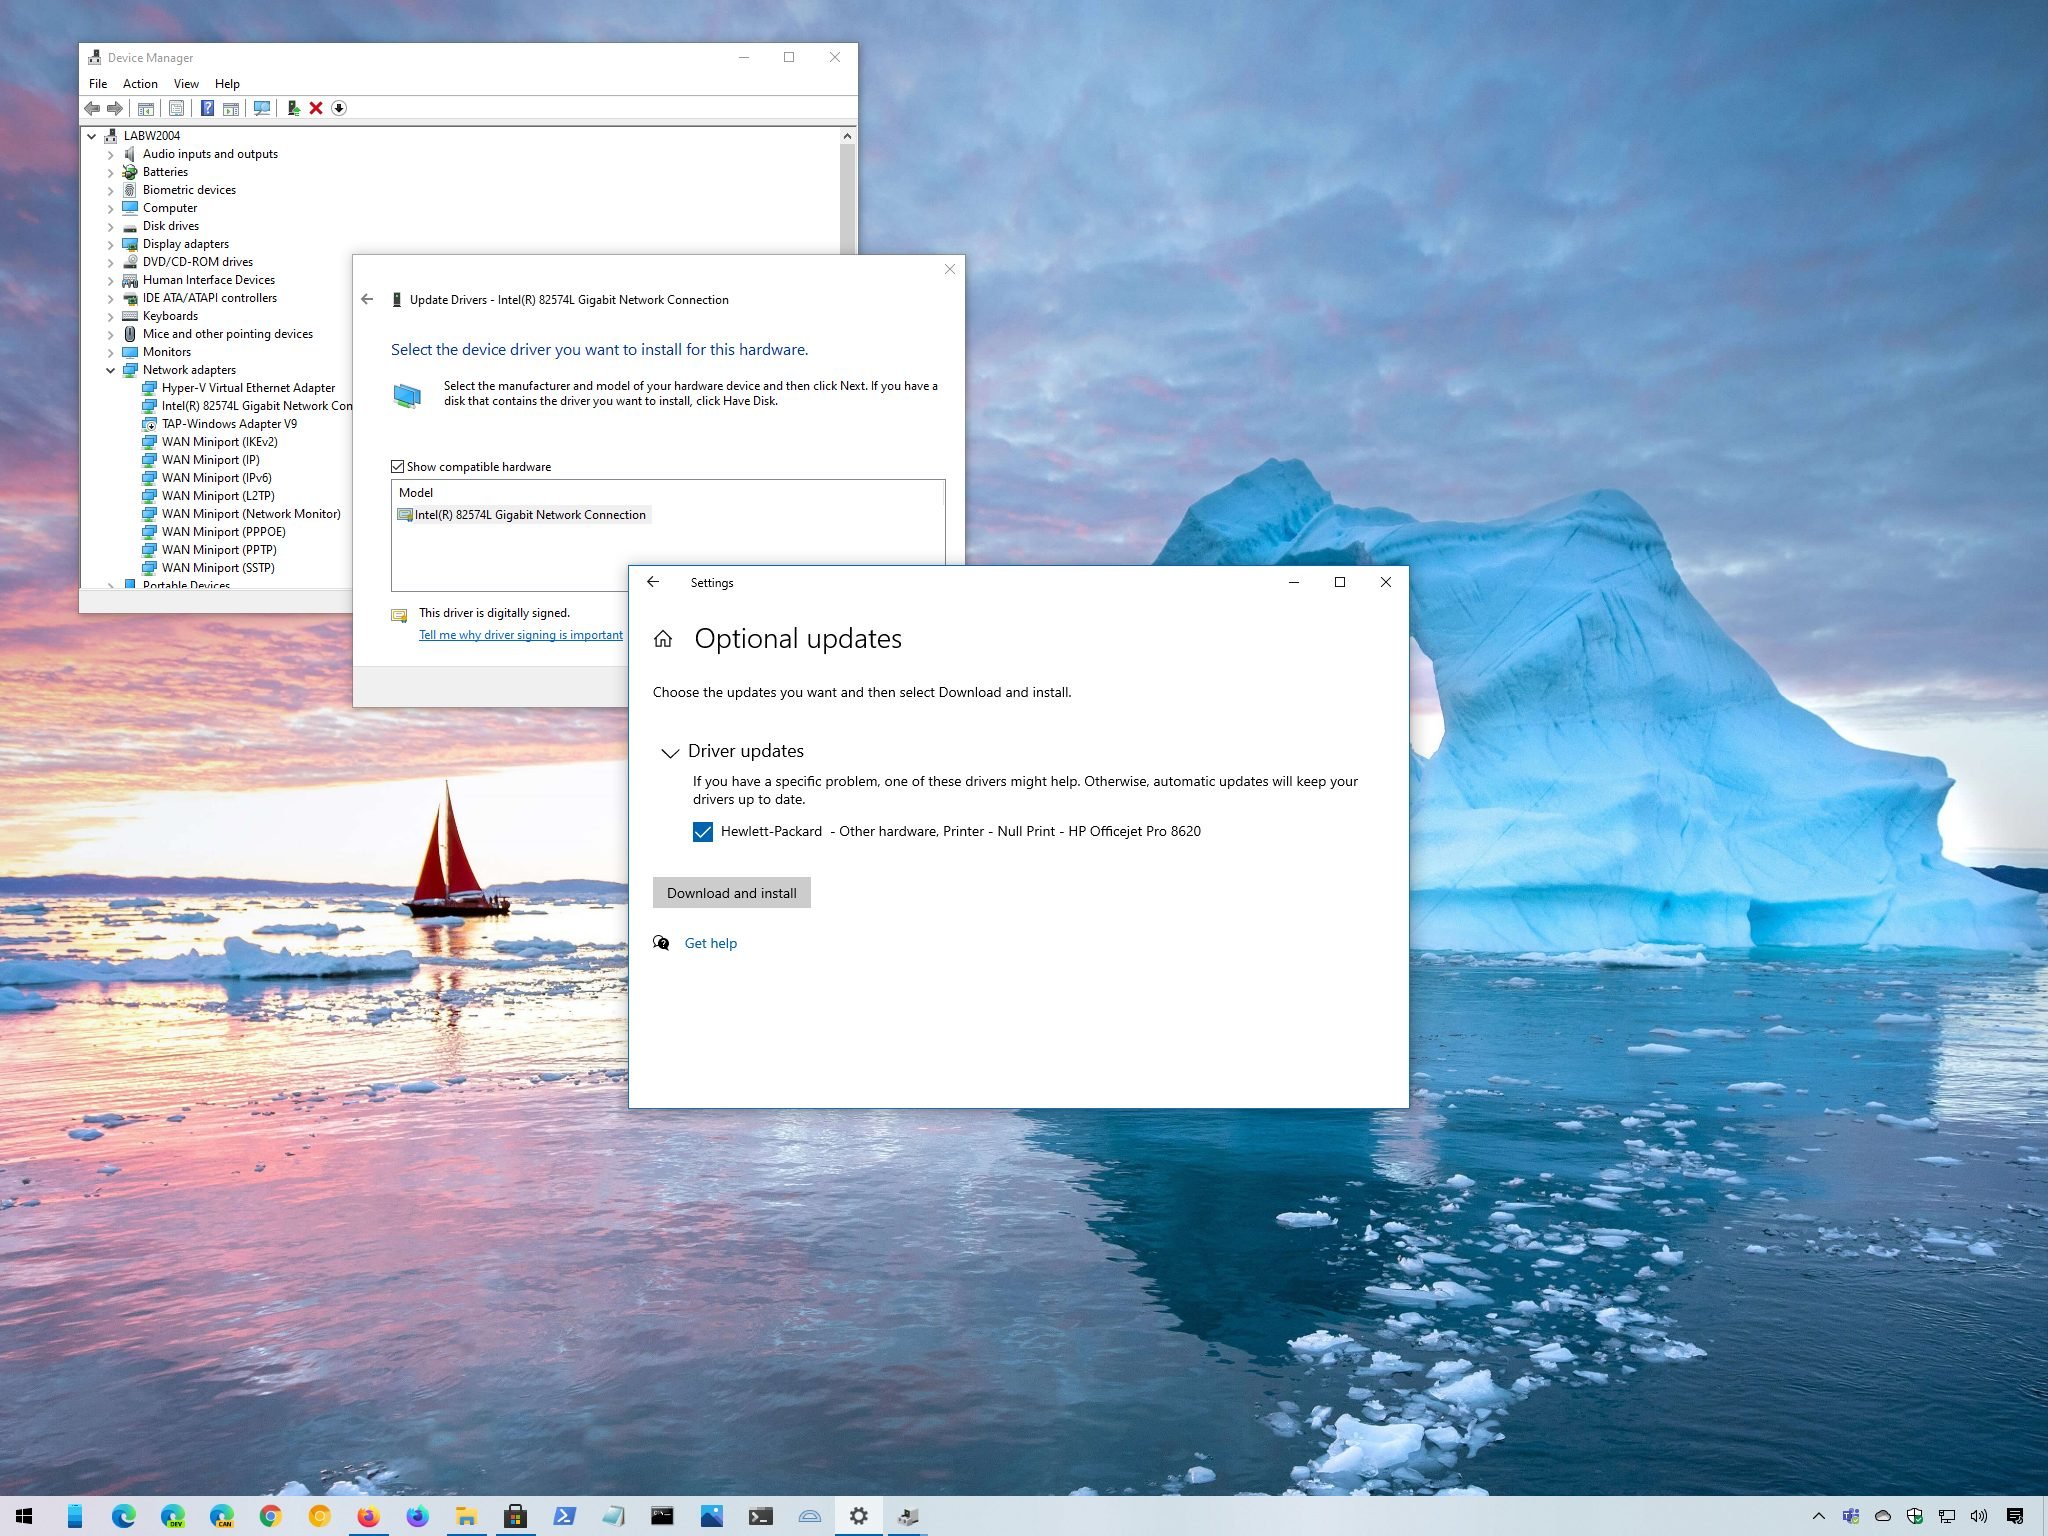
Click the View optional updates option.
 Source: Windows Central
Select the driver you want to update.
Source: Windows Central
Once you complete the steps, the newer driver will download and install automatically on your device.
If the «View optional updates» link is not available after checking for updates, then Windows Update doesn’t have any new drivers or any update for other products at that particular time.
How to update drivers on Windows 10 using Device Manager
Alternatively, you can also update drivers for a printer, wireless adapter, monitor, and other components using Device Manager.
If the driver isn’t available on Windows Update because it’s too recent or available only in beta, you will have to download and install the package from the manufacturer’s support website manually.
Usually, when downloading an update from the manufacturer, you should always use their instructions first. If the support website doesn’t offer any assistance, then double-click the installer and continue with the on-screen directions to complete the update.
In the case that you’re dealing with a self-extracting package, double-click the file to extract its content. Or use this guide to extract the content of the «.zip» compressed file, and then continue with these steps:
- Open Start.
- Search for Device Manager and click the top result to open the tool.
- Double-click the branch with the hardware you want to update.
Right-click the hardware and select the Update driver option.
 Source: Windows Central
Click the Browse my computer for driver software option.
Source: Windows Central
Click the Browse button.
Source: Windows Central
After you complete the steps, the wizard will scan, detect, and install the newer driver on your device to improve the overall experience and support with fixes and new features.
While you can manually update a component using this method, typically, you would use these steps to update the controllers for an older piece of hardware. In the case that you want to install an old printer, you can use these steps.
Historically, you could also use Device Manager to download drivers directly from the Windows Update service. However, it’s no longer possible since Microsoft has removed the option from Device Manager during a quality update released for the Windows 10 May 2020 Update. As a result, moving forward, when a new driver update is detected on your computer, it’ll appear automatically in the Windows Update settings, more specifically, inside the optional updates page.
How to update graphics drivers on Windows 10
Typically, if the graphics card is working, it’s never a good idea to update its driver. However, graphics card manufacturers are known to rollout updates periodically to improve the experience, support, fix bugs, and add more functionalities, especially for games.
If you have to be on the most recent version of the graphics driver, instead of waiting for it to arrive through Windows Update, you can use the graphics control panel available from Nvidia, AMD, or Intel to download and install the latest updates.
You can use the links below to download the software for the brand you’re using:
After you download the app, installing it should be as easy as double-clicking the installers and going through the usual next, next, next wizard. Once you’re in the control panel, you can click the check for updates button from the driver’s section to download and install the latest driver.
Source: Windows Central
Download graphics driver manually
In the case that you don’t want to install another piece of software, you should be able to download the latest graphics driver directly from the manufacturer’s support website.
The list below includes the links to download the latest update for your graphics card directly from your manufacturer support website:
Once you downloaded the package, use the manufacturer instructions to complete the update installation. If no instructions are available, usually, you only need to launch the installer, go trough a couple of clicks, and the wizard will remove the old driver and replace it with the new version automatically.
In the case that you’re dealing with .zip or a self-extracting package, you can refer to our previous steps to complete the driver installation using Device Manager.
Download graphics driver automatically
Alternatively, if you don’t know the brand and model of the video card, some manufacturers often provide a tool to detect the driver you need automatically.
You can use the links below to download and run the auto-detect and install driver assistant for your computer:
While on the website, download the assistant, then double-click the executable, and continue with the on-screen directions to complete the driver update.
If you’re using an OEM device (such as Dell, HP, Lenovo, Asus, etc.), consider that many manufacturers (especially Intel) modify their drivers to limit, expand, or optimize the functionalities of the integrated graphics card. This means that if you have a branded device, it’s always recommended to download the latest updates from the computer manufacturer support website instead of Intel. Otherwise, your device might experience unexpected behaviors, missing configurations, or you may not be able to access all the features.
You may also be able to check the device model and brand using Device Manager with these steps:
- Open Start.
- Search for Device Manager and click the top result to open the tool.
- Expand the Display adapters branch.
Confirm the brand and model of the graphics card.
Source: Windows Central
After you complete the steps, you can use the information to download the correct driver update for your computer. If the information isn’t available, then you may have to use one of the available tools from Nvidia, AMD, or Intel to detect the driver you need. Or you could also consult your device manual to determine the hardware configuration to find the correct driver update.
How to determine if a driver updated successfully on Windows 10
Once the update has been applied, you may want to confirm that the latest version was installed correctly using Device Manager.
To see the current driver version details on Windows 10, use these steps:
- Open Start.
- Search for Device Manager and click the top result to open the tool.
- Expand the branch with the hardware you updated.
Right-click the hardware and select the Properties option.
Source: Windows Central
Confirm the «Driver Date» and «Driver Version» information.
 Source: Windows Central
Once you complete the steps, if these details match the manufacturer’s support website’s information, then the device has the latest version of the driver on Windows 10.
If the driver didn’t update correctly, repeat the steps one more time. If you continue with the same problem, make sure to ask for help in the Windows Central forums.
More Windows 10 resources
For more helpful articles, coverage, and answers to common questions about Windows 10, visit the following resources:
We may earn a commission for purchases using our links. Learn more.
![]()
The Dell XPS 15 is our choice for best 15-inch laptop
For a lot of people, a 15-inch laptop is a perfect size that offers enough screen for multitasking, and in a lot of cases, some extra performance from powerful hardware. We’ve rounded up the best of the best at this size.
![]()
Halo: MCC’s live service elements make it better, not worse
Halo: The Master Chief Collection is more popular than ever, but some fans don’t agree with the live service approach 343 Industries has taken with it. Here’s why those elements are, at the end of the day, great for the game and for Halo overall.
![]()
Microsoft’s Surface Duo is not ‘failing up’
Microsoft announced this week that it was expanding Surface Duo availability to nine new commercial markets. While Surface Duo is undoubtedly a work in progress, this is not a sign of a disaster. It’s also doesn’t mean that Surface Duo is selling a ton either. Instead, the reason for the expansion is a lot more straightforward.
![]()
These are the best PC sticks when you’re on the move
Instant computer — just add a screen. That’s the general idea behind the ultra-portable PC, but it can be hard to know which one you want. Relax, we have you covered!


