- Create Hard Disk Partitions Before Installing Windows 10/8/7
- Why create partition before installing Windows 10/8/7?
- Partition a hard drive during Windows setup
- Create partitions without OS pre-installed with free partition manager
- Windows Setup: Installing using the MBR or GPT partition style
- Why should I convert my drive?
- Reformatting the drive using a different partition style
- Make sure Windows Setup boots to the correct firmware mode
- Capture and apply Windows, system, and recovery partitions
- Capture the customized partitions
- Step 1: Determine which partitions to capture
- Step 2: Prepare to capture partitions
- Step 3: Capture images for each customized partition.
- Step 4: Save images to the network or another safe location.
- Apply the images
- Step 1: Prepare to apply partitions
- Step 2: Apply the partitions
- Step 3: Verify that it worked
Create Hard Disk Partitions Before Installing Windows 10/8/7
Learn how to create hard disk partitions before installing Windows 10/8/7 operating system on your hard drive for your system, applications, games and other data better organized.

By AOMEI  / Last Updated January 16, 2020
Why create partition before installing Windows 10/8/7?
By default, Windows will generate a system reserved partition (on MBR disk) or recovery partition (on GPT disk) and C: drive if you select an unallocated space to install Windows operating system (OS). Since GPT disks can have multiple primary partitions as you like, it is no big deal to have one or more extra small partitions on a GPT disk, but things will be different for MBR disks, because you can have at most 4 primary partitions on a MBR disk.
If your computer supports UEFI boot mode, you can convert MBR to GPT disk without data loss. Otherwise, for those people who want to install multiple OS on one MBR drive, the 4 primary partitions are really precious. Besides, you can only have three primary partitions if you have logical partition(s) on the same disk. Therefore, to make full use of the primary partitions is to allow Windows to be installed into one partition without generating a system reserved partition or system recovery partition. The only way to prevent Windows from creating another partition is to partition hard drive before installing.
Partition a hard drive during Windows setup
Windows build-in tool, Disk Management or Diskpart.exe can be used for hard drive partitioning. Disk Management can only be used when OS has been successfully loaded, so you can use Disk Management to create a new partition for another OS if you already have windows installed. If you want to create partition without Windows pre-installed on the hard drive, you can use a Windows installation disc to run Diskpart. The specific steps listed below:
1. Insert the installation disc, and boot your computer from it.
2. At the Windows Setup screen, press Shift+F10 simultaneously to open a command line prompt. If you use the New button to create partitions, it will generate a system partition for an MBR disk.
3. Type “diskpart” and press Enter.
4. At Diskpart>, run a few lines of commands to create a new partition:
в—† List disk
в—† Select disk [disk number]
в—† Create partition primary [size=n]
For example, the following command is to create a 30000 MB primary partition on disk 0:
в—† List disk
в—† Select disk 0
в—† Create primary partition size=30000
5. Then you will have created a partition around 30GB. You can use this command to create more partitions or exit.
If your hard drive has enough space, then it is recommended to allocate more than 100GB to the system drive because Windows update, installed programs, and other system files will keep consuming space on system partition. If you don’t have a Windows installation disc, then you can use third-party free partition manager software to create partition without operating system.
Create partitions without OS pre-installed with free partition manager
AOMEI Partition Assistant Standard is a freeware for disk and partition management that provides the ability to create bootable media, so you can partition a hard drive with or without OS pre-installed. If you have Windows installed on your hard drive, you can just free download this software and start to partition your hard drive without losing data. Let’s see how it works:
1. Boot your computer from the AOMEI bootable media you created. It will lead you to the main interface of AOMEI Partition Assistant.
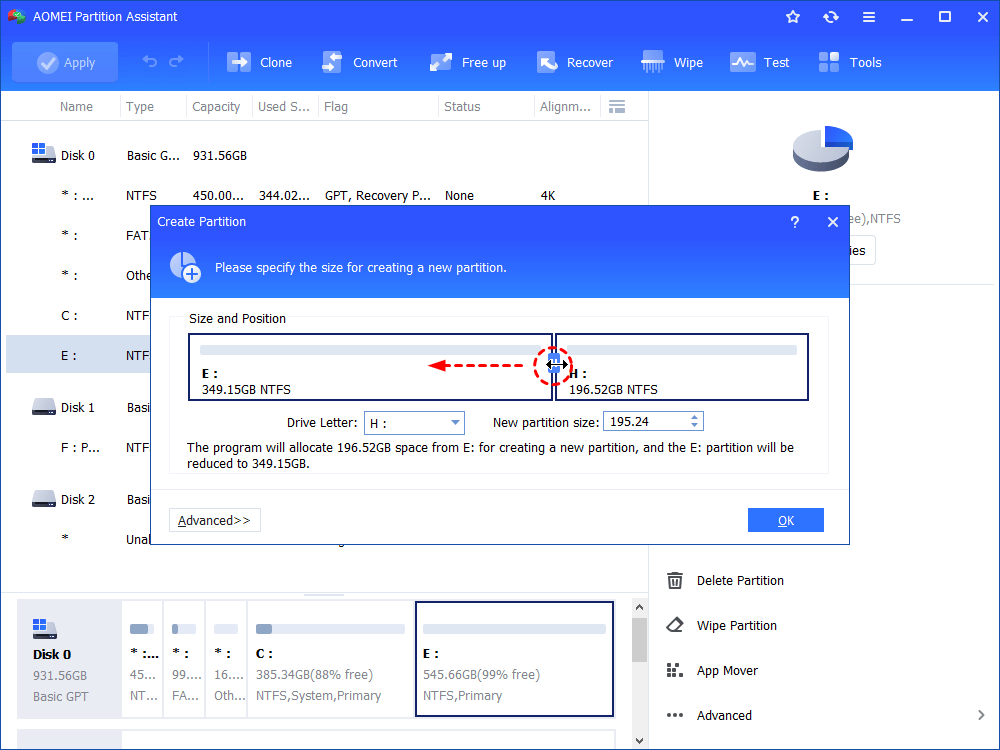
2. Right-click on unallocated space or a partition that is big enough to create a new partition, and then choose Create Partition button.
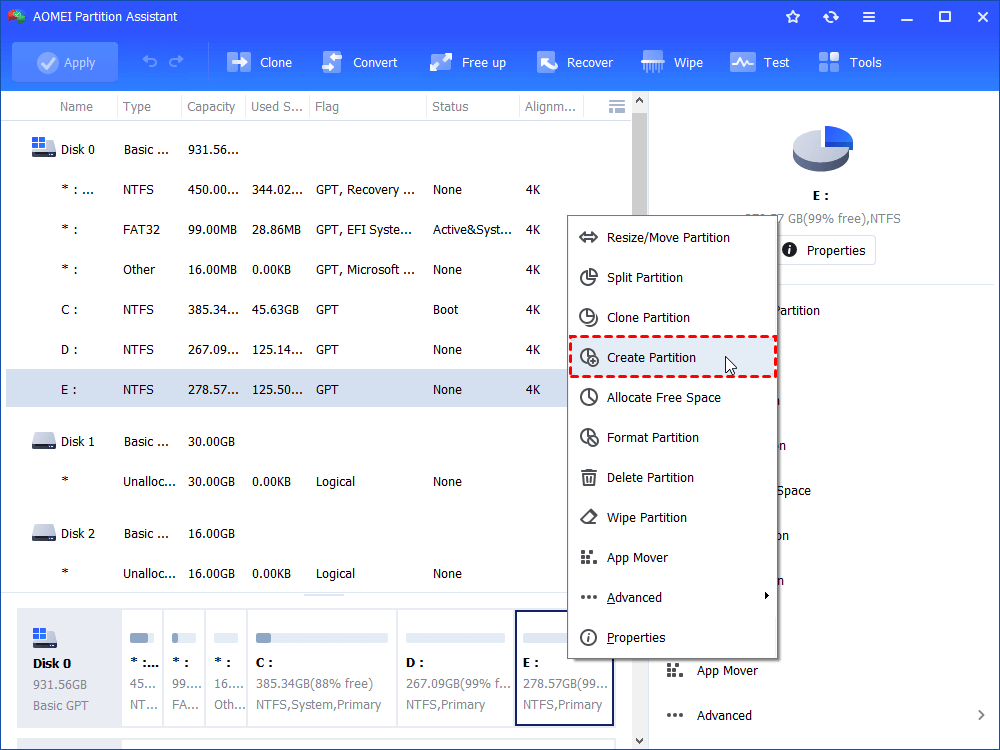
3. At the next screen, drag the slider or enter the amount of space to specify the partition size. You can also click Advanced option to see more options. Click OK when settings are done.
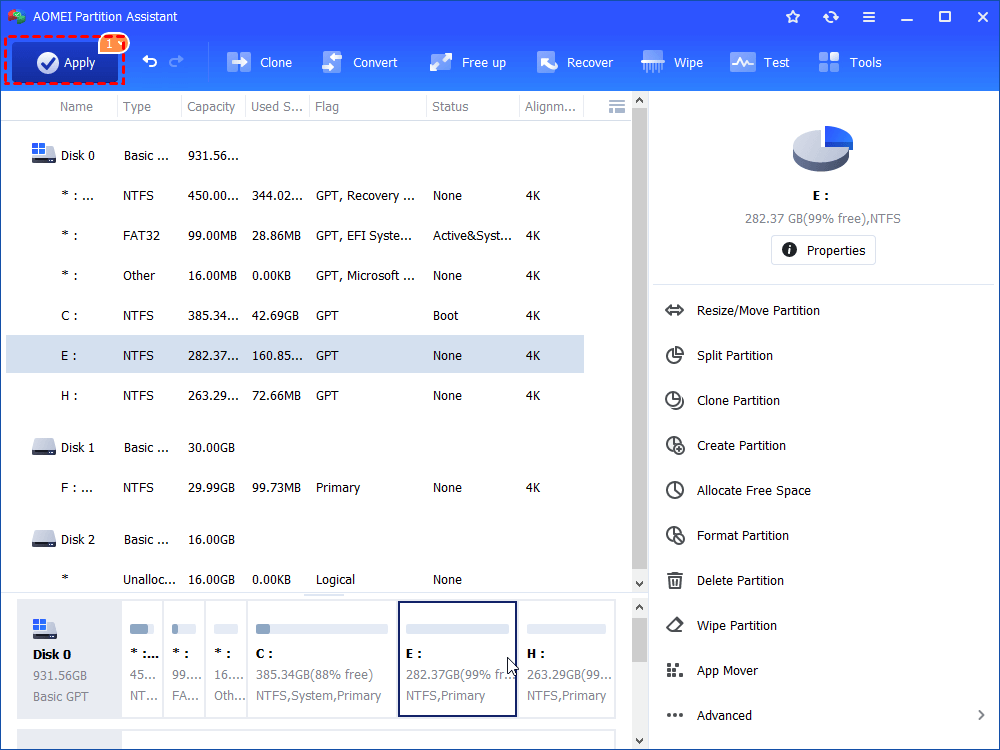
4. The program allows you to preview the partition layout without making any changes to your hard drive. If no problem, click Apply to run the operations.
It is really a good shot to create partition before installing another OS on your hard drive. Besides NTFS, AOMEI Partition Assistant also supports many other file systems including FAT32, FAT16, FAT12, exFAT, ReFS, and Ext2/Ext3/Ext4. The paid edition, like AOMEI Partition Assistant Professional or AOMEI Partition Assistant Server, provides even more advanced features like enabling you to migrating OS to GPT disk, converting dynamic disk into basic, etc.
Windows Setup: Installing using the MBR or GPT partition style
When installing Windows on UEFI-based PCs using Windows Setup, your hard drive partition style must be set up to support either UEFI mode or legacy BIOS-compatibility mode.
For example, if you receive the error message: “Windows cannot be installed to this disk. The selected disk is not of the GPT partition style”, it’s because your PC is booted in UEFI mode, but your hard drive is not configured for UEFI mode. You’ve got a few options:
Reboot the PC in legacy BIOS-compatibility mode. This option lets you keep the existing partition style. For more info, see Boot to UEFI Mode or Legacy BIOS mode.
Configure your drive for UEFI by using the GPT partition style. This option lets you use the PC’s UEFI firmware features.
You can preserve your data and convert the drive using the MBR2GPT tool. You can also choose to reformat the drive using the instructions below. Reformatting will erase all the data on the drive.
Why should I convert my drive?
Many PCs now include the ability to use the UEFI version of BIOS, which can speed up boot and shutdown times and can provide additional security advantages. To boot your PC in UEFI mode, you’ll need to use a drive formatted using the GPT drive format.
Many PCs are ready to use UEFI, but include a compatibility support module (CSM) that is set up to use the legacy version of BIOS. This version of BIOS was developed in the 1970s and provides compatibility to a variety of older equipment and network configurations, and requires a drive that uses the MBR drive format.
However, the basic MBR drive format does not support drives over 4TB. It’s also difficult to set up more than four partitions. The GPT drive format lets you set up drives that are larger than 4 terabytes (TB), and lets you easily set up as many partitions as you need.
Reformatting the drive using a different partition style
To wipe and convert the drive by using Windows Setup
Turn off the PC, and put in the Windows installation DVD or USB key.
Boot the PC to the DVD or USB key in UEFI mode. For more info, see Boot to UEFI Mode or Legacy BIOS mode.
When choosing an installation type, select Custom.
On the Where do you want to install Windows? screen, select each of the partitions on the drive, and select Delete. The drive will show a single area of unallocated space.
Select the unallocated space and click Next. Windows detects that the PC was booted into UEFI mode, and reformats the drive using the GPT drive format, and begins the installation.
To manually wipe a drive and convert it to GPT:
Turn off the PC, and put in the Windows installation DVD or USB key.
Boot the PC to the DVD or USB key in UEFI mode. For more info, see Boot to UEFI Mode or Legacy BIOS mode.
From inside Windows Setup, press Shift+F10 to open a command prompt window.
Open the diskpart tool:
Identify the drive to reformat:
Select the drive, and reformat it:
Close the command prompt window.
Continue the Windows Setup installation.
When choosing an installation type, select Custom. The drive will appear as a single area of unallocated space.
Select the unallocated space and click Next. Windows begins the installation.
Make sure Windows Setup boots to the correct firmware mode
To automate this process, you’ll need to run Windows Setup through Windows PE, and use a script to detect which mode you’re in before installing Windows. For more info, see WinPE: Boot in UEFI or legacy BIOS mode.
Capture and apply Windows, system, and recovery partitions
When you’re deploying Windows using the WIM format, and using customized partitions, a customized system partition or an additional utility partition, learn how to capture the right partitions to apply to new PCs.
If you don’t need custom partitions, you usually can just capture the Windows partition, and then use files from that image to set up the rest of the partitions on the drive. See Capture and Apply Windows using a single WIM file.
If you’re capturing using the FFU format, you’ll be fine — FFU captures all of the partitions on the drive.
Capture the customized partitions
Step 1: Determine which partitions to capture
This table shows the types of partitions that you must capture and those that are managed automatically.
If you’re deploying both UEFI and BIOS systems, you can reuse your primary and logical partitions across UEFI-based and BIOS-based devices, but not the other partition types.
| Partition type | Should you capture this partition? | Can you reuse the same WIM on UEFI and BIOS firmware? |
|---|---|---|
| System partition (EFI System Partition or BIOS system partition) | Optional. If only a simple set of partition files is required, you don’t have to capture this partition. | No |
| Microsoft Reserved partition (MSR) | No | No |
| Primary partitions (Windows partitions, data / utility partitions that you’ve added) | Yes | Yes |
| Recovery partition | Optional. If you haven’t customized this partition, you don’t have to capture it. | No |
| Extended partition | No | No |
| Logical partitions (Windows partitions, data / utility partitions that you’ve added) | Yes | Yes |
Step 2: Prepare to capture partitions
If you’ve booted the Windows image, generalize it so that it can be deployed to other devices. For more information, see Sysprep (Generalize) a Windows installation.
Start your reference device by using WindowsВ PE.
At the WindowsВ PE command prompt, type diskpart to open the DiskPart tool.
Check to see if the partitions that you want to capture have drive letters assigned.
If any of the partitions you want to capture don’t already have a drive letter assigned, continue:
List the disks in your PC:
Select the primary hard disk:
View the partitions:
Select a partition that needs a drive letter:
Assign a letter to the partition with the assign letter command. For example,
Type exit to return to the WindowsВ PE command prompt.
For more information, see the DiskPart Help from the command line, or Diskpart Command line syntax.
Step 3: Capture images for each customized partition.
At the WindowsВ PE command prompt, capture each customized partition, for example:
For more information about using the DISM tool to capture an image, see DISM Image Management Command-Line Options.
Step 4: Save images to the network or another safe location.
Connect an external drive, or connect to a safe network location, for example:
If prompted, provide your network credentials.
Copy the partitions to your network share. For example,
Apply the images
Step 1: Prepare to apply partitions
Start your destination device by using WindowsВ PE.
Connect an external drive, or connect to a safe network location, for example:
If prompted, provide your network credentials.
Wipe the hard drive and create new partitions.
To apply to multiple devices, save the Diskpart commands into a script and run them on each new device. For examples, see Configure UEFI/GPT-Based Hard Drive Partitions or Configure BIOS/MBR-Based Hard Drive Partitions. Example:
Where D: is a USB flash drive or other file storage location.
In these DiskPart examples, the partitions are assigned the letters: System=S, Windows=W, and Recovery=R.
Change the Windows drive letter to a letter that’s near the end of the alphabet, such as W, to avoid drive letter conflicts. Do not use X, because this drive letter is reserved for Windows PE. After the device reboots, the Windows partition is assigned the letter C, and the other partitions don’t receive drive letters.
If you reboot, WindowsВ PE reassigns disk letters alphabetically, starting with the letter C, without regard to the configuration in Windows Setup. This configuration can change based on the presence of different drives, such as USB flash drives.
Optional: speed up the image capture by setting the power scheme to High performance:
Step 2: Apply the partitions
Windows and data partitions: Apply the image(s), example:
where W: is the Windows partition.
System partition: You can either:
Configure the system partition by using the BCDBoot tool. This tool copies and configures system partition files by using files from the Windows partition. For example:
Apply a custom image
Where S: is the system partition
Recovery partition:
a. You can either:
Copy the Windows Recovery Environment (RE) tools into the recovery tools partition.
Where R: is the recovery partition
Apply a custom image
b. Register the location of the recovery tools, and hide the recovery partition using Diskpart. You can use our sample script or perform the steps manually:
Diskpart steps for UEFI:
Diskpart steps for BIOS:
Step 3: Verify that it worked
Reboot the device ( exit ). Windows should boot.
If the device doesn’t boot, (for example, if you receive the error message: Bootmgr not found. Press CTRL+ALT+DEL) check the steps for setting up the system partition:
- See BCDBoot command-line options for more info about copying boot files to the system partition.
- Use the DiskPart tool to check to make sure that the system partition is set to Active.
Complete the out of box experience (OOBE) as a new user, and check the recovery partition:
Check that in File Explorer that the Recovery partition is not visible.
View the partitions exist, either by right-clicking Start and selecting Disk Management, or by using diskpart (Open a command prompt as an administrator > diskpart > select disk 0 > list partition > exit ).


