- Download Windows 10
- Windows 10 October 2020 Update
- Create Windows 10 installation media
- Create installation media for Windows
- How to Inject Drivers into a Windows 10 WIM/ISO Install Image?
- How to Inject Driver into a Windows 10 Install Image using PowerShell?
- Adding Drivers to an Offline Windows Server 2012 R2 Image Using DISM
Download Windows 10
Before updating, please refer to the Windows release information status for known issues to confirm your device is not impacted.
Windows 10 October 2020 Update
The Update Assistant can help you update to the latest version of Windows 10. To get started, click Update now.
Create Windows 10 installation media
To get started, you will first need to have a license to install Windows 10. You can then download and run the media creation tool. For more information on how to use the tool, see the instructions below.

Here’s when to use these instructions:
- You have a license to install Windows 10 and are upgrading this PC from Windows 7 or Windows 8.1.
- You need to reinstall Windows 10 on a PC you’ve already successfully activated Windows 10.
If you are installing Windows 10 on a PC running Windows XP or Windows Vista, or if you need to create installation media to install Windows 10 on a different PC, see Using the tool to create installation media (USB flash drive, DVD, or ISO file) to install Windows 10 on a different PC section below.
Note: Before you install Windows 10, check to make sure your PC meets the system requirements for Windows 10. We also recommend going to the PC manufacturer’s website for any additional info about updated drivers and hardware compatibility.
- Select Download tool, and select Run. You need to be an administrator to run this tool.
- On the License terms page, if you accept the license terms, select Accept.
- On the What do you want to do? page, select Upgrade this PC now, and then select Next.
After downloading and installing, the tool will walk you through how to set up Windows 10 on your PC. All Windows 10 editions are available when you select Windows 10, except for Enterprise edition. For more information on Enterprise edition, go to the Volume Licensing Service Center.
- If you don’t have a license to install Windows 10 and have not yet previously upgraded to it, you can purchase a copy here: https://www.microsoft.com/en-us/windows/get-windows-10.
- If you previously upgraded to Windows 10 on this PC and you’re reinstalling it, you don’t need to enter a product key. Your copy of Windows 10 will automatically activate later using your digital license.
Follow these steps to create installation media (USB flash drive or DVD) you can use to install a new copy of Windows 10, perform a clean installation, or reinstall Windows 10.
Before you download the tool make sure you have:
- An internet connection (internet service provider fees may apply).
- Sufficient data storage available on a computer, USB or external drive for the download.
- A blank USB flash drive with at least 8GB of space or blank DVD (and DVD burner) if you want to create media. We recommend using a blank USB or blank DVD, because any content on it will be deleted.
- When burning a DVD from an ISO file, if you are told the disc image file is too large you will need to use Dual Layer (DL) DVD Media.
Check a few things on the PC where you want to install Windows 10:
- 64-bit or 32-bit processor (CPU). You’ll create either a 64-bit or 32-bit version of Windows 10. To check this on your PC, go to PC info in PC settings or System in Control Panel, and look for System type.
- System requirements. Make sure the PC meets the system requirements for Windows 10. We also recommend going to the PC manufacturer’s website for additional info about updated drivers and hardware compatibility.
- Language in Windows. You’ll need to choose the same language when you install Windows 10. To see what language you’re currently using, go to Time and language in PC settings or Region in Control Panel.
- Edition of Windows. You should also choose the same edition of Windows. To check what edition you’re currently running, go to PC info in PC settings or System in Control Panel, and look for Windows edition. Windows 10 Enterprise isn’t available in the media creation tool. For more info, go to the Volume Licensing Service Center.
- Microsoft Office products. If you just purchased a new device that includes Office 365, we recommend redeeming (installing) Office before upgrading to Windows 10. To redeem your copy of Office, please see Download and install Office 365 Home, Personal, or University on your PC. For more information, check How to upgrade to Windows 10 on new devices that include Office 365.
If you have Office 2010 or earlier and choose to perform a clean install of Windows 10, you will need to locate your Office product key. For tips on locating your product key, check Find your Office 2010 product key or Enter the product key for your Office 2007 program.
Using the tool to create installation media:
- Select Download tool now, and select Run. You need to be an administrator to run this tool.
- If you agree to the license terms, select Accept.
- On the What do you want to do? page, select Create installation media for another PC, and then select Next.
Select the language, edition, and architecture (64-bit or 32-bit) for Windows 10. This table will help you decide which edition of Windows 10 you’ll choose:
| Your current edition of Windows | Windows 10 edition |
|---|---|
| Windows 7 Starter Windows 7 Home Basic Windows 7 Home Premium Windows 7 Professional Windows 7 Ultimate Windows 8/8.1 Windows 8.1 with Bing Windows 8 Pro Windows 8.1 Pro Windows 8/8.1 Professional with Media Center Windows 8/8.1 Single Language Windows 8 Single Language with Bing Windows 10 Home Windows 10 Pro | Windows 10 |
| Windows 8/8.1 Chinese Language Edition Windows 8 Chinese Language Edition with Bing | Windows 10 Home China |
- USB flash drive. Attach a blank USB flash drive with at least 8GB of space. Any content on the flash drive will be deleted.
- ISO file. Save an ISO file to your PC, which you can use to create a DVD. After the file is downloaded, you can go to location where the file is saved, or select Open DVD burner, and follow the instructions to burn the file to a DVD. For more info about using an ISO file, see Additional methods for using the ISO file to install Windows 10 section below.
After completing the steps to install Windows 10, please check that you have all the necessary device drivers installed. To check for updates now, select the Start button, and then go to Settings > Update & Security > Windows Update, and select Check for updates. You may also wish to visit your device manufacturer’s support site for any additional drivers that may be needed.
Note: Drivers for Surface devices may be found on the Download drivers and firmware for Surface page.
Before you install Windows 10, it’s a good idea to save any work and back up your PC before you start. If you used the media creation tool to download an ISO file for Windows 10, you’ll need to burn it to a DVD before following these steps.
- Attach the USB flash drive or insert the DVD on the PC where you want to install Windows 10.
- Restart your PC.
If your PC does not automatically boot to the USB or DVD media, you might have to open a boot menu or change the boot order in your PC’s BIOS or UEFI settings. To open a boot menu or change the boot order, you’ll typically need to press a key (such as F2, F12, Delete, or Esc) immediately after you turn on your PC. For instructions on accessing the boot menu or changing the boot order for your PC, check the documentation that came with your PC or go to the manufacturer’s website. If you do not see the USB or DVD media device listed within the boot options, you may need to reach out to the PC manufacturer for instructions for temporarily disabling Secure Boot in your BIOS settings.
If changing the boot menu or order doesn’t work, and your PC immediately boots into the OS you want to replace, it is possible the PC had not fully shut down. To ensure the PC fully shuts down, select the power button on the sign-in screen or on the Start menu and select Shut down.
If you downloaded an ISO file for Windows 10, the file is saved locally at the location you selected. If you have a third-party DVD burning program installed on your computer that you prefer to use for creating the installation DVD, that program might open by going to the location where the file is saved and double-clicking the ISO file, or right-click the ISO file, select Open with and choose your preferred DVD burning software.
If you want to use the Windows Disk Image Burner to create an installation DVD, go to the location where the ISO file is saved. Right-click the ISO file and select Properties. On the General tab, click Change and select Windows Explorer for the program you would like to use to open ISO files and select Apply. Then right-click the ISO file and select Burn disc image.
If you want to install Windows 10 directly from the ISO file without using a DVD or flash drive, you can do so by mounting the ISO file. This will perform an upgrade of your current operating system to Windows 10.
Create installation media for Windows
You can use installation media (a USB flash drive or DVD) to install a new copy of Windows, perform a clean installation, or reinstall Windows 10.
To create installation media, go to the software download website, where you’ll find step-by-step instructions. On that website, you can select a version of Windows and create your own installation media using either a USB flash drive or a DVD. To go directly to one of the versions, select one of these links:
Windows 10 (Then select Download tool now.)
Important: Back up your files before you install or reinstall Windows on your PC. Learn how for Windows 10 or for Windows 7 and Windows 8.1.
To create the installation media, here’s what you’ll need:
A PC with a reliable internet connection. The download time will vary, depending on your internet connection.
A USB flash drive or DVD. A blank USB flash drive with at least 8 GB of space, or a blank DVD (and DVD burner). We recommend using a blank USB or blank DVD because any content on it will be deleted. When burning a DVD from an ISO file, if you’re told the disc image file is too large, you’ll need to use dual layer (DL) DVD media.
A product key. Your 25-character product key (not required for digital licenses). For help finding it, go to Find your Windows product key.
After you’ve created the installation media, you can reset or reinstall Windows. To learn more, go to Recovery options in Windows 10.
How to Inject Drivers into a Windows 10 WIM/ISO Install Image?
In this article, we will show you how to add the necessary device drivers directly into the Windows installation image. The integration of the device drivers into your offline Windows image is widely used when you need to deploy a large number of workstations and servers on the same hardware. Instead of manually installing specific drivers (including AHCI/ RAID/ NVMe) on each device, you can significantly simplify and accelerate OS deployment process by integrating the drivers directly into the Driver Store of the Windows installation image in the ISO/WIM or the VHD/VHDX file. When installing such an image, the Plug and Play service (PnP) will automatically install the necessary drivers for the detected hardware.
This manual is about the integration of device drivers into a Windows image and can be used both on desktop editions of Windows 10, Windows 8.1 and on Windows Server 2016, 2012 R2.
In modern Windows editions you can add drivers to the installation ISO image in two ways:
- using the DISM utility;
- using the PowerShell CLI.
In fact, both techniques perform the same operation: add additional drivers into the offline Windows image. How to use it is a matter of personal administrator preference. Let us consider in more detail both ways on the example of integrating drivers into the Windows 10 installation image.
How to Inject Driver into a Windows 10 Install Image using PowerShell?
First of all you need to download and place all the necessary device drivers in one directory (for each driver you need to create a separate folder). Please note that many vendors (including Dell, HP) supply their drivers in the form of self-extracting exe or zip archive files. Such archives must be unpacked to local drive so that the directory with drivers contains inf, cat and sys files.
Before you start, create the following directory structure on your local drive:
- The Drivers folder – it contains unpacked driver files for your Windows 10 edition (which are supposed to be integrated into the install media);
List all Windows editions contained in the Install.wim file using the Get-WindowsImage PowerShell cmdlet. This is necessary in order to specify the Widows edition into which it is planned to integrate the additional drivers.
Get-WindowsImage -ImagePath C:\WinWork\ISO\install.wim
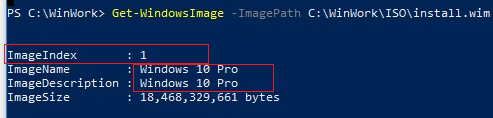
In our example, the WIM file contains only one Windows 10 Pro edition with the index 1 (ImageIndex: 1).
Next you need to mount the image of the selected Windows edition in the directory Mount. The Windows image index, which you need to mount, must be specified as an argument of the Index parameter:
Mount-WindowsImage -Path C:\WinWork\Mount\ -ImagePath C:\WinWork\ISO\install.wim -Index 1

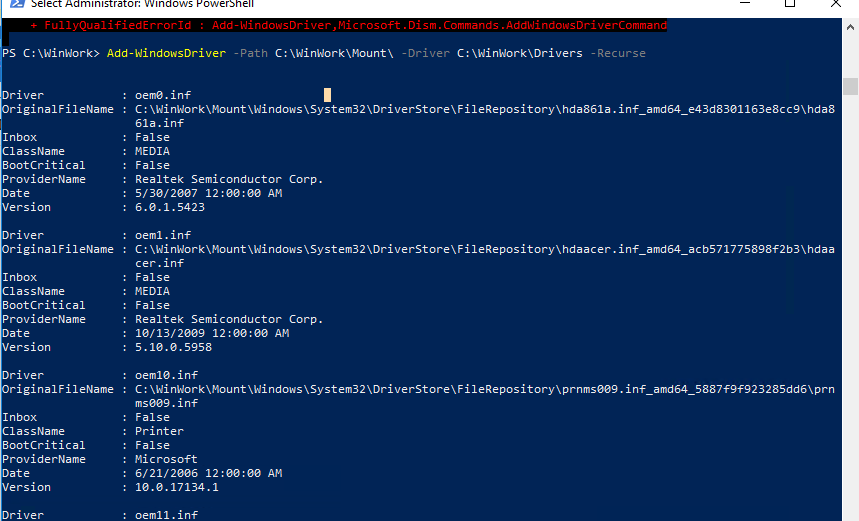
After the image is mounted, you can add drivers to it from the Drivers directory using the command:
Add-WindowsDriver -Path C:\WinWork\Mount\ -Driver C:\WinWork\Drivers -Recurse
The Add-WindowsDriver cmdlet will recursively search (the -Recurse parameter) the specified folder for all *.inf files with driver description. According to the description in the inf file, the cmdlet will add the dependent INF, DLL, CAT, PNF, etc. files to the Driver Store of your Windows image.
So, the drivers are copied, and the current image can be unmounted with saving changes:
Dismount-WindowsImage -Path C:\WinWork\Mount\ –Save

In the above example, we added drivers to the Install.wim image file. This is the Windows image that will be deployed to a computer local disk. If you need to add drivers to a Windows boot image (from which the computer boots when you install Windows), you need to add drivers to the Boot.wim file. This is usually necessary when installing Windows, the computer doesn’t detect local hard drives or doesn’t connect to LAN. Usually, only drivers of disk controllers and network adapters need to be integrated into the boot.wim image.
You can convert your install.wim file containing the Windows installation image with integrated drivers into the install.esd format using the DISM compress option:
DISM /Export-Image /SourceImageFile:C:\WinWork\ISO\install.wim /SourceIndex:1 /DestinationImageFile:C:\WinWork\ISO\install.esd /Compress:recovery
It remains to create an ISO file using Dism++ or the oscdimg command and write it to a disk or USB flash drive:
oscdimg -n -m -bc:\ISO\boot\etfsboot.com C:\ISO C:\new_win10pro_image.iso
Adding Drivers to an Offline Windows Server 2012 R2 Image Using DISM
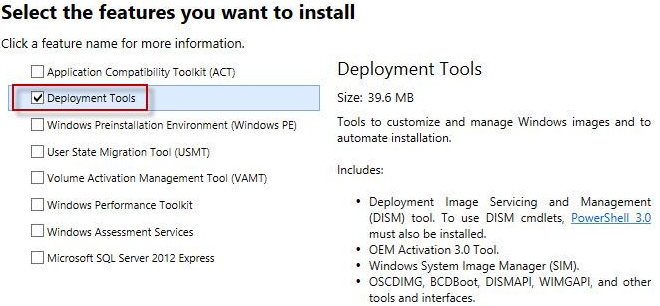
Now we will show an example of integrating drivers into the install image of Windows Server 2012 R2. If you are building an image on Windows 8.1, you will need to download and install Windows 8 ADK (http://www.microsoft.com/en-us/download/details.aspx?id=30652) to continue working with the latest version of DISM. You need to install the Deployment Tools component.
Use the same directory structure: Drivers (drivers and *.inf files are stored), ISO (unpacked image of Windows Server 2012 R2), Mount (image mount directory). It is assumed that in the install.wim file we are interested in the Windows Server 2012 R2 Datacenter edition with index 3.
Mount the install.wim installation image:
dism /Mount-Wim /WimFile:c:\iso\sources\install.wim /Index:3 /MountDir:c:\mount
Run a recursive search and integration of the new drivers into the driver store of the Windows Server 2012 R2 image:
dism /image:c:\mount /Add-Driver «/driver:c:\drivers\» /recurse
Save the changes to the WIM image:
dism /unmount-wim /mountdir:d:\mount /commit
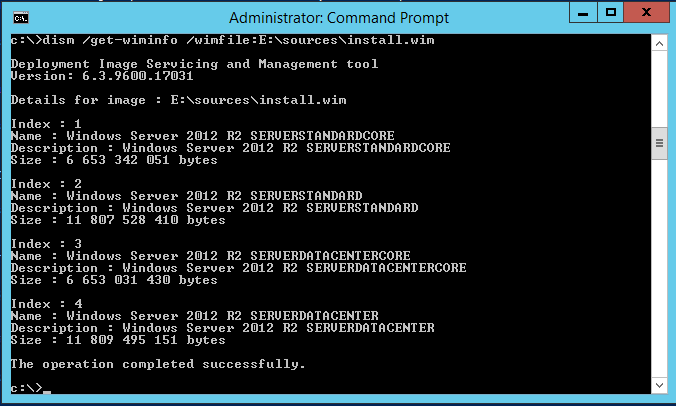
If you need to add drivers to all Windows Server editions contained in the wim file, these operations must be performed for all indexes of OS versions that the command returned:
dism /get-wiminfo /wimfile:d:\install.wim
In addition to driver integration, it is usually necessary to inject security updates to the Windows image to be installed (How to add updates into the Windows installation image). This will increase the security of your OS immediately after the installation. It remains to write the resulting installation image to the DVD disk or USB flash drive or convert it to the ISO image.


