- Top 2 Easy Ways to Install Windows 10 on SSD
- [Case] I want to install Windows 10 on a new SSD
- Should I install Windows 10 to SSD?
- Preparations before installing Windows 10 on SSD
- How to install Windows 10 on a new SSD? (2 methods)
- Method 1. How to reinstall Windows 10 on SSD using installation disc?
- Method 2. How to install Windows 10 on SSD from HDD without losing data?
- Boot from the new SSD
- Can’t install Windows 10 on SSD
- Conclusion
- Поэтапная установка Windows 7 на SSD
- Шаг 1: Запись образа ОС на флешку
- Шаг 2: Подготовка BIOS
- Шаг 3: Выбор разметки диска
- Шаг 4: Изучение правил форматирования SSD
- Шаг 5: Установка операционной системы
- Шаг 6: Инсталляция драйверов
- Шаг 7: Настройка для слабых компьютеров
Top 2 Easy Ways to Install Windows 10 on SSD
To install Windows 10 on SSD, you have two available ways, clean install or clone system with disk cloning software. Scroll down to learn all you need to know.

By AOMEI  / Last Updated March 22, 2021
Quick Navigation:
[Case] I want to install Windows 10 on a new SSD
«I want to do a clean install of Windows 10 OS on a new ssd and make this the boot drive. I would like to keep the old WD 1T hard drive as a storage drive. What is the best/easiest procedure for extracting the old windows 10 OS from the old hard drive. I’m not sure that I know how to properly identify the OS files.»
— Question from Microsoft.com
Should I install Windows 10 to SSD?
SSD (short for solid-state disk) is based on NAND flash memory technology and uses integrated circuit assemblies to store data persistently. It doesn’t track down information byВ physical spinning disk & movable read–write head,В and therefore have quicker access time, lower latency, less noise, etc.В compared with HDD.
Nowadays, many users would like to upgrade old hard drive to SSD with Windows installed, or reinstall Windows 10 on SSD afterward. The faster boot speed and reading & writing speed make it known as a better boot drive.
To be specifc, after installing the operating system on a new SSD, you’ll find the computer boots up faster, and runs smoothly even with muliple programs in the background. Want to have a try? Keep reading and learn how to implement it safely.
Preparations before installing Windows 10 on SSD
How to replace hard drive with SSD and install Windows on it? This may be a doubt for many users. Therefore, I’m here to introduce all the preparationsВ need to be done, and then walkВ you through every detailed steps to install OS on a new SSD.В
Ensure the security of your data and system. To do fresh or clean install, it’s better toВ backup filesВ that are important to you, because personal data on the old hard drive will be removed during the process.В To prevent unexpected system failures, you could backup the system as well, thisВ is especially important for a novice.В
Put a diet on HDD. As known, SSDs are generally smaller than HDDs at the same price, so it’s recommended to free up space on HDD by deleting the backed up personal data, removing useless files with Disk Cleanup, uninstalling useless programs, etc.
Initialize and format SSD for Windows 10 install. In general, a disk without initializing cannotВ be used normally. And, you may receive error message like «You need to format the disk before you can use it «В
Prepare a SATA-to-USB adapter or encloser to connect SSD if you are using a laptop or your computer only has one slot. If you need to swap hard drive of Windows 10, please prepare a well-matched screwdrivers.В
How to install Windows 10 on a new SSD? (2 methods)
Generally speaking, you have two methods to install Windows 10 on SSD. For anyone who wants to clean install Windows 10 on SSD, you can refer to Method 1 to learn the details. Or if you want to clone HDD to SSD in Windows 10, then Method 2 is the way to go.
Method 1. How to reinstall Windows 10 on SSD using installation disc?
A clean install gives you a brand new operating system just like the computer you first started — it only has all the bloatware installed by manufacturer. And the process will remove the current Windows operating system and user files during the installation.
Besides, all the personal data on the system hard disk will be wiped out. You canВ backup Windows 10 to USB driveВ or external hard drive in advance. This method requires a CD or USB drive to boot a computer. If you want to install Windows 10 on SSD without CD or USB or keep your data and programs intact, you can refer toВ Method 2В to move Windows 10 from HDD to SSD.
The most common situations for cleaning install Windows 10 on SSD:
Want to replace Windows 10 hard drive with serious problems and install Windows 10 on a new SSD.
Want to wipe the SSD and perform a clean installation.
To clean install Windows 10 on SSD, follow the steps below:
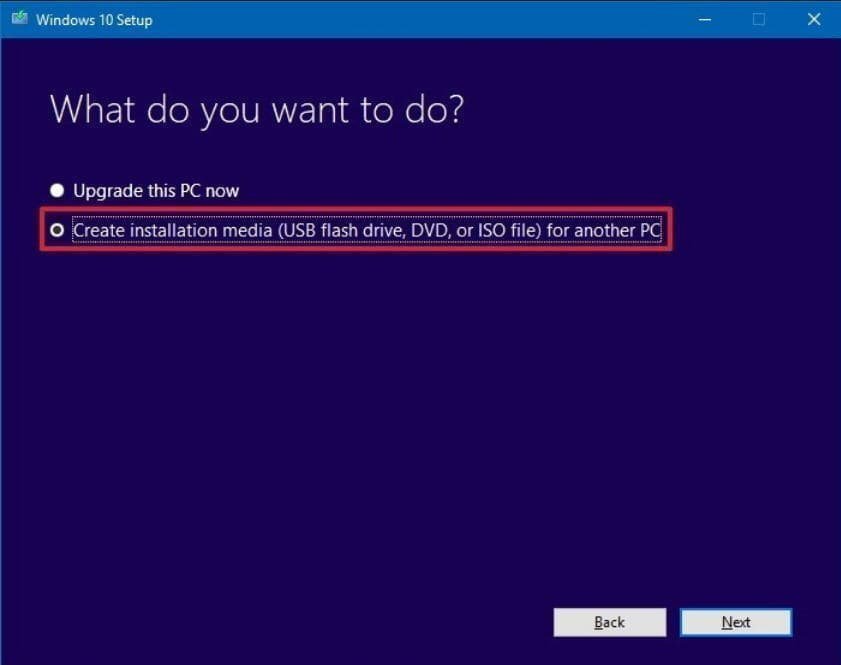
1. Create a new and correct installation media for Windows 10. DownloadВ Windows 10 Media Creation tool,В start it up, then select “Create installation media for another PC” option and follow the wizard to create installation media.В
2. Connect installation disk to your computer and install SSD. After creating Windows 10 installation media, shut down your computer and open its case, remove HDD and insert SSD into the drive bay instead.
3. Modify boot order for installation disk. Start your computer and press a specified key (usually F2 or F12) to boot into BIOS, then go to the BootВ ab and use «+» to move CD/DVD to the first choice, then press «F10» or “Enter” to exit this window and restart from the installation disk.В
4. Click «Install Now» in the initial Windows Setup screen.
5. Type your product key or skip it.В
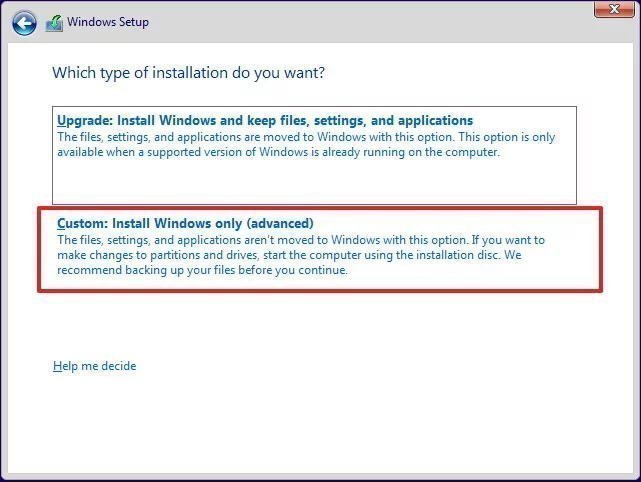
6. Select installation typeВ «Custom» .
7. Select partition on SSD to install Windows and click Next. Wait until the process ends and set preferences as you like.

Note: Whether you upgrade to Windows 10 from Windows 7/8 or do a clean install on a brand new SSD, you have to buy the product key to activate Windows. If your SSD has installed Windows 10 already, you can skip to next step, Windows 10 will get activated after fresh installation.
Method 2. How to install Windows 10 on SSD from HDD without losing data?
CleanВ install Windows 10 will erase all your data on the computer. Besides, it is time-consuming and troublesome. If you preferВ an easier way to add new SSD to Windows 10 without CD or USB drive, you could use a reliable third-party software – AOMEI BackupperВ Professional.В
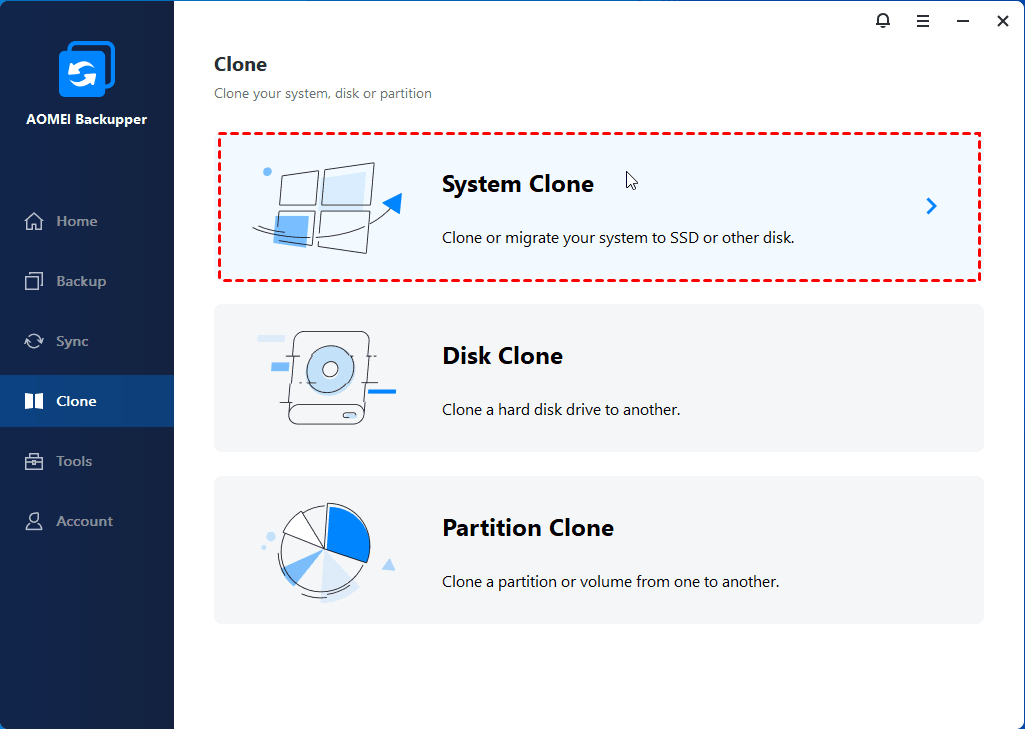
It’s an all-in-one disk cloning software for Windows 7/8/10, which contains «Disk Clone», «System Clone» and «Partition Clone» to meed the needs of different users.В
The «Disk Clone» feature allows you to clone entire hard drive to SSD, even for new hard drive with diferent partition style, clone MBR disk to GPT, for example.В
The system clone feature allows you to clone only C drive to SSD without efforts, which is especially useful if you want toВ migrate Windows 10 to smaller SSD.В
The software is running in intelligent mode by default, which will only clone the used sectors to save space. Optionally, you can also create an intact copy with sector-by-sector mode.
You can tick the «SSD Alignment» option to accelerate the writing and reading speed of target SSD.В
Preparations for migrating OS to SSD in Windows 10:В
вњЋ Insert your SSD into the drive bay and make sure it can be detected. If there is no extra room inside the laptop to install more disks, you may need to install SSD via a SATA-to-USB adaptor.В If you have neither a second drive bay nor a SATA to USB adaptor, you can use «System Backup» feature toВ create a system image, and then restore it to the SSD.
вњЋ В Install and launch AOMEI Backupper.В
To install Windows 10 on SSD without CD/DVD, use the following steps:
1. Click «Clone», then select «System Clone» in the main page. To clone entire disk, click «Disk Clone» as instead.В
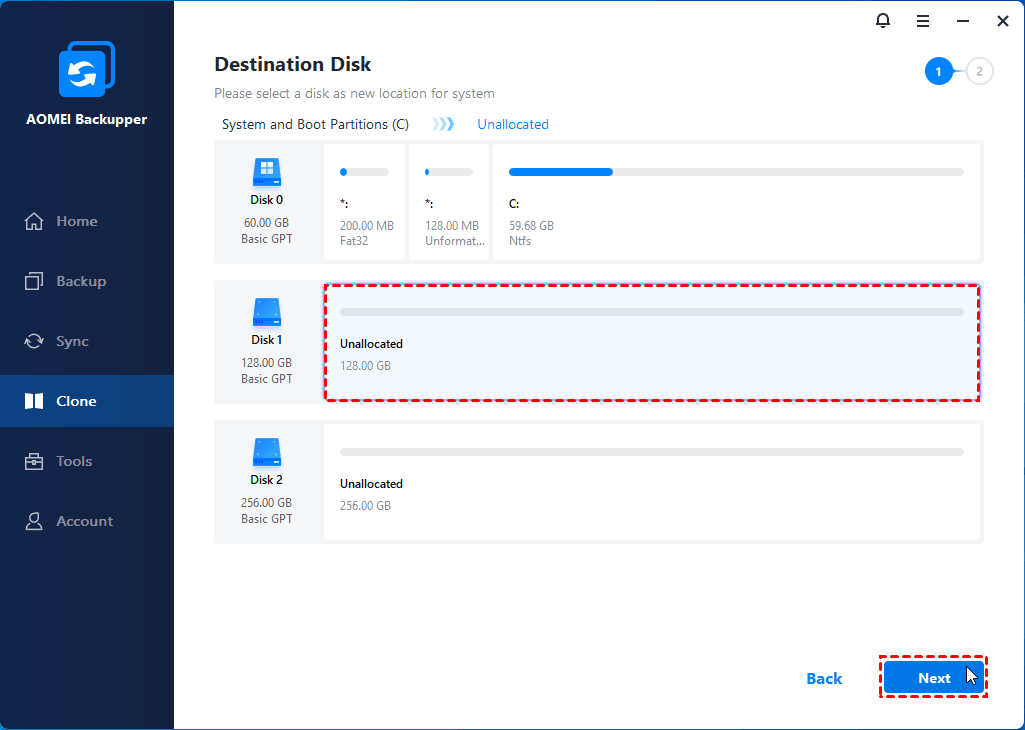
2. Just select the SSD as the new location, and then click «Next»В to continue. Because the program is designed to automatically select system partition and boot related partitions for you.В В
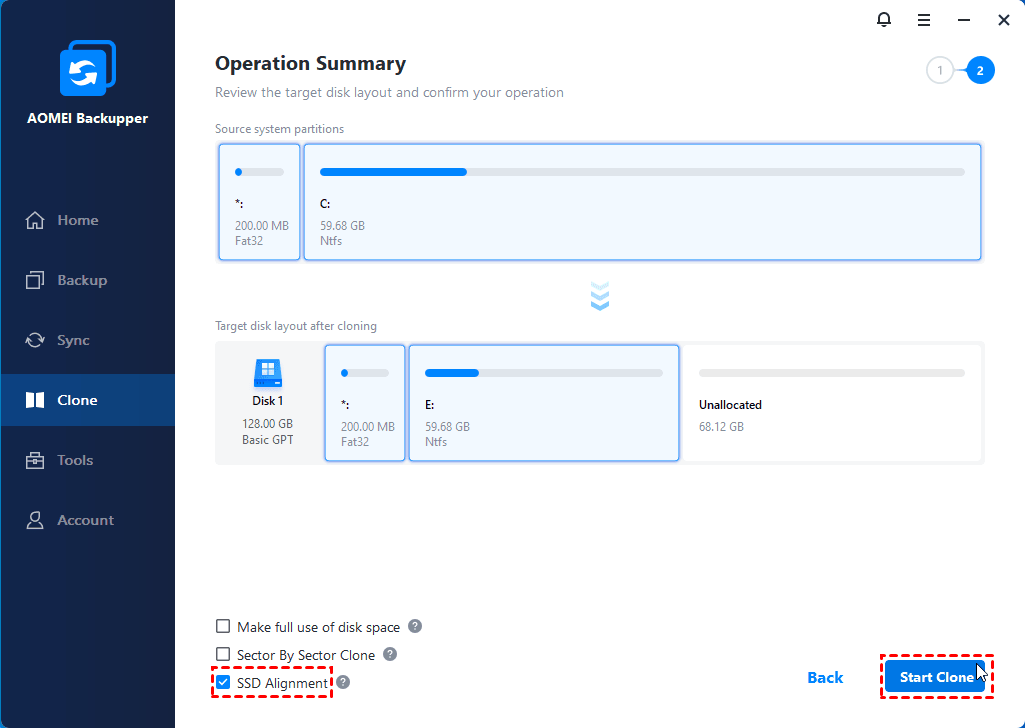
3. Confirm the operations, tick «SSD Alignment» to speed up the performance of SSD and click «Start Clone«.
Tips вњЋ.
• «Sector by Sector clone» is only suitable for target disk of the same size or larger than source disk.В
• After cloning only OS to SSD, you can keep the old disk as a second storage, or remove and discard it. AOMEI Backupper integrates the function to wipe system partition, or clean a hard drive in Windows 10 completely.
• If you want to install SSD on unlimited PCs within one company, you can use AOMEI Backupper Technician. With the help of AOMEI Image Deploy, you can deploy OS to multiple computers simultaneously.В
Boot from the new SSD
After the system clone finishes, shut down the computer. And then disconnect the source disk and connect the destination disk to the socket of the source disk. The source disk could be plugged into another socket as a secondary storage device.В
Next, restart your computer, press specific key to enter BIOS when you see a message like «Press ESC to enter BIOS», go to the Boot tab and change the first boot option to new SSD, at last press «F10» to save changes and boot your computer.

Can’t install Windows 10 on SSD
Sometimes, you will receive error messages like «Windows cannot be installed to this disk. The selected disk is of the GPT partition style», «Windows cannot be installed to this disk. The computer’s hardware may not support booting to this disk» when you reinstall SSD in laptop or desktop Windows 10 using installation media. Why can’t I install Windows 10 on SSD? How to solve it?В
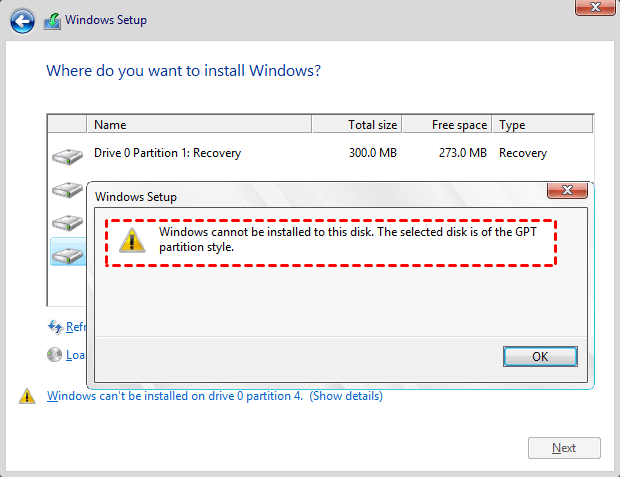
For the first error, it may be caused by a wrong boot mode. Your computer only supports Legacy BIOS rather than both Legacy and UEFI boot, and the tradition BIOS can only boot from MBR disk, so you can only install Windows 10 on a second hard drive with MBR. To resolve it, you could consider converting MBR to GPT first, or use a disk cloning software that support cloning MBR disk to GPT without converting partition style.В
For the second error, there are two possible reasons. First, your computer has hard disk protection enabled. Second, the SATA Controller mode was set incorrectly. To fix this problem, you need to read the specification and confirm if the problem is causedВ by hard disk protection. If so, please remove it. If not, please change the controller mode in BIOS. If your BIOS shows AHCI, just change it to IDE.
Conclusion
Altogether, you have these two ways to install Windows 10 onВ SSD: clean installВ and system clone. If you want to move Windows 10 from HDD to new SSD, to clone system to SSD with AOMEI Backupper will save you much time and effort.
And it’s suggested to keep AOMEI Backupper installed on your computer, which can also be regarded as backup software to protect your personal data or system with its comprehensive features, including, system backup, disk backup, partition backup,and file backup. In addition, it allows you toВ schedule automatic backup in Windows 10В with daily/weekly/monthly, event triigers, incremental and differential backup, etc.
Download AOMEI Backupper, use it to upgrade hard drive to SSD in Windows 10 and later protect your data and system security.
Поэтапная установка Windows 7 на SSD
Сейчас многие пользователи все еще предпочитают устанавливать на свои компьютеры Windows 7, обходя стороной более новые версии данного семейства операционных систем. При замене жесткого диска на SSD возникает задача инсталляции ОС на новый накопитель. При этом юзеру важно знать о некоторых особенностях взаимодействия с твердотельными накопителями информации, о которых и пойдет речь далее. Мы предлагаем ознакомиться с пошаговым руководством по инсталляции Виндовс 7 на SSD, чтобы выполнить эту операцию быстро и легко.
Для начала уточним, что имеется возможность перенести операционную систему с HDD на SSD, полностью сохранив ее работоспособность. Однако для этого придется выполнять сложные действия в стороннем программном обеспечении. Если вас заинтересовала эта тема, предлагаем прочесть отдельные инструкции, связанные с ней, кликнув по следующей ссылке.
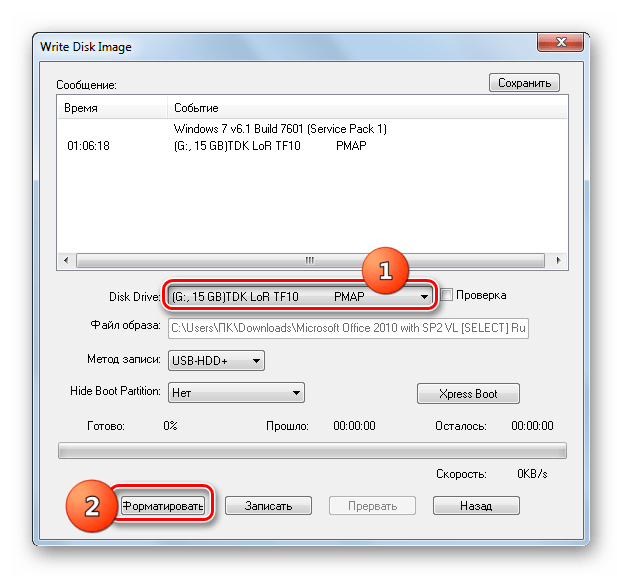
Шаг 1: Запись образа ОС на флешку
Если вы собираетесь устанавливать операционную систему, используя для этого лицензионный диск, попросту пропустите этот шаг и сразу же переходите ко второму. В противном случае придется подготовить флешку, сделав ее загрузочной. В этом нет ничего сложного, ведь все действия происходят в автоматическом режиме через специальное программное обеспечение. Однако для начала юзеру придется отыскать образ Виндовс 7 в формате ISO и выбрать ПО, через которое и будет производиться запись. Детальнее обо всем этом читайте в руководстве далее.
Шаг 2: Подготовка BIOS
Единственная особенность установки ОС на твердотельный накопитель — необходимость изменить один параметр BIOS, установив режим совместимости AHCI. Он требуется для корректного взаимодействия используемого хранилища информации с материнской платой. Пункт, отвечающий за включение такого режима, присутствует абсолютно во всех версиях BIOS и UEFI, но может располагаться в разных меню, поэтому юзеру предстоит самостоятельно отыскать его и активировать, что не должно занять много времени.

Шаг 3: Выбор разметки диска
На текущий момент времени существует два типа разметки диска: MBR и GPT. Каждый из них имеет свои особенности и рекомендован к использованию в разных ситуациях. Если вы еще не знакомы с такими понятиями или сомневаетесь в выборе правильной разметки, советуем ознакомиться со специальным обучающим материалом на нашем сайте, перейдя по ссылке ниже. Там вы найдете детальные описания этих двух технологий, а также полезные советы, которые помогут непосредственно перед установкой операционной системы.
Шаг 4: Изучение правил форматирования SSD
Этот этап является промежуточным, и мы решили включить его в рамки сегодняшнего материала только в качестве ознакомления. Дело в том, что некоторые юзеры при использовании SSD не совсем понимают принцип работы такого устройства и даже боятся его форматировать, ссылаясь на значительное понижение срока службы при выполнении подобных действий. Однако без очистки структуры не получится запустить установку ОС, даже если речь идет о только что приобретенном накопителе. Мы же советуем прочесть все сведения о форматировании SSD, чтобы знать, когда это нужно делать и как данная процедура отражается на самом комплектующем.
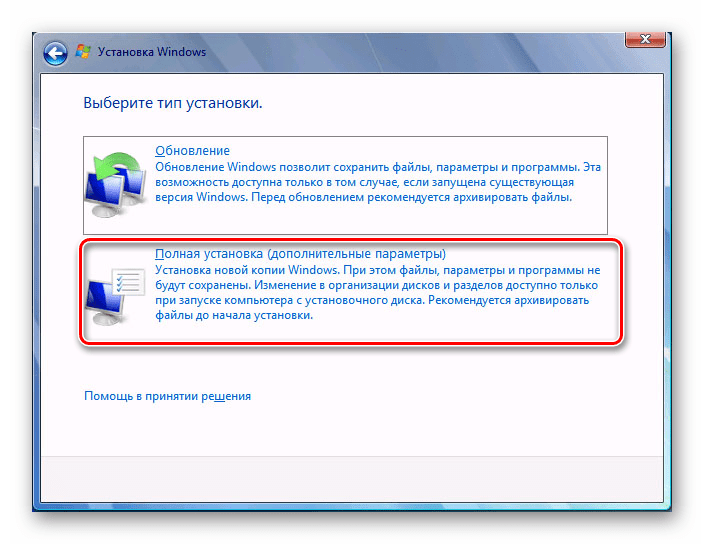
Шаг 5: Установка операционной системы
Вот мы и добрались к самому основному этапу, который заключается в инсталляции Виндовс 7 на твердотельный накопитель. Все нюансы подготовки уже разобраны выше, поэтому больше никаких особенностей не имеется. Однако пользователям, выбравшим структуру GPT, стоит обратить внимание на одну небольшую деталь, которая связана с ручным форматированием накопителя в соответствии с системой разделов. Если вы предпочли GPT, кликните по ссылке далее и выполните инсталляцию ОС в соответствии с инструкциями.

В случаях, когда разметка осталась в стандартном формате MBR, остается только запустить диск или загрузочную флешку, чтобы начать инсталляцию. Этим темам тоже посвящены отдельные наши материалы, к которым можно перейти путем нажатия по одному из следующих заголовков.
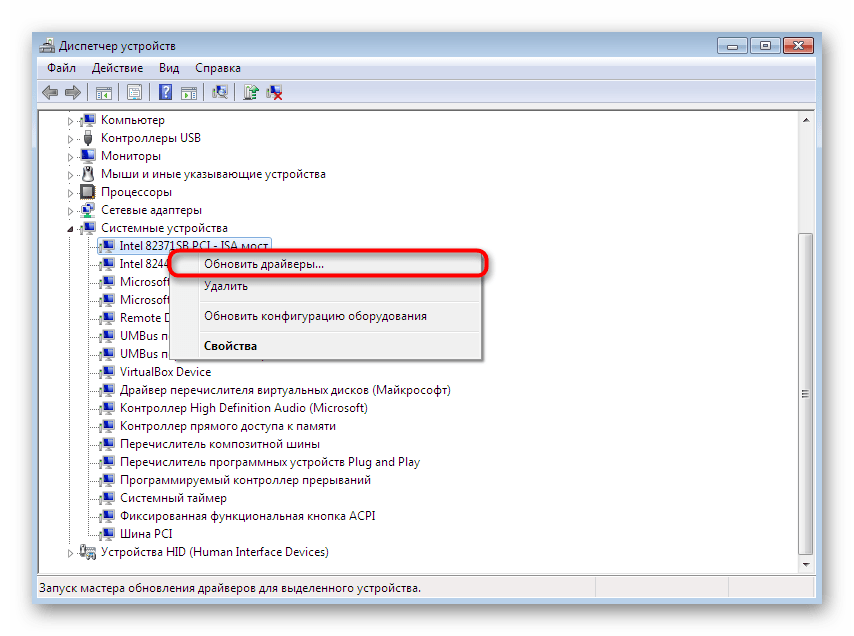
Шаг 6: Инсталляция драйверов
После первого успешного запуска операционная система еще не совсем готова к работе, поскольку в ней отсутствуют файлы драйверов встроенных комплектующих и периферийных устройств. Они необходимы для того, чтобы оборудование корректно выполняло все свои функции и могло взаимодействовать друг с другом. Если вы ранее никогда не сталкивались с установкой подобного программного обеспечения, разобраться в этом помогут другие инструкции на нашем сайте.
Шаг 7: Настройка для слабых компьютеров
Завершающий этап предназначен для обладателей слабых компьютеров, которые желают оптимизировать работу установленной ОС, чтобы обеспечить максимальное быстродействие. Существует ряд рекомендаций, которые рекомендуется выполнить, чтобы облегчить нагрузку на ОС. Сюда относится отключение ненужных служб, программ автозагрузки, визуальных эффектов и использование специального софта.
Только что вы узнали все об инсталляции Windows 7 на SSD. Как видно, уникальных особенностей у такого способа почти нет, поэтому остается только следовать каждому этапу, чтобы без труда завершить установку и перейти к полноценному использованию компьютера.


