- SOLVED: Windows 10 Won’t Use Full RAM
- Solution 1: Modify RAM used on Boot
- Solution 2: BIOS Settings
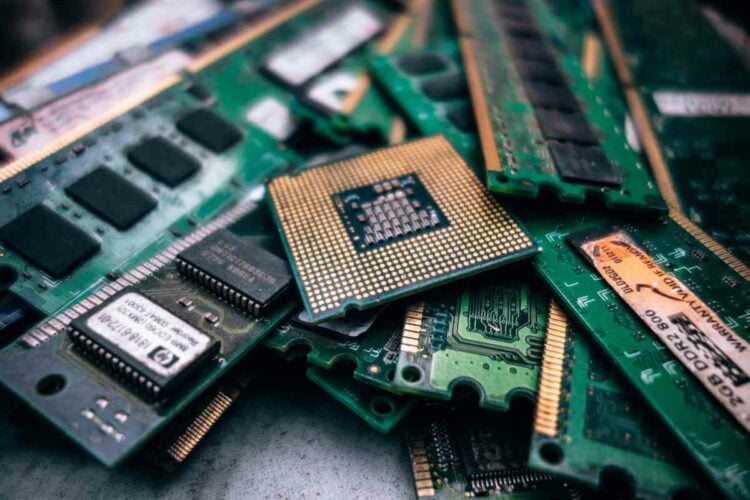
- Solution 3: Physical Inspect RAMs
- Solution 4: Update BIOS
- Solution 5: Update Windows and Drivers of Your PC to the Latest Build
- Solution 6: Restore the BIOS of Your PC to Defaults
- Computer not using all RAM? How to increase usable RAM
- What can I do if Windows 10 isn’t using all RAM?
- 1. Use the 64-bit version of Windows
- 2. Turn off Auto RAM Virtualization
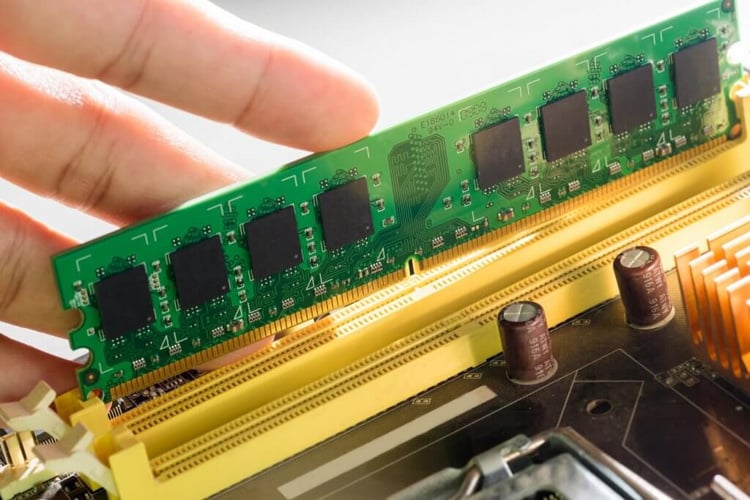
- 3. Check if your RAM is properly seated
- 4. Check if your RAM is faulty
- 5. Rearrange your RAM modules
- 6. Change your BIOS settings
SOLVED: Windows 10 Won’t Use Full RAM
RAM is a volatile storage device that your computer uses to store data and also use it simultaneously but it is used to store the type of data that is being frequently used by the operating system or an application running on it. Once your computer shuts down all the data in it is lost as it is a temporary but fast storage device. The more amount of RAM you have, more smoothly your computer will multitask by enabling the applications to store more files they need frequently. Having more RAM never hurts, but not able to use the whole of it can be unacceptable to a user.
Many of the users, when started using Windows 10, reported that when they open the Windows property window or the Task Manager, they noticed that only a part of the total amount of RAM is currently usable by Windows. In some cases, they would see an unusually large amount of RAM been “Hardware Reserved” by the Windows in the Task manager. It could be in fact due to reason that amount of memory has been reserved for the internal graphics adapter installed on your computer but if you have dedicated graphics card installed on your computer then this shouldn’t be the problem. And for some, the amount was from 1024 MB to 4181 MB which is not normal.
There are some configurations in Windows 10 and your motherboard’s BIOS that can reserve some amount of RAM making them unusable. They can be easily changed and are listed in the solutions below. But In some cases, the hardware was also found to be the culprit causing this issue. Below listed are the best solutions that have worked for users. But before you start with the solutions, you should know that if you have a 32 bit Windows 10 operating system installed, you can only use 3.5GB RAM no matter how much RAM is physically installed on your computer. You will need to install a 64 bit Windows 10 operating system to use more than 3.5GB RAM.
- To know which type of operating system you have, simply Press and Hold the Windows key and Press R.
- In the Run dialog box type msinfo32 and Press Enter.
- In the SystemInformationwindow that opens, look for System type in the right pane.
- If next to System type the value is x86 then you have a 32 bit Windows 10 installed. If it is x64 then you have a 64 bit Windows 10 installed.
- Now let’s start with the solutions.
Solution 1: Modify RAM used on Boot
This option in Windows is used to reserve RAM that is used during the boot procedure when your system is turning on. By default, it may permanently and unnecessarily reserve a significantly large amount of RAM for it.
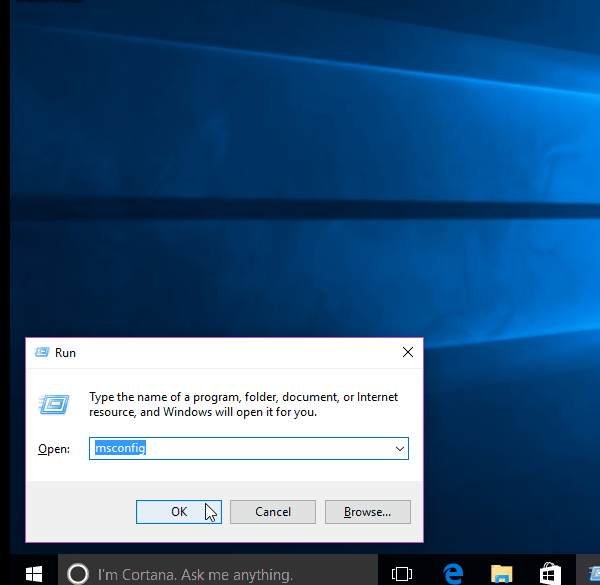
- To set that right, Press and Hold the Windows key and Press R. Type msconfig in the Run dialog box and Press Enter.
- The System Configuration window will open. Go to the Boot tab in it.
- Select your Operating system from the list below if you have more than one. Now Click on the Advanced Options button.
- On the upper right corner, Clear the checkbox next to Maximum memory. Click Ok.

- Now restart your computer. Check of the issue resolved. If not, move on to the next solution.
Solution 2: BIOS Settings
There are a few configurations on BIOS that can limit the Windows from using the full amount of RAM installed. Firstly, if you have a separate dedicated video card installed, then you have to make sure the internal graphic processing unit (iGPU) is off which is is used in case you don’t have any external one. If it is On, Windows can be reserving the memory for it.
To make sure it is off, Restart your computer and enter its BIOS/UEFI setup. You will have to tap a specific key to Enter BIOS and it differs by your system’s model. It can be F1, F2, F12 or the Esc key. You can easily google the model of your system to see which key to use to enter the BIOS setup.
In the BIOS setup, search for iGPU, Internal Graphics or Onboard Graphics. The name and location of this setting can once again vary according to your system’s manufacturer so you will have to search for it. Once you find it, make sure it is Disabled or turned Off.
Also in BIOS, there is a Memory Map Feature that can give Windows full access to the RAM installed. Search for it and make sure it is Enabled or turned On.
In addition to the feature mentioned above, if you can find the below features, make sure they are in their respective states as mentioned next to them.
Feature State
Render Standby Enabled
iGPU Memory Auto
Multimonitor Disabled
Save changes and Restart your computer. Check if can now use the whole RAM. If still an amount of RAM is unusable, move on to the next solution.
Solution 3: Physical Inspect RAMs
In some cases, the reason Windows 10 showed less amount of RAM usable was due to a physical defect. So we will check the RAMs physically, and will also rule out the possibility if the slots on which the RAMs are installed are faulty. Only proceed if you’re comfortable opening your CPU.
Unplug all wires and remove the cover of your computer. Here, you will be able to see Rectangular sticks (RAMs) installed on your motherboard. They will be next to a big heat sink with a fan on it. There will be either 2 or 4 slots on which RAMs can be installed.
There will be clips at the sides of the slots. Toggle them and Unplug All the RAMs installed and make sure there contacts are clean. Also, remove any dust that may be inside the slots.
If you have more than 1 stick of RAM installed it is possible one may be faulty so remove any one them and start up your computer. Do the same with the other stick of RAM. If the system fails to run with any one of the RAM installed, then that stick of RAM is faulty.
Similarly, check the slots in use by inserting a known working stick of RAM in it and running your computer. If it fails to run on any one slot, then the slot in question is faulty rendering the RAM inserted in it unusable by Windows.
If all the slots and stick of RAM are working, inserting them back but in different slots as they were originally in before. This is also known to work for some users. Make sure they are properly placed and locked in.
Solution 4: Update BIOS
In some cases, an outdated BIOS version has been known to cause this memory bug to appear in Windows 10.
The procedure to update BIOS varies by system manufacturers and models. Access your system manufacturer’s website to download and install the latest BIOS version on your system.
Before moving with the solutions to make your RAM fully usable in Windows 10, check if booting the system with the bare minimum (make sure to empty the PCI slots e.g., removing a PCI network card) resolves the issue. Moreover, make sure your system supports the RAM you are trying to use with it i.e., no hardware limit is in place, for example, Intel 945 chipset motherboard has a hardware limit of 4 GB of RAM, and more than that cannot be used with it.
Solution 5: Update Windows and Drivers of Your PC to the Latest Build
Windows, like any OS, is prone to bugs and the RAM issue at hand could also be a result of a bug. Microsoft is trying its best to eliminate bugs from Windows and for this purpose, it uses the Windows update channel to populate the latest patches of the reported bugs. Before diving into more technical solutions, it will be a good idea to update the Windows of your system to the latest build which may solve the problem.
- Manually update the Windows of your PC to the latest stable release. Also, make sure the system’s drivers are updated to the latest build. Check for Windows Updates
- After updating the Windows and drivers, check if the RAM issue is resolved.
- If not, then check if reinstalling the graphics drivers resolves the RAM issue.
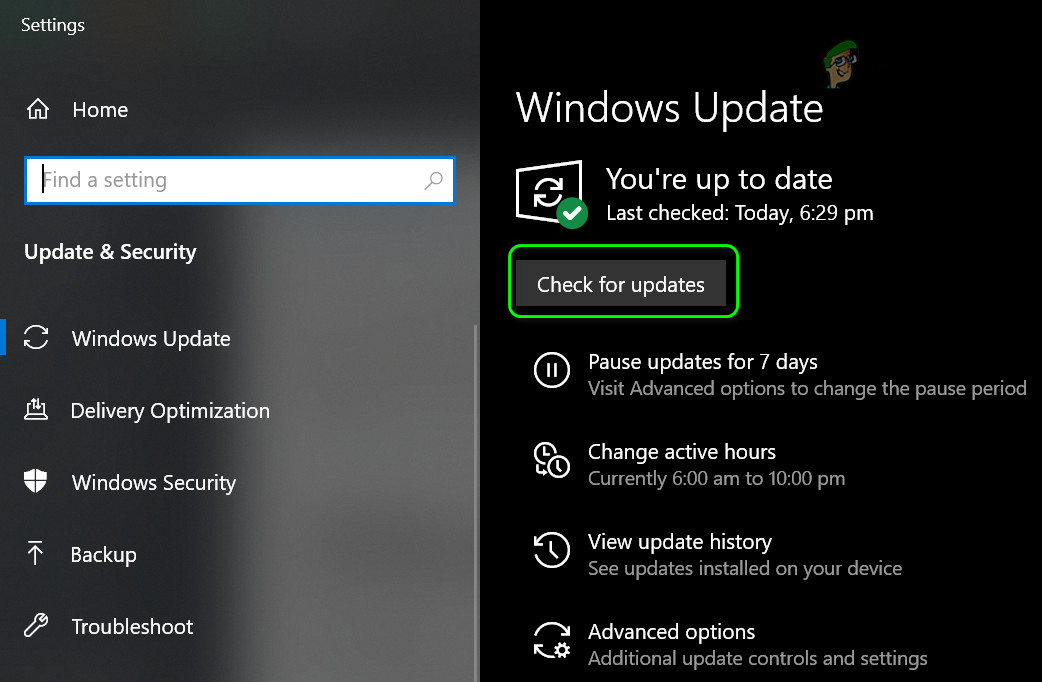 Check for Windows Updates
Solution 6: Restore the BIOS of Your PC to Defaults
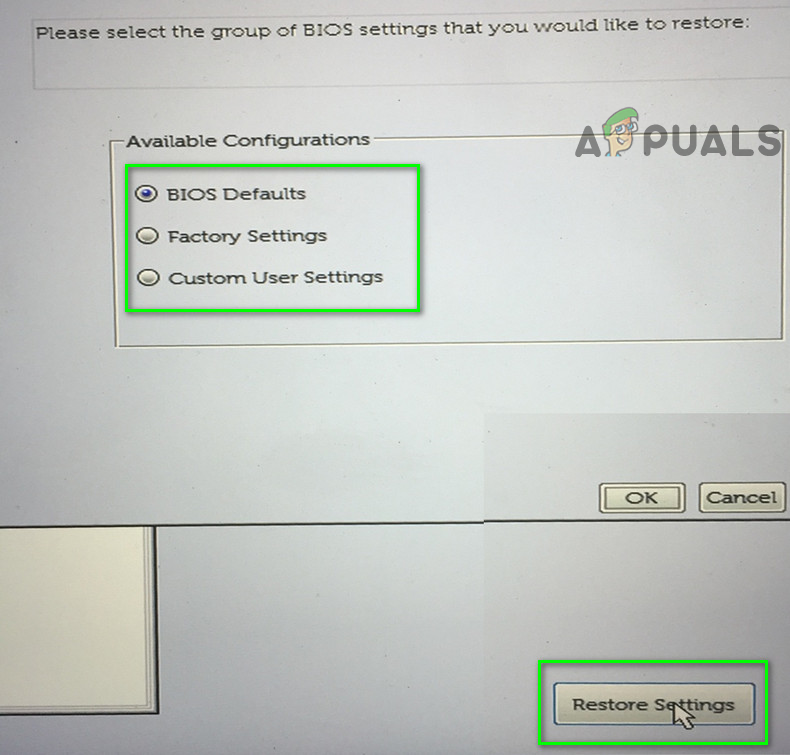
You may encounter the issue at hand if the BIOS of your system is wrongly configured. In this case, restoring the BIOS to the factory defaults may solve the problem. For illustration, we will discuss the process for a Dell system, you may follow the instructions as per your make and model of the PC.
Warning: Advance at your own risk as editing the system’s BIOS is a proficient task and if done wrong (or if a sudden power failure occurs during the process), you may brick your system and cause everlasting damage to your data.
- Boot your system into BIOS (you may press the F2 key when powering on your system).
- Now, near the bottom of the right pane, click on Restore Settings (or Load Defaults) and then confirm to restore the BIOS (or load defaults). Reset BIOS to Defaults
- Then exit BIOS and boot the system into Windows to check if the RAM issue is resolved.
 Reset BIOS to Defaults
If the issue persists, then check if disabling/enabling the paging file resolves the issue. You can also use a utility TestLimit by Sysinternals to solve the RAM problem. If that did not do the trick, then either the RAM sticks are faulty/incompatible or the issue is caused by a failing hard drive (some users reported that a failing hard drive caused the same issue for them).
Computer not using all RAM? How to increase usable RAM

- When your PC isn’t using all RAM, it certainly doesn’t perform well.
- Luckily, there are several ways to force your Windows 10 computer to use all RAM.
- Checking that the existing RAM is compatible with the motherboard is important.
- Tweaking some BIOS settings to make sure it recognizes the RAM is another step.
- Download Restoro PC Repair Tool that comes with Patented Technologies (patent available here).
- Click Start Scan to find Windows issues that could be causing PC problems.
- Click Repair All to fix issues affecting your computer’s security and performance
- Restoro has been downloaded by 0 readers this month.
Your RAM is an important resource, but many users reported that Windows 10 isn’t using all RAM. This is a strange issue that can cause reduced performance, however, there’s a way to fix this problem.
How do I make Windows 10 use all RAM? First, you need to update your BIOS. If your PC is still not using all RAM, then change your BIOS settings to make sure Windows 10 isn’t reserving any RAM for secondary GPUs.
Of course, these are only two of the quickest solutions. If the problem persists, here are some additional troubleshooting methods that you can use to fix your RAM.
What can I do if Windows 10 isn’t using all RAM?
1. Use the 64-bit version of Windows
- Press Windows Key + S and enter system. Now select System from the menu.
- When System window opens, check the information in the System section. There you can see System type as well as the processor model you’re using.

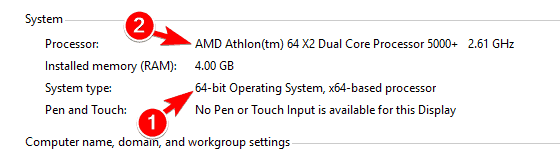
If you’re not using the 64-bit version of Windows, you’ll have to perform a clean install and install Windows again. Keep in mind that to install the 64-bit version of Windows, you need to have a 64-bit processor.
For a clean install, download Windows 10 64-bit ISO from Microsoft and use the Media Creation Tool to create a bootable drive.
The process will remove all files from your system drive, so be sure to back them up beforehand. After you install the 64-bit version of Windows, your PC should utilize all your available RAM.
Quick warning, if you already have a 64-bit version and Windows isn’t using all your RAM, there’s no need to reinstall it. Instead, try one of our other solutions.
2. Turn off Auto RAM Virtualization
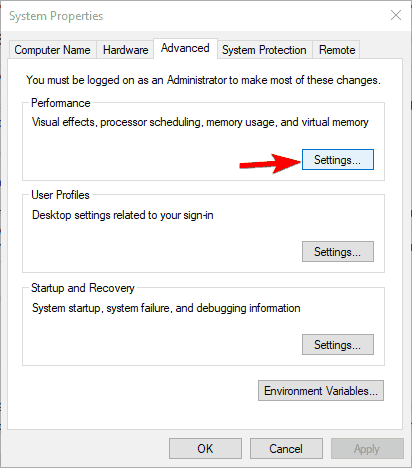
- Press Windows Key + S and enter advanced. Choose View advanced system settings from the menu.
- When System Properties window opens, click the Settings button in the Performance section.
- Performance Options window will appear. Go to the Advanced tab and click on Change.
- In the Virtual Memory window, uncheck Automatically manage paging file size for all drives option. Now select each drive on the list and choose No paging file option. Click OK to save changes.


After you make the necessary changes, restart your PC. Once your PC restarts, check if the problem still appears. If not, you can enable Automatically manage paging file size for all drives feature again.
Several users reported this solution fixed the problem for them, so be sure to check it out.
3. Check if your RAM is properly seated
If Windows 10 isn’t using all RAM, this can be because the RAM module isn’t properly seated. If you installed new RAM recently, it’s possible that you didn’t lock it properly thus causing this problem to appear.
To fix the issue, you need to unplug your PC, disconnect it from the power outlet and open it. Now locate your RAM and check if it’s locked properly. If your RAM module is loose, you need to press it gently until its properly locked.
If needed, you can also check and see if the latches are holding your RAM properly. Keep in mind that you need to be extra cautious while working with your hardware in order to avoid causing any damage to PC.
If you’re not sure how to check your RAM, it might be best to contact an expert.
4. Check if your RAM is faulty
If Windows 10 isn’t using all RAM, it might be because your RAM is faulty. In most cases faulty RAM will cause Blue Screen of Death errors to appear, so if you’re PC is restarting frequently, it’s possible that your RAM is faulty.
The easiest way to check your RAM is to test your modules one by one. Simply remove all modules except one and see if your PC is recognizing all of your RAM. Repeat these steps for all memory modules until you find the faulty one.
If you want to perform a detailed scan, it’s highly recommended to scan each RAM module with the MemTest86+ tool. This is a free tool that will allow you to perform a detailed scan of your RAM.
Simply create a bootable USB flash drive with MemTest86+ on it and boot your PC from it. After doing that, start the scan and let it run for a couple of hours. Keep in mind that you’ll have to scan each of your RAM modules individually, so this process might take a while.
After you find the problematic module, remove it, and replace it with a new one. Several users reported that faulty RAM caused this error to appear on their PC, so be sure to check your RAM.
5. Rearrange your RAM modules
According to users, if Windows 10 isn’t using all RAM it might be because your RAM modules aren’t installed in the correct order.
Many motherboards are quite specific about the order of RAM modules, so you might have to remove your RAM and rearrange it in order to fix this problem.
In addition, we advise you to check your motherboard manual and see how to properly arrange your RAM modules.
If you’re using two modules, be sure to add them to proper sockets. Your sockets are colored differently, so if you’re using two modules, be sure to add them to sockets with matching colors.
Users reported that rearranging their RAM fixed the problem, so be sure to try that.
6. Change your BIOS settings

If Windows 10 isn’t using all RAM that can usually be because of your BIOS settings. To fix the issue, you need to enter BIOS and change a few settings. To see how to enter BIOS, be sure to check your motherboard manual.
Once you enter BIOS, you need to change the following settings:
- Vitualization – ON.
- iGPU – OFF.
- Render Stability – Enabled
- iGPU memory – Auto
- Multimonitor – Disabled
In addition, you also need to enable Memory Remap feature. To do that, navigate to Advanced > System Agent Configuration > Memory Remap and set it to Enabled.
After doing that, save changes and the problem with RAM should be resolved. If you hav e I nternal Graphics or Onboard Graphics options in BIOS, be sure to disable them as well.
Several users reported that you can fix this problem only by changing iGPU settings in BIOS, so be sure to try that.
If you want to know more about these settings and how to access them, we strongly advise you to check your motherboard manual.
It’s also worth mentioning that changing Frame Buffer Location from Above 4G to Below 4G can fix the problem, so you might want to try that as well.


