- Microsoft Store apps install location
- Replies (3)
- Changing default install location in Windows 10
- Replies (6)
- Change default Program Files installation directory location in Windows 10
- Change default Program Files directory
- We couldn’t install Windows in the location you choose, Error 0x80300002
- We couldn’t install Windows in the location you choose, error 0x80300002
- 1] Verify the compatibility between the BIOS and the installation media
- 2] Recreate all the partitions
- 3] Recreate the bootable USB drive
- Install Parameters
- Installation Folders
- Installation Options
- Package Type
- Installation Type
- Reboot Behavior
- Perform the reboot if required without showing any prompts
- Limit to a basic user interface (simple progress and error handling)
- Enable Verbose Logging
- Execution Level
- Minimize Installation Time
- Fast Installation
- Don’t save system restore points for installation
- Perform only file costing and skip checking other costs
- Reduce the frequency of progress messages
- Properties
- Creating a new property
- Modifying a property
- Removing a property
- Show properties with empty an value or used in dialog controls
- Show properties used by predefined dialogs
Microsoft Store apps install location
Replies (3)
Hi oğuzhangenç and thanks for reaching out. My name is Joseph. I am an independent adviser. I’ll be happy to help you out today.
Type «file explorer» press enter
Go to «view» tab and click «Option» button.
Go to View tab again
Check «Show hidden files, folders and drives» and hit okay.
and go here..
C:\Users\Username of your PC\AppData\Local\Packages
I hope this helps. Feel free to ask back any questions and let me know how it goes. I will keep working with you until it’s resolved.
33 people found this reply helpful
Was this reply helpful?
Sorry this didn’t help.
Great! Thanks for your feedback.
How satisfied are you with this reply?
Thanks for your feedback, it helps us improve the site.
How satisfied are you with this reply?
Thanks for your feedback.
3 people found this reply helpful
Was this reply helpful?
Sorry this didn’t help.
Great! Thanks for your feedback.
How satisfied are you with this reply?
Thanks for your feedback, it helps us improve the site.
How satisfied are you with this reply?
Thanks for your feedback.
You may try following these steps. Check this video tutorial for detailed instructions.
I hope this helps. Feel free to ask back any questions and let me know how it goes. I will keep working with you until it’s resolved.
Standard Disclaimer: There are links to non-Microsoft websites. The pages appear to be providing accurate, safe information. Watch out for ads on the sites that may advertise products frequently classified as a PUP (Potentially Unwanted Products). Thoroughly research any product advertised on the sites before you decide to download and install it.
12 people found this reply helpful
Was this reply helpful?
Sorry this didn’t help.
Great! Thanks for your feedback.
How satisfied are you with this reply?
Thanks for your feedback, it helps us improve the site.
Changing default install location in Windows 10
I’ve been trying to change the default install location to my D: drive, this was my initial idea when building my PC so obviously the D: drive has a lot more capacity than the main drive, which I was planning on using just for Windows software. However, everything is getting installed automatically to the C: drive which is now maxed out. For some reason, at moment of installation I’m never asked in what folder I’d like for the program to be in.
I tried going to Settings > System > Apps & Features, but the Move feature is grayed out.
I also tried changing the Regedit > HKEY_LOCAL_MACHINE > SOFTWARE > Microsoft > Windows > CurrentVersion > ProgramFilesDir path, but programs are still installing in the C: drive
So, what do I need to do to select in what folder I want programs to be installed in? I searched online and it appears a lot of people are having this problem too, but no solution for Windows 10.
I would greatly appreciate a solution, thank you!
Replies (6)
I’ve been trying to change the default install location to my D: drive, this was my initial idea when building my PC so obviously the D: drive has a lot more capacity than the main drive, which I was planning on using just for Windows software. However, everything is getting installed automatically to the C: drive which is now maxed out. For some reason, at moment of installation I’m never asked in what folder I’d like for the program to be in.
I tried going to Settings > System > Apps & Features, but the Move feature is grayed out.
I also tried changing the Regedit > HKEY_LOCAL_MACHINE > SOFTWARE > Microsoft > Windows > CurrentVersion > ProgramFilesDir path, but programs are still installing in the C: drive
So, what do I need to do to select in what folder I want programs to be installed in? I searched online and it appears a lot of people are having this problem too, but no solution for Windows 10.
I would greatly appreciate a solution, thank you!
Change default Program Files installation directory location in Windows 10
In Windows 10/8/7 OS, by default, software gets installed on your System Drive, usually C drive, in the Program Files folder. The typical path is normally in Windows 32-bit is C:\Program Files and in Windows 64-bit is C:\Program Files and C:\Program Files(x86).
Microsoft recommends the C:\Program Files folder for the default installation destination. It’s a convention that ensures proper inter-operation between your program and the OS’s application and security models. So, once software programs are installed they go by default to C:\Program files on the computer.
This can, however, be changed by selecting another folder or location or partition. To change the default installation folder, the data must be modified in the ProgramFilesDir key and a new path must be chosen for the installation folder.
Windows uses the System Disk for installing any new applications, That is, if your Windows is installed on the C Drive, the default folder where all the applications you install would automatically show up as C:\Program Files, unless of course, you change in manually while installing the application’s locations.
Do note that Microsoft does not support changing the location of the Program Files folder by modifying the ProgramFilesDir registry value. It states that if you change the location of the Program Files folder, you may experience problems with some Microsoft programs or with some software updates.
Change default Program Files directory
If you almost always prefer to NOT install on the System Disk, but instead on another partition, say, the D drive, then rather than changing the default location every time, you can edit the registry as follows:
Now open Regedit and navigate to the following key:
Now in the right pane look for the value ProgramFilesDir and/or ProgramFilesDir (x86) depending on whether your Windows is 32-bit or 64-bit.
Double-click on it and in the box which opens up change its Value data from C:\Program Files to say, D:\Program Files.
The default directory for the installation of all your programs shall now be D:\Program Files.
If you are using Windows 64-bit, you have to change the value of ProgramFilesDir and ProgramFilesDir (x86).
We couldn’t install Windows in the location you choose, Error 0x80300002
The installation of Windows 10 depends on several factors. Hardware configuration and software configuration is just a broad classification of this dependency. Any mismatch in this configuration can cause many errors. One such error is error code 0x80300002 for We couldn’t install Windows in the location you choose. The whole error states-
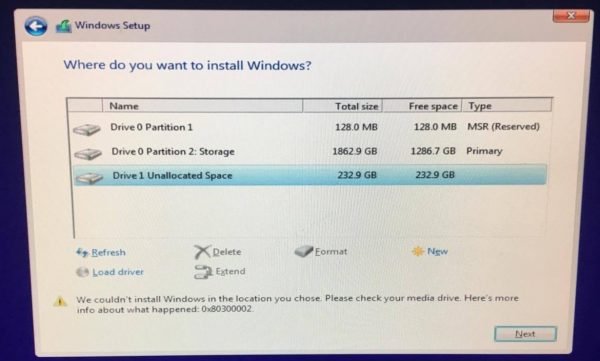
We couldn’t install Windows in the location you choose. Please check your media drive. Here’s more info about what happened: 0x80300002.
This error occurs due to corruption in the partition table of the drive on which the installation is in progress. It is also possible that there is corruption on the Media Device. In this article, we will be checking out how to fix it.
We couldn’t install Windows in the location you choose, error 0x80300002
Some of the working methods to fix the error code 0x80300002 for Windows Installation are:
- Verify the compatibility between the BIOS and the installation media.
- Recreate all the partitions.
- Recreate the bootable USB drive.
WARNING: The steps in these processes involve the deletion of partitions. So be aware that if you have data, it would be all lost. If you can, then take a backup by connecting the hard drive to a different computer.
1] Verify the compatibility between the BIOS and the installation media
The complicated point for Windows installation is that, if your Installation media is based on GPT, you need to have a BIOS, based on UEFI. And in case you have your bootable media with MBR Partitioning, you need to have your BIOS set to Legacy.
You need to verify these parameters and check if the compatibility is satisfied. If not, you can refer our guides about toggling between UEFI and Legacy or recreate the bootable USB drive with the appropriate partitioning table from method 3.
2] Recreate all the partitions
Restart the Windows installation process, and wait till you reach the screen which says Where do you want to install Windows?
In the same screen, you have the options to delete, format, extend, create new partitions, etc. Delete all the partitions. Then use the New button to create new partitions.
Make sure you have at least one primary partition where Windows 10 can install. Continue installing Windows on the new partition.
When you create a new partition, it recreates the partition table configuration. So there is no chance of any error.
3] Recreate the bootable USB drive
There is also a possibility of corruption of data in your installation media. Create a new USB Bootable device again and start the installation process. Check if that fixes your issues.
If the second method did not work correctly, repeat the given steps after getting a new ISO image file for Windows 10.
Hope these fixes help you in getting rid of the error 0x880300002 for Windows Installation.
Install Parameters
Windows Installer properties are used during the installation process.
You can use the drop-down list in the toolbar to select the current build. Also, all the changes made in this view apply only to the current build.
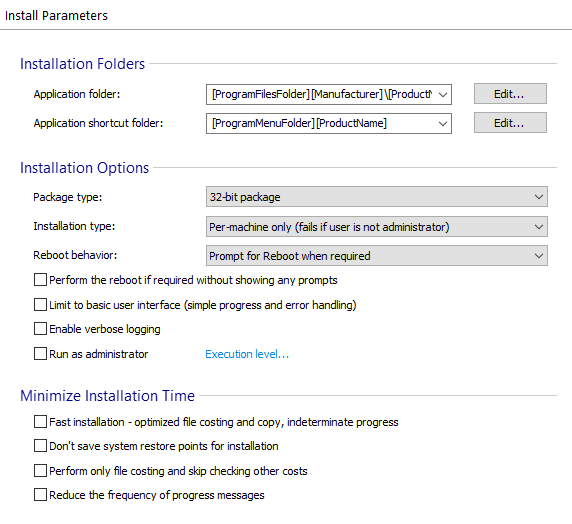
Installation Folders
- Application Folder — in this field, you can specify the default location for the Application Folder (APPDIR). This path is stored in the APPDIR property, and it is applicable only to those files and folders which are located under the «Application Folder» directory in the Files and Folders Page. During the installation, the user can modify this path by either using the [ Browse ] button in the «FolderDlg» (Select Installation Folder) dialog or by manually editing the Path Edit control on the same dialog. The default value of this field points to a sub-folder of the ProgramFilesFolder for the per—machine installs.
- Application Shortcut Folder — in this field, you can specify the default location for the Application Shortcut Folder (SHORTCUTDIR). This path is stored in the SHORTCUTDIR property, and it is applicable only to those files and folders which are located under the «Application Shortcut Folder» directory in the «Files and Folders» page. The default value of this field points to a sub-folder of the ProgramMenuFolder.
These values are directly editable, with a suggested set of defaults available in the drop-down lists. Click the [ Edit. ] button to change them through the Edit Formatted Type Dialog.
Installation Options
Package Type
Select between 32-bit, Arm64, 64-bit for Intel 64 Itanium processors, 64-bit for AMD64 or EM64T processors and mixed 32/64 bit packages.
If the package runs on an x64 processor, the «64-bit package for x64 processors(AMD64, EM64T)» must be selected.
You can read more about the difference between those types in the Package Types page.
Installation Type
- Per-user only — the application will be available only for the user who installed it.
- On Windows Vista or above, with this option set, the logged user will never be elevated to administrative privileges, so if the installation requires such privileges, it will fail.
- Per-user only (with administrator rights required) — on Windows Vista or above, use this option to create a package which will be installed per user but requires administrator privileges (e.g. its application files need to be installed in a privileged location such as «Program Files»).
- In this case, the user may see an Elevation Prompt dialog that will ask for administrator privileges. If the logged user is a member of the «Administrators» user group, he will be asked to allow or deny the installation. Otherwise, he will be prompted to provide credentials for one of the computer administrators.
- On other Windows versions, this option behaves like the previous one.
- Per-machine only (fails if the user is not administrator) — the application will be available for all the users of that machine.
- On Windows Vista or above the user may see an Elevation Prompt dialog that will ask for administrator privileges when installing the package. If the logged user is a member of the «Administrators» user group, he will be asked to allow or deny the installation. Otherwise, he will be prompted to provide credentials for one of the computer administrators.
- Per-machine if the user is an administrator, per-user otherwise — the application will be installed «Per-machine» if the user has administrative rights and «Per-user» otherwise.
- To help with the appropriate install location, AI_UserProgramFiles property will be referenced in the application folder path.
- On Windows Vista and above this option has the same installation behavior as the previous one.
- On Windows 7 or above the installation will be per-user with no UAC prompt only if the resources are installed in per-user locations. Besides this, the installation will also require the InstallTypeDlg so the user can choose the per-user option. This option will set the MSIRunningElevated property which can be manually set instead of using the dialog.
The «Per-machine if the user is an administrator, per-user otherwise» option requires «InstallTypeDlg» dialog to be present in Dialogs page
A per-user installation cannot upgrade a per-machine installation, and a per-machine installation cannot upgrade a per-user installation. However, you can try using a Preserve Install Type of the old version predefined UI custom action.
On Windows Vista or above, it is strongly recommended that you do not alter the value of the ALLUSERS property during install.
When performing a Per User installation, the package must respect some rules:
- it creates registry entries only under HKEY_CURRENT_USER
- it creates shortcuts only in the user’s profile (not in per-machine locations)
- it writes information only in Per User locations (for example a normal user cannot write in the «Windows» or «Program Files» folders)
Reboot Behavior
Windows Installer can determine when a system reboot is required and automatically prompt the user at the end of the installation. For instance, if the installer needs to replace any files that are in use during the installation it will automatically prompt for a reboot once the installation is finished.
You can change this default behavior by specifying one of the options below to always prompt for a reboot or to suppress some or all reboot prompts.
- Prompt for Reboot when required — let Windows Installer decide when a system reboot is necessary (for example, when it needs to replace any files that are in use during the installation).
- Force Reboot after install — always prompt for a reboot at the end of the installation, even if a system reboot is not required.
- Suppress Reboot after install, except for ForceReboot actions — Suppress prompts for a reboot at the end of the installation. If the installer encounters the ForceReboot action, it still prompts the user with an option to reboot during the installation.
- Suppress all Reboots and Reboot prompts — all reboots and reboot prompts at the end of the installation and during the installation (initiated by the ForceReboot action) are suppressed.
A reboot request will discontinue a chained installation. If one of the chained packages requires a reboot, you should suppress it by setting the REBOOT property to ReallySuppress . For the main package, you can set the REBOOT property to Force . This way a reboot will be performed when the chained installation is complete.
Perform the reboot if required without showing any prompts
This option makes the installer perform any required reboots automatically, without prompting the user.
Limit to a basic user interface (simple progress and error handling)
This option directs Windows Installer to display only a dialog with a progress bar showing the evolution of the installation and the message boxes that display error messages. It is used especially for unassisted or automated installs (e.g. deployment through Group Policy).
If you select this option, the “Disable Modify” option from “Programs and Features (Control Panel)” will also be selected.
Enable Verbose Logging
By enabling this option, a log file will be generated each time the install package runs. This option sets the Windows Installer MsiLogging property to vp value. Windows Installer will automatically set the MsiLogFileLocation property to the path where the log file will be generated. By default, the MsiLogFileLocation will point to:
- CurrentUser\LocalSettings\Temp\MSI*.LOG for Windows XP.
- CurrentUser\AppData\Local\Temp\MSI*.LOG for Windows Vista or later.
Where * is a random set of letters and numbers.
The MsiLogFileLocation is a Read-only property and cannot be changed by the package author or by the user. Its value is automatically set during the runtime of the installation package.
This option requires Windows Installer 5.0 on Windows Server 2008 R2 or Windows 7. Windows Installer 4.0 or Windows Installer 4.5 on Windows Server 2008 or Windows Vista, Windows Installer 4.5 on Windows Server 2003 or Windows XP to work properly.
Execution Level
Run as administrator — enabling this option automatically sets the execution level to «Require Administrator». Disabling it will set the execution level back to «As Invoker» default.
Checking «Run as administrator» doesn’t give administrative permissions to the Control Panel instance of the application.
Run as administrator does not work for MSI packages launched in maintenance mode.
Execution level. — this link displays the EXE bootstrapper’s Execution Level Settings.
Minimize Installation Time
Fast Installation
These options enable you to drastically reduce the time it takes your application to install by:
- Moving files on the same volume rather than copy
- Suppressing installation progress estimate
- Installation is using the Enhanced User Interface.
- The install location selected by the user is on the same drive where the files have been extracted.
- Per-machine installation is performing.
- The first time the application is installing.
- No features are being advertised or installed to run from source.
- No isolated components are being installed.
On Windows 7 and above when Fast Installation option is used, the standard users access to installed files will be restricted.
The three following options can be used together but are ignored on machines with Windows Installer 4.0 or older. The installation time can be decreased with these options only when Windows Installer 4.5 or higher is found on the target machine.
Don’t save system restore points for installation
If this option is set, Windows Installer will no longer create system restore points for the install process.
Perform only file costing and skip checking other costs
If this option is set, Windows Installer will perform only file costing, ignoring the rest of costs.
Reduce the frequency of progress messages
If this option is set, the installation progress is updated less frequently.
Properties
You can add new custom Properties to your MSI package. This page is mainly used to give default values to the properties in your package. If your package uses properties initialized by another part of the installation (for example the User Interface), then there is no need to specify that property in this section.
Creating a new property
Use the [ New ] toolbar button, the “New” list context menu item or press the Insert key while the focus is on the list control. If you specify a property which is already created by another part of the installation package (for example the property of a dialog control), this property will be not be created. Instead, the information you specified in the «New Property» dialog will update the existing information of this property.
Modifying a property
Use the “Edit” list context menu item or press the Space key while the focus is on the name or value column in the list control.
Add extra information about properties in the comments section.
The properties values are PseudoFormatted Type. The property can be localized from its value field’s context menu as described in How to localize the value of a property based on the OS language? article.
Removing a property
Use the [ Delete ] toolbar button, the “Delete” list context menu item or press the Delete key while the focus is on the list control.
Show properties with empty an value or used in dialog controls
Display empty properties as well as properties utilized by dialog controls in Advanced Installer.
Show properties used by predefined dialogs
Display all properties used by predefined dialogs in Advanced Installer.


