- Installer. Rollback(IDictionary) Метод
- Определение
- Параметры
- Исключения
- Примеры
- Примечания для тех, кто наследует этот метод
- Disable Rollback feature of Windows Installer in Windows 10/8/7
- Disable Rollback using Registry Editor
- Prohibit Rollback using Local Group Policy Editor
- Что за программа Windows Rollback?
- Принцип действия
- Заключение
- Msiexec: automatic rollback to previous version on installation failure
- 3 Answers 3
- Пункт Windows Rollback в меню загрузки
Installer. Rollback(IDictionary) Метод
Определение
Восстанавливает состояние компьютера до установки, если переопределен в наследующем классе. When overridden in a derived class, restores the pre-installation state of the computer.
Параметры
Интерфейс IDictionary, содержащий сведения о состоянии компьютера до установки. An IDictionary that contains the pre-installation state of the computer.
Исключения
Параметр savedState имеет значение null . The savedState parameter is null .
-или- -or- Словарь сохраненного состояния IDictionary мог быть искажен. The saved-state IDictionary might have been corrupted.
Возникло исключение во время фазы Rollback(IDictionary) установки. An exception occurred during the Rollback(IDictionary) phase of the installation. Исключение игнорируется, и откат продолжается. This exception is ignored and the rollback continues. Однако по завершении отката компьютер может быть возвращен в свое первоначальное состояние не полностью. However, the computer might not be fully reverted to its initial state after the rollback completes.
Примеры
В следующем примере демонстрируется Rollback метод Installer . The following example demonstrates the Rollback method of Installer. RollbackМетод переопределяется в производном классе класса Installer . The Rollback method is overridden in the derived class of Installer. Для принудительного отката установки создается исключение. An exception is generated to force an installation rollback.
Примечания для тех, кто наследует этот метод
При переопределении Rollback(IDictionary) метода в производном классе не забудьте сначала вызвать метод базового класса Rollback(IDictionary) в производном методе. When you override the Rollback(IDictionary) method in a derived class, be sure to call the base class’s Rollback(IDictionary) method first in your derived method. Операция отката восстанавливает состояние компьютера до момента установки. A rollback operation restores the computer to the state it was in before the installations occurred. Rollback(IDictionary)Метод вызывается Install(IDictionary) , если метод данного экземпляра Installer или любой установщик в коллекции установщик не работает правильно. The Rollback(IDictionary) method is called if the Install(IDictionary) method of this instance of Installer, or any installer in the installer collection, fail to run correctly. Все исключения, созданные при вызове Rollback(IDictionary) методов установщиков в коллекции установщиков, игнорируются, и после этого выполняется откат других установщиков. Any exceptions generated by calling the Rollback(IDictionary) methods of the installers in the installer collection are ignored and the rollback of the other installers continues.
Disable Rollback feature of Windows Installer in Windows 10/8/7
One of the best things about Windows is the big platform support for tons of software. Windows users always enjoy this fact and test or use a lot of software. However, there are certain scenarios when we’re just unable to finish the installation of a software. This might be due to a missing installation component, incompatibility, corrupted setup, etc.
By default, in the case of failure of any installation, Windows Installer tries to gain the original state of the system. Thus in order to do that, it nullifies the changes it has made during the installation of that failure program. This is basically called Rollback of installation. For example, if you guys have installed Visual Studio 2005 or any other version of it when the setup is unable to finish the installation, it generates the rollback script to reverse the changes it has made to your computer.
While this feature is definitely useful, as a system administrator, there may be times, where you may want to disable this Rollback feature. You can do so by configuring the Prohibit Rollback group policy. This policy is designed to reduce the amount of temporary disk space required to install programs. It can also prevent malicious users from interrupting an installation to compromise the system.
Disable Rollback using Registry Editor
1. Press Windows Key + R combination, type put Regedt32.exe in Run dialog box and hit Enter to open the Registry Editor.
2. Navigate to this registry key:
HKLM\Software\Policies\Microsoft\Windows\Installer
3. In the right pane of this location, you’ll see the DWORD DisableRollback having its Value data set to 1. Double click on it to modify:
4. In order to fix the Windows Installer, in the above box put the Value data equals to 0. Click OK. Alternatively, you can delete the DisableRollback DWORD, and it’ll also fix the issue.
That’s it! You may close the Registry Editor and reboot; your problem should be fixed.
Prohibit Rollback using Local Group Policy Editor
1. Press Windows Key + R combination, type put gpedit.msc in Run dialog box and hit Enter to open the Local Group Policy Editor.
2. Navigate here:
Computer Configuration\Administrative Templates\Windows Components\Windows Installer
This policy setting prohibits Windows Installer from generating and saving the files it needs to reverse an interrupted or unsuccessful installation. If you enable this policy setting, Windows Installer is prevented from recording the original state of the system and sequence of changes it makes during installation. It also prevents Windows Installer from retaining files it intends to delete later. As a result, Windows Installer cannot restore the computer to its original state if the installation does not complete. This policy setting is designed to reduce the amount of temporary disk space required to install programs. Also, it prevents malicious users from interrupting an installation to gather data about the internal state of the computer or to search secure system files. However, because an incomplete installation can render the system or a program inoperable, do not use this policy setting unless it is essential. This policy setting appears in the Computer Configuration and User Configuration folders. If the policy setting is enabled in either folder, it is considered be enabled, even if it is explicitly disabled in the other folder. Microsoft does not now support linking of 2 email IDs or Microsoft accounts.
3. In the right pane of this location, look for the setting Prohibit rollback. Since you’re facing the issue, this policy should show Enabled status. Double click on it to modify:
4. In the above window, set the policy to Not Configured or Disable state to solve your issue. Click Apply followed by OK.
That’s it! You may close the Group Policy Editor and reboot to see the results.
As we mentioned earlier, if you configure this policy, Windows Installer will be prevented from recording the original state of the system and sequence of changes it makes during installation and from retaining files it intends to delete later. As a result, Windows installer cannot restore the computer to its original state if the installation does not complete. And because an incomplete installation can render the system or a program inoperable, do not use this policy unless essential.
Что за программа Windows Rollback?
Большинство пользователей операционных систем Windows (7, 8, 8.1) в период повсеместного внедрения Windows 10 получили на свой ПК рекламный баннер, призывающий обновить программную платформу до самой новой версии. Во многих случаях новая ОС не пришлась по нраву владельцам ПК, а системное средство восстановления изменений после обновления попросту отказалось работать.
В компании NeoSmart Technologies позаботились о таких пользователях, разработав приложение Windows Rollback. Они сумели справиться с «обязаловкой» от Microsoft и защитить простых пользователей от нежелательного обновления. Далее представлен обзор, позволяющий понять, что это за программа Windows Rollback и каковы её особенности.
Принцип действия
Итак, Windows Rollback – это утилита, позволяющая откатить изменения, выполненные в процессе обновления Windows 10, а также допускающая возможность возврата на предыдущие версии ОС, если изначально (до обновления) на ПК использовалась одна из них.
- Загрузите файлы программы (из образа или архива) на диск или USB накопитель.
- Запустите ПК с записанного носителя. Для этого стоит ознакомиться со схемой запуска ПК через USB или диск.
- В первом же меню выберите пункт «Автоматическое восстановление».
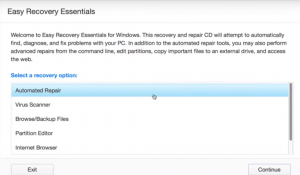
Выбор автоматического обновления
4. Программа просканирует ПК на предмет установленных в нём ОС и выдаст список таковых.
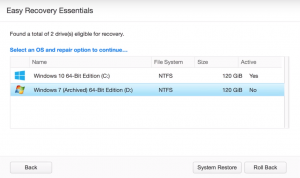
Сканирование жесткого диска на наличие операционных систем
5. Выберите необходимую, нажмите кнопку «Roll Back» и по завершению процедуры перезагрузите систему, вытащив USB или диск раньше, чем ПК начнет загружаться с них заново. Процесс отката занимает куда меньше времени, чем обновление до Windows 10.
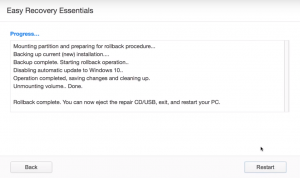
На этом процесс перехода к ранней версии Windows завершен. Также стоит знать при работе с Windows Rollback, что это приложение может заблокировать обновление до Windows 10 в дальнейшем. Однако «свежая» ОС хранится в отдельной папке на жестком диске и всегда может быть активирована посредством этого же ПО.
Заключение
Таким образом, Windows Rollback – это абсолютно бесплатная утилита, посредством которой в несколько манипуляций можно переключиться между двумя операционными системами разных версий. Целевая задача данного ПО – возврат с Windows 10 к версиям 7, 8 или 8.1. Каждое выполненное при этом изменение обратимо на 100%. Достаточно иметь под рукой загрузочный диск или флешку с записанными файлами утилиты Windows Rollback.
Msiexec: automatic rollback to previous version on installation failure
When installing a .MSI file using msiexec in silent mode, is it possible to automate it such that on installation failure it rollbacks to the previous version? Assuming that on installation an older application version is already installed.
3 Answers 3
Yes, restoring the old application version via rollback upon an installation failure is actually a built-in feature of Windows Installer, but you need to configure things correctly to get it to work as you require.
Windows Installer rollback will work as you request if you use: 1) a minor upgrade or 2) a properly sequenced major upgrade that uninstalls the older versions after successfully updating all files. If the major upgrade is set to uninstall the old version before installing the new, the rollback is not available since the uninstall is already over, and the new installer will hence leave nothing installed if it fails and rolls back.
Important: For minor upgrades and for late uninstall of old version in major upgrades to work correctly, all MSI component rules must be followed 100% accurately.
When thinking about a major upgrade that uninstalls the old version after updating, you can view it as a patching operation without having the update packaged as a patch. Windows Installer will actually run a diff on the old and new version and then implement only the required changes, leaving the rest of the application untouched. Depending on the application structure and number of files, this can be significantly faster to install as well.
Late-sequenced major upgrades are also a way to prevent configuration files from being reverted to their original installation status during upgrades. This is a classic issue where config files are changed after installation, uninstalled during a major upgrade and then being reinstalled giving the impression that they are reverted, when they are actually freshly reinstalled.
I have written about Windows Installer Rollback before. Might be worth a read.
Пункт Windows Rollback в меню загрузки
Пункт Windows Rollback в меню загрузки
| Alis | BB-код ссылки (для форумов):
После установки у меня вот такое меню загрузки
Интересно что это за Windows Rollbak ? BB-код ссылки (для форумов):
скорее всего возврат к предидущей операционке. я его удалил из msconfig BB-код ссылки (для форумов):
BB-код ссылки (для форумов):
BT\Sources\SafeOS\winre.wim и позволяет откатить систему до предыдущей версии Windows. BB-код ссылки (для форумов):
BB-код ссылки (для форумов):
BB-код ссылки (для форумов): Теперь, для того чтобы просто СПРЯТАТЬ, исключить из отображения элемент ROLLBACK, надо ввести Перегрузитесь и при перезагрузке Вы уже не увидите в меню так не понравивашейся Вам строки, но вот если Вы решите откатиться к старой системе, то сможете легко восстановить спрятанный элемент. BB-код ссылки (для форумов): BB-код ссылки (для форумов): BB-код ссылки (для форумов): BB-код ссылки (для форумов): BT\Sources\SafeOS\boot.sdi. BT, тем не менее проявил любопытство перед тем, как сносить и решил посмотреть, а как же представлен элемент ROLLBACK в бут-меню. Результат выполнения команды BCDEDIT без параметров я сохранил в текстовом файле и вот именно на основе контента этого файла, свойств элемента ROLLBACK и будет изложено все дальнейшее. Итак, в моем случае элемент ROLLBACK был представлен следующим фрагментом: BT\Sources\SafeOS\winre.wim, <7accbf82-a49b-11e4-832d-0c607688d174> BT\Sources\SafeOS\winre.wim, <7accbf82-a49b-11e4-832d-0c607688d174> Ну вроде ничего страшного, похоже на элемент для загрузки из VHD, но вот пугает GUID <7accbf82-a49b-11e4-832d-0c607688d174>, где взять его значение тому, у которого элемент ROLLBACK уже удален и лог команды BCDEDIT не был создан? И что собой представляет эта GUID строка? Ответы начну с объяснения что такой winre.wim: это образ так называемого RAM-диска, контент WIM-файла распаковывается в память и представляет один из вариантов мини-ОС Windows PE. Так вот, в документации к программе BCDEDIT от Microsoft представленный выше GUID называется ramdiskoptions, то есть опции RAM-диска. Приводится достаточно сложная процедура создания отдельного объекта с GUID BT\Sources\SafeOS\winre.wim», но хорошо, что я пошел более коротким путем, так как эту строку я бы в Registry не нашел, нет ее там. Но зато выйдя на нужный объект, сумел быстренько найти вот такой ключик: А вот это уже отличный поисковый ключ для решения ОБРАТНОЙ задачи, а именно: отыскать в Registry GUID объекта, содержащего \$WINDOWS. BT\Sources\SafeOS\boot.sdi. Все дальнейшее просто как: bcdedit /copy BT\Sources\SafeOS\winre.wim,GUID BT\Sources\SafeOS\winre.wim,GUID BT\Sources\SafeOS\boot.sdi». Ну вот, собственно и все. Перегружайтесь, выбирайте ROLLBACK и откатывайтесь к старой системе, желаю успеха. Вы конечно же были правы, но вот я только что прочитал блог от MS на Insider hub и там предлагается еще более экзотический путь и тоже с помощью BCDEDIT: If you would like to remove the uninstall option from the boot up experience, do the following: |