- Формат файла MST — описание, как открыть?
- Чем открыть файл в формате MST
- TRANSFORMS property
- Remarks
- Installation and setup
- Wizard installation
- Workspace views
- Transform (.mst) file basics
- Expanding EXE packages
- Loading an installer file
- Open a recent project
- Loading a transform file
- Saving a project
- Pre deployment file verification
- Reset installation settings
- Multiple installations
- How To: Create a Windows Installer Transform (*.MST) file for ArcInfo Workstation setup
- Summary
- Procedure
Формат файла MST — описание, как открыть?
Файлы формата MST открываются специальными программами. Существует 2 типа форматов MST, каждый из которых открывается разными программами. Чтобы открыть нужный тип формата, изучите описания файлов и скачайте одну из предложенных программ.
Чем открыть файл в формате MST
Файл шаблона, создаваемый в Corel Presentations — программе, используемой для создания слайд-презентаций. Содержит настройки, установленные по умолчанию для фонового изображения, стилей и размеров шрифтов, заголовков и нижних колонтитулов слайдов в презентации. Используется для применения стилей шаблонов на протяжение всех слайдов презентации.
Чем открыть файл в формате MST (Corel Presentations Master Template File)
Файл настроек, используемый программой Microsoft Windows Installer (msiexec.exe) — компонентом операционной системы Windows, запускающим инсталляторы программ. Содержит опции конфигурации. Позволяет применять специальные параметры для установки. Используется в разработке программ и тестировании версий конфигураций программы.
Файлы MST используются в связке с пакетами установки Microsoft Windows (файлы .MSI). Их настройки можно включать в состав пакета инсталляции в командной строке при помощи следующего синтаксиса:
msiexec installpkg.msi TRANSFORMS=transforms.mst
Примечание: как файлы MSI, так и MST можно настраивать с помощью Microsoft Orca Editor (Orca.exe) — программы, входящей в состав набора Windows Software Development Kit (SDK).
Чем открыть файл в формате MST (Windows Installer Setup Transform File)
TRANSFORMS property
The TRANSFORMS property is a list of the transforms that the installer applies when installing the package. The installer applies the transforms in the same order as they are listed in the property. Transforms can be specified by their filename or full path. To specify multiple transforms, separate each file name or full path with a semicolon (;). For example, to apply three transforms to a package, set TRANSFORMS to a list of file names or to a list of full paths.
You can indicate that a transform file is embedded in a storage of the .msi file, rather than as a stand-alone file, by prefixing the filename with a colon (:). For example, the following example indicates that transform1.mst and transform2.mst are embedded inside the .msi file and that transform3.mst is a stand-alone file.
The installer requires the transforms listed in TRANSFORMS at every installation, advertisement, installation-on-demand, or maintenance installation of the package. The TransformsSecure policy policy, the TRANSFORMS property, and the first character of the TRANSFORMS string informs the installer how to handle the source resiliency of stand-alone transform files. Windows Installer treats setting TransformsAtSource policy or TRANSFORMSATSOURCE the same as TransformsSecure policy and TRANSFORMSSECURE. Note that transforms embedded in the .msi file are not cached and are always obtained from the package.
| TRANSFORMS Property | Transforms Secure | Caching and Resiliency |
|---|---|---|
| @[list of filenames] Example: @transform1.mst;transform2.mst; transform3.mst | No effect. | Secure-At-Source transforms. The source of the transforms must be at the root of the source for the package. When the package is installed or advertised, the installer saves the transforms on the user’s computer in a cache where the user does not have write access. If the local copy of the transform becomes unavailable, the installer searches for a source to restore the cache. The method is the same as searching the source list for an .msi file. See Source Resiliency. |
| |[list of paths] Example: | No effect. | Secure-Full-Path transforms. The source of each transform must be at the full path passed to TRANSFORMS. The transform source does not have to be located at the source of the package. When the package is installed or advertised, the installer saves the transforms on the user’s computer in a cache where the user does not have write access. If the local copy of the transform becomes unavailable the installer can only restore the cache from the source at the specified path. |
| [list of filenames] The first character is not @ or |. Example: transform1.mst;transform2.mst; transform3.mst | TransformsSecure policy or TRANSFORMSSECURE set to 1 OR TransformsAtSource policy or TRANSFORMSATSOURCE set to 1. | If TRANSFORMS is a list of filenames, the installer treats them as Secure-At-Source transforms. If TRANSFORMS is a list of full paths, the installer treats them as Secure-Full-Path transforms. |
| [list of filenames] The first character is not @ or |. Example: transform1.mst;transform2.mst; transform3.mst | TransformsSecure policy and TRANSFORMSSECURE are not set AND TransformsAtSource policy and TRANSFORMSATSOURCE are not set. | Unsecured Transforms. The source of the transforms must be at the root of the source for the package. When the package is installed or advertised per-user, the installer saves the transforms in the user’s profile. This enables a user to roam between computers while maintaining their customizations. For a per-machine install, the transform is saved in the %windir%\Installer folder. If the local copy of the transform becomes unavailable the installer searches for a source to restore the cache. The method is the same as searching the source list for an .msi file. See Source Resiliency. |
| [list of paths] The first character is not @ or |. Example: | TransformsAtSource policy and TRANSFORMSSECURE are not set AND TransformsAtSource policy and TRANSFORMSSECURE are not set.. | Unsecured Transforms. When the package is installed or advertised per-user, the installer saves the transforms in the user’s profile. This enables a user to roam between computers while maintaining their customizations. For a per-machine install, the transform is saved in the %windir%\Installer folder. If the local copy of the transform becomes unavailable, the installer searches for a source to restore the cache. The method is the same as searching the source list for an .msi file. See Source Resiliency. |
You cannot use filenames and paths together in the same TRANSFORMS list. You cannot specify secure and profile transforms together in the same list. You may include transforms embedded in the package in a list with other transforms.
Note that because the list delimiter for transforms is the semicolon character, semicolons must not be used in a transform filename or path.
Remarks
In cases where the TransformsSecure policy or the TRANSFORMSSECURE property has been set with Windows Installer, it is not necessary to pass the @ or | symbol when setting TRANSFORMS using the command line. The installer assumes Secure-At-Source or Secure-Full-Path if the list consists entirely of file names located at the source or consists entirely of full paths. You still cannot mix the two types of transform sources.
Note that the installer uses a different search order for unsecured transforms applied during first time and maintenance installations. For more information, see Unsecured Transforms.
Installation and setup
Wizard installation
You must use a Wizard version that is the same as the product version. Thus, DC products can only be customized with Wizard version DC. To install the Wizard:
Download the installer for Windows. There is also a Mac installer.
Run the installer EXE.
At the Welcome screen, choose Next.
Accept the license agreement, and choose Next.
Verify the install location, and choose Next.
Choose Install.
Choose Finish.
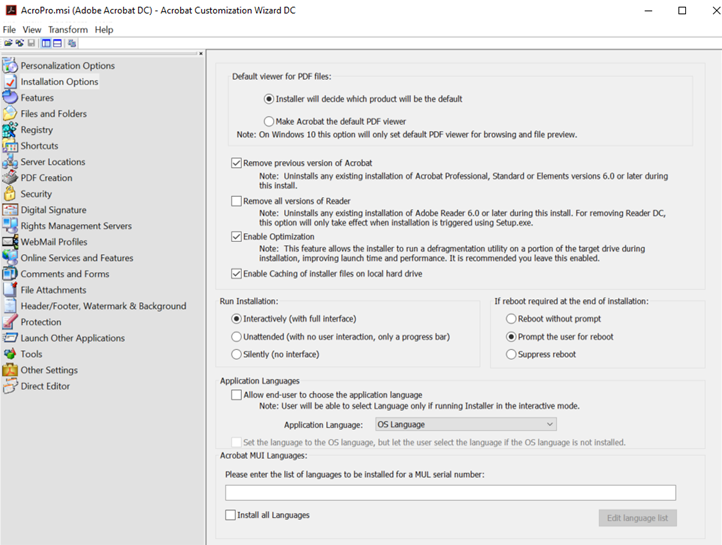
Workspace views
The Wizard workspace is made up of five elements:
The status bar at the bottom of the workspace displays system information.
The top menu bar provides key menu options.
The left-hand navigation bar links to configuration panels you use to modify installation settings. Panels are context-sensitive and will not display unless that feature is supported by the product. If you do not see a link in the navigation bar, then the settings are is not available for the installer you’ve loaded.
The main work area on the right displays configurable installation settings.
The help panel below the main work area contains context-sensitive assistance for optimizing your use of the Customization Wizard.
To show and hide panels:
Choose View.
Select an element to add to or remove from the workspace.
The title bar, menu bar, and main work area cannnot be hidden in the workspace.
Wizard user interface
Transform (.mst) file basics
When you save a project, the Wizard creates an MST file that contains most of your customizations. As shown in the examples below, you simply chain the the install with any needed updates (.msp) and the transform file (.mst). However, keep in mind the following rules:
Once an MST is applied during an install, another MST can’t be used later during an update (say, to change one setting).
The way the Windows Installer Technology works is that during an update or repair, the installer references the MST file that the installation used when it was first installed.
The only way to use a different MST is to uninstall the product and then reinstall with a new MST file.
Acrobat installers support multiple transforms. A semi colon-separated list of transforms can be applied during installation. For details, see the Microsoft documentation.
Expanding EXE packages
The Wizard works with MSI files. If you’ve downloaded an EXE file, expand it as described below to obtain an MSI and other needed files.
To expand an EXE:
Open a command prompt.
Expand the MSI package with 7-zip command line switches. The general form of the command to convert a compressed file to an MSI package is:
Reader EXE (32-bit and 64-bit):
Actobat EXE (32-bit and 64-bit): •
There must be no space between the 7-zip switch and the path.
You can also combine other 7-zip commands to change the install worflow. For example, -sfx_nu can also be combined with -sfx_o and -sfx_ne to silently extract the installation files without actually triggering the installation. The command for doing the same would be:
Loading an installer file
Before customizing the installer, archive a version of the downloaded MSI or MSP file and back it up. Do not modify this file. Only modify a copy of the file.
Open the Customization Wizard.
Choose File > Open Package or press CTRL+O.
Browse to locate the product installation directory.
Select the file to modify.
Choose Open.
Open a recent project
If you have recently opened an installer, you can access it quickly from the shortcut on the File menu.
Choose Start > Programs > Adobe Customization Wizard.
Choose File > Open Package or press CTRL+O, and click the file name from the shortcut list.
Loading a transform file
To apply a transform file associated with another project to your current project:
Choose Transform > Load Transform.
In the Open dialog box, browse to find the file location, and then select the transform file name.
When you are done, choose Open.
To apply the newly loaded installation settings to the open project, choose File > Save or press CTRL+S.
If the transform file is not already located in the same directory as the project file, the Wizard creates a copy of the transform file there when you save the project file.
Saving a project
When you are finished customizing the installer, save your settings by choosing File > Save (or press CTRL+S). The Wizard saves your customizations in a transform (.mst) file and updates the project (.msi) file and setup.ini file in the same directory.
If the setup.ini file is not located in the same directory as the project file, you will see an error message when you try to save the file. But if the transform file is not located in the same directory as the project file, the Wizard places a copy in the same directory as the .msi file.
If the setup.ini file is not located in the same directory as the project file, you will see a message indicating that you cannot save the project (.msi) file.
Pre deployment file verification
As part of the customization process, the Wizard modifies three files which must be located in the same directory:
Project file (.msi): The installer file for your application.
Transform file (.mst): Contains your modifications to the installer as well as any separate files. The Wizard creates or updates a transform file every time you save an .msi file.
Setup.ini file: Contains initialization data for the installer. Some Adobe and MSI properties are written to this file. You can manually edit this file to add more properties and features. For details, see the Enterprise Administration Guide.
Reset installation settings
To restore an edited package to its default settings:
Choose File > Reset Package to Adobe default.
Choose Yes to confirm.
Multiple installations
If you have multiple installation scenarios in your organization, you can specify multiple sets of installation settings in separate transform files. You do not need to create and store a complete package for each scenario. Instead, you can create a standard package and store multiple transform files in a separate directory. When you are ready to run an installation, open the project file, and load the transform file containing the installation settings you want to use.
© Copyright 2020, Adobe Inc.. Last updated on Feb 22, 2021.
How To: Create a Windows Installer Transform (*.MST) file for ArcInfo Workstation setup
Summary
Instructions provided describe how to create a basic transform for the ArcInfo Workstation setup using ORCA, a free tool available from the MSI SDK.
Other tools are available that use a wizard to create transform files, for example, Wise for Windows Installer and InstallShield Admin Studio.
For more information on deploying managed ArcGIS setups, see the links in the Related Information section below.
Procedure
Transform (*.MST) files are used to customize setups created using Microsoft Installer (MSI) technology. An .MST file can be used to install ArcInfo Workstation with pre-determined parameters without a Graphical User Interface or user interaction. The .MST file customizes the properties of the ArcInfo Workstation MSI package; this includes the installation location, license manager, and features to install.
The bullet points below include information on changing the installation location, license manager, and features to install using ORCA. Use any or all of the parameters as needed.
See the Related Information section below to download ORCA. ORCA requires Windows Installer SDK v.2.0.
To install Windows Installer SDK v.2.0.
- Download and install the Windows Installer SDK v. 2.0.
- Navigate to the installation location and launch Orca.msi from the \bin folder.
- The Orca.msi launches the Orca setup program. Once the setup program is complete, an Orca shortcut is added to the Start Menu.
- Open the setup.msi in ORCA.
- On the main toolbar, navigate to Transform > New Transform.
- Customize the transform using the information from the following bullet points:
- To change the default installation location.
For version 9.3 and 10:
- In the Property table, add a row. The values for the fields are:
- Property: INSTALL_LOC
- Value: [WindowsVolume]\Workstation
- In the Custom Action table, find the custom action called SET_INSTALLDIR.
- Set the Target field for this custom action to [INSTALL_LOC].
- In the CustomAction table, add a row. The values for the fields are:
- Action: SET_INSTALLDIR_SILENT
- Type: 35
- Source: INSTALLDIR
- Target: [INSTALL_LOC]
- In the InstallExecuteSequence table, add a row. The values for the fields are:
- Action: SET_INSTALLDIR_SILENT
- Condition: NOT Installed
- Sequence: 1236
- In the Property table, add a row. The values for the fields are:
- Property: INSTALL_LOC
- Value: [WindowsVolume]Workstation
- In the Custom Action table, find the custom action called SET_INSTALLDIR.
- Set the Target field for this custom action to [INSTALL_LOC].
To specify the license manager to use for the ArcInfo Workstation applications:
- In the Property table, change the value of LICENSESERVER from @ to @ .
To change the features selected for installation:
- To add features, in the Feature table, select the features to install and change the Level from level 4 to level 3.
- To remove features, in the Feature table, select the features not to be installed and change the Level from level 3 to level 4.


