- Migrating the WSUS Database from WID to SQL
- Prerequisites
- Migrating the WSUS database
- Stop the IIS and WSUS services on the WSUS server
- Detach SUSDB from the Windows Internal Database
- Using SQL Management Studio
- Using Command Prompt
- Copy the SUSDB files to the SQL Server
- Attach SUSDB to the SQL Instance
- Verify SQL Server and Database Logins and Permissions
- SQL Server Login Permissions
- Database Permissions
- Edit the registry to point WSUS to the SQL Server Instance
- Start the IIS and WSUS services on the WSUS server
- Uninstalling the WID role (not recommended)
- Администрирование Windows Internal Database
- Управление базой Windows Internal Database
- Как удалить базу WID
- Ошибка при установке WID в Windows Server 2012: служба MSSQL$MICROSOFT##WID не смогла войти в систему как NT SERVICE\MSSQL$MICROSOFT##WID
- Симптомы
- Причина
- Обходной путь
- Дополнительные сведения
Migrating the WSUS Database from WID to SQL
Applies to: Windows Server 2012, Windows Server 2012 R2, Windows Server 2016
Use the following steps to migrate the WSUS database (SUSDB) from a Windows Internal Database instance to a Local or Remote instance of SQL Server.
Prerequisites
- SQL Instance. This can be the default MSSQLServer or a custom Instance.
- SQL Server Management Studio
- WSUS with WID role installed
- IIS (This is normally included when you install WSUS through Server Manager). It is not already installed, it will need to be.
Migrating the WSUS database
Stop the IIS and WSUS services on the WSUS server
From PowerShell (elevated), run:
Detach SUSDB from the Windows Internal Database
Using SQL Management Studio
- Right-click SUSDB ->Tasks -> click Detach:
 Tasks > Detach option selected.» data-linktype=»relative-path»/>
 - Check Drop Existing Connections and click OK (optional, if active connections exist).
 Tasks > Detach option selected.» data-linktype=»relative-path»/>
Using Command Prompt
These steps show how to detach the WSUS database (SUSDB) from the Windows Internal Database instance by using the sqlcmd utility. For more information about the sqlcmd utility, see sqlcmd Utility.
- Open an elevated command prompt
- Run the following SQL command to detach the WSUS database (SUSDB) from the Windows Internal Database instance by using the sqlcmd utility:
Copy the SUSDB files to the SQL Server
- Copy SUSDB.mdf and SUSDB_log.ldf from the WID Data Folder (%SystemDrive%\Windows\WID\Data) to the SQL Instance Data Folder.
For example, if your SQL Instance Folder is C:\Program Files\Microsoft SQL Server\MSSQL12.MSSQLSERVER\MSSQL, and the WID Data folder is C:\Windows\WID\Data, copy the SUSDB files from C:\Windows\WID\Data to C:\Program Files\Microsoft SQL Server\MSSQL12.MSSQLSERVER\MSSQL\Data
Attach SUSDB to the SQL Instance
- In SQL Server Management Studio, under the Instance node, right-click Databases, and then click Attach. Attach option selected.» data-linktype=»relative-path»/>
- In the Attach Databases box, under Databases to attach, click the Add button and locate the SUSDB.mdf file (copied from the WID Folder), and then click OK.
 Attach option selected.» data-linktype=»relative-path»/>
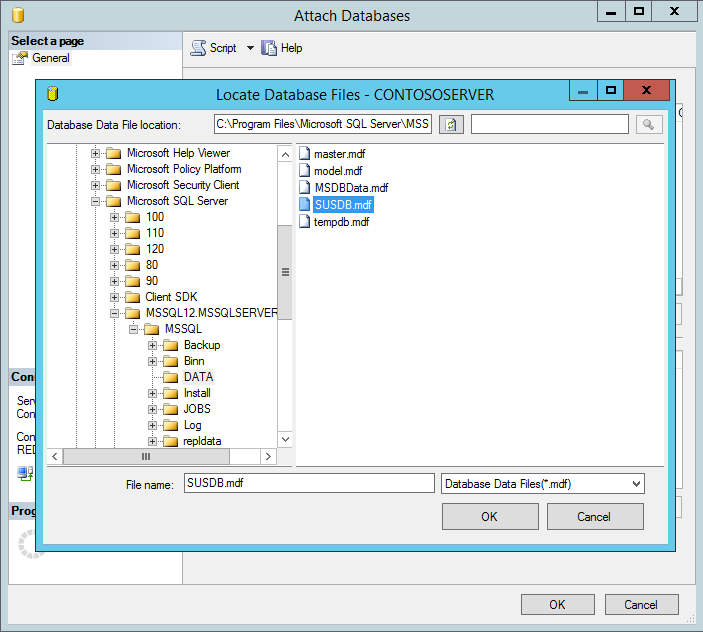
This is also able to be done using Transact-Sql. Please see the SQL documentation for attaching a database for its instructions.
Example (using paths from previous example):
Verify SQL Server and Database Logins and Permissions
SQL Server Login Permissions
After attaching the SUSDB, verify that NT AUTHORITY\NETWORK SERVICE has login permissions to the instance of SQL Server by doing the following:
- Go into SQL Server Management Studio
- Opening the Instance
- Click Security
- Click Logins
The NT AUTHORITY\NETWORK SERVICE account should be listed. If it is not, you need to add it by adding New Login Name.
If the SQL Instance is on a different machine from WSUS, the WSUS Server’s computer account should be listed in the format [FQDN]\[WSUSComputerName]$. If not, the steps below can be used to add it, replacing NT AUTHORITY\NETWORK SERVICE with the WSUS Server’s computer account ([FQDN]\[WSUSComputerName]$) This would be in addition to granting rights to NT AUTHORITY\NETWORK SERVICE
Adding NT AUTHORITY\NETWORK SERVICE and granting it rights
- Right Click Logins and click New Login…New Login option selected.» data-linktype=»relative-path»/>
- On the General page, fill out the Login name (NT AUTHORITY\NETWORK SERVICE), and set the Default database to SUSDB.
- On the Server Roles page, ensure public and sysadmin are selected.
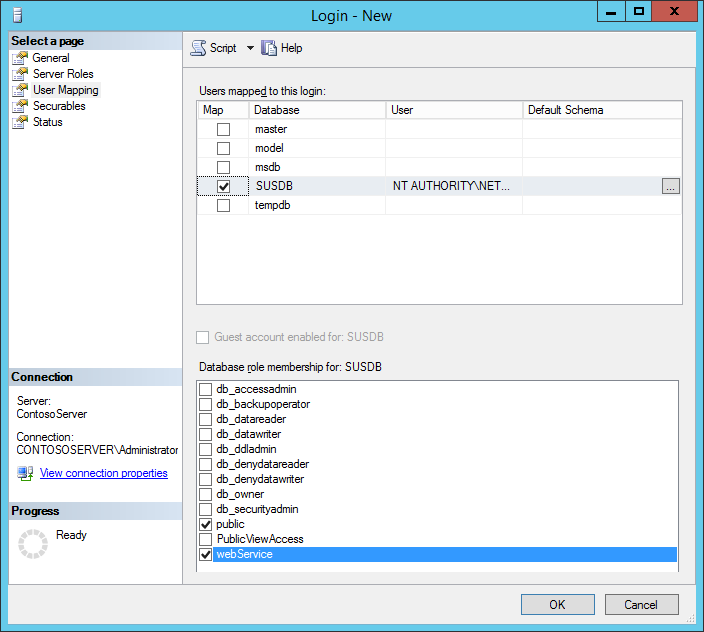
- On the User Mapping page:
- Under Users mapped to this login: select SUSDB
- Under Database role membership for: SUSDB, ensure the following are checked:
- public
- webService
- Click OK
 New Login option selected.» data-linktype=»relative-path»/>
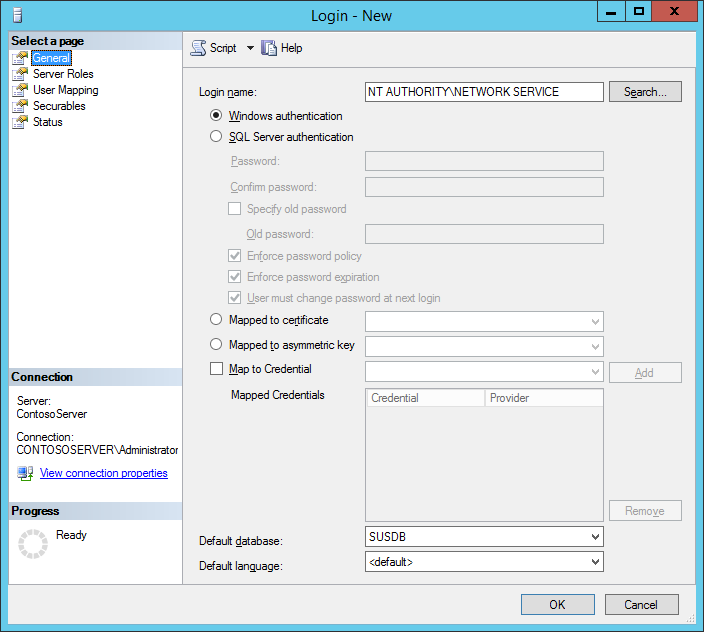

You should now see NT AUTHORITY\NETWORK SERVICE under Logins. 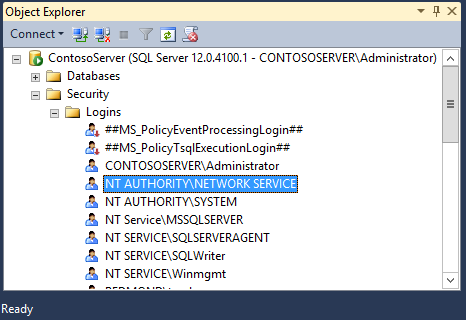
Database Permissions
- Right-click the SUSDB
- Select Properties
- Click Permissions
The NT AUTHORITY\NETWORK SERVICE account should be listed.
If it is not, add the account.
On the Login name textbox, enter the WSUS machine in the following format:
Verify that the Default database is set to SUSDB.
In the following example, the FQDN is Contosto.com and the WSUS machine name is WsusMachine:

On the User Mapping page, select the SUSDB Database under Users mapped to this login
Check webservice under the Database role membership for: SUSDB: 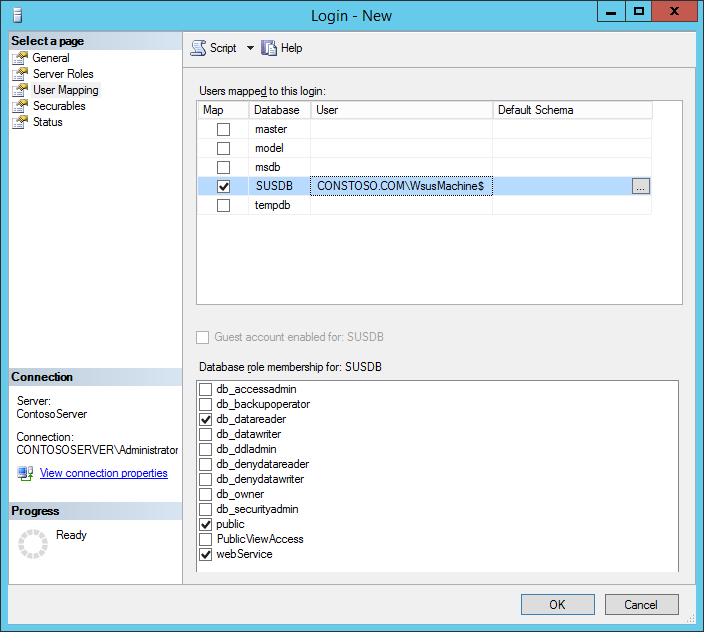
Click OK to save settings.
You may need to restart the SQL Service for the changes to take effect.
Edit the registry to point WSUS to the SQL Server Instance
Follow the steps in this section carefully. Serious problems might occur if you modify the registry incorrectly. Before you modify it, back up the registry for restoration in case problems occur.
Click Start, click Run, type regedit, and then click OK.
Locate the following key: HKEY_LOCAL_MACHINE\SOFTWARE\Microsoft\UpdateServices\Server\Setup\SqlServerName
In the Value text box, type [ServerName]\[InstanceName], and then click OK. If the instance name is the default instance, type [ServerName].
Locate the following key: HKEY_LOCAL_MACHINE\SOFTWARE\Microsoft\Update Services\Server\Setup\Installed Role Services\UpdateServices-WidDatabase 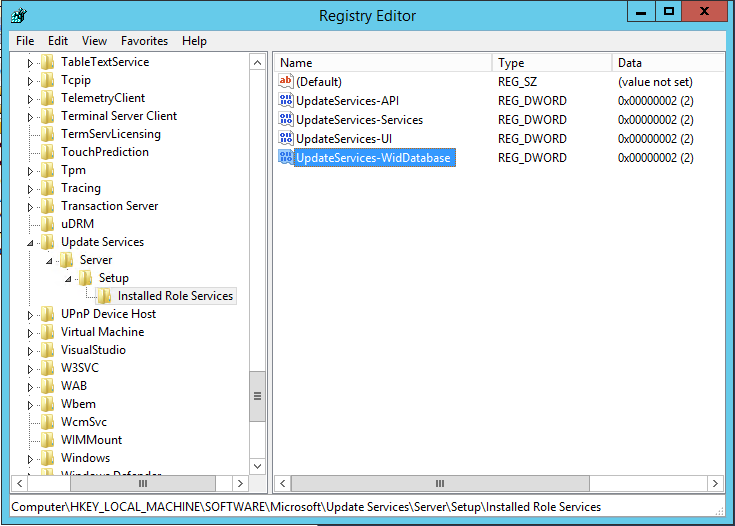
Rename the Key to UpdateServices-Database 
If you do not update this key, then WsusUtil will attempt to service the WID rather than the SQL Instance to which you have migrated.
Start the IIS and WSUS services on the WSUS server
From PowerShell (elevated), run:
If you are using the WSUS Console, close and restart it.
Uninstalling the WID role (not recommended)
Removing the WID role also removes a database folder (%SystemDrive%\Program Files\Update Services\Database) that contains scripts required by WSUSUtil.exe for post-installation tasks. If you choose to uninstall the WID role, make sure you back up the %SystemDrive%\Program Files\Update Services\Database folder beforehand.
After the WID role is removed, verify that the following registry key is present: HKEY_LOCAL_MACHINE\SOFTWARE\Microsoft\Update Services\Server\Setup\Installed Role Services\UpdateServices-Database
Администрирование Windows Internal Database
Windows Internal Database (WID) представляет собой «облегченной» базу данных SQL, основанную на SQL Server Express. Windows Internal Database предлагается в качестве бесплатной базы данных SQL, которую можно использовать в различных продуктах Microsoft (или сторонних разработчиков) в качестве легкого и бесплатного SQL- решения для хранения данных. В частности, WID может использоваться SharePoint или таким ролями Windows Server, как WSUS, ADRMS, ADFS, Connection Broker и т.п.
Windows Internal Database включается в состав серверных ОС Window, начиная с версии Windows Server 2008. В Windows 2008 независимо от разрядности доступна только 32 битная версия WID (устанавливается в C:\Program Files (x86)\Microsoft SQL Server), в Windows Server 2012 версия WID — 64-битная (база находится в каталоге C:\Windows\WID). В качестве отдельного продукта Windows Internal Database пользователям не доступна.
Основные особенности Windows Internal Database:
- База данных WID предполагает только локально использование, удаленно к ней подключиться не получится
- Отсутствуют ограничения на размер файлов БД (в отличии от той же редакции SQL Express)
- Не требует для своего использования лицензии.
Управление базой Windows Internal Database
По задумке разработчиков база WID предназначена только для консольной или скриптовой установки, а все операции с ней должны выполняться через командную строку. Но к счастью базой WID можно управлять и через GUI с помощью SQL Management Studio.
Для этого нужно:
- Скачать и установить SQL Server Management Studio Express 2012 (входит в состав Microsoft SQL Server 2012 Express, но ее можно скачать и отдельно, выбрав ENU\x64\SQLManagementStudio_x64_ENU.exe)
- Запустить консоль Management Studio с правами администратора
- Подключится к базе, указав следующее имя сервера:
- в Windows Server 2008 / R2 — \\.\pipe\mssql$microsoft##ssee\sql\query
- в Windows Server 2012 / R2 — \\.\pipe\MICROSOFT##WID\tsql\query
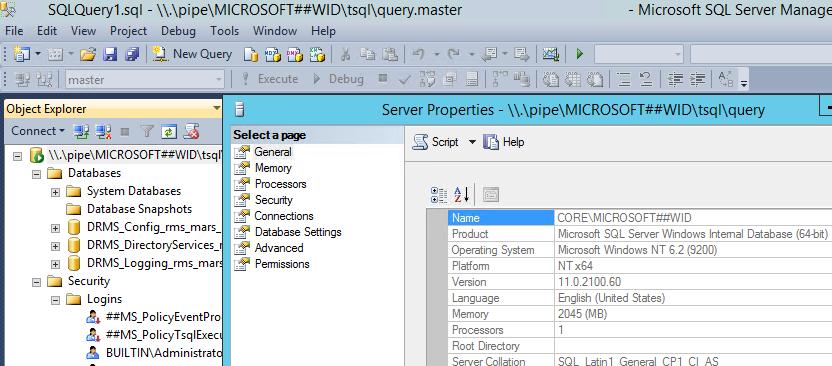
Для подключения через sqlcmd.exe следует выполнить такую команду:
Как удалить базу WID
После удаления роли Windows, которая использует базу Windows Internal Database, сам инстанс SQL с базой WID не удаляется, причем инструментов для ее удаление в системе нет. Деинсталлировать базу Windows Internal Database можно только при помощи Windows Installer.
Для удаления базы WID на Windows Server 2008 нужно:
- на 32 битной системе:
- на 64 битной системе:
В Windows Server 2012 базу WID можно удалить гораздо проще — с помощью Powershell:
Сами файлы базы данных (.mdb и .ldb) придется удалить вручную – пути к ним указаны в начале статьи.
Определить версию установленную версию WID можно по файлу:
Ошибка при установке WID в Windows Server 2012: служба MSSQL$MICROSOFT##WID не смогла войти в систему как NT SERVICE\MSSQL$MICROSOFT##WID
В этой статье повеяна проблема, из-за которой нельзя установить внутреннюю базу данных Windows (WID) на компьютере под управлением Windows Server 2012.
Оригинальная версия продукта: Windows Server 2012 R2
Исходный номер КБ: 2832204
Симптомы
При установке служб Федерации Active Directory (AD FS) с помощью мастера добавления ролей и функций в Windows Server 2012 установка WID не работает. И вы получите следующее сообщение об ошибке:
Служба MSSQL$MICROSOFT##WID не смогла войти в систему как NT SERVICE\MSSQL$MICROSOFT##WID с настроенным паролем из-за следующей ошибки:
Ошибка logon: пользователю не был предоставлен запрашиваемого типа логотипа на этом компьютере.
Служба: MSSQL$MICROSOFT##WID
Домен и учетная запись: NT SERVICE\MSSQL$MICROSOFT##WID
Эта учетная запись службы не имеет необходимого права пользователя «Вход в качестве службы».
Назначить учетную запись службы на этом компьютере в качестве службы. Для этого можно использовать локальные параметры безопасности (Secpol.msc). Если этот компьютер является узлом кластера, убедитесь, что это право пользователя назначено учетной записи службы кластера на всех узлах кластера. Если вы уже написали этому пользователю право на учетную запись службы и право пользователя будет удалено, обратитесь к администратору домена, чтобы узнать, может ли объект групповой политики, связанный с этим узлом, удалить право.
Причина
При установке WID NT SERVICE\MSSQL$MICROSOFT##WID создается локализованная виртуальная учетная запись. Эта учетная запись предоставляется Log on as a service пользователю право локальной групповой политики. Если объект групповой политики (GPO), связанный с сайтом, доменом или организационным подразделением, переоценил локальный параметр групповой политики, учетная запись NT SERVICE\MSSQL$MICROSOFT##WID не имеет необходимых прав пользователя. Поэтому WID нельзя установить.
Обходной путь
Чтобы решить проблему, используйте один из следующих методов:
- Log on as a service Назначьте пользователю право на NT SERVICE\ALL SERVICES в GPO, определяемом правом пользователя.
- Исключить компьютер из GPO, определяемого правом пользователя.
Дополнительные сведения
В этой ситуации также могут возникнуть другие симптомы. Например, служба WID может показаться установленной, но она не начинается. Кроме того, мастер добавления ролей и функций указывает, что перезапуск ожидается.


