- How to Find the IP Address of Your Windows 10 PC
- Finding the IP Address of a Windows 10 PC
- How To Find Your Local IP Address In Windows 7 or Vista
- How To Find Your Local IP Address In Windows 7 Using CMD
- Step 1
- Step 2
- Step 3 (optional)
- Further reading
- How to find IP address of your computer (Windows XP, Vista, 7, 8, 10,Mac)?
- How to Show IP Address on Desktop Background in Windows 10
- Show IP Address on Desktop Background in Windows 10
- Through Bginfo
- Using Raimeter
- Final note
- 8 ways to find your IP address in Windows (all versions)
- 1. How to find your IP address from the Command Prompt (all versions of Windows)
- 2. How to find your IP address in the Settings app (Windows 10 only)
- 3. How to find your IP Address in the Control Panel (all versions of Windows)
- 4. How to find your IP address in System Information (all versions of Windows)
- 5. How to find the IP address in PowerShell (all versions of Windows)
- 6. How to find your IP address in Task Manager (Windows 10 and Windows 8.1 only)
- 7. How to find your computer’s IP address using the Network Map (Windows 7 only)
- 8. How to find your IP address in the PC Settings app (Windows 8.1 only)
- Conclusion
How to Find the IP Address of Your Windows 10 PC


Your computer’s IP address (Internet Protocol) is, as the name suggests, an address that provides an identity for your device on a network. Whether it’s a local network within an intranet at a business, your home, or a massive network such as the Internet. Every website you visit on the Internet uses a unique IP address, too. But luckily for that, we can use simple names like Microsoft.com using DNS.
Why would you want to know your IP address, though? Well, we live in a world where we are surrounded by multiple devices that need to talk to each other. Whether it is connecting two computers together in a peer to peer fashion for sharing resources or for accessing another device remotely. Also, if you need to troubleshoot devices on a network, knowing your IP Address can help a lot.
Finding the IP Address of a Windows 10 PC
There are a few ways you can find your IP address. Let’s start with the easiest method that allows you to use the UI and not the command line.
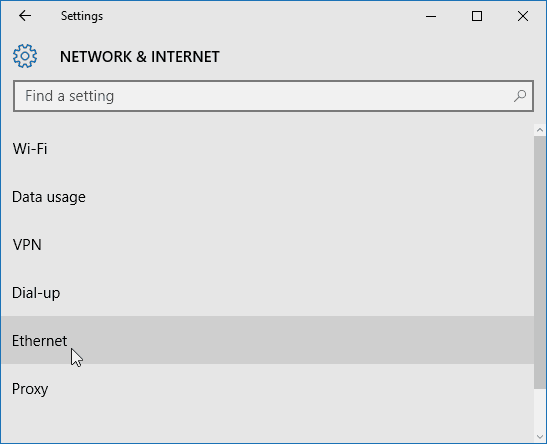
Go to Settings > Network & Internet. Then select either Wi-Fi or Ethernet (depending on how the device connects). In this example, I’m connected to Ethernet.
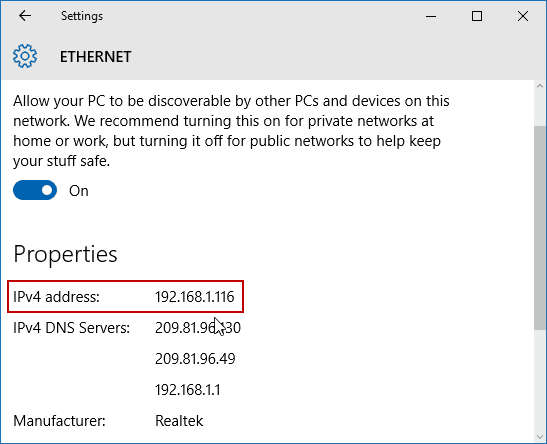
Then select the Ethernet Connected icon. Scroll down to the Properties section and you’ll see your IPV4 address information.
Finding your Wi-Fi IP address is a bit different. You still go to Settings > Network & Internet, but then select Advanced options. Then scroll down to the Properties section to see the IP address of the device.

Find an IP Address Using the Command Prompt
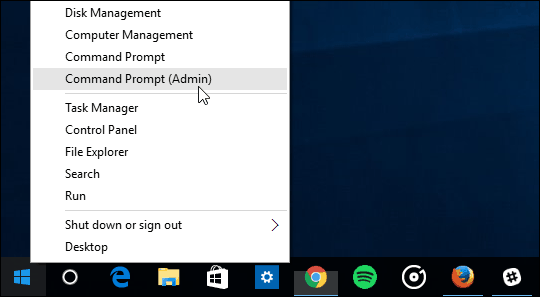
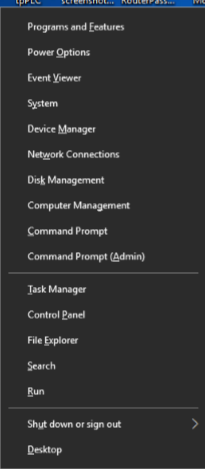
Right-click the Start button or hit Windows Key+X to bring up the hidden quick access menu and select Command Prompt (Admin) or — select Windows PowerShell (Admin) depending on your version of Windows 10.
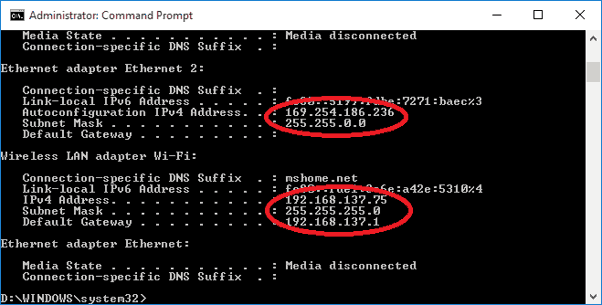
Now type: ipconfig then press the Enter key.
In this case, I am connected to both Wireless and Wired networks, so I have IP addresses displayed for both.
Finding your IP address on Windows PCs hasn’t changed much over the years. But if you haven’t upgraded to Windows 10 yet, you might be interested in how to find your local IP address on Windows 7.
Also, if you have several devices on your home network, read our article on how to find the IP of all connected devices on your network the easy way.
How To Find Your Local IP Address In Windows 7 or Vista


Finding your IP address under Windows 7 is a very simple process. The process is exactly the same whether you’re using Windows 7, Windows Vista, Windows XP or even Windows Server 2003/2008.
In most circumstances, the majority of users don’t need to worry about their “IP Address” due to DHCP from your local network or ISP. For system administrators, knowing the IP address of your machine, server, or customer’s PC is imperative.
How To Find Your Local IP Address In Windows 7 Using CMD
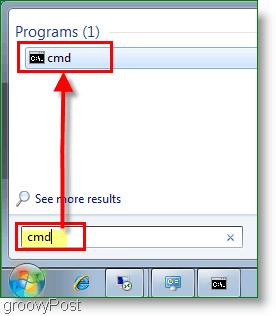
Step 1
Click Start, in the search Type in cmd. Next, Click on the program cmd. This click will open the Command Prompt/Windows.
Step 2
The command prompt should open; now in the open line, you’ll need to type in ipconfig and press Enter
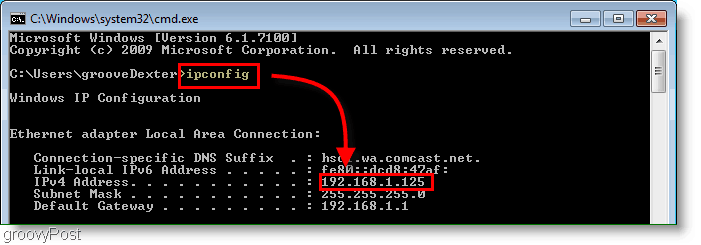
You’ll see your IP address listed right above the subnet mask. Usually, it will say IPv4 Address and follow the prefix 192.168.1.# or 192.168.0.# for home networks as shown in the screenshot above.
Step 3 (optional)
If you’re not looking for your LOCAL IP address but instead the IP address provided by your ISP to your Cable Modem or FIOS Router, just open your browser and go to https://whatismyip.org.
Please note – This is not the actual IP you’re using on your LOCAL computer as shown above in Step 2. This IP address is the one assigned to your Cable Modem/FIOS Router on the Internet.
Further reading
What is an IP Address?
- If you want to call someone, you use their Telephone or Mobile number, right? Well, an IP Address or Internet Protocol Address for a computer or network device is a phone number for your computer. That’s it. It’s pretty simple.
- Because no one knows the “ Phone Number IP Address” for www.google.com, another technology was created to act as an Automatic Phonebook for IP Addresses. It’s called DNS. When you type www.groovypost.com into your browser, DNS will translate that into an IP Address and send you to the website. It’s all very simple once you understand it.
IPV6 Address?
- In a system or network that uses IPv6, you won’t see a Subnet mask, and the address will follow the fe80::## prefix. However, for most home users, IPv6 use is uncommon.
IPv4 Vs. IPv6?
- IPv4 is the old system we currently use to designate IP addresses across all of the public computers that are connecting to the internet. The problem with IPv4 is the address is only 32bit’s in length which means there are not enough addresses to go around.
- IPv6 is 128 bits in length which should allow for more than enough addresses in the foreseeable future. The good news is most modern operating systems understand both, so when the times comes for the cutover, it should be invisible for most users.
Do You Have Any Groovy Questions or Comments? Drop your comment below, or join us in the groovyPost Free Tech Support Community.
How to find IP address of your computer (Windows XP, Vista, 7, 8, 10,Mac)?
The steps below will help you to find your IP address of your computer. There are two ways to find IP address of your computer.


Step 1
Go to Control Panel. Press Windows key+X at the same time and select Control Panel.
Step 2
Click on Network and Internet -> Network and Sharing Center, click on Change adapter settings on the left side.
Step 3
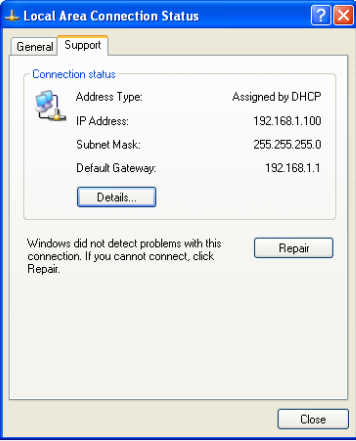
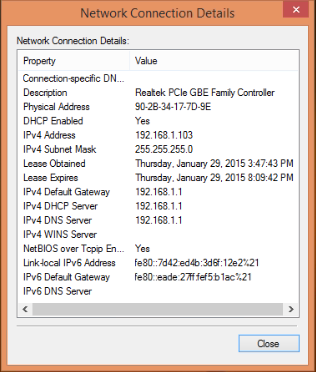
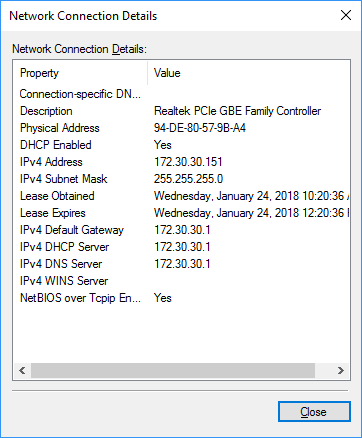
Highlight and right click on Ethernet, go to Status -> Details. The IP address will display.
Method 2
Step1
Click the network icon (may look like a computer or Wi-Fi signal) in the task tray. Go to Network settings.
Click the Windows symbol and then choose the Settings button on the bottom- left corner. It will pop up on the Settings page, go to Network & Internet.


Step 2
Click Ethernet > Change adapter options. Or click Status > Change adapter options. The IP address will display.
How to Show IP Address on Desktop Background in Windows 10
Ways to Show IP Address on Desktop Background in Windows 10. – Many times, while you are connecting to the Internet you need to frequently see IP address of the network. In addition, when you remotely connect a device from the local network you might require typing the device’s IP address. If any error happens then you have to repeat this process time and again. So you might want to keep the IP address of the router or your computer and other details on the Windows 10 desktop background.
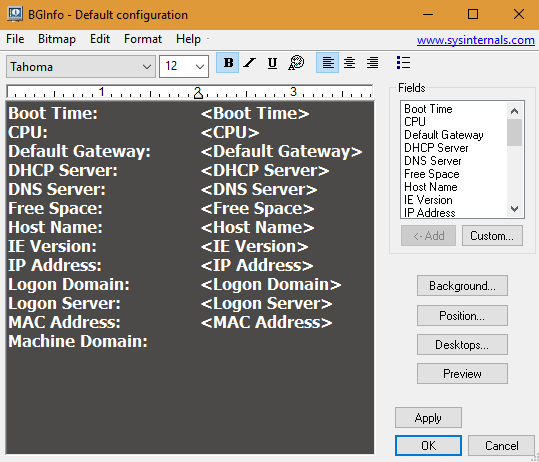
A tool is available that help you Show IP Address on Desktop Background in Windows 10. This is Bginfo that lets you display Default Gateway, Host Name, IP Address, Logon, Domain, Logon Server, MAC Address, Memory, System Type and a lot more. Using this tool you can Show IP Address on Desktop Background including many other details in your personalized way. You can change the background color, Font, position, of the information placed by Bginfo.
Show IP Address on Desktop Background in Windows 10
Through Bginfo
Step 1 – Go to This tool on TechNet and click on Download Bginfo.
Step 2 – Extract the Bginfo file after the end of downloading. Double click on the folder found after the extraction and locate the setup.
Step 3 – Double click on Bginfo to open the Default configuration Window.
Step 4 – On the Default configuration window, edit the content as you want to see on your Windows 10 desktop. Simply remove the information using backspace or delete key on your keyboard.
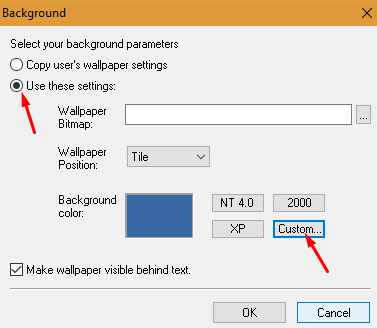
Step 4 – If you like to change the look of the Bginfo information background and font click on the Background and change meeting with your need. On the Background pop up, Select the option Use these settings and then click on Custom. Select OK after the change.
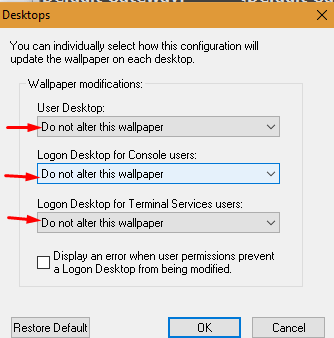
Step 5 – Commonly the information looks changes with the wallpaper alteration but you can modify the settings. Click on Desktops and select the option Don’t alter the wallpaper from the dropdowns under all 3 settings.
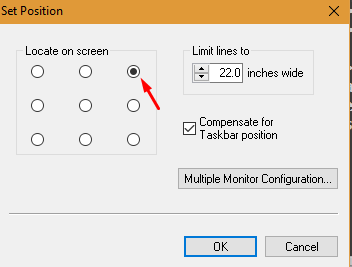
Step 6 – To change the location of the info click on Position and choose a suitable one. Click OK to save the new position.
Step 7 – If you face any issue between this work you can reset Bginfo. Click File followed by Reset default settings. Finally, you can see the network and other information like this.

Using Raimeter
Rainmeter, the skin providing tool, allows you to Show IP Address on Desktop Background in Windows 10.
Get the application from the article How to Personalize Windows 10 Desktop With Rainmeter and install on your computer.
Once the application gets installed, go to Illustro => Network => Network.ini and click on Load.
Go to the upper right of the desktop screen and see the network IP Address, Upload and Download data.
So, these are the 2 ways to Show IP Address on Desktop Background in Windows 10.
Final note
The first tool in this concern is from Technet and a pretty lightweight and more effective. If you like to use this network info displaying utility including more personalization tools you can opt for the second one. So Show IP Address on Desktop Background in Windows 10 and make your computing easy.
8 ways to find your IP address in Windows (all versions)
The IP address or Internet Protocol address is a numerical label that is used in networks to identify and locate network devices, from computers to smartphones, to printers and other devices. The IP address can be a useful piece of information, especially when you want to set up your home router or when you want to connect to other devices on a network. But how do you check a PC’s IP address in Windows? In this tutorial, we will show you eight methods that work in Windows 10, Windows 7 and Windows 8.1:
NOTE: The information shared in this tutorial applies to all modern Windows operating systems: Windows 10, Windows 8.1 and Windows 7. To make things simpler, we use screenshots taken mostly in Windows 10. If you want to learn more technical details about IP addresses and their role in networking, we recommend you to read these articles:
1. How to find your IP address from the Command Prompt (all versions of Windows)
Open the Command Prompt , type the command ipconfig and press Enter. This command lists all the network adapters (both Ethernet and wireless) found on your Windows computer, and it shows details about each of them.
For each network adapter, you get to see both the IPv4 address and the IPv6 Address.
To learn more about the parameters accepted by the ipconfig command and what each of them does, run the command ipconfig /?.
And, if you are interested in finding more information about other networking commands that you can run using the Command Prompt, check this tutorial: Command Prompt – Advanced networking commands .
2. How to find your IP address in the Settings app (Windows 10 only)
If you are using Windows 10, open the Settings app . There, go to Network & Internet. You are shown a list of networking related settings and categories. If you are connected to a wireless network, in the column on the left, choose Wi-Fi and then, on the right, click or tap on the name of the network that you are connected to.
You are shown a long list of properties. Scroll down until you find the fields for the IPv6 and IPv4 addresses, highlighted below.
If you are connected using a network cable, in the column on the left choose Ethernet and then click or tap on the network name, on the right side of the screen.
Scroll down the list of network properties until you find the entries for the IPv6 and IPv4 addresses, highlighted below.
Now you can close the Settings app.
3. How to find your IP Address in the Control Panel (all versions of Windows)
Another geeky method that does not involve using a command is to use the Network and Sharing Center. To access it, open the Control Panel and go to “Network and Internet -> Network and Sharing Center.” If you want to learn more about it, read this guide: Simple questions: What is the Network and Sharing Center in Windows? . Next, click or tap the “Change adapter settings” link on the left.
The Network Connections window is opened, listing the network adapters installed on your computer, including virtual ones, used by VPN services or virtualization apps. Double click (or double tap) the network adapter for which you want to see the IP address.
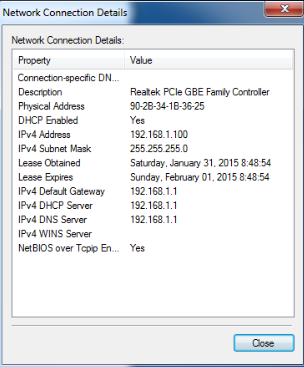
This action opens the Status window of that adapter. Click or tap the Details button to see a series of details about that network adapter, including its IPv4 and IPv6 addresses.
Scroll through the list of details until you find the IPv4 and IPv6 address fields, highlighted below.
When done, Close the windows you just opened.
4. How to find your IP address in System Information (all versions of Windows)
Another method that works in all versions of Windows is to use the System Information desktop app. You can open it by using search and typing “System Information“ in the appropriate search field and clicking on the search result with the same name. Learn more about this tool and how to open it, from this guide: System Information – How to learn your PC’s complete configuration .
In the System Information desktop app, on the column on the left, expand Components followed by Networks and then Adapter. On the right side of the app window, you can see detailed information about each network adapter that is found on your computer. Scroll down the list until you find the network card that you are interested in. There you see a field named IP Address, giving you all the information you need.
Close the System Information app when done.
5. How to find the IP address in PowerShell (all versions of Windows)
PowerShell is a tool similar to the Command Prompt, but it is even more powerful and allows you to work with more elements that make up Windows. PowerShell has two commands which you can use to find the IPv4 and IPv6 address of a network adapter. The first one is gip. Type it in PowerShell and then press Enter. The command triggers the display of several details about each network adapter, including their IP addresses.
Another command which returns the same results is Get-NetIPConfiguration. Type it, press Enter and then look for the information that you want.
Close PowerShell when done.
6. How to find your IP address in Task Manager (Windows 10 and Windows 8.1 only)
If you use Windows 10 or Windows 8.1, start the Task Manager . If it starts in the compact view that only displays open apps, click or tap “More details.” Next, select the Performance tab and look for your network card. If you are connected to a wireless network, click or tap Wi-Fi. On the right side, you can see the IPv6 and IPv4 addresses.
If you are connected to a wired network, choose Ethernet on the left side of the Performance tab. On the right side look for the IPv6 and IPv4 addresses.
Close Task Manager when done.
7. How to find your computer’s IP address using the Network Map (Windows 7 only)
Windows 7 has a unique feature that is not available in Windows 8.1 or Windows 10. It is called the Network Map, and it shares a visual map of your network. If you want to find more about it, we recommend that you read this article: The Network Map – Access your network computers in a fun way . First, open the Network and Sharing Center. On the top right of the window, there is a link called “See full map.” Click on it.
This opens the Network Map. If you hover with the mouse over your computer, networking related information will be displayed, including the IPv4 and IPv6 address.
Write it down and close the Network Map.
8. How to find your IP address in the PC Settings app (Windows 8.1 only)
If you are using Windows 8.1, open the PC Settings app . There, choose Network and then go to Connections. Here you can see the network adapter that you are using the name of the network that you are connected to. Click or tap on the network name, under Ethernet (if you are on a wired connection) or Wi-Fi (if you are using a wireless network).
You are shown the properties of your connection, including the IP address.
Close PC Settings when done.
Conclusion
Finding the IP address of your Windows computer provides information that can be useful in many networking situations. If you know of other ways to find the IP address in Windows, or if you have questions regarding this subject, do not hesitate to leave a comment below.


