- Restore Windows 10 System Image to New Hard Drive | 2 Ways
- The need to backup and restore Windows 10 to new hard drive
- Method 1. Restore Windows 10 system image to new hard drive with Backup and Restore(Windows 7)
- Part 1: Create Windows 10 full system backup with Backup and Restore (Windows 7)
- Part 2: Restore system image Windows 10 to new hard drive
- Part 3: What to do after backup and restore Windows 10 image to new hard drive?
- Situation 1: Restore Windows 10 backup to larger hard drive
- Situation 2: Restore Windows 10 image to smaller drive
- Method 2. Restore Windows 10 image to new hard drive with AOMEI Backupper Standard
- Step by step guide: Windows 10 system image restore to new hard drive
- Conclusion
- Restoring from Windows 7 system image backup
Restore Windows 10 System Image to New Hard Drive | 2 Ways
Here you will learn how to restore Windows 10 system image to new hard drive with «Backup and Restore(Windows 7)» and AOMEI Backupper Standard. Select one per your needs.

By Ivy  / Last Updated February 1, 2021
The need to backup and restore Windows 10 to new hard drive
Given that you have a laptop that can only hold one hard drive which is failing, how do you transfer Windows 10 to new hard drive without wasting time reinstalling the operating system and programs? In this case, you can backup Windows 10 to external hard drive or USB and then restore system image to new hard drive or SSD.
Although the final version of Windows 10 has been released for a long time, it still has many bugs reported by users. Therefore, it is essential to backup system image in Windows 10, so you can restore system from backup in the event of hard drive failure or any other unexpected error.
When it comes to migrating Windows 10 to new hard drive free, you could consider using Windows 10 backup utility, Backup and Restore (Windows 7) or AOMEI Backupper Standard. Both of them can help you create Windows 10 backup image as well as bootable USB to boot your computer, but the latter is simpler. Keep reading to get the two methods or the easier way directly.
Method 1. Restore Windows 10 system image to new hard drive with Backup and Restore(Windows 7)
Now, let’s start to restore system image from external hard drive in Windows 10 to new hard drive. You should prepare one external hard drive or USB flash drive to save the backup image. And one CD/DVD is required to create the system repair disc.
Part 1: Create Windows 10 full system backup with Backup and Restore (Windows 7)
Step 1. Go to Control Panel, click System and Security and Backup and Restore (Windows 7) in order.
Step 2. Click Create a system image in the left pane.
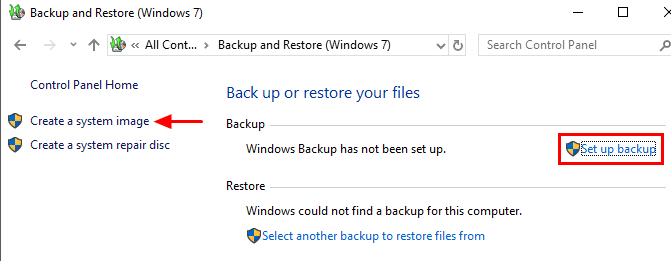
Note: There’s one option named “Set up backup” at the right side. You can also click it to create a system image. On this occasion, you can add other files or partitions that you want to backup besides the system.
Step 3. Choose the destination drive (external hard drive or USB flash drive) to save your backup.
Step 4. The drives that are required for Windows to run will be included by default and click Next to continue.
Step 5. Confirm the settings and click Start backup.
When the backup is done, you’ll be asked if you want to create a system repair disc (CD/DVD) to access the recovery options when your computer is unable to boot. If you do not have the CD-ROM device, you can choose to create Windows 10 recovery disk with your USB flash drive instead.
Part 2: Restore system image Windows 10 to new hard drive
In the following, we will use Windows 10 system image recovery to put Windows on a new hard drive, which is a recovery tool in Windows recovery environment to help users restore Windows 10 backup image and get computer back to a normal state.
Step 1. Shutdown the computer and switch hard drives in Windows 10.
Step 2. Connect the external hard drive containing Windows 10 backup image to your computer. Also, the system repair disc is required.
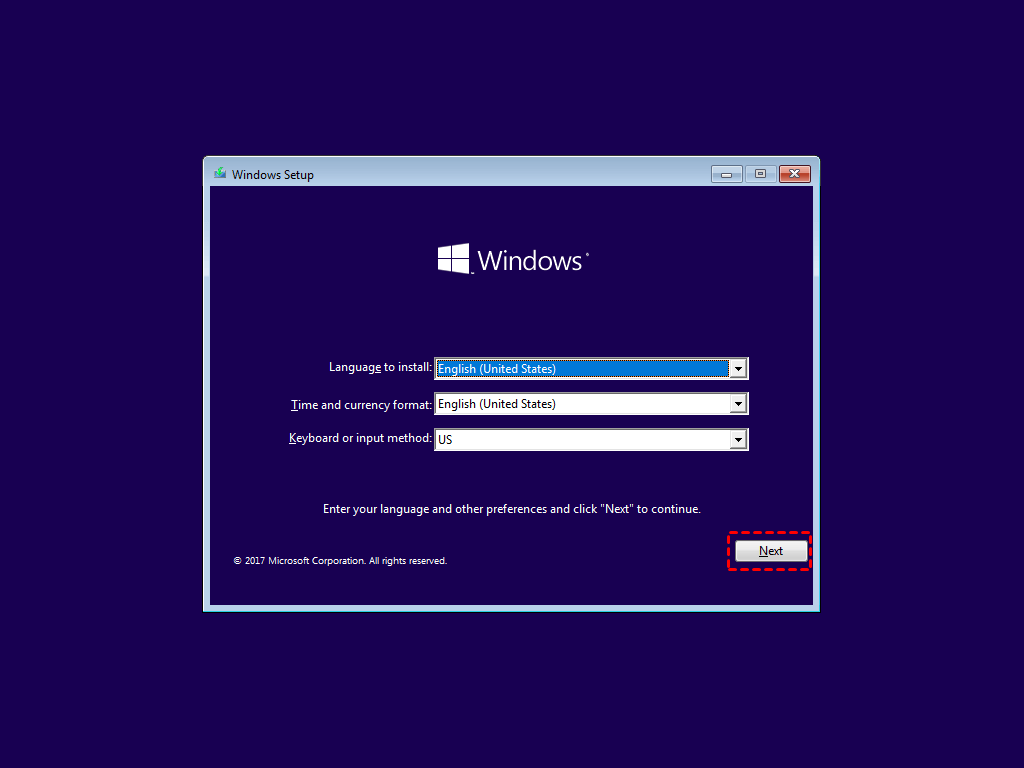
Step 3. Boot computer from the system repair disc. Change your system’s BIOS settings to make sure it can boot from the CD/DVD by hitting the specified key on the first screen.
Step 4. Click Next when you see the Windows Setup interface for the first time, then choose Repair your computer > Troubleshoot > System Image Recovery > Windows 10 subsequently.
Step 5. In the re-image your computer window, tick Use the latest available system image and then click Next.
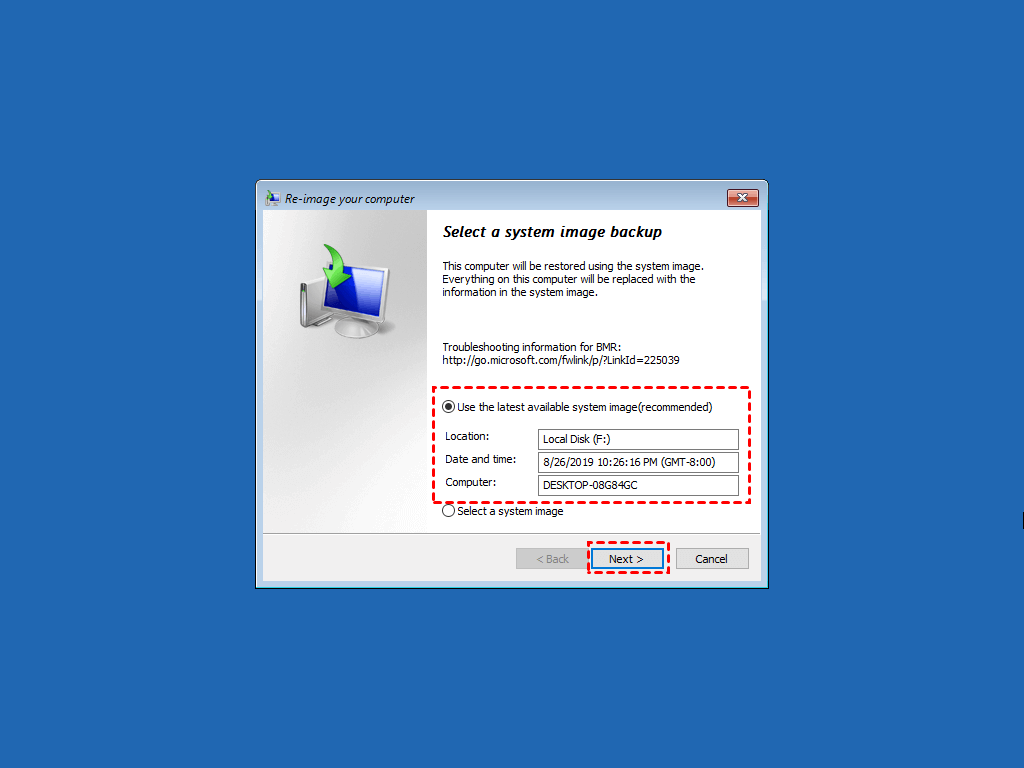
Step 6. Choose Format and repartition disks option, then click Next > Finish > Yes to start the restoration.
Part 3: What to do after backup and restore Windows 10 image to new hard drive?
Is it over here? No, you still need to do something per your situation. Here are two main situation, please stay for a while and check it carefully, which can help you make full use of disk space on the new hard drive and avoid system restore failed error.
Situation 1: Restore Windows 10 backup to larger hard drive
If the new hard drive is larger than the old one, there will be an unallocated space at the end of new disk. Thus, you need to extend the partition size, otherwise you cannot use it to store data or do any operation. Here I’ll show you the simple steps to extend partition.
1. Press Win + R to open the run window and type diskmgmt.msc to open Disk Management in Windows 10.
2. Right-click the partition at the left side of unallocated space and select Extend Volume. Then, you will enter the Extend Volume Wizard, click Next to move on.

3. Select the disk you want to extend the partition and click Next. Usually, you can only use unallocated space on the same disk to extend volume.
4. Click Finish to start this operation.
This method works in most cases, but there is an except. If there is the 450MB recovery partition or other partition between the system partition and unallocated space, this method will become invalid. At this time, you need a professional partition resize feature, such as, «Edit Partitions» in AOMEI Backupper.
Situation 2: Restore Windows 10 image to smaller drive
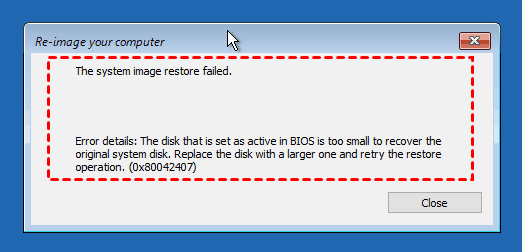
Also, there are some users restore Windows 10 image to smaller drive, and most of them are out of luck. They will encounters the major problem of Windows backup and restore software: it does not support restoring to partition layouts that smaller than the original disk.
For example, if you restore a system image in Windows 10 created on 500GB hard drive to 250GB SSD, you will receive the system image restore failed error and indicated the disk is too small.
If you receive this error, the backup image is useless unless you replace the smaller hard drive with a larger one. Instead, you can use a third party tool like AOMEI Backupper to restore only used sectors on the old hard drive or consider only cloning Windows 10 to new hard drive.
Besides the system image restore error, Windows built-in backup tool still has backup errors, such as, system image backup failed because of shadow copy storage, not enough space, EFI or BIOS, no disk can be used, backup error 0x80070002, etc.
Method 2. Restore Windows 10 image to new hard drive with AOMEI Backupper Standard
AOMEI Backupper Standard is trust and reliable Windows backup and restore software to help you backup and restore Windows 10 from system image to new hard drive smoothly, even a smaller one, while your computer is running well. Also, it’s appliable to restore system image to new SSD. In addition, it allows you to create bootable media and boot the unbootable computerper.
More so, you can perform Windows 10 system image restore to different computer , even with different hardware. However, you need the help of Universal Restore feature and this feature is only available on the paid version, such as, AOMEI Backupper Professional. And this software can help you reuse unallocated space after restoration with its «Edit Partitions» feature. The premise is the restored hard drive does not have multiple partitions.
Step by step guide: Windows 10 system image restore to new hard drive
To restore Windows 10 to new hard drive using AOMEI Backupper, you need to do some preparations first.
Download and install AOMEI Backupper Standard on your computer.
Create system image backup in Windows 10 with AOMEI Backupper and save the image files to external hard drive, USB flash drive or other storage devices. Because it only restores the image created by itself.
Create bootable USB to boot your computer when it’s unbootable. If you don’t have USB drive or CD/DVD, you could consider adding an entry to this software by creating Windows recovery environment.
Then, let’s see how to restore from system image in Windows 10.
Step 1. Install new hard drive in Windows 10, and connect bootable media created by AOMEI Backupper as well as the external drive containing system image to your computer. Then, boot your computer from the bootable media.
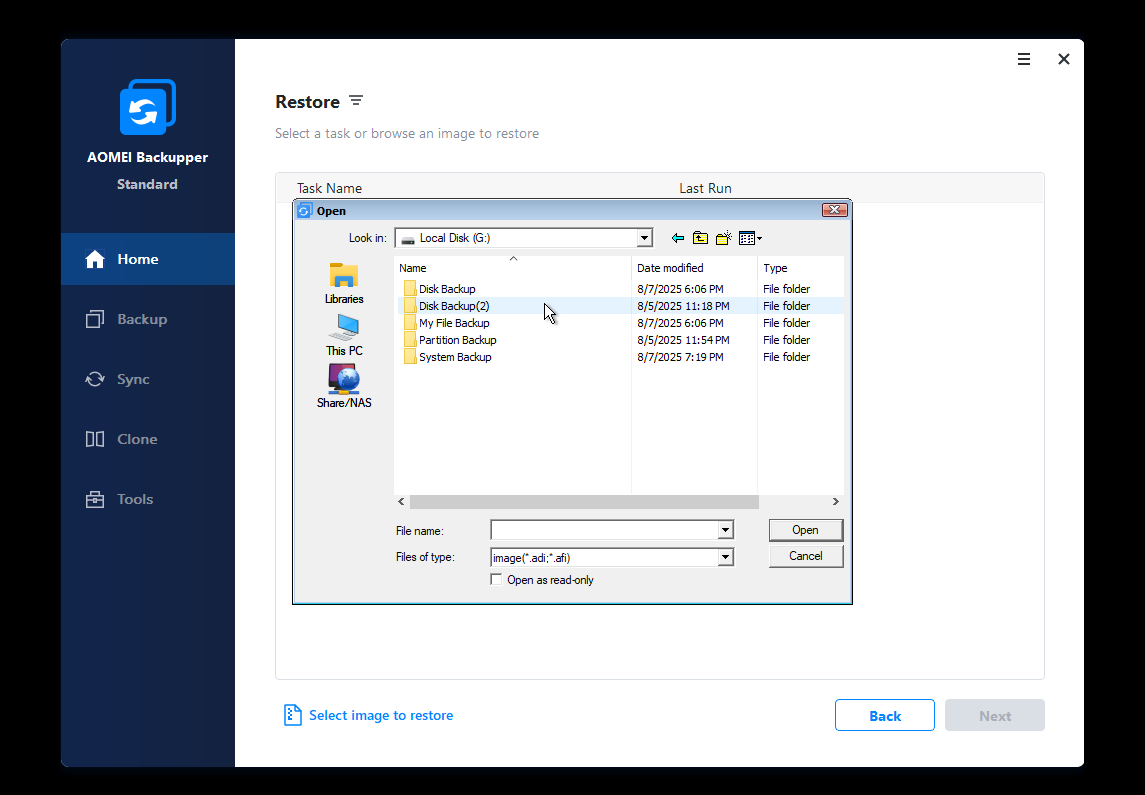
Step 2. Under Restore tab, click Select Image File to find the image on your external drive and hit Next.
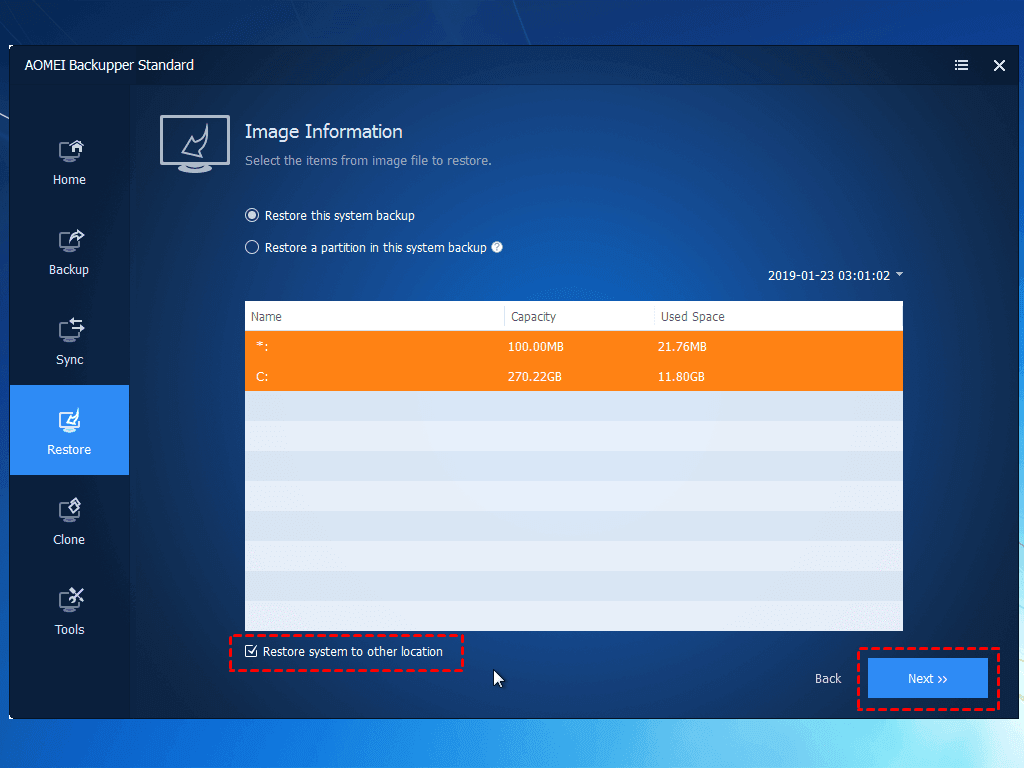
Step 3. Tick restore this system backup and Restore system to other location, then click Next to continue. If you set a scheduled full/incremental/differential backup task, there will be a few backup image that you can choose.
Step 4. Select a destination partition to restore t the image and click Next.
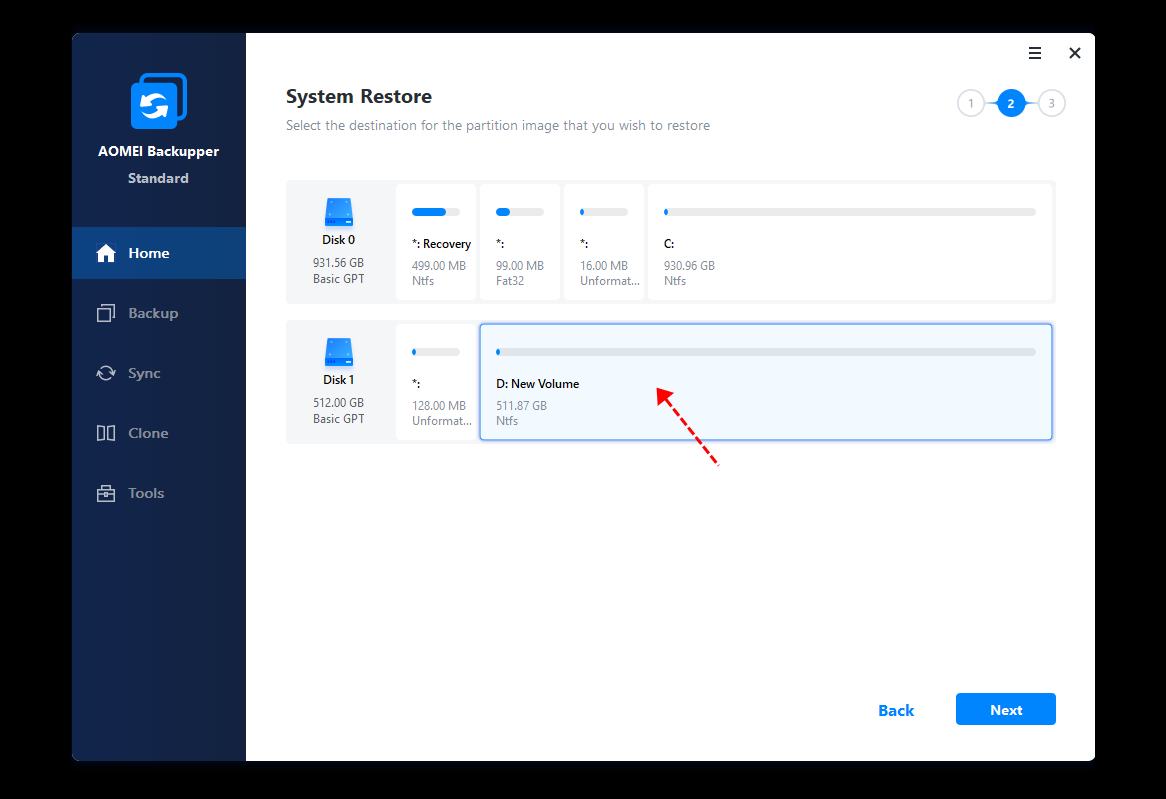
Tip: Please select the first partition on the target disk as destination, otherwise the system could not boot from the target disk.
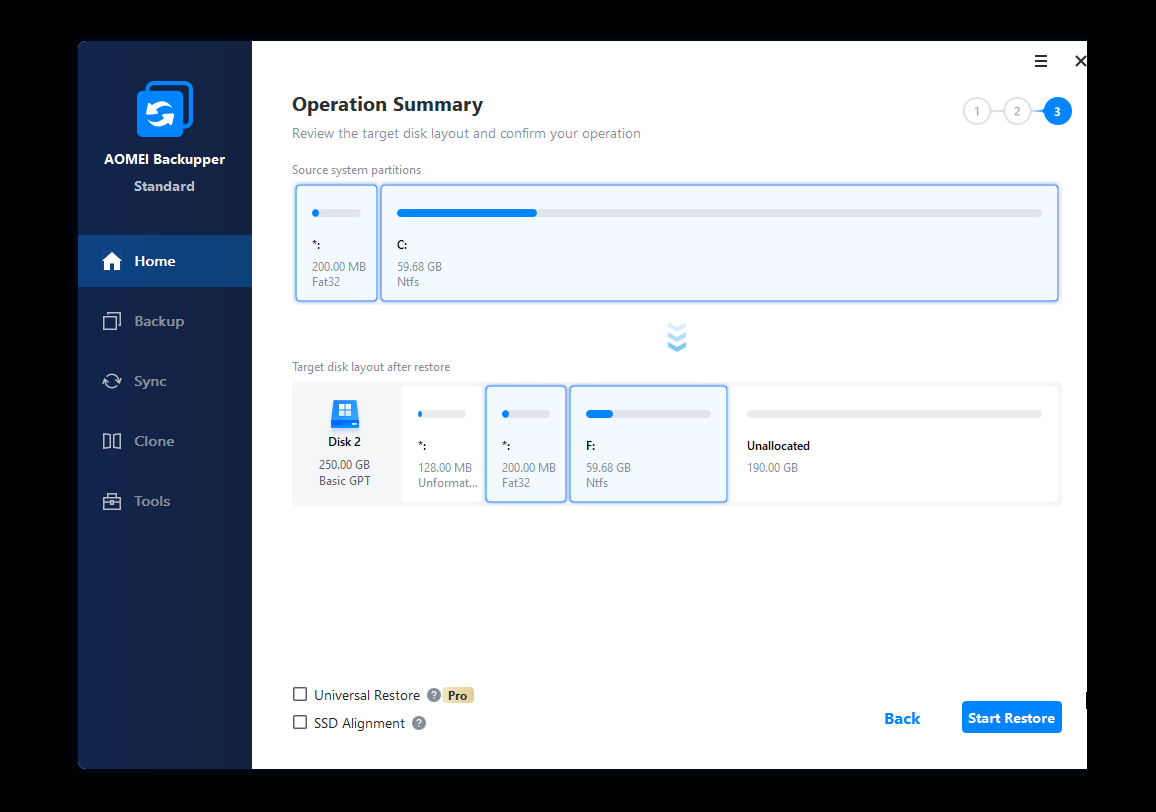
Step 5. Click Start Restore to install OS on new hard drive.
Tips:
в—’ If you want to put Windows on a new hard drive in different computer, it’s suggested to tick «Universal Restore (supported by AOMEI Backupper Professional)». Because this feature can install all drivers required to boot Windows.
в—’ If you are restoring Windows 10 system image to new SSD, please tick «SSD Alignment«. Because this feature can accelerate writting and reading speed of SSDs with 4k alignment technology.
в—’ If your new hard drive is big enough to hold everything on the old disk, you could create a disk image in Windows 10. Then, restore Windows 10 disk image to new hard drive.
Conclusion
That’s all for how to restore Windows 10 image to new hard drive. You can make it with Windows built-in tool or AOMEI Backupper Standard. No matter what method you use, a bootable media is needed if your system crashes, Either optical drive or USB flash drive will be fine.
Besides system backup, you still can backup hard drive, partitions and files. Also, you can set custom schedule backup task to backup automatically, such as, daily/weekly/monthly backup, event trigger backup, USB plug in, differential backup etc. Trust me, it’s one of the most powerful software for you to secure your data and system. Just explore it by yourself now!
Restoring from Windows 7 system image backup
I did yesterday a system image backup in windows 7. My question has 2 parts
Q1. How do you restore from the system image backup, what are the steps.
Q2. If I want to delete my system image backup in order to take a more recent system image backup, what are the steps?
Welcome to Microsoft Windows 7 Answers Forum!
You may try the steps as below and check if the issue gets fixed.
To restore from the system image backup
1. Open the Control panel ( All items view)
2. Click on the Backup and Restore icon .
3. Click on Restore files button or Restore all users’ files link. (See screenshot below)

4. You will not see the Restore Files window. (See screenshot below)

5. To Restore Files from Another Backup Location —
A) Click on the Restore files from another location link. (See screenshot above)
B) If you want to add a network backup location, then click on the Browse network location. (See screenshot below)

Browse to and select a network backup location, then click on OK. (See screenshot below) 
C) Select (highlight) an available Backup Period listed, and click on the Next button.. (See screenshot below step 5A)
6. To Add a Backup File to be Restored —
A) Click on the Browse for files button. (See screenshot below step 4)
B) Navigate to and select the backup file that you want to restore from inside the backup location, then click on the Add button. (See screenshot below)
NOTE: This will add the backup file to the list of files and folders to be restored (step 8).

C) If you would like to add another backup file to be restored, then repeat steps 6A and 6B.
7. To Add a Backup Folder to be Restored —
A) Click on the Browse for folders button. (See screenshot below step 4)
B) Navigate to and select the backup folder that you want to restore from inside the backup location, then click on the Add button. (See screenshot below)
NOTE: This will add the backup folder to the list of files and folders to be restored (step 8). All contents in the backup folder will be restored as well.

C) If you would like to add another backup folder to be restored, then repeat steps 7A and 7B.
8. To Restore the Current Backup Version —
NOTE: This will restore the selected files and folders using the latest (most current) backup version .
A) Click on the Next button. (See screenshot below)
NOTE: This example has both a file and folder added to the selected files and folders restore list .

B) Go to step 10.
9. To Restore from a Older Backup Version —
NOTE: This will allow you to select to restore the selected files and folders using a older available backup version of your choice.
A) Check the Restore an older version of the selected files box, then click on the Next button. (See screenshot below step 8A)
B) Select (highlight) another backup version that is available, and click on the Next button. (See screenshots below)


10. Select (dot) where you want to restore the backup files to, and click on the Restore button. (See screenshot below)
· In the original location — Restores the selected backup files and folders to their original location on the computer.
In the following location — Allows you to restore the selected backup files and folders to a location of your choice instead. You have the choice of restoring the backup with it’s subfolders and files or only the files in the backup to the selected location.

11. You will now see this window. (See screenshot below)

12. If you have existing copies of the selected backup files and folders at the restore location you have selected, then click on the Copy and Replace option. (See screenshot below)
NOTE: You will not see this pop-up if you do not have existing copies of the selected backup files and folders at the restore location .

13. When it is finished restoring the backup, click on the Finish button. (See screenshot below)

14. Close the Backup and Restore window when done.
To delete the system image backup
2. Click on the Backup and Restore icon .
3. Under Backup, click on the Manage Space link. (See screenshot below)

4. To Select a Backup Location —
NOTE: This is for where the User file backup is located at. If the backup location is already displayed, then go to step 5 .
A) Under Backup location, click on the Browse link. (See screenshot below)

B) Navigate to the backup location and select it.
C) Continue to step 5.
5. Under User file backup, click on the View backups button. (Seescreenshot below step 4A)
6. Select the Backup Period that you want to delete, and click on the Delete button. (See screenshot below)

7. To Delete Only the User File Backup —
A) Click on the Delete button. (See screenshot below)

B) Click on the Close button. (See screenshot below)

8. To Delete the User File Backup and Create a New Backup —
A) Click on the Delete and run backup now button. (See screenshot below)
B) Click on the Close button. (See screenshot below)
C) You will now see this window. (See screenshot below)
NOTE: If you wish to stop the backup during this point, click on the Stop backup, Stop, and Close buttons .

D) Click on the Close button when the backup is complete. (See screenshot below)

9. Click on the Close button. (Seescreenshot below step 4A)
10. Close the Back and Restore window. (See screenshot below step 3)
OPTION TWO: To Manage System File Backups
NOTE
This option is for when you have the backup schedule turned on . You will have the option to let Windows 7 manage space used for backup, or keep only the latest system backup and minimize space used by backup.
2. Click on the Backup and Restore icon.
3. Under Backup, click on the Manage Space link. (See screenshot below)
4. To Select a Backup Location —
NOTE: This is for where the System file backup is located at. If the backup location is already displayed, then go to step 5 .
A) Under Backup location, click on the Browse link. (See screenshot below)
B) Navigate to the backup location and select it.
C) Continue to step 5.
5. Under System file backup, click on the Change settings button. (Seescreenshot below step 4A)
6. Select (dot) the option you want for a system file backup, and click on OK. (See screenshot below)

7. Click on the Delete button. (See screenshot below)
NOTE: You will only see this if you have selected the Keep only the latest system backup. option in step 6 .

To Delete All System File Backups
Note: This option is for when you have the backup schedule turned off. You will have the option to retain only the most recent system file backup, or delete all system file backups on this computer.
1. Click on the Close button. (See screenshot below step 4A)
2. Close the Back and Restore window. (See screenshot below step 3) 1. Turn off the backup schedule .
3. Click on the Backup and Restore icon.
4. Under Backup, click on the Manage Space link. (See screenshot below)
5. To Select a Backup Location —
NOTE: This is for where the System file backup is located at. If the backup location is already displayed, then go to step 6 .
A) Under Backup location, click on the Browse link. (See screenshot below)
B) Navigate to the backup location and select it.
C) Continue to step 6.
6. Under System file backup, click on the Change settings button. (Seescreenshot below step 5A)
7. Select (dot) the option you want for a system file backup, and click on OK. (See screenshot below)
8. To Keep Only the Latest System File Backup —
A) Select (dot) Retain the most recent system file backup created on your date, and click on OK..
B) Click on the Delete button. (See screenshot below)
C) Go to step 10.
9. To Delete All System File Backups —
A) Select (dot) Delete all system file backups for this computer, and click on OK.
B) Click on the Delete button. (See screenshot below)

10. Click on the Close button. (Seescreenshot below step 4A)
11. Close the Back and Restore window. (See screenshot below step 3)


