- Windows iso usb burning
- Download
- Burn ISO to USB disks with ease
- Bootable USB flash disks
- Windows USB/DVD Download Tool
- Overview
- Installation
- Using the Windows USB/DVD Download Tool
- Frequently Asked Questions
- Troubleshooting
- 4 Best Ways to Burn ISO to USB on Windows 10/8/7 PC
- Part 1: Burn ISO to USB with Windows USB/DVD Download Tool
- Part 2: How to Burn ISO to USB Bootable via UUByte ISO Editor
- Key Features of ISO Editor
- Step 1: Install UUByte ISO Editor on a PC or Mac
- Step 2: Insert USB Drive and Add ISO File
- Step 3: Start Burning ISO File to USB Drive
- Part 3: YUMI (Free ISO to USB Burning Tool)
- Part 4: UltraISO Premium ISO Burner
- Part 5: Frequently Asked Questions
- Q: Can I just copy Windows ISO to USB?
- Q: Is an ISO file bootable?
- Q: Are all USB drives bootable?
- Q: Can I use 4GB USB drive?
- Q: Should I format my USB drive to FAT32 or NTFS?
- Q: Why my USB drive was not recognized as a bootable device after burning?
- Q: How long does it take to make a bootable USB drive?
- Q: Where to download Windows 10 ISO for free?
- Summary
Windows iso usb burning
ISO to USB is a free and small software that can burn the ISO image file directly to the USB drives, these USB drives include USB flash drives, memory sticks and other USB storage devices, it also supports to create a bootable USB disk with Windows operating systems. Freeware.
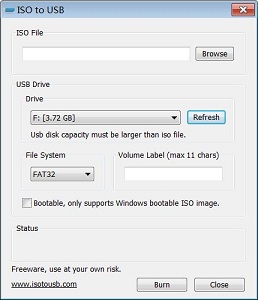
Click the image to view full size screenshot.
Download
The software license is Freeware, feel free to use it, but do so at your own risk.

Get it from a file mirror
Burn ISO to USB disks with ease
The ISO image file is a popular image of the CD/DVD discs, an ISO file can include all the content on the disc, this software can easily burn these ISO files to a USB flash disk, makes it easy to carry and use. The program’s interface is very simple, you only need select the ISO file you want to burn and the target USB drive, then click «Burn» button, an USB disk that includes all ISO image data will be created. There do not have any complicated settings, it is easy to use very much.
Bootable USB flash disks
This software currently only support Windows bootable disk, can work with both BOOTMGR and NTLDR boot mode, can create USB disk with FAT, FAT32, exFAT or NTFS file system. (When you are making a bootable USB disk, suggest you choose the FAT32 file system.)
This program have be tested with Win8/Win7 PE and WinXP PE bootable ISO image files, it can work fine, the generated USB disk can normally boot the computers. Only a small part of the machines can boot Win8/Win7, but can not boot WinXP, these machines will display «NTLDR is missing», for this problem there is no good solution currently.
Windows USB/DVD Download Tool
Overview
When you download Windows from Microsoft Store, you have two options: You can download a collection of compressed files, or you can download an ISO file. An ISO file combines all the Windows installation files into a single uncompressed file.
If you choose to download an ISO file so you can create a bootable file from a DVD or USB drive, copy the Windows ISO file onto your drive and then run the Windows USB/DVD Download Tool. Then simply install Windows onto your computer directly from your USB or DVD drive.
When you download the ISO file, you must copy it onto a USB or DVD. When you’re ready to install Windows, insert the USB drive or DVD with the ISO file on it and then run Setup.exe from the root folder on the drive.
This allows you to install Windows onto your machine without having to first run an existing operating system. If you change the boot order of drives in your computer’s BIOS, you can run the Windows installation directly from your USB drive or DVD when you first turn on your computer. Please see the documentation for your computer for information about how to change the BIOS boot order of drives.
Making copies
To install the software, you can make one copy of the ISO file on a disc, USB flash drive, or other media.
After you’ve installed the software and accepted the license terms that accompany the software, those license terms apply to your use of the software. The license terms for Windows permit you to make one copy of the software as a back-up copy for re-installation on the licensed computer. If you do not delete your copy of the ISO file after installing the Windows software, the copy of the ISO file counts as your one back-up copy.
If you need to download the software again, you can go to your Download Purchase History in your Microsoft Store account and access the download there.
Installation
To install the Windows USB/DVD Download Tool:
2. Click Download then Run.
3. Follow the steps in the setup dialogs. You’ll have the option to specify where to install the Windows USB/DVD Download Tool.
You must be an administrator on the computer on which you are installing the Windows USB/DVD Download tool. It requires the Microsoft .NET Framework version 2.0 or higher.
System requirements
Windows XP SP2, Windows Vista, or Windows 7 (32-bit or 64-bit)
Pentium 233-megahertz (MHz) processor or faster (300MHz is recommended)
50MB of free space on your hard drive
DVD-R drive or 4GB removable USB drive
For Windows XP users
The following applications must be installed prior to installing the tool:
Microsoft .NET Framework 2.0 must be installed. It can be downloaded here.
Microsoft Image Mastering API v2 must be installed. It can be downloaded here.
Using the Windows USB/DVD Download Tool
Before you run the Download Tool, make sure you have purchased the Windows ISO download from Microsoft Store and downloaded the Windows ISO file to your drive. If you have purchased Windows but have not yet downloaded the ISO file, you can download the ISO file from your Microsoft Store Account.
To make a copy of your Windows ISO file:
1. Click the Windows START button, and click WINDOWS USB/DVD DOWNLOAD TOOL in the ALL PROGRAMS list to open the Windows USB/DVD Download Tool.
2. In the SOURCE FILE box, type the name and path of your Windows ISO file, or click BROWSE and select the file from the OPEN dialog box. Click NEXT.
3. Select USB DEVICE to create a copy on a USB flash drive or select DVD disk to create a copy on a DVD disk.
4. If you are copying the file to a USB flash drive, select your USB device in the drop-down list and click BEGIN COPYING. If you are copying the file up to a DVD, click BEGIN BURNING.
When your Windows ISO file is copied to your drive, install Windows by moving to the root folder of your DVD or USB drive, and then double-click Setup.exe.
Frequently Asked Questions
Where can I download .NET framework 2.0?
The .NET framework can be downloaded here.
Where can I download Image Mastering API 2.0?
The Image Mastering API can be downloaded here.
What size USB drive is required?
You need a USB drive with a minimum of 4GB of free space.
Can I use my newly created USB drive to install Windows on someone else’s computer?
No. The Windows ISO file on the USB drive is only intended to be used to install Windows on the licensed user’s own computer.
Can I back up to a CD-ROM?
No. The Windows ISO file is too large to fit on a CD.
Can I back up to a Blu-ray Disc?
Yes, as long as your DVD drive can write to a Blu-ray Disc.
IfI have other files on the USB drive will the Windows USB/DVD download tool delete them?
This tool requires the USB drive to be completely blank before the Windows files are copied. This helps ensure that the device is bootable after the copying has completed.
Can I backup to an external hard drive or other device with enough free disk space?
Yes, but this is not recommended. The device must be formatted in order for the device to be bootable. A dedicated USB flash drive would be a better option.
Can I use the Windows USB/DVD Download Tool to back up other files?
No. This tool is only for use with the Windows ISO file purchased from Microsoft Store.
Does the tool support dual-layer DVD discs for burning?
No. Currently, the tool does not support dual-layer DVD discs.
Troubleshooting
The tool is asking me to install the .NET framework and Image Mastering API before I install the tool
If you’re running Windows XP, you must install the .NET Framework 2.0 and the Image Mastering API 2.0 before installing the tool. You can download .NET framework here and you can download the Image Mastering API here.
A restart may be required after installing the .NET framework and the Image Mastering API.
When creating a bootable USB device, I am getting an error about bootsect
To make the USB drive bootable, you need to run a tool named bootsect.exe. In some cases, this tool needs to be downloaded from your Microsoft Store account. This may happen if you’re trying to create a 64-bit bootable USB device from a 32-bit version of Windows. To download bootsect:
1. Login to your Microsoft Store account to view your purchase history.
2. Look for your Windows purchase.
3. Next to Windows, there is an Additional download options drop-down menu.
4. In the drop-down menu, select 32-bit ISO.
5. Right-click the link, and then save the bootsect.exe file to the location where you installed the Windows USB/DVD Download Tool (e.g. C:\Users\username\AppData\Local\Apps\Windows USB DVD Download Tool).
6. Once the file has been saved, go back to the Windows USB/DVD Download Tool to create your bootable USB device.
My USB drive is not in the list of available devices
If you don’t see your USB drive in the list of available devices, please make sure the drive is inserted in the USB port, and then click the Refresh button beside the list of available drives.
I inserted a blank DVD in my DVD-ROM drive, but the Windows USB/DVD Download Tool doesn’t recognize it
If there are multiple drives on the system, the tool will select the first one that is capable of burning DVDs. If you have multiple DVD-R drives, try inserting the blank DVD into another DVD-R drive. If that doesn’t help, please make sure that your disc isn’t damaged and that your DVD-R drive is operational. Contact Product Support if issues continue to arise.
I inserted a blank DVD in my DVD-ROM drive, but the tool won’t let me burn it
Make sure the disc isn’t a dual-layer DVD disc. Currently, dual-layer discs are not supported within the tool.
4 Best Ways to Burn ISO to USB on Windows 10/8/7 PC
By Petty Madison | Last Updated: Nov. 10, 2020
There are several reasons why you might want to make a bootable USB flash drive, such as installing a new OS on the computer, repairing PC with installation CD. Whatever the reason is, the fact is that there are a number of ways you can learn from in order to burn an ISO file to USB drive. However, if you chose the wrong software, then the burning process would fail. Why? Becasue some of the candidates were not updated for years and doesn’t support the latest Windows 10.
So in here, we tested 10+ popular ISO burning software and pick up the best 4 from the list according to the test result. So you don’t need to worry about it any more. Please keep reading and find the best one for you.
Updates: We just added a new FAQ section at the end of this post as we are constantly receiving questions from end users.
Part 1: Burn ISO to USB with Windows USB/DVD Download Tool
Windows USB/DVD Download Tool is created by Microsoft once Windows 7 was released. This one is favored by many of the users because of its simplicity and compatibility with older versions of Windows. Mostly importantly, it is free. So if you intended to burn ISO on a Windows 7 or Windows 10 computer, then it is the best choice for burning Windows installation ISO with this tool. For Linux or other ISO file, the success rate is dramatically reduced for no reason.
Step 1: To begin the process, you must first download the application and install it on your Windows PC. Once you launch the program you must also insert a USB drive with adequate space to save the ISO file. Remember that during the process, some or all of your data saved on the USB drive may be deleted. This is because the drive will need to be formatted before the ISO file can be burned onto it. The advantage of using a USB, however, is that you can burn other data onto it later on, unlike a writable DVD that you can only burn once.
Step 2: When opening the program, you will see a window where you will need to add the ISO file to be burned onto the USB drive.
Step 3: Choose the media type, which will be USB drive in this particular instance.
Step 4: Once you have made your selection, you will see an option that says «Start Copying». Click on that to initiate the burning process. At this point, you may receive an alert notifying you that all data on the USB drive will be erased. This is usually a two-step confirmation which has been implemented to prevent accidental deletion of data from the USB drive. Once you click «Yes» on the final confirmation window. Once the process is over, remove the USB drive and use that for whatever purpose you need to.
Part 2: How to Burn ISO to USB Bootable via UUByte ISO Editor
Like we said before, Windows USB/DVD Download Tool doesn’t always work on all ISO files. We have tested this program on 5 blank DVD disc and USB drives. Only half of them passed the test with Windows USB/DVD Download Tool. So what is to do it it failed? You don’t need to worry much about this becasue there are so many alternatives out there. UUByte ISO Editor is one of them.
UUByte ISO Editor is a highly reliable ISO burning utility and it is fairly straightforward to use. The biggest advantage with UUByte is that it supports multiple Windows versions, including Windows 10, Windows 8, Windows 7 and Windows XP. In addition, there are other useful functions for dealing with ISO image. Please check the list below:
Key Features of ISO Editor
- Burn all kinds of ISO files to USB, CD or DVD
- Create ISO image from files and folders.
- Extract files from ISO image file.
- Directly make ISO file from CD or DVD disc.
- Edit ISO files as much as you want.
Step 1: Install UUByte ISO Editor on a PC or Mac
Download and install UUByte ISO Burner to a PC or Mac and launch the application after installation. From the main interface, please click «Burn» button. This will go to the ISO burning window..
Step 2: Insert USB Drive and Add ISO File
Now, insert an USB drive into the computer. Then UUByte program will detect the device in a minute and you can find it in drop-down menu. Next, click «Browse» button to add an ISO file from the local drive to the program.
Step 3: Start Burning ISO File to USB Drive
Select the USB name and click «Burn» button at the bottom to start the ISO burning process. You will see a message popping up when it is completed successfully. It usually takes 3-10 minutes to be finished, which is largely dependent on how big the file is.
P.S the steps are the same if you want to burn ISO image to USB on a Mac.
As you can see, UUByte ISO Editor is quite impressive for ISO burning, right? Only a few clicks to help you make a bootable USB sticks so you can use it to fix system issues. It is free for try!
Part 3: YUMI (Free ISO to USB Burning Tool)
YUMI is another famous ISO burning program but it is a bit different from other tools. YUMI is short Universal Multiboot Installer. As its name implies, the main purpose of this program is creating bootable USB drive from operating system ISO (Windows, Linux, etc.), rescue disk and WinPE. In addition, it is easy to create multiple boot devices with this amazing tool.
Step 1: Download and install YUMI on your computer. Now insert a USB flash drive into the computer.
Step 2: Now, launch the application and select the USB device name at the beginning. Next, you should select distribution name and ISO file to be burned on that USB.
Step 3: Finally, click on «Create» button in order to create your multiboot USB drive. Once it is done, you can boot up the USB drive and select the boot option accordingly.
Part 4: UltraISO Premium ISO Burner
UltraISO is the most well-known name when it comes to ISO burning. It had a great repution in the past. However, it is a little bit more complex to use than the previous three utilities. The long list of options might get you confused when using it. That is why it is not recommended in first position. It is still reliable and trusted by thousands of users around the world.
Step 1: As with the other applications, download and install this utility to your PC. Note that you will need to run the application as administrator.
Step 2: Next, go to the ‘File’ menu and click on «Open» to select the appropriate ISO file. Once the file has been selected, click on the bootable menu and select the option called «Write Disk Image»‘.
Step 3: You can now select the USB drive as your ‘Write Method’, and then click on the «Write» button. Your USB drive will first be formatted. With this software, you will need to click on «Yes» after the formatting is done.
Part 5: Frequently Asked Questions
Below is a couple of frequently asked questions during bootable USB creation process. This is a great for those users who failed to create a bootable USB without any luck by using above ISO burning software.
Q: Can I just copy Windows ISO to USB?
No. Windows ISO image is a compressed archive that combines hundreds of Windows 10 installation file into a single file. To make it bootable, Windows bootloader should be written to USB and decompress the ISO image. However, the file copy operation will only copy the file byte by byte without adding boot information and never decompress the ISO image. The USB is not bootable with a copy action.
Q: Is an ISO file bootable?
The fact is that not all ISO files are bootable. Only OS installation ISO files are bootable, such as Windows, Linux and system rescue CDs. The data and program installation ISO file is not bootable for sure.
Q: Are all USB drives bootable?
Yes. USB drive can be seen as a legal booting device (USB-HDD) in BIOS if there is a valid boot sector in it. This can be achieved with the help of ISO burning software.
Q: Can I use 4GB USB drive?
4GB free storage is enough for creating a bootable device, such as Linux, Windows PE and rescuing disk. However, it is not recommended for Windows ISO, especially Windows 10 ISO, which is large than 4GB. For that, it is more practical to use 8GB or larger USB stick.
Q: Should I format my USB drive to FAT32 or NTFS?
It depends. For ISO image file less than 4GB, it is recommended formatting it to FAT32, which has better support for hardware compatibility. Otherwize, format USB drive to NTFS if ISO file is larget than 4GB.
Q: Why my USB drive was not recognized as a bootable device after burning?
This happens mostly on modern computers with UEFI boot, a more secure firmware mechanism than traditional BIOS. If it was the case, you have to turn off Secure Boot in BIOS and switch to Legacy Boot.
Q: How long does it take to make a bootable USB drive?
The common range is 10 — 30 minutes. The larger the ISO image is, more time is taken for ISO burning process. It also has something to do with the ISO burning software. Some of them such as UUByte ISO Editor are much faster because of multi-thread file writing engine.
Q: Where to download Windows 10 ISO for free?
Microsoft does not provide direct download link for Windows 10 ISO any more. Please refer to this step-by-step guide instead.
Summary
All of these utilities continue to be used by thousands of users around the world every day. Choosing the right one is often a matter of preference rather than capability since all of these are pretty powerful tools. Another deciding factor is your purpose for creating bootable media. Based on all these parameters, choose the right one to help you burn ISO files to USB.
Petty is editor in chief at UUByte and writes various topics about Windows and Mac to help people make the most of current technology.


