- Windows java current version
- Java SE 11 (LTS)
- Oracle JDK
- Java SE 8
- Oracle JDK
- Java SE 7
- Early Access Releases
- Additional Resources
- JDK Mission Control (JMC)
- Changing current version of Java within Windows
- 7 Answers 7
- How to switch Java versions in Windows (updated 03/2021 for Java 16)
- Installation of multiple Java versions
- Download sources
- Environment variables
- Setting environment variables manually
- Scripts for changing the Java version
- Как проверить версию, обновить или удалить Java с помощью PowerShell?
- Как узнать установленную версию Java в Windows?
- Как узнать версию Java из PowerShell?
- PowerShell: получить версию Java на удаленных компьютерах
- Скрипт PowerShell для удаления всех версий Java
- Как скачать установить Java JRE с помощью PowerShell?
Windows java current version
Looking for Oracle OpenJDK builds?
- Oracle Customers and ISVs targeting Oracle LTS releases: Oracle JDK is Oracle’s supported Java SE version for customers and for developing, testing, prototyping or demonstrating your Java applications.
- End users and developers looking for free JDK versions:Oracle OpenJDK offers the same features and performance as Oracle JDK under the GPL license .
To Learn more about these options visit Oracle JDK Releases for Java 11 and Later
Java SE 11 (LTS)
Java SE 11.0.10 is the latest release for the Java SE 11 Platform
- Documentation
- Installation Instructions
- Release Notes
- Oracle License
- Binary License
- Documentation License
- Java SE Licensing Information User Manual
- Includes Third Party Licenses
- Certified System Configurations
- Readme
Oracle JDK
Java SE 8
Java SE 8u281 is the latest release for the Java SE 8 Platform.
- Documentation
- Installation Instructions
- Release Notes
- Oracle License
- Binary License
- Documentation License
- BSD License
- Java SE Licensing Information User Manual
- Includes Third Party Licenses
- Certified System Configurations
- Readme Files
- JDK ReadMe
- JRE ReadMe
Oracle JDK
Which Java package do I need?
- Software Developers: JDK (Java SE Development Kit): For Java Developers. Includes a complete JRE plus tools for developing, debugging, and monitoring Java applications.
- Administrators running applications on a server: Server JRE (Server Java Runtime Environment): For deploying Java applications on servers. Includes tools for JVM monitoring and tools commonly required for server applications, but does not include browser integration (the Java plug-in), auto-update, nor an installer. Learn more
- End user running Java on a desktop: JRE: (Java Runtime Environment): Covers most end-users needs. Contains everything required to run Java applications on your system.
Java SE 7
Updates for Java SE 7 released after April 2015 are only available to Oracle Customers through My Oracle Support (requires support login).
Please visit Java SE Subscription to learn more about becoming an Oracle Customer.
Early Access Releases
Early access versions of future releases of the JDK and the JRE are available for testing. These early access releases include future update and future major releases. These releases are licensed only for testing, not for use in production.
Additional Resources
JDK Mission Control (JMC)
JDK Mission Control (JMC) enables you to monitor and manage Java applications without introducing the performance overhead normally associated with profiling and monitoring tools.
Changing current version of Java within Windows
I’m working in a Windows XP environment and have recently installed java 1.6 because it was required by an application.
However I don’t want this to be the default version of java to be used. How do I set it so that the command java -version will return 1.5.x
7 Answers 7
Change your PATH variable so that it has the location of the jdk5/bin directory:
- Start -> Control Panel -> System -> Advanced
- Click on Environment Variables, under System Variables, find PATH, and click on it.
- In the Edit windows, modify PATH by adding the location of your jdk5/bin directory to the beginning. If you do not have the item PATH, you may select to add a new variable and add PATH as the name and the location of the directory as the value.
- Close the window.
- Reopen Command prompt window, and run java -version

In the command shell:
That will temporarily set up the environment in the command shell. Maven, Ant, etc. will pick up on your new version of Java without having to go to the Control Panel repeatedly.
Tools like Eclipse should be able to select which JDK to use in their own configuration tools for use within their environments.
Java 8 creates three shortcuts on \ProgramData\Oracle\Java\javapath that point to the latest Java8 java.exe, javaw.exe and javaws.exe and then puts \ProgramData\Oracle\Java\javapath at the front of the PATH so that no matter what you do to the JAVA_PATH environment variable, you still get the latest Java 8.
You can get around this by
1) renaming \ProgramData\Oracle\Java\javapath to something else (\ProgramData\Oracle\Java\javapath8 for example)
2) creating a new javapath folder under Java and
3) creating the shortcuts that you need.
Just restore the javapath when you are done with the old versions and you get Java 8 back.
How to switch Java versions in Windows (updated 03/2021 for Java 16)

As a Java programmer, I work on various projects based on different Java versions, especially since the transition to the six-month release cycle. From time to time, I also have a piece of Java code that I want to try out on different Java versions – on the command line without having to click through the menus of my IDE. So it is helpful to be able to quickly and easily change the Java version to be used for compiling code or executing class files.
In this article, I’ll show you how to install several Java versions simultaneously in Windows and how to switch between them on the command line with short commands.
Installation of multiple Java versions
Installing several Java versions at the same time is incredibly easy in Windows. You can download and run the installer for each version, which automatically installs the versions in separate directories.
Download sources
- Java SE 1.1 – You can no longer install this version on 64-bit Windows.
- Java SE 1.2 – Installed to C:\jdk1.2.2\ and C:\Program Files (x86)\JavaSoft\JRE\1.2\ by default – I recommend changing this to C:\Program Files (x86)\Java\jdk1.2.2\ and C:\Program Files (x86)\Java\jre1.2.2\ for the sake of clarity.
- Java SE 1.3 – Installed to C:\jdk1.3.1_28\ by default – I recommend changing this to C:\Program Files (x86)\Java\jdk1.3.1_28\ .
- Java SE 1.4 – Installed to C:\j2sdk1.4.2_19\ by default – I recommend changing this to C:\Program Files (x86)\Java\jdk1.4.2_19\ .
Starting with the following versions, you don’t need to change the default installation directories:
Attention – you may use the following Oracle distributions only for private purposes and development:
The following version is currently an early access build. You should use it only for testing purposes:
Environment variables
In most cases, the following two environment variables decide which Java version an application uses:
- JAVA_HOME – many start scripts use this variable.
- Path – is used when running a Java binary (such as java and javac ) from the console.
These variables should always point to the same Java installation to avoid unforeseen problems due to inconsistencies. Some programs, such as Eclipse, define the Java version in a separate configuration file (for Eclipse, for example, this is the entry «-vm» in the eclipse.ini file).
Setting environment variables manually
The installers of the Java versions listed above already create various environment variables, which you need to clean up first (see below). The fastest way to change the environment variables is to press the Windows key and type «env» – Windows then offers «Edit the system environment variables» as a search result:
At this point, you can press «Enter,» and the system properties appear:
Here you click on «Environment Variables…», after which the following window opens:
As the standard version, I currently use the latest release version, Java 16. Therefore, you should make the following settings:
- The top list («User variables») should not contain any Java-related entries.
- The lower list («System variables») should contain an entry «JAVA_HOME = C:\Program Files\Java\jdk-16\» (please check the version number, you may have a newer one). If this entry does not exist, you can add it with «New…». If it exists, but points to another directory, you can change it with «Edit…».
- Delete the following entries under «Path»:
- C:\ProgramData\Oracle\Java\javapath
- C:\Program Files (x86)\Common Files\Oracle\Java\javapath
- Insert the following entry instead:
- %JAVA_HOME%\bin
The path list should then look like this:
The last entry ensures that Path and JAVA_HOME are automatically consistent. Attention: this only works for the default setting configured here. If you change JAVA_HOME via the command line, you have to adjust Path accordingly (more about this below).
Now open a command line to check the settings with the following commands:
As a result, you should see this:
Scripts for changing the Java version
Finally, we come to the possibility to change the Java version quickly and easily. Therefore I create a separate command for each Java version, called, for example, java16 , java15 , java14 , java13 . I put these commands in the directory C:\Program Files\Java\scripts , which I add to the environment variable «Path» as described before:
The files are named, for example, java16.bat , java15.bat , java14.bat , java13.bat , and change the environment variables as shown in the following example of java16.bat :
This script, admittedly kept very simple, inserts the bin directory of the Java version to be activated at the beginning of the Path variable, so that is where, for example, java.exe is looked for first. The path variable becomes longer with each switching. However, since this is only the case for the currently opened command prompt, I don’t think this is a problem.
The following ZIP file contains all my scripts from Java 1.2 to Java 17 (you might have to adopt one or the other Java directory to your installation): scripts-up-to-jdk17.zip
You can quickly test whether the scripts work in a command line. Attention: after adding the scripts directory to the Path variable, you have to open a new command line.
At this point, the setup is complete. I hope this article was helpful for you, and I’d love to hear your comments. If you liked the article, I’d be happy if you shared it via one of the following share icons.
Как проверить версию, обновить или удалить Java с помощью PowerShell?
Java Runtime Environmen (JRE) достаточно широко используется для запуска различных корпоративных приложений, написанных на java. Однако некоторые программы требуют для запуска определенную версию Java и могут некорректно работать в других версиях. В этой статье мы рассмотрим, как разобраться, какие версии Java установлены на компьютерах пользователей в вашей сети, а также как удалить или обновить версию среды JRE с помощь PowerShell.
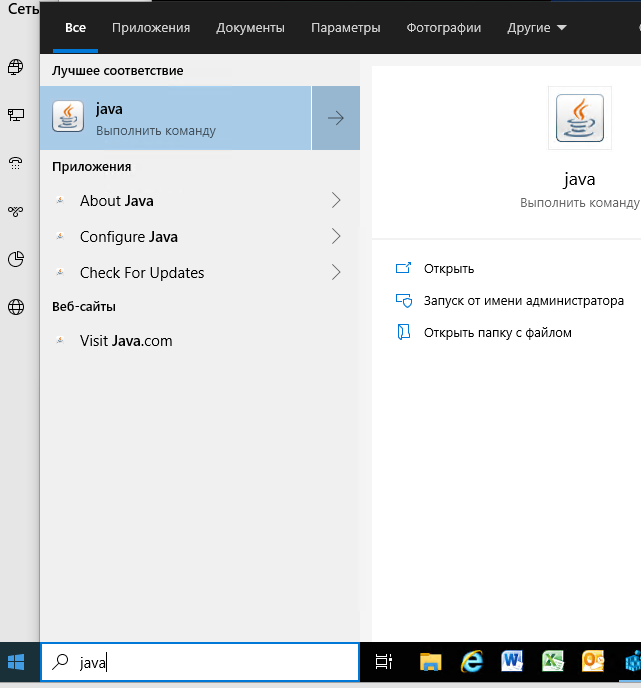
Как узнать установленную версию Java в Windows?
Вы можете получить номер версии Java, установленной на вашем компьютере, если наберете ‘ java ’ в окне поиска Windows 10 и запустите апплет Java.
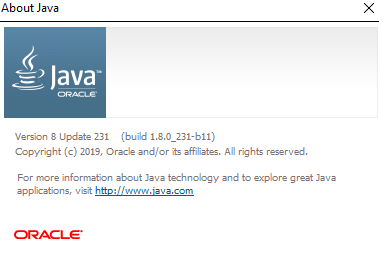
В открывшемся окне «About Java» указана текущая версия JRE. В моем случае это Java Version 8 Update 231 (build 1.8.0_231-b11). Обратите внимание на значение билда JRE. Во всех версиях Java в начале указана 1, затем номер мажорной версии JRE (у меня это 8), потом номер обновления.
Также вы можете узнать текущую версию Java в панели ‘Программы и компонентах Windows’ (Win+R -> appwiz.cpl ).

Можно вывести текущую версию Java из командной строки. Запустите cmd.exe и выполните команду:

Как узнать версию Java из PowerShell?
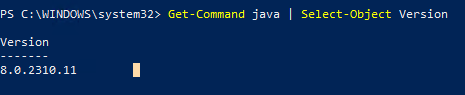
Вы можете узнать версию Java на вашем компьютере с помощью PowerShell. Можно просто проверить версию исполняемого файла java.exe (путь к ней прописывается в переменные окружения при установке JRE SE на вашем компьютере). Выведем версию java файла:
Get-Command Java | Select-Object Version
Можно вывести подробную информацию о версии, обновлении и релизе Java:
Get-Command java | Select-Object -ExpandProperty Version
Если вам нужно получить строковое значение версии Java для использования в скриптах, используйте:
(Get-Command java | Select-Object -ExpandProperty Version).tostring()

Также вы можете узнать версию Java через WMI класс, который содержит список установленных программ в Windows:
Get-WmiObject -Class Win32_Product -Filter «Name like ‘%Java%'»
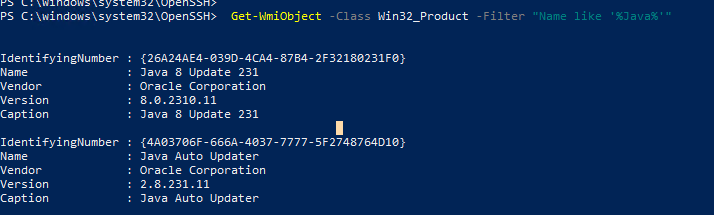
Полученные ID можно использовать в дальнейшем для корректного удаления JRE.
Если нужно вывести только версии Java, и нужно исключить Java Auto Updater, используйте команду:
Get-WmiObject -Class Win32_Product -Filter «Name like ‘%Java%’ and not Name like ‘%Java Auto Updater%'» | Select -Expand Version
PowerShell: получить версию Java на удаленных компьютерах
Если вы хотите выполнить инвентаризацию версий Java, используемых на компьютерах или серверах в вашем домене, вы можете использовать следующий PowerShell скрипт. Данный скрипт может удаленно опросить сервера по списку указанному вручную, загрузить список из текстового файла. Также вы можете получить список серверов или компьютеров из AD с помощью командлета Get-ADComputer из модуля RSAT-AD-PowerShell.
# PowerShell скрипт для проверки верси Java SE (JRE) на удаленных компьютерах/серверах
# Проверить версию Java по списку компьютеров
# Проверить версию Java по списоку серверов в текстовом файле
# Получить версию Java на всех серверах домена
Get-WmiObject -Class Win32_Product -ComputerName $computers -Filter «Name like ‘%Java%’ and not Name like ‘%Java Auto Updater%’» | Select __Server, Version
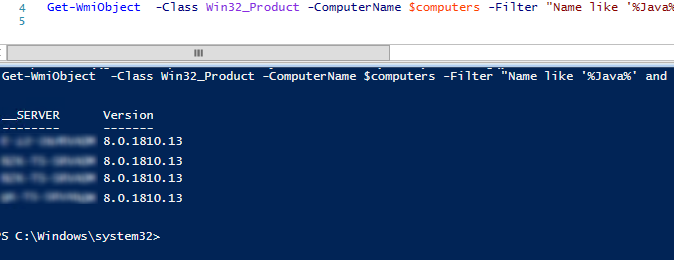
В результате у вас появится табличка со списком компьютеров/серверов и версией Java на них.
Скрипт PowerShell для удаления всех версий Java
Почему вам может понадобится удалять предыдущие версии Java в Windows?
- Перед установкой новой версии Java желательно удалить все предыдущие версии. Как и во всех других продуктах в Java постоянно обновляется функционал, и исправляются критические уязвимости. Если у вас установлена старая версий Java, вы подвергаете компьютер риску заражения и эксплуатации известных и 0-day уязвимостей. В Java встроен механизм автоматического обновления, но по разным причинам администраторы могут отключать его на компьютерах домена.
- У вас нет коммерческой подписки на использование Java JRE. С 2019 года Oracle изменил лицензионную политику Java. Теперь, если вы хотите использовать старые версии Oracle JDK (Java SE), вам нужно приобретать платную подписку. Это касается всех выпусков Java JRE после 16 апреля 2019 года (начиная с Java 8 SE Update 211).
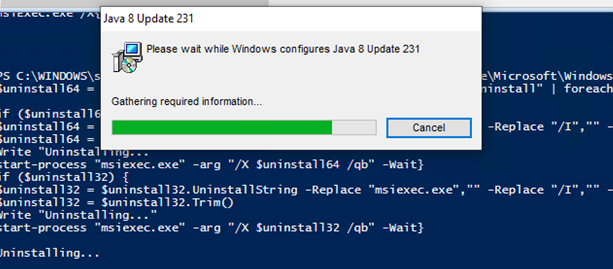
Следующий PowerShell скрипт можно использовать для удаление всех установленных версий Java на компьютере
$jre_installed = Get-WmiObject -Class Win32_Product -Filter «Name like ‘%Java%'»
$jre_installed.Uninstall()
Однако рассмотренная выше команда удаления основана на WMI и не смотря на свою простоту, работает довольно медленно.
Вместо этого можно получить список установленных Java из реестра и удалить все найденные версии Java по GUID продукта, который генерируется при установке ПО через MSI.
#PowerShell скрипт для удаления всех версий Java SE (JRE) на компьютере
$uninstall32 = gci «HKLM:\SOFTWARE\Wow6432Node\Microsoft\Windows\CurrentVersion\Uninstall» | foreach < gp $_.PSPath >| ? < $_ -like "*Java*" >| select UninstallString
$uninstall64 = gci «HKLM:\SOFTWARE\Microsoft\Windows\CurrentVersion\Uninstall» | foreach < gp $_.PSPath >| ? < $_ -like "*Java*" >| select UninstallString
# Удаление 64 битных версий Java
if ($uninstall64) <
$uninstall64 = $uninstall64.UninstallString -Replace «msiexec.exe», «» -Replace «/I», «» -Replace «/X», «»
$uninstall64 = $uninstall64.Trim()
Write «Uninstalling. «
start-process «msiexec.exe» -arg «/X $uninstall64 /qb» -Wait
>
# Удаление 32 битных версий Java
if ($uninstall32) <
$uninstall32 = $uninstall32.UninstallString -Replace «msiexec.exe»,»» -Replace «/I»,»» -Replace «/X»,»»
$uninstall32 = $uninstall32.Trim()
Write «Uninstalling all Java SE versions. «
start-process «msiexec.exe» -arg «/X $uninstall32 /qb» -Wait
>
Как скачать установить Java JRE с помощью PowerShell?
Следующий PowerShell скрипт позволяет автоматически скачать последнюю версию дистрибутива Java (можно скачать офлайн или онлайн установщик) с официального сайта и установить его на компьютере пользователя. При этом мы подавляем требование перезагрузки и отключаем автоматическое обновлений Java.


Скрипт автоматически загрузит установочный файл Java, сохранит его на диск в виде jre8.exe и установит среду JRE.


