- Java для Майнкрафт / TLauncher [Windows/MacOS/Linux] [32/64x]
- Где скачать Java
- Установка Java в Windows (XP, 7, 8, 10)
- Установка Java в MacOS
- Установка Java в Linux
- Установка Java в Ubuntu для TLauncher/Minecraft
- Установка Java в Debian/Mint для TLauncher/Minecraft
- Установка Java в Fedora/CentOS для TLauncher/Minecraft
- Решение проблем при установке Java
- Java Launcher for Windows
- Softonic review
- Execute your JavaScript with this free tool
- Many features that will suit Java programmers
- Plenty more that you are able to do
- Author’s review
- Исправляем ошибку Java Virtual Machine Launcher в играх
- Не хватает памяти
- Настройка переменной среды
- Создание файла запуска
- Видео
- Windows java jar launcher
- Highlight changes
- User Interface
- Bug fixes
- Running JAR file on Windows
- 25 Answers 25
Java для Майнкрафт / TLauncher [Windows/MacOS/Linux] [32/64x]
Для запуска нашего лаунчера и самой игры Minecraft, у вас обязательно должен быть установлена Джава. На данной странице, вы узнаете все основные подробности установки. На всё это у вас уйдёт не много времени, а в результате получите доступ к одной из самых популярных игр в истории.
Для TLauncher и Minecraft нужна именно Java 8! В некоторых Linux системах работает и с Java 11.
Рекомендованная версия Джава для Minecraft на Windows: Java 8 Update 51 (приоритет) или Java 8 Update 45.
Рекомендованная версия Java для Майнкрафт на MacOS/Linux: Java 8 Update Последний.
Где скачать Java
MacOS*: Java MacOS x64 (MacOS 10.7.3 и ВЫШЕ версии!);
* Все версии взяты с официального сайта Java, не было внесено никаких изменений, подписаны цифровой подпись Oracle!
Установка Java в Windows (XP, 7, 8, 10)
1) Определяем разрядность вашей системы — x32 или x64, если знаете, переходите к следующим пунктам. Если нет, то открываем «Мой компьютер» -> в верхнем меню (Компьютер) ищем «Свойства системы» и кликаем на эту кнопку.
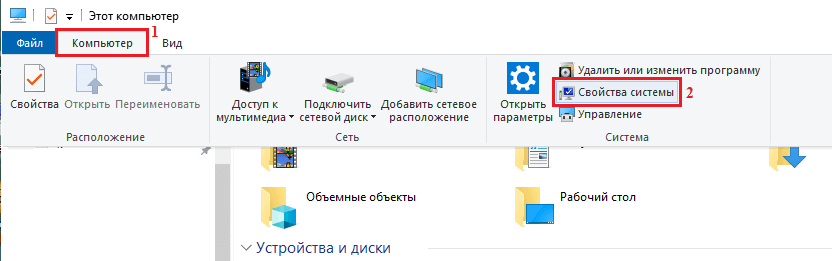
2) Ищем пункт «Тип системы«, и возле него будет указана разрядность вашей системы.
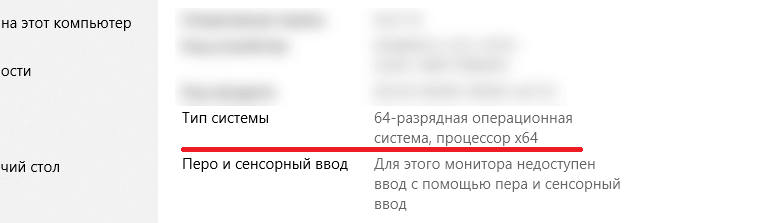
2.1) Если указано «32-разрядная операционная система, процессор x64«, то рекомендуется переустановить Windows используя разрядность x64, так как процессор ваш поддерживает. В противном случаи, x32 обладает ограничениями на выделения оперативной памяти!
3) Определив вашу разрядность, скачиваем версию Java для x32 или x64 по ссылкам выше.
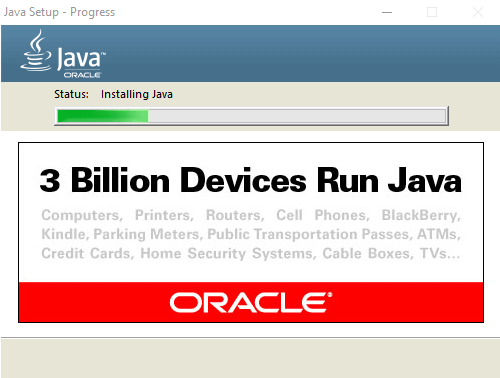
4) Запускаем скаченный установщик и нажимаем на кнопку «Install«. Произойдёт установка и теперь ваш компьютер готов к работе с Minecraft/TLauncher.
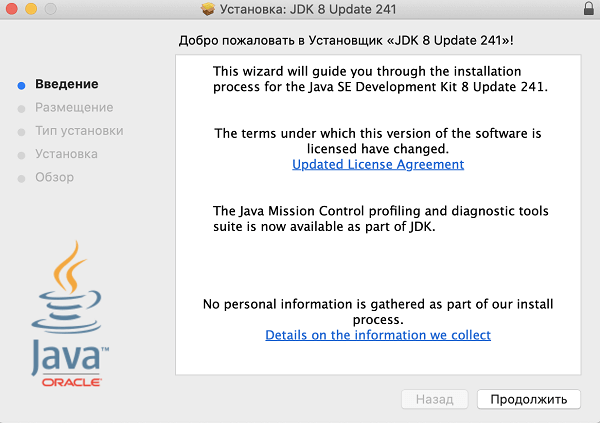
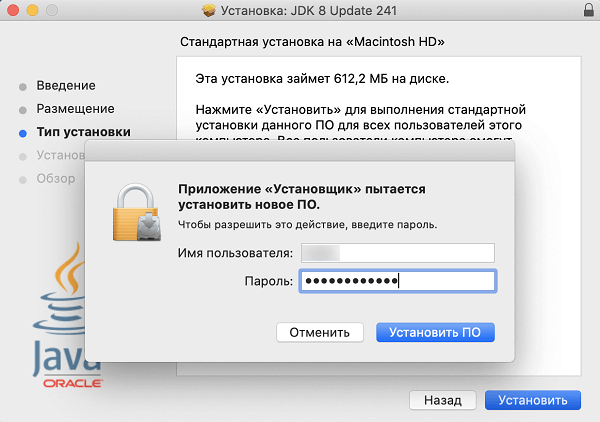
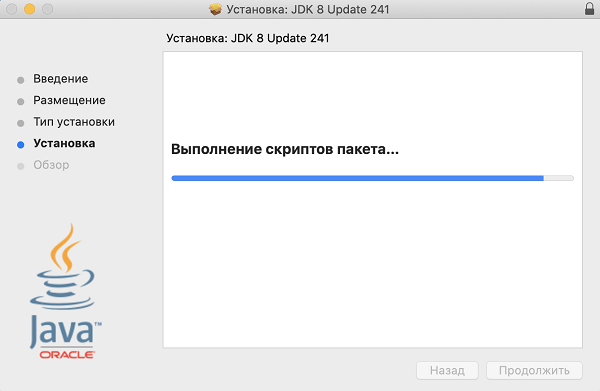
Установка Java в MacOS
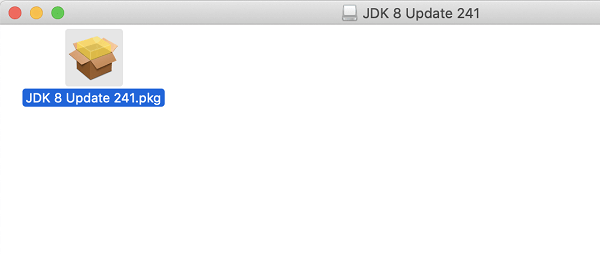
1) Скачиваем версию Java под MacOS x64 по ссылке выше.
2) Запускаем скаченный образ DMG и запускаем в нём пакет установки PKG:
3) В первых двух окнах просто нажимаем «Продолжить«:
4) Как всегда, при установке в Мак ОС, вводим пароль:
5) Готово! Теперь у вас установлена Java на OS X.
Установка Java в Linux
Установка Java в Ubuntu для TLauncher/Minecraft
1) Открываем Терминал и выполняем стандартные sudo apt-get update , а после sudo apt-get upgrade .
2) Устанавливаем Java: sudo apt install openjdk-8-jdk и соглашаемся Y на установку.

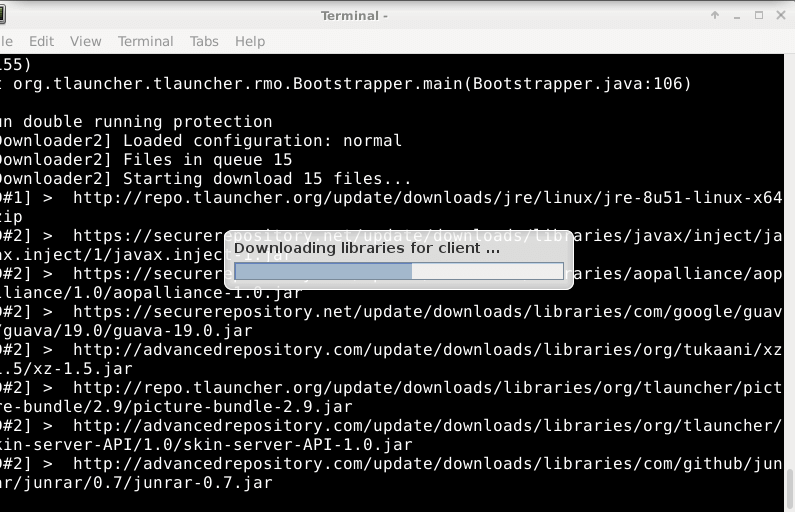
3) Скачиваем Linux версию лаунчера и распаковываем архив с .jar файл в любое место (Архив .zip распаковываем, но не сам .jar!)
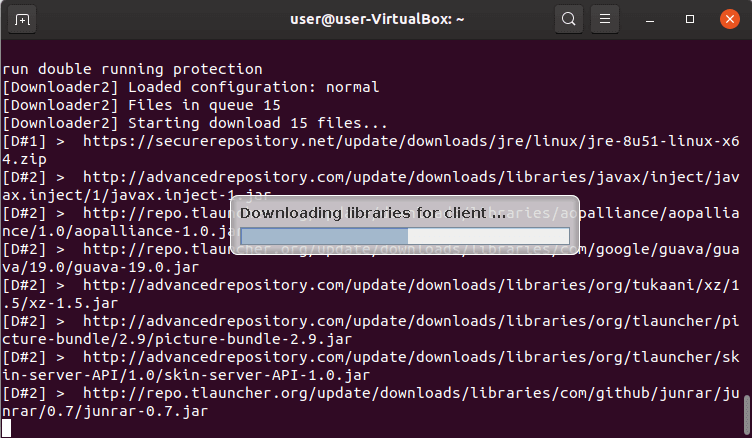
4) Запускаем лаунчер командой sudo java -jar /home/user/Downloads/TLauncher-2.72.jar . У вас будет другой путь, смотря куда положили файл! Будут скачены нужные файлы и запущен лаунчер:
Установка Java в Debian/Mint для TLauncher/Minecraft
1) Открываем Терминал и выполняем стандартные sudo apt-get update , а после sudo apt-get upgrade .
2) Устанавливаем саму Java: sudo apt install default-jdk и соглашаемся Y на установку.

3) Скачиваем Linux версию лаунчера и распаковываем архив с .jar файл в любое место (Архив .zip распаковываем, но не сам .jar!)
4) Запускаем лаунчер командой sudo java -jar /root/Downloads/TLauncher-2.72.jar . У вас будет другой путь, смотря куда положили файл! Будут скачены нужные файлы и запущен лаунчер:
Установка Java в Fedora/CentOS для TLauncher/Minecraft
1) Открываем Терминал и выполняем стандартные sudo yum update и обновляем.
2) Устанавливаем Java: sudo yum install java-11-openjdk и соглашаемся Y на установку.

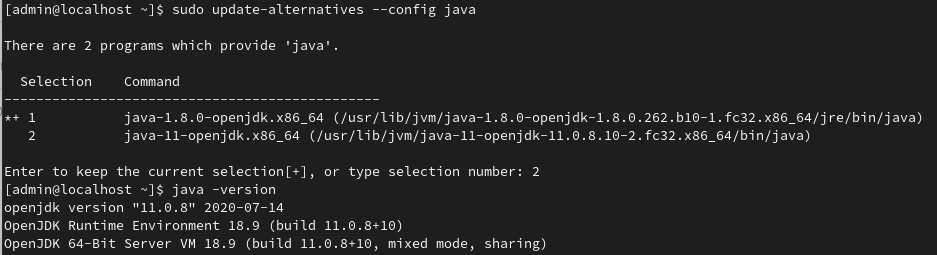
3) Выполняем команду sudo update-alternatives —config java и указываем в поле число соответствующей версии Java 11, чтобы установить её по умолчанию. Проверяем с помощью java -version , что выводит Java 11:
4) Скачиваем Linux версию лаунчера и распаковываем архив с .jar файл в любое место (Архив .zip распаковываем, но не сам .jar!)
5) Запускаем лаунчер командой sudo java -jar /home/user/Downloads/TLauncher-2.72.jar . У вас будет другой путь, смотря куда положили файл! Будут скачены нужные файлы и запущен лаунчер.
Решение проблем при установке Java
1) Не запускается установщик Java, без ошибок и окон.
1.1) Пробуем полностью перезагрузить компьютер и запустить снова установщик.
1.2) Если перезагрузка не помогает, нужно переустановить вашу ОС (Windows и т.д.), так как она сломалась.
Java Launcher for Windows
Softonic review
Execute your JavaScript with this free tool
Java Launcher is a very basic looking tool that allows you to run JavaScript applets and JavaScript applications by simply double-clicking class files. The tool has nine features that are suitable for JavaScript learners and intermediate programmers.
Many features that will suit Java programmers
Java Launcher allows you to run JavaScript applets and applications by clicking their class files, and the function will detect and set the correct classpath automatically. Right click the class files and you are able to deploy your class files as source code (java), plus you may display a class hierarchy in graphic format. You are able to decode a class file as scope code instead of using a JavaScript decompiler. A programmer may also examine what is inside of zip and jar files without having to extract them first. Compile your JavaScript files easily and quickly, and execute your apps by selecting options after right clicking.
Plenty more that you are able to do
There are more functions that you may enjoy when using the Java Launcher. It is a great debugging and executing tool. It allows you to create windows exe files, create executable jar files, and automatically create a very advanced help system. The program has a very simple user interface that many programmers will find easy to use because you can work out what each function does with a little trial and error testing.
Author’s review
Java Launcher is a powerful and easy-to-use Java tool, designed to help you get the most from the development platform. The app lets you quickly run Java applications, and boasts a range of a tools for handling Java files and creating executables.
Features of the program:
- Run Java applications and applets by double-clicking class files in Explorer
- Display Java source code in text format and class hierarchy in graphic format by right-clicking class files in Explorer
- Examine contents of JAR and ZIP files in details without extracting them by just one right-clicking in Explorer
- Compile thousands of Java files by just one right-clicking in Explorer
- Execute thousands of applications and applets by just right-clicking in Explorer
- Debug thousands of applications and applets by just one right-clicking in Explorer
- Create Windows EXE files
- The software automatically generates an advanced Help System for JDK (or) J2SE documentations without taking your precious energy and time
Исправляем ошибку Java Virtual Machine Launcher в играх

Данная публикация посвящается всем ценителям Minecraft и других игр, требующих установки Java. На днях знакомые попросили помочь: при попытке запустить Майнкрафт у них появлялось сообщение — Java Virtual Machine Launcher ошибка, как исправить сейчас расскажу.
Не хватает памяти
При установке Джавы, необходимой для работы некоторых игр, отображалось следующее окно:

Она указывает на то, что для создаваемой виртуальной машины не хватает памяти. Очень часто подобная ситуация возникает, если некорректно выходить из игры (нажав Alt + F4 ) или при внезапном отключении ПК.
В моем случае, ошибка появилась после того, как пользователь случайно удалил компонент Java, потом пытался его переустановить, но на последнем этапе инсталляции отображалось вышеупомянутое окно.
На зарубежных источниках нашел два решения. Начну с более простого.
Настройка переменной среды
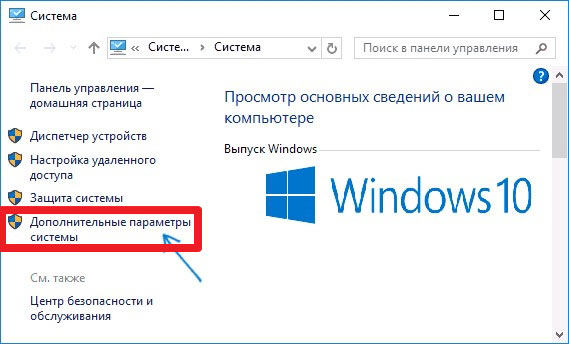
- Открываем панель управления. В Windows 7 это можно сделать через меню «Пуск», в «десятке» достаточно кликнуть правой кнопкой мышки по кнопке «Старт» (или нажать Win + X ), и выбрать из списка нужный элемент:

- Переходим к разделу «Система»:

- Слева кликаем по ссылке «Дополнительные параметры…»:
- В новом окне снизу есть кнопка «Переменные среды», которую стоит нажать:

- Кликаем по кнопке «Создать…», присваиваем новой переменной:

- Обязательно сохраняем все изменения, нажав на ОК. Перезагрузка компьютера не требуется.
Теперь при запуске установщика Джава ошибка Java Virtual Machine Launcher не появиться.
Переходим ко второму способу.
Создание файла запуска
Покажу всё на примере Minecraft.
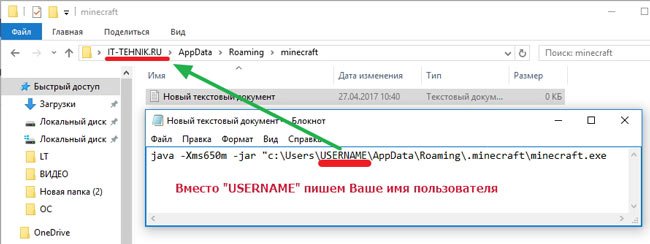
- Открываем пользовательскую папку, где хранятся игровые настройки. Для этого нажимаем Win + R и пишем команду:
- На экране отобразится каталог, в котором нужно найти игровую директорию, войти в неё и внутри создать новый текстовый документ (Блокнот):
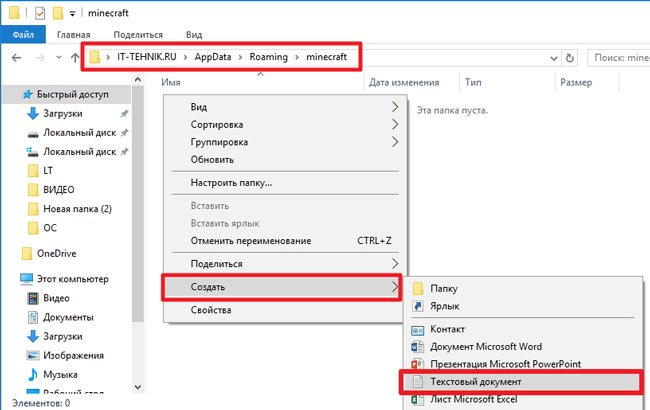
- Туда стоит записать следующую фразу:
java -Xms650m -jar «c:\Users\USER_NAME\AppData\Roaming\.minecraft\minecraft.exe
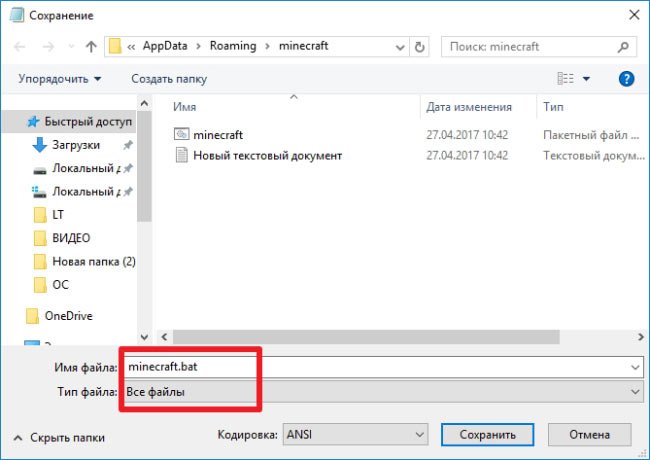
- Теперь нажимаем на пункт меню «Файл», затем выбираем «Сохранить как». Указываем имя «minecraft.bat» и указываем тип «Все…», как показано на скриншоте:
- Осталось только создать ярлык для созданного элемента и отправить его на рабочий стол, чтобы через него запускать игру.
Видео

Вы узнали, как исправить ошибку Java Virtual Machine Launcher. Но если вопросы остались, обязательно задавайте их с помощью формы комментирования внизу страницы.
Windows java jar launcher
khanhduytran0 released this Jan 17, 2021
Highlight changes
- Added Microsoft account authentication (special thanks to @MiniDigger for his documentation). You need to buy/migrate Minecraft before login, otherwise there will be an error: The server has not found anything matching the request URI .
- Minecraft 1.5.2 and below are now supported! (arm32/aarch32 devices may not able to launch).
- Forge 1.14+ are now supported!
- OptiFine Installer is back!
- The game folder is now changed to games/PojavLauncher/.minecraft , the home folder is now games/PojavLauncher
- Improved performance by removes G1GC default arguments.
User Interface
- V2 UI now become default (thanks to @serpentspirale for finish V2 UI).
- Skins are now shown in the profile selector
- Separate account removal button in the profile selector
- New fancy icons for launcher settings (props to @artdeell and @serpentspirale)
- Now launcher shows an error page when it can’t load the news
Bug fixes
- IME support (allows you to type almost all non-latin characters including Chinese (not all keyboards confirmed))
- The entire input pipe was rewritten. This fixes some Forge event pipe bugs, which made TF2 Stuff mod more playable and the keyboard more usable
- De-stubbed some important functions — Shift+Click, F3+ combinations started to work again!
- Mouse was patched — now it works in Forge config menu and app-debug and app-debug-noruntime
- app-debug has bigger size, because it contains Java Runtime, allow install or update when offline.
- As it’s name, app-debug-noruntime has no Java Runtime inside. It can be used when Java Runtime is already installed, for updating the launcher.
artdeell released this Dec 4, 2020
khanhduytran0 released this Dec 2, 2020
This is another v3 update that bring many features on. See below for full list.
Running JAR file on Windows
I have a JAR file named helloworld.jar. In order to run it, I’m executing the following command in a command-line window:
This works fine, but how do I execute it with double-click instead? Do I need to install any software?

25 Answers 25
Easiest route is probably upgrading or re-installing the Java Runtime Environment (JRE).
- Open the Windows Explorer, from the Tools select ‘Folder Options. ‘
- Click the File Types tab, scroll down and select JAR File type.
- Press the Advanced button.
- In the Edit File Type dialog box, select open in Actions box and click Edit.
- Press the Browse button and navigate to the location the Java interpreter javaw.exe.
- In the Application used to perform action field, needs to display something similar to C:\Program Files\Java\j2re1.4.2_04\bin\javaw.exe» -jar «%1» % (Note: the part starting with ‘javaw’ must be exactly like that; the other part of the path name can vary depending on which version of Java you’re using) then press the OK buttons until all the dialogs are closed.

In Windows Vista or Windows 7, the manual file association editor has been removed.
The easiest way is to run Jarfix, a tiny but powerful freeware tool. Just run it and your Java apps is back. double-clickable again.
If you need to distribute your .jar file and make it runnable at other people’s Windows computers, you can make a simple .bat file like this in the command prompt:
and place the .bat file in the same directory as your .jar file.
If you have a jar file called Example.jar, follow these rules:
- Open a notepad.exe
- Write : java -jar Example.jar
- Save it with the extension .bat
- Copy it to the directory which has the .jar file
- Double click it to run your .jar file
An interesting side effect of this causes a problem when starting runnable jar files in the command prompt.
If you try (in a command prompt):
No joy, because this is being translated to the following (which doesn’t work):
However, the following command does work:
If you change the association in file manager as described above to:
Then you can type:
in the command prompt and it will now work!
EDIT:(However you then get a black console window when you run a form based (non console) Java app, so this is not an ideal solution)
If you run these jar files by double clicking them in windows, no parameters will be passed so your Java code needs to handle the stack overflow exception and include a «press a key» function at the end or the window will just disappear.
In order to pass a parameter in windows you have to create a shortcut to the jar file, which includes the parameter in the target line (right click on the shortcut and select properties) you can not add parameters to the jar file icon itself in this way.
There isn’t a single, consistent solution here, but you would have the same problem with any other console application.
There is a windows freeware application called «bat to exe» which you can use to create an exe file from a .bat file with the apropriate command line in it. you can also embed the jar file in the exe with this application, and make it clean it up when it has finished running, so this may be a more elegant solution.


