- Установка Java (JDK) в Windows и Linux, переменная PATH и JAVA_HOME
- Установка Java (JDK) в Windows
- Установка Java (JDK) на Linux
- Переменная окружения JAVA_HOME – что это такое и она нужна
- Что такое JAVA_HOME
- Какие программы используют JAVA_HOME
- Ошибки, связанные с JAVA_HOME
- Как установить переменную окружения JAVA_HOME в Windows
- Резюме
- How to switch Java versions in Windows (updated 03/2021 for Java 16)
- Installation of multiple Java versions
- Download sources
- Environment variables
- Setting environment variables manually
- Scripts for changing the Java version
- How to set JAVA_HOME on Windows 10?
- 1. Advanced System Settings
- 2. Environment Variables
- 3. Add JAVA_HOME
- 4. Update PATH
- JAVA_HOME and java -version
- 7 Answers 7
Установка Java (JDK) в Windows и Linux, переменная PATH и JAVA_HOME
Java — язык общего назначения, основанных на классах, поддерживающий многопоточность и являющийся объектно-ориентированным. Программы на Java компилируются в так называемый byte-код, который в свою очередь запускается Виртуальной Машиной Java (Java Virtual Machine — JVM), независимо от архитектуры компьютера. На данный момент последняя версия Java двенадцатая.
Ниже мы рассмотрим — как установить Java на Windows и Linux. Для каждой из платформ создана своя версия JDK, JRE и JVM, хотя сами программы на Java и не меняются от платформы к платформе (что логично).
Давайте проясним несколько вещей перед тем, как мы начнем.
- JDK (Java Development Kit) — эта штука нужна для разработчиков на Java (то есть нас) и включает в себя инструменты разработки, документирования, упаковки и так далее (в том числе компилятор Javac, Javadoc, Jar-упаковщик и дебаггер).
- JRE (Java Runtime Environment) — сюда включены библиотеки Java, которые необходимы для запуска Java-программ. Эта штука нужна обычным пользователям и не содержит инструментов для разработки.
- JVM (Java Virtual Machine) — это и есть сама виртуальная машина Java, которая непосредственно и запускает наши Java-программы (байткод). Ее реализация написана для множества железа и платформ.
Установка Java (JDK) в Windows
Первым делом необходимо скачать JDK с официальной страницы Oracle. В нашем случае нужна версия под Windows, в самом низу.
После установки запустите скачанный exe-файл и установите его на ваш компьютер. Как только вы это сделаете, нужно будет настроить окружение.

Перейдите в Панель управления -> Система и безопасность -> Система. На вкладке «Дополнительно» нажмите на «Переменные среды», как показано ниже:

Теперь нужно найти и дополнить переменную PATH так, чтобы она содержала путь до установленной Java. Выберите PATH и нажмите «Изменить»:

Вы увидите список уже установленных переменных. Сейчас необходимо нажать «Новый» и добавить путь, по которому установлена Java (каталог bin!). По умолчанию это обычно «C:\Program Files(x86)\Java\jdk\bin».

Нажмите «Готово» (или «Ок»), сохраните настройки и на этом всё готово! Чтобы проверить, что установка прошла корректно, откройте консоль и введите:
Если вы получили сведения о версии Java, значит всё хорошо.
Установка Java (JDK) на Linux
В Linux есть несколько способов установить Java. Мы опишем самый простой и быстрый, с использование терминала. И в данном случае мы установим OpenJDK. OpenJDK — это бесплатная и свободная реализация виртуальной машины Java, причем очень популярная.
Откройте терминал и напишите команду для установки пакета:
Осталось подтвердить установку и на этом всё, Java установлена! Единственное, что меняется — это прописывание путей до компилятора.
Чтобы прописать JAVA_HOME в окружение, выполните следующую команду (только убедитесь, что такой каталог уже есть):
Чтобы прописать компилятор Java в PATH, выполните другую команду (опять же, ваши пути до Java могут отличаться от моих):
На этом установка закончена. Чтобы проверить, что всё работает правильно, достаточно написать в терминале:
О том, как же всё-таки писать на Java, мы расскажем в следующий раз.
Переменная окружения JAVA_HOME – что это такое и она нужна
Во многих статьях в интернете, документации к инструментам для разработки на Java и в книгах зачастую упоминается JAVA_HOME. Что же такое JAVA_HOME?
Что такое JAVA_HOME
JAVA_HOME это переменная окружения, указывающая на директорию с установленным JDK (Java Development Kit, комплект разработчика Java). JAVA_HOME это соглашение, используемое во многих программах из экосистемы Java.
Какие программы используют JAVA_HOME
- Intellij IDEA, Eclipse, NetBeans
- Apache Maven, Apache Ant, Gradle
- Apache Tomcat
- Jenkins
Некоторые игры, написанные на Java (например, Minecraft), тоже могут требовать установленной переменной JAVA_HOME.
Ошибки, связанные с JAVA_HOME
Если переменная окружения JAVA_HOME не определена, некоторые программы могут выдавать следующие ошибки:
- Переменная среды java_home не определена
- Cannot determine a valid Java Home
- JAVA_HOME is set to an invalid directory
- JAVA_HOME is not defined correctly
- JAVA_HOME environment variable is not set
- JAVA_HOME command not found
- JAVA_HOME not found in your environment
- JAVA_HOME does not point to the JDK
При появлении таких ошибок просто установите переменную JAVA_HOME
Как установить переменную окружения JAVA_HOME в Windows
Сперва вам нужно установить JDK или JRE.
- Установите JDK, если вы занимаетесь разработкой программ на Java
- Установите JRE, если вам нужно только запустить прикладную программу на Java
После установки JDK либо JRE запишите путь установки, он понадобится.
Теперь щёлкните правой кнопкой на «Мой компьютер» → «Свойства» → «Дополнительные параметры системы» → «Переменные среды…». В разделе «Системные переменные» нажмите кнопку «Создать…» и укажите следующие данные:
| Имя переменной | JAVA_HOME |
| Значение переменной | Путь к директории JDK / JRE, например: C:\Java\jdk-11.0.6 |
Сохраните изменения, кликнув «OK». Теперь выберите в списке переменную окружения Path и нажмите «Изменить…». В конце списка добавьте строчку со значением «%JAVA_HOME%\bin«
![]()
![]()
Для проверки откройте консоль (Win+R, cmd) и укажите последовательно укажите две команды:
Если вы правильно установили JDK/JRE и правильно установили переменные окружения, вы увидите вывод наподобие этого:
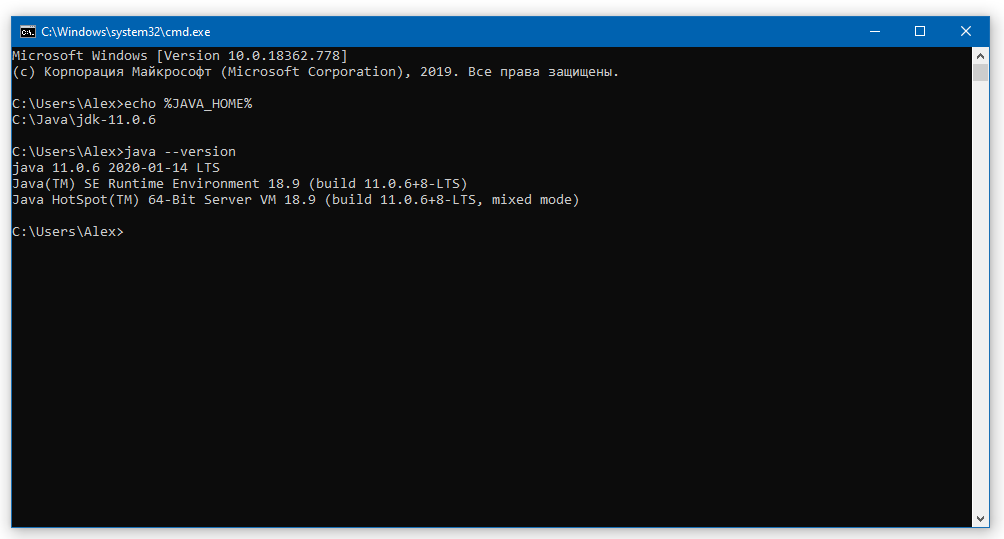
Это будет служить результатом того, что переменная JAVA_HOME установлена правильно и Java работает из командной строки.
Резюме
В данной статье мы рассказали вам, что являет собой переменная окружения JAVA_HOME, где она используется и как её корректно указать.
How to switch Java versions in Windows (updated 03/2021 for Java 16)

As a Java programmer, I work on various projects based on different Java versions, especially since the transition to the six-month release cycle. From time to time, I also have a piece of Java code that I want to try out on different Java versions – on the command line without having to click through the menus of my IDE. So it is helpful to be able to quickly and easily change the Java version to be used for compiling code or executing class files.
In this article, I’ll show you how to install several Java versions simultaneously in Windows and how to switch between them on the command line with short commands.
Installation of multiple Java versions
Installing several Java versions at the same time is incredibly easy in Windows. You can download and run the installer for each version, which automatically installs the versions in separate directories.
Download sources
- Java SE 1.1 – You can no longer install this version on 64-bit Windows.
- Java SE 1.2 – Installed to C:\jdk1.2.2\ and C:\Program Files (x86)\JavaSoft\JRE\1.2\ by default – I recommend changing this to C:\Program Files (x86)\Java\jdk1.2.2\ and C:\Program Files (x86)\Java\jre1.2.2\ for the sake of clarity.
- Java SE 1.3 – Installed to C:\jdk1.3.1_28\ by default – I recommend changing this to C:\Program Files (x86)\Java\jdk1.3.1_28\ .
- Java SE 1.4 – Installed to C:\j2sdk1.4.2_19\ by default – I recommend changing this to C:\Program Files (x86)\Java\jdk1.4.2_19\ .
Starting with the following versions, you don’t need to change the default installation directories:
Attention – you may use the following Oracle distributions only for private purposes and development:
The following version is currently an early access build. You should use it only for testing purposes:
Environment variables
In most cases, the following two environment variables decide which Java version an application uses:
- JAVA_HOME – many start scripts use this variable.
- Path – is used when running a Java binary (such as java and javac ) from the console.
These variables should always point to the same Java installation to avoid unforeseen problems due to inconsistencies. Some programs, such as Eclipse, define the Java version in a separate configuration file (for Eclipse, for example, this is the entry «-vm» in the eclipse.ini file).
Setting environment variables manually
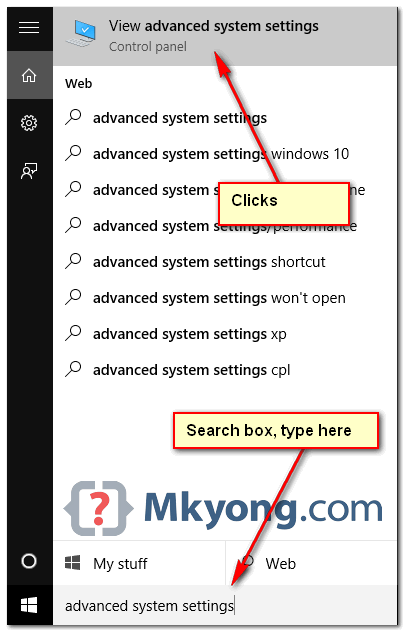
The installers of the Java versions listed above already create various environment variables, which you need to clean up first (see below). The fastest way to change the environment variables is to press the Windows key and type «env» – Windows then offers «Edit the system environment variables» as a search result:
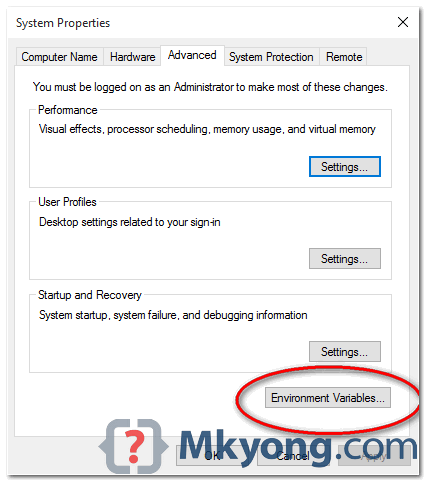
At this point, you can press «Enter,» and the system properties appear:
Here you click on «Environment Variables…», after which the following window opens:
As the standard version, I currently use the latest release version, Java 16. Therefore, you should make the following settings:
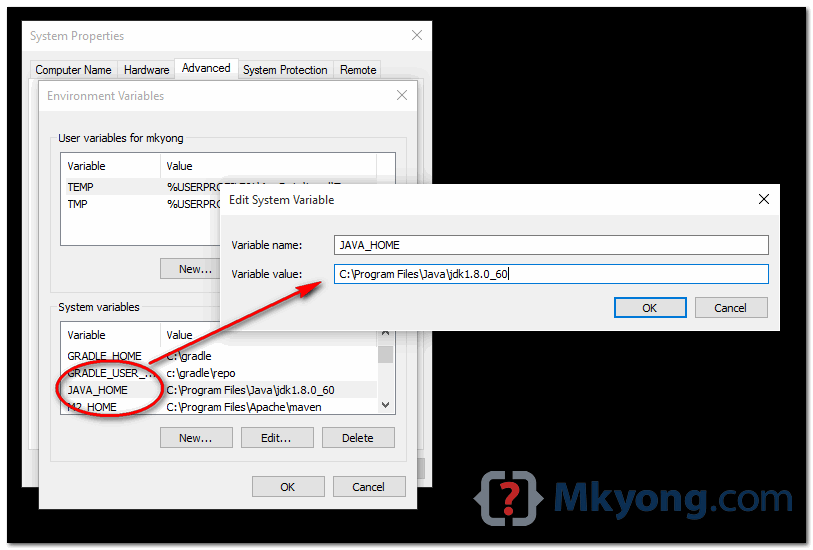
- The top list («User variables») should not contain any Java-related entries.
- The lower list («System variables») should contain an entry «JAVA_HOME = C:\Program Files\Java\jdk-16\» (please check the version number, you may have a newer one). If this entry does not exist, you can add it with «New…». If it exists, but points to another directory, you can change it with «Edit…».
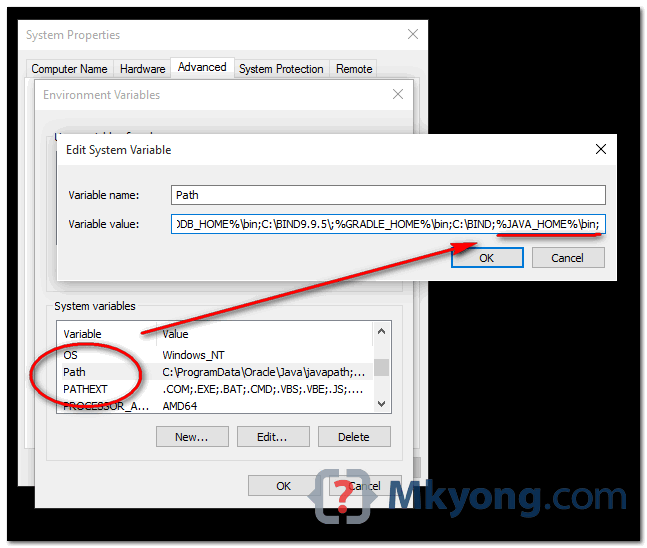
- Delete the following entries under «Path»:
- C:\ProgramData\Oracle\Java\javapath
- C:\Program Files (x86)\Common Files\Oracle\Java\javapath
- Insert the following entry instead:
- %JAVA_HOME%\bin
The path list should then look like this:
The last entry ensures that Path and JAVA_HOME are automatically consistent. Attention: this only works for the default setting configured here. If you change JAVA_HOME via the command line, you have to adjust Path accordingly (more about this below).
Now open a command line to check the settings with the following commands:
As a result, you should see this:
Scripts for changing the Java version
Finally, we come to the possibility to change the Java version quickly and easily. Therefore I create a separate command for each Java version, called, for example, java16 , java15 , java14 , java13 . I put these commands in the directory C:\Program Files\Java\scripts , which I add to the environment variable «Path» as described before:
The files are named, for example, java16.bat , java15.bat , java14.bat , java13.bat , and change the environment variables as shown in the following example of java16.bat :
This script, admittedly kept very simple, inserts the bin directory of the Java version to be activated at the beginning of the Path variable, so that is where, for example, java.exe is looked for first. The path variable becomes longer with each switching. However, since this is only the case for the currently opened command prompt, I don’t think this is a problem.
The following ZIP file contains all my scripts from Java 1.2 to Java 17 (you might have to adopt one or the other Java directory to your installation): scripts-up-to-jdk17.zip
You can quickly test whether the scripts work in a command line. Attention: after adding the scripts directory to the Path variable, you have to open a new command line.
At this point, the setup is complete. I hope this article was helpful for you, and I’d love to hear your comments. If you liked the article, I’d be happy if you shared it via one of the following share icons.
How to set JAVA_HOME on Windows 10?
This tutorial shows you how to set a JAVA_HOME system variable on Windows 10.
1. Advanced System Settings
Type advanced system settings in the search box (beside the Windows start button), clicks View advanced system settings .
2. Environment Variables
Select Advance tab, clicks Environment Variables
3. Add JAVA_HOME
In System variables, clicks New. button to add a new JAVA_HOME variable and point it to the JDK installed folder.
- Correct – C:\Program Files\Java\jdk1.8.0_60
- Wrong – C:\Program Files\Java\jdk1.8.0_60\bin
4. Update PATH
In System variables, find PATH , clicks edit. button :
4.1 In old version of Windows, it will prompt you below dialog box to edit the values directly, append this %JAVA_HOME%\bin; to the end of the line.
4.2 In latest Windows 10, it will prompt you below dialog box, clicks on New button, and add this %JAVA_HOME%\bin
JAVA_HOME and java -version
I’m using a Windows .bat script and I set JAVA_HOME as C:/Program Files/Java/jdk1.6.0_32 when I do a java -version , it still shows the 1.3
How can I fix this? What am I doing wrong?
7 Answers 7
Try %JAVA_HOME%\bin\java -version
If you modify JAVA_HOME , it’s usually better to invoke java with an absolute path (using JAVA_HOME ) because the new binary is probably not in the path (and then Windows will load the wrong binary).
For me the issue was in my PATH variable, C:\ProgramData\Oracle\Java\javapath; was added by java windows install before my %JAVA_HOME%\bin; . So I’d echo %JAVA_HOME% pointing to a JDK7 and java -version showing jdk8.
I’d to put %JAVA_HOME%\bin; before C:\ProgramData\Oracle\Java\javapath; so that java -version displays jdk7.

Make sure that the PATH environment variable is pointing to %JAVA_HOME%\bin .

Be sure not to mix the system variable path and the user variable system path. I feel OK in calling java without the absolute path (when I know how JAVA_HOME and PATH are configured).

Calling java -version from command line, causes cmd.exe to do the lookup on the «known» directories. «Known» means PATH environment variable. It seems that your PATH contains a java 1.3 bin folder, and not 1.6.
JAVA_HOME is another variable, that is used (for example, and not only) by java wrappers, or by scripts executing some java stuff.
Add quotes where needed.
I had similar issue,in my case , I had two versions java installed. it can be fixed by uninstalling one version of java completely from system.
Had a similar scenario today — two Windows 10 devices — both have JRE 1.6 & 1.7.
One device shows 1.6 the other 1.7.
This was preventing me running a third party JAR to install some software on the device showing 1.6 (which worked fine on the device showing 1.7 when running java -version), using:
As the JAR needed to be run by 1.7.
Cause of this was in the PATH environment variable — one device had the location of 1.6 first in the PATH list, moving the 1.7 location above the 1.6 location resulted in consistency using Java -version and allowed me to install the software.


