- How can I use the Windows (Super) key?
- 5 Answers 5
- Windows Key while using Unix/ Linux?
- 4 Answers 4
- Windows Equivalents — Assigning and Disabling Keys in Ubuntu — Capslock and the Windows Start Key
- Keyboard Properties in Windows
- Keyboard Preferences in Ubuntu
- Assigning the Windows Key to Show Menus
- “Show Desktop” in Ubuntu
- Changing the Capslock Action in Ubuntu
- Related Reading about Ubuntu Windows Equivalents
- Windows key in ubuntu
- Requirements
- 2. Passphrase considerations
- 3. Key generation with Ubuntu on WSL
- 4. Key generation with OpenSSH
- 5. Key generation with Putty
- 6. Getting help
How can I use the Windows (Super) key?
The Windows key seems to not have any use in Ubuntu, but since I’m just coming from Windows I’m used to this key having some function.
How can I make good use of the Windows key in Ubuntu?
I’ve seen that I can remap keys in System>Preferences>Keyboard>Layout>Options> Alt / Super key behavior, but I have no idea what the choices meta, super, hyper mean. The help button in this dialog doesn’t give any specifics about them.
I’ve experimented a little and found that meta seems to have some use, like Super + M = Me menu, or Super + S is the shutdown menu, but for some keys (B, I) it’s more like Ctrl (bold, italic). Haven’t found any further.
What would a useful setting be for a Linux newbie?

5 Answers 5
Windows key tab is useful for compiz fusion toggling of windows. It’s also a great key to assign to your own custom shortcuts due to it’s general lack of use in the linux world.
If you want to use it like in windows, to trigger the menu, go to System -> Preferences -> Keyboard Shortcuts. Scroll down to and click on ‘Show the panel’s main menu’. Click on the right hand cell, which should change to ‘New shortcut. ‘ and press the Windows key.
EDIT: turns out this doesn’t work but you can make it work by pressing Alt + F2 then entering
You can bind it to other things as well. You can use it as part of a key combination in for another shortcut or for an action in compiz. For example, I have my Windows key bound to the Initiate Window Resize action (because this is easier than trying to grab the sides of the window) which can be found in Compiz Config Settings Manager under Window Management -> Resize Window.
Windows Key while using Unix/ Linux?
Ever since I moved to Ubuntu Linux, the windows key on the lower left hand corner of my keyboard doesn’t has any utility.

Can there be any possible utility of this key in Unix/ Linux systems ?. I am sure there are many innovative enthusiasts who can suggest some use of this lame windows key !
UPDATE : Guys thanks for your replies — is there any sure fire method for Ubuntu 9.10 (with Gnome desktop environment)?
4 Answers 4
A shortcut I often use is win + s , it shows your shutdown menu.
You can define your own custom actions under Systrem -> Preferences -> Keyboard shortcuts, and use the super key (known as mod4) to hotkey your actions globally.
See this post for a list of useful Ubuntu shortcuts, including some with the super key!
You cannot make it have the dual role it has in Windows, but you can definitely use it.
One thing you could use for is to bring up the Gnome Applications menu; just use System -> Preferences -> Keyboard shortcuts and select a «new accelerator» for «Show the panel menu».
Alternatively, you can use it as a modifier key, like Alt and Ctrl to expand your range of available keyboard shortcuts; it is a bit involved so I’ll just give a link.
(The point of the dual role in Windows is that the key can be used both on its own to bring up the «Start» menu or as a modifier in shortcuts such as Win+E to start Windows Explorer. This isn’t, or rather wasn’t the last time I looked, possible in Linux.)
Edit: the method of using the Windows key to bring up the Applications menu has changed; you also don’t need to change anything to use it as a modifier any more: just go into the keyboard shortcut thing and use it.
Windows Equivalents — Assigning and Disabling Keys in Ubuntu — Capslock and the Windows Start Key
Keyboard Properties in Windows
In Windows, going to Control Panel and selecting “Keyboard” opens the “Keyboard Properties” applet. Then under the “Key Settings” tab, the user can choose the key he wants to change. For most keys, the only option is “Disable.”
Keyboard Preferences in Ubuntu
The equivalent act in Ubuntu is going to System → Preferences → Keyboard and selecting the Layouts tab. Then click on the “Layout” name and select the “Keyboard Layouts” button. This will provide a list of most of the key assignments that can be altered in Ubuntu.
You may want to check and make sure that Ubuntu has properly identified your keyboard. In my case, it was selected as a “Generic 105-key keyboard.” By clicking beside “Keyboard model,” I was then able to select “IBM” under “Vendors” and find “IBM ThinkPad R60/T60/R61/T61” under “Models.”
The first question to ask is what functionality one desires from the “Windows” key. In Windows, it’s often labeled “Start” and pressing it brings up the main menu. Ubuntu defaults to assigning this to Alt+F1, which is non-intuitive for Windows users.
Setting the Windows key to activate the panel menu involves two steps. The first is assigning the Windows key to become the “Super” key, which hopefully will already be the default. Then the second step is assigning the Windows/Super key to bring up the main menu.
Assigning the Windows Key to Show Menus
Assigning the Windows key to Super takes place right in the Keyboard Layout Options Windows. First, find “Alt/Win key behavior.” It should already be set to “Default,” but please select it if it is not already.
Next, go to System → Preferences → Keyboard Shortcuts. The function we’re interested in changing is under “Desktop” and is called “Show the panel’s main menu.” Click “Alt + F1” on the right, and it’ll change to “New Shortcut.” Then press the Windows key.
The right side of the column should then say “Super L,” and that’s fine as the default is “Super” and it’s the left key.
With this assignment, pressing the Windows button will cause the “Applications” menu in the panel to open. The arrow buttons will give access to the Places and System menus as well.
“Show Desktop” in Ubuntu
Another feature that I find useful in Windows is “Show Desktop” or “Minimize All.” In Ubuntu, the equivalent feature is called “Hide all normal windows and set focus to the desktop background.” (It’s under “Window Management” in the Keyboard Shortcuts.) I have this set to the “Menu” key, which I don’t normally use even in Windows. Unlike in Windows, after minimizing all, a second press of the same key restores all.
Changing the Capslock Action in Ubuntu
Things are not nearly so straight-forward in Ubuntu regarding the Capslock action. There’s no graphical method to disable it, and there’s no guarantee that the system will remember or act upon your request even if you write the commands into your startup files like .bashrc and .profile. Ubuntu 9.04 seems to be buggy in this way, at least on my ThinkPad.
However, here’s what always seems to work to disable the Capslock key for the current session. Open a terminal and enter:
xmodmap -e “remove lock = Caps_Lock”
This translates into “xmodmap perform expression remove lock on Caps_Lock.”
There are several different alternate assignments in System → Preferences → Keyboard → Layouts → Layout Options → CapsLock key behavior. Some of them are to make things easier for folks using traditional Linux or UNIX editors, but you can view the entire list of options there.
Related Reading about Ubuntu Windows Equivalents
How to Install “Device Manger” in Ubuntu — Is there an Ubuntu equivalent for the Windows Device Manager application? Yes, there IS a similar application, but it’s not installed by default, and the focus of the program has less to do with drivers than it does with properties, which are, in fact, types of different messages in Linux.
Using “Task Manager” in Ubuntu — Windows users soon learn that pressing Ctrl-Alt-Delete starts the Task Manager when an application bogs down the system, but is there a similar “Kill Bill” utility in Ubuntu Linux? Sure there is, and in some ways, it’s better than the Windows version.
Windows key in ubuntu
SSH, the secure shell, is often used to access remote Linux systems. But its authentication mechanism, where a private local key is paired with a public remote key, is used to secure all kinds of online services, from GitHub and Launchpad to Linux running on Microsoft’s Azure cloud.
Generating these keys from Linux is easy, and thanks to Ubuntu on WSL, you can follow the same process from Windows 10. But even without Ubuntu, SSH keys can also be generated with the free and open source OpenSSH client built into Windows 10 or with PuTTY for Windows 8.1 and earlier.
Over the following few steps, we’ll guide you through the process of generating SSH keys using Ubuntu on WSL, OpenSSH, and PuTTY.
Requirements
All you need is a PC running Windows and one of the following installed:
- Ubuntu on WSL for Windows 10
- The OpenSSH client built into Windows 10
- The puttygen.exe executable from PuTTY for Windows 7 or 8.1
If you don’t already have Ubuntu on WSL, take a look at our Install Ubuntu on WSL tutorial.
Originally authored by Graham Morrison.
2. Passphrase considerations
When creating the SSH key pair, as shown in the following steps, you can choose to either lock your private key with a passphrase or use no passphrase at all.
Adding a passphrase requires the same passphrase to be entered whenever the key pair is used. Not adding a passphrase removes this requirement. For this reason, creating a key pair without a passphrase is more convenient and potentially essential for certain scripts and automation tasks. But it’s also less secure.
If a third-party gains access to a private key without a passphrase they will be able to access all connections and services using the public key.
A good compromise between convenience and security is to generate a separate key pair for each service or connection you want to use, adding a passphrase only for critical services. If you suspect a key has been compromised, simply generate a new pair for that service and remove the less secure key.
3. Key generation with Ubuntu on WSL
Launch Ubuntu on WSL from the start menu and make sure SSH is installed by entering following command at the command prompt:
The key generation process is identical to the process on a native Linux or Ubuntu installation. With SSH installed, run the SSH key generator by typing the following:

You will be asked two questions. The first asks where to save the key, and you can press return to accept the default value. The second question asks for the passphrase. As discussed, entering a passphrase will require you to use the same passphrase whenever the key is accessed.
However, the passphrase isn’t a requirement, and pressing return (twice) will generate a key pair without one. Consequently, you won’t be asked for a passphrase when using your key.
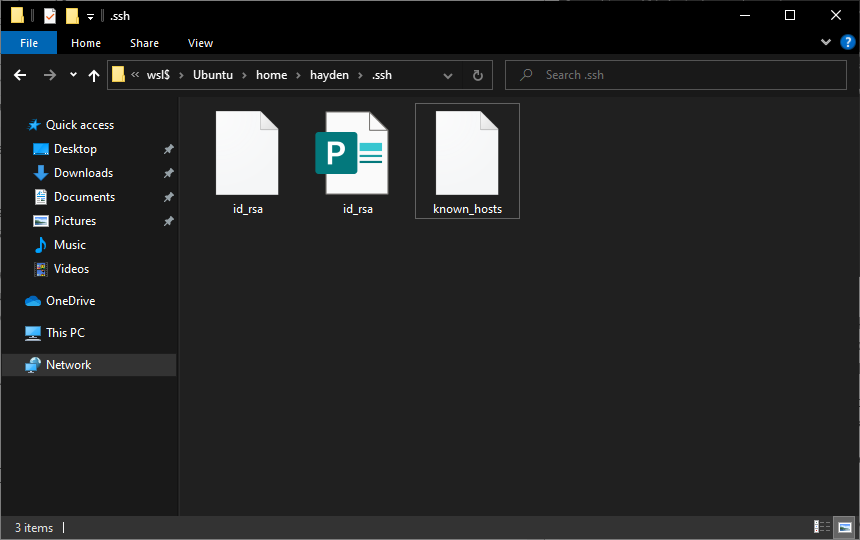
When the process has finished, the private key and the public key can be found in the
/.ssh directory accessible from the Ubuntu terminal, or the following folder from Windows file manager:
4. Key generation with OpenSSH
Recent versions of Windows 10 include the OpenSSH client by default, but if yours does not or you’re unsure, follow these steps:
Open Settings and then navigate to Apps > Apps and Features > Optional Features:


Scan this list to see if OpenSSH client is already installed. If not, at the top of the page select Add a feature, then, to install the OpenSSH client, locate OpenSSH Client and click Install
Once the installation completes, return to Apps > Apps and Features > Optional Features and you should see the OpenSSH component(s) listed:

You can optionally install the OpenSSH client using PowerShell, first launch ‘Windows PowerShell’ as an Administrator. To check the status of the OpenSSH client type the command:
This should return:
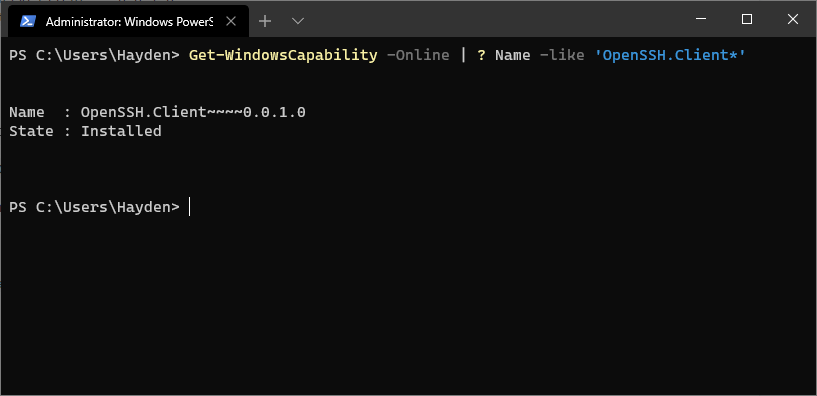
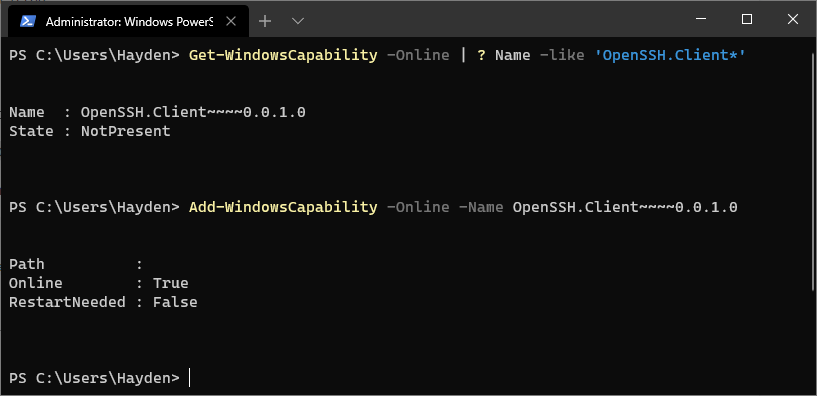
If OpenSSH client is listed as “NotPresent” you can install by typing:
The command should return:
Finally, to generate your keys, launch ‘Windows PowerShell’ as an Administrator, and type:

5. Key generation with Putty
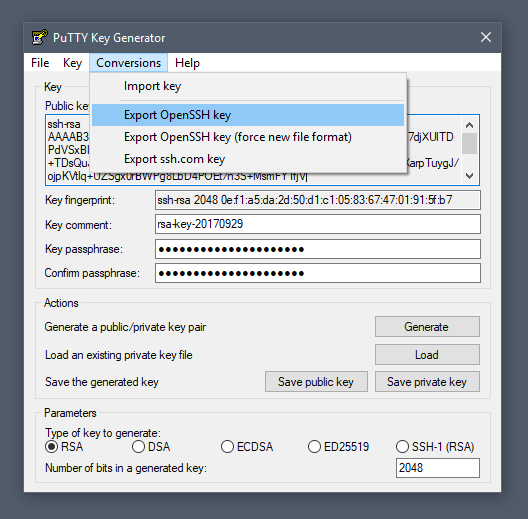
To generate a key pair with the PuTTY key generator, simply run puttygen.exe and click the Generate button in the window that appears.
You will be asked to move the mouse and press keys to improve the random number generation at the heart of SSH security. After this, the raw contents of the public key will be displayed alongside its fingerprint and a timestamp comment.
Two important fields, Key passphrase and Confirm passphrase, allow you to enter a passphrase to protect the private key.
Finally, you will need to export both the private and public keys separately:
- to export the private key, select Export OpenSSH key from the Conversions menu
- to export the public key, click Save public key from the main window
Public keys typically use the .pub suffix. By convention, the private key is usually called id_rsa and the public key id_rsa.pub , but this isn’t a requirement. It’s common to have many keys with more descriptive filenames, for instance.
6. Getting help
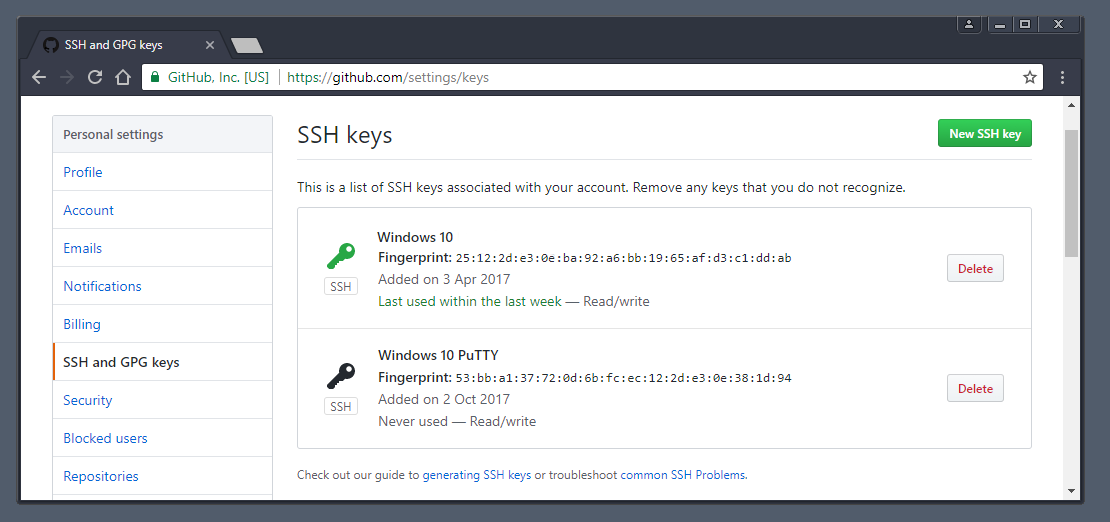
Congratulations! You have just generated a SSH key pair from Windows 10. You can now add the public key to those services you wish to authenticate.
If you need more details on using SSH keys, take a look at the Ubuntu community documentation, and if you get stuck, help is always at hand:


