- Using Keyboard Input
- Processing Keystroke Messages
- Translating Character Messages
- Processing Character Messages
- Using the Caret
- Displaying Keyboard Input
- Manage the input and display language settings in Windows 10
- Change Default Keyboard Input Method In Windows 10
- How To Change Default Keyboard Input Method In Windows 10?
- Wrapping It Up
- Change your keyboard layout
- Change the keyboard layout or other method you use to type
- Install or change a display language
- Change your keyboard layout
Using Keyboard Input
A window receives keyboard input in the form of keystroke messages and character messages. The message loop attached to the window must include code to translate keystroke messages into the corresponding character messages. If the window displays keyboard input in its client area, it should create and display a caret to indicate the position where the next character will be entered. The following sections describe the code involved in receiving, processing, and displaying keyboard input:
Processing Keystroke Messages
The window procedure of the window that has the keyboard focus receives keystroke messages when the user types at the keyboard. The keystroke messages are WM_KEYDOWN, WM_KEYUP, WM_SYSKEYDOWN, and WM_SYSKEYUP. A typical window procedure ignores all keystroke messages except WM_KEYDOWN. The system posts the WM_KEYDOWN message when the user presses a key.
When the window procedure receives the WM_KEYDOWN message, it should examine the virtual-key code that accompanies the message to determine how to process the keystroke. The virtual-key code is in the message’s wParam parameter. Typically, an application processes only keystrokes generated by noncharacter keys, including the function keys, the cursor movement keys, and the special purpose keys such as INS, DEL, HOME, and END.
The following example shows the window procedure framework that a typical application uses to receive and process keystroke messages.
Translating Character Messages
Any thread that receives character input from the user must include the TranslateMessage function in its message loop. This function examines the virtual-key code of a keystroke message and, if the code corresponds to a character, places a character message into the message queue. The character message is removed and dispatched on the next iteration of the message loop; the wParam parameter of the message contains the character code.
In general, a thread’s message loop should use the TranslateMessage function to translate every message, not just virtual-key messages. Although TranslateMessage has no effect on other types of messages, it guarantees that keyboard input is translated correctly. The following example shows how to include the TranslateMessage function in a typical thread message loop.
Processing Character Messages
A window procedure receives a character message when the TranslateMessage function translates a virtual-key code corresponding to a character key. The character messages are WM_CHAR, WM_DEADCHAR, WM_SYSCHAR, and WM_SYSDEADCHAR. A typical window procedure ignores all character messages except WM_CHAR. The TranslateMessage function generates a WM_CHAR message when the user presses any of the following keys:
- Any character key
- BACKSPACE
- ENTER (carriage return)
- ESC
- SHIFT+ENTER (linefeed)
- TAB
When a window procedure receives the WM_CHAR message, it should examine the character code that accompanies the message to determine how to process the character. The character code is in the message’s wParam parameter.
The following example shows the window procedure framework that a typical application uses to receive and process character messages.
Using the Caret
A window that receives keyboard input typically displays the characters the user types in the window’s client area. A window should use a caret to indicate the position in the client area where the next character will appear. The window should also create and display the caret when it receives the keyboard focus, and hide and destroy the caret when it loses the focus. A window can perform these operations in the processing of the WM_SETFOCUS and WM_KILLFOCUS messages. For more information about carets, see Carets.
Displaying Keyboard Input
The example in this section shows how an application can receive characters from the keyboard, display them in the client area of a window, and update the position of the caret with each character typed. It also demonstrates how to move the caret in response to the LEFT ARROW, RIGHT ARROW, HOME, and END keystrokes, and shows how to highlight selected text in response to the SHIFT+RIGHT ARROW key combination.
During processing of the WM_CREATE message, the window procedure shown in the example allocates a 64K buffer for storing keyboard input. It also retrieves the metrics of the currently loaded font, saving the height and average width of characters in the font. The height and width are used in processing the WM_SIZE message to calculate the line length and maximum number of lines, based on the size of the client area.
The window procedure creates and displays the caret when processing the WM_SETFOCUS message. It hides and deletes the caret when processing the WM_KILLFOCUS message.
When processing the WM_CHAR message, the window procedure displays characters, stores them in the input buffer, and updates the caret position. The window procedure also converts tab characters to four consecutive space characters. Backspace, linefeed, and escape characters generate a beep, but are not otherwise processed.
The window procedure performs the left, right, end, and home caret movements when processing the WM_KEYDOWN message. While processing the action of the RIGHT ARROW key, the window procedure checks the state of the SHIFT key and, if it is down, selects the character to the right of the caret as the caret is moved.
Note that the following code is written so that it can be compiled either as Unicode or as ANSI. If the source code defines UNICODE, strings are handled as Unicode characters; otherwise, they are handled as ANSI characters.
Manage the input and display language settings in Windows 10
To manage all aspects of the input and display language settings on your Windows 10 device, use the following methods.
To switch the keyboard layout you’re using in Windows 10, press and hold the Windows key and then repeatedly press the Spacebar to cycle through all your installed keyboards. (If this doesn’t do anything, it means you have only one installed.)
You can also select the language abbreviation on the far right of the taskbar and then choose the language or input method you want to use.
Note: In the input field, press Windows +period (.) to access the emoji keyboard, if your language supports this.
If you can’t find the keyboard layout you want, you may have to add a new keyboard.
Adding an input language lets you set a language-preference order for websites and apps, as well as change your keyboard language.
Select the Start button, then select Settings > Time & Language > Language.
Under Preferred languages, select the language that contains the keyboard you want, and then select Options.
Select Add a keyboard and choose the keyboard you want to add. If you don’t see the keyboard you want, you may have to add a new language to get additional options. If this is the case, go on to step 4.
Return to the Language settings page, and select Add a language.
Choose the language you want to use from the list, and then select Next.
Review any language features you want to set up or install, and select Install.
The display language you select changes the default language used by Windows features like Settings and File Explorer.
Select the Start button, then select Settings > Time & Language > Language.
Choose a language from the Windows display language menu.
If a language is listed under Preferred languages but doesn’t appear on the Windows display language list, you’ll first need to install its language pack (if it’s available).
Select the Start button, then select Settings > Time & Language > Language.
Choose a language from the Add a language list under Preferred languages, and then select Options.
Select Download from the Download language pack option.
After the language pack is installed, select Back .
Choose a language from the Windows display language menu.
If you receive an «Only one language pack allowed» or «Your Windows license supports only one display language» message, you have a single language edition of Windows 10. Here’s how to check your Windows 10 language edition:
Select the Start button, select Settings > About, and then scroll down to the Windows specification section.
If you see Windows 10 Home Single Language next to Edition, you have a single language edition of Window 10, and you can’t add a new language unless you purchase an upgrade to either Windows 10 Home or Windows 10 Pro.
Select the Start button, then select Settings > Time & Language > Language.
Under Preferred languages, select the language you want to remove, and then click Remove.
To remove an individual keyboard, select the language in question (see step 2), select Options, scroll down to the Keyboards section, select the keyboard you want to remove, and click Remove.
Change Default Keyboard Input Method In Windows 10
This tutorial details how to change default keyboard input method in Windows 10. Pretty much all software applications (even the small ones) are available in a whole variety of languages these days, so why should Operating Systems be any different? After all, the OS is the (system) software that the end user (directly or indirectly) uses the most. Almost all modern Operating Systems support multiple languages. The same is true for Windows 10 as well, which easily lets you add extra language(s), so that you can have the textual OS elements such as menus, help tips etc. displayed in a language of your choice.
And since no two languages are the same, it’s only obvious that the way they’re input via the keyboard differs from language to language as well. That’s why the standard English input method, with the popular QWERTY keyboard layout can’t be used to input every single language that Windows 10 supports.
But that’s hardly an issue, because Microsoft’s latest OS lets you change that, so that you can have a keyboard input method of your choice, even if it doesn’t match with the currently selected language. Stoked? Jump over to the other side of the break to see how you can change default keyboard input method in Windows 10.

How To Change Default Keyboard Input Method In Windows 10?
It’s incredibly simple to override the default text input method in Windows 10. However, for this to work, you need to have at least two languages (including the default system language) in your language list. And obviously, this is useful if one of the languages in the list has an input method that’s different from that of the default system language. Here’s a little illustrative walkthrough, to see you through the finish line:
Step 1: Go to the Windows Control Panel, and click on the Language item to access the language settings pane. It shows a listing of all the languages currently added to the system’s language list. You can view options specific to the added languages, and even re-order them. Move to the left, and click the Advanced settings option.

Step 2: You should be now on the Advanced settings page. Move to the Override for default input method sub-section, and use the drop down menu to select the language whose keyboard input method you want to set as the default. Once done, click Save. Here’s a screen grab:

That’s it. You have successfully changed the default keyboard input method. To switch back to original input method, use the input toolbar in the taskbar, or use the Win+Space combination. Pretty cool, don’t you think?
Wrapping It Up
The wide variety of languages supported by Windows 10 makes it one of the most customizable Windows Operating Systems ever. And the fact that you can change the keyboard input method, even overriding the currently set system language’s settings, sweetens the pot a lot more. Take it for a spin, and shout out your thoughts in the comments.
Change your keyboard layout
Swipe in from the right edge of the screen, tap Settings, and then tap Change PC settings. (If you’re using a mouse, point to the lower-right corner of the screen, move the mouse pointer up, click Settings, and then click Change PC settings.)
Tap or click Time and language, and then tap or click Region and language, and then tap or click Add a language.
Browse for the language you want, and then tap or click it to add it to your language list.
Swipe in from the right edge of the screen, tap Settings, and then tap Change PC settings. (If you’re using a mouse, point to the lower-right corner of the screen, move the mouse pointer up, click Settings, and then click Change PC settings.)
Tap or click Time and language, and then tap or click Region and language.
If the language says Language pack available, tap or click Options.
Note: If you don’t see Language pack available, you might be able to download the language pack at the Download Center.
Tap or click Download. The download process might take a while, depending on your PC and the size of the language pack.
Swipe in from the right edge of the screen, tap Settings, and then tap Change PC settings. (If you’re using a mouse, point to the lower-right corner of the screen, move the mouse pointer up, click Settings, and then click Change PC settings.)
Tap or click Time and language, and then tap or click Region and language.
Tap or click the language that you want to see Windows in, and then tap or click Set as primary. The Will be display language after next sign-in message will appear under the language.
Tap or click Set as primary to move the language to the top of the list. If the language can become your Windows display language, you’ll see Will be display language after next sign-in appear under the language.
Sign out of Windows, and then sign back in.
Warning: When you change your primary language, your keyboard layout might also change. When signing back in to Windows, make sure you’re using the right keyboard layout for entering your password. Otherwise, you might not be able to sign in. You can change your keyboard layout on the sign-in screen by tapping or clicking the language abbreviation button in the lower-right corner.
Change the keyboard layout or other method you use to type
Whenever you add a language, a keyboard layout or input method is added so you can enter text in the language. If you want to use a different keyboard layout or input method, you can add a new one or switch between the ones you have.
Swipe in from the right edge of the screen, tap Settings, and then tap Change PC settings. (If you’re using a mouse, point to the lower-right corner of the screen, move the mouse pointer up, click Settings, and then click Change PC settings.)
Tap or click Time and language, and then tap or click Region and language.
Tap or click the language you want to add a keyboard to, and then tap or click Options.
Tap or click Add a keyboard, browse the input method list for the one you want to use, and then tap or click it.
You can enter text with different keyboard layouts or input methods by switching between them. There are a few different ways to switch between keyboard layouts or input methods:
On a hardware keyboard, press and hold the Windows logo key , and then press the Spacebar to cycle through your input methods.
If you have a touchscreen, you can switch your touch keyboard layout by tapping or clicking the keyboard icon, and then tapping or clicking the keyboard layout you want to switch to.
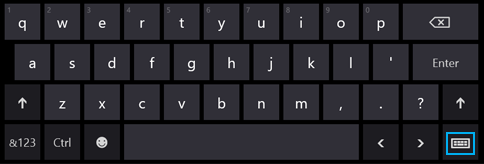
Language abbreviation button in the touch keyboard
On the desktop taskbar, tap or click the language abbreviation in the notification area at the far right of the taskbar, and then tap or click the keyboard layout or input method you want to switch to.
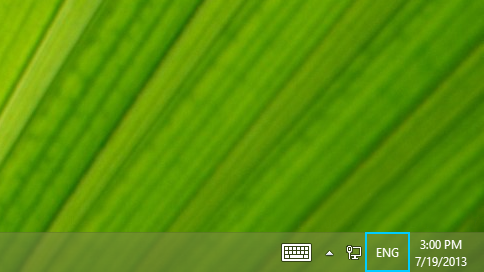
Language abbreviation button in the desktop taskbar
Your default keyboard layout or input method is the one that’s automatically used with the language you see Windows in (for example, the QWERTY keyboard for American English). If you want to keep your Windows language the same but use a different keyboard automatically, follow these steps:
Open Control Panel by swiping in from the right edge of the screen, tapping Search (or if you’re using a mouse, pointing to the upper-right corner of the screen, moving the mouse pointer down, and then clicking Search), entering Control Panel in the search box, and then tapping or clicking Control Panel.
Enter Add a language in the search box, and then tap or click Add a language.
Tap or click Advanced settings.
Under Override for default input method, choose the keyboard layout or input method you’d like to be your new default, and then tap or click Save.
Note: If you don’t see the keyboard layout or input method you want, then you haven’t added it to your input method list. For instructions, see the Add a keyboard layout or input method for a language section.
Install or change a display language
You can change the language Windows uses to display text in wizards, dialog boxes, menus, and other items in the user interface. Some display languages are installed by default, while others require you to install additional language files.
To install a Language Interface Pack (LIP), double-click the file to open the setup program. To install a language pack, follow these steps:
Open Region and Language by clicking the Start button , clicking Control Panel, clicking Clock, Language, and Region, and then clicking Region and Language.
Click the Keyboards and Languages tab.
Under Display language, click Install/uninstall languages, and then follow the steps.  If you’re prompted for an administrator password or confirmation, type the password or provide confirmation.
Note: The Display language section will be visible only if you have already installed a Language Interface Pack or if your edition of Windows supports a language pack. Language packs are available only in Windows 7 Ultimate and Windows 7 Enterprise.
When you change the display language, the text in menus and dialog boxes for some programs might not be in the language that you want. This happens because the program might not support Unicode.
Open Region and Language by clicking the Start button , clicking Control Panel, clicking Clock, Language, and Region, and then clicking Region and Language.
Click the Keyboards and Languages tab.
Under Display language, choose a language from the list, and then click OK.
Note: If you don’t see the list of display languages, you need to install additional language files.
Change your keyboard layout
On the Language bar, click the Input language button, and then select an input language.
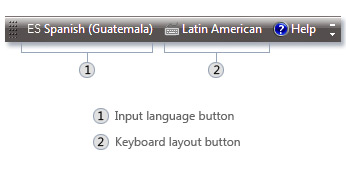
Click the Keyboard layout button, and then select a keyboard layout.
Note: If you don’t see the Language bar, right-click the taskbar, point to Toolbars, and then click Language bar.
On the Welcome screen, click the Keyboard layout button  , and then select a keyboard layout.
Note: If you don’t see the Keyboard layout button, you might not have more than one input language, or your regional and language settings might not be applied to reserved accounts.


