- Find last boot up time of remote Windows computers using WMI
- Contents
- A Few Simple Examples
- A Simple PowerShell Function For Checking Last Boot Up Time Using WMI
- Getting both reboot time and «uptime»
- Alternate Way In Retrospect
- Multiple Target Computers
- Get Data In XML Format
- Create A CSV Report Of Retrieved Boot Times
- Windows last boot time
- Answered by:
- Question
- Answers
- All replies
- Find Last BIOS Boot Time in Windows 10
- To Find Last BIOS Boot Time in Windows 10,
- About Sergey Tkachenko
Find last boot up time of remote Windows computers using WMI
Here are a bunch of ways to determine the last boot up time or uptime of remote Windows computers, using WMI/CIM (and via PSRemoting).
I added the obvious, basic examples below, and an example function, for those with simpler needs.
I researched the topic a little before writing this article, and I saw various more or less sane ways of determining the last boot-up time, but what I’ll be demonstrating here is with WMI, CIM and PSRemoting from PowerShell, which I think should be good approaches. I threw in some more obscure corner cases as well.
See this article for how to get computer names from an OU in AD — or the entire AD.
Contents
A Few Simple Examples
Here’s a simple example against the remote host «winxpssd»:
And we see that the XP workstation was last booted on Wednesday, June 13th, 2012.
Remember that you can add «-ComputerName server1, server2, server3» to gwmi/Get-WmiObject in all these examples.
You can also do it like this, since the WMI object will have a ConvertToDateTime method:
Or this cute one-liner approach:
Or why not even a «dummy» WMI object:
WMI via PowerShell remoting:
With PSv3 (Windows Management Framwork 3.0) and up, you can also use the Get-CimInstance, Get-CimClass and Get-CimSession cmdlets. Here’s a basic example with Get-CimInstance, that works almost equivalently to Get-WmiObject. Get-Cim* cmdlets use WSMAN, meaning they should work without WMI access, so long as PSRemoting is set up. Notice how the dates are nicely formatted for you without any effort (progress, yay).
What if you don’t have WMI access, but PsExec works? Invoke-PsExec to the rescue!
Oh, wait, the remote computer doesn’t even have PowerShell and WMI doesn’t work?! Unless you can Invoke-PsExec up, you might be out of luck. If PsExec does work, you could roll something like the following, where you use wmic.exe remotely, and parse the results using PowerShell locally.
A Simple PowerShell Function For Checking Last Boot Up Time Using WMI
The -ComputerName parameter for Get-WmiObject accepts an array of strings, but if one of them has an error, I haven’t found a way of connecting the results with the computer names it succeeded for (NB! Also see «alternate method in retrospect» below, but you need PSv3 for that). I think I’m missing something here, but considering this, a very basic, generic function for this that you could put in your profile, or dot-source when needed, might look something like this:
To use it, you’d do something like this, where you first dot-source the script to get the function in the current scope, and then use the function:
Getting both reboot time and «uptime»
Here is another example function where I also get the «uptime» as a time span object showing how many days, hours, minutes, and seconds the computer has been up.
And here’s an example run:

Alternate Way In Retrospect
I have since writing this above found a way to get the computername associated with the data despite errors. There’s a «hidden» PSComputerName property, but it does not exist in PowerShell version 2, only version 3 and up.
In PSv3 and up, you can use «-ErrorVariable SomeVarName», and you can then look at the «TargetObject» property from those objects to see which ones failed. There’s a TargetObject property in the error object in v2 as well, but it’s empty when I test.
You can also use «-ErrorAction SilentlyContinue» on gwmi/Get-WmiObject to suppress errors.
Multiple Target Computers
NB. I would word this differently in retrospect. You can produce CSV reports using all the methods above as well, but the method described in this section scales well for large environments with many computers, and gives the capability to get a nuanced report. Serializing WMI is necessary when you need a «snapshot» (from a window in time), and that’s what this does.
Now to the slightly more interesting part where I demonstrate how to process a bunch of remote computers and create a simple report of when they were last booted. I promote my own Get-WmiObject-Wrapper script, which is really quite ideal for this purpose. It is written as both a serial version, and an asynchronous version using PowerShell runspaces. The asynchronous version in my experience processes thousands of servers in a few minutes, and the majority of the time is actually spent writing the resulting XML file afterwards, due to a lot of (exponentially slower) string concatenation.
You can download the script from the above link. The documentation there is fairly extensive, but if you follow this guide you should be good to go without too much hassle.
- Download the files at the link above and put them in your working directory.
- Retrieve target computer names from AD, if necessary, and put them in a text file or a variable holding an array of target computer names. If you have a text file of target computers, use the parameter «-ComputerName (gc .\hosts.txt)».
- Retrieve the desired data using the WMI wrapper script against target hosts.
Here’s a complete example in a screenshot (PowerShell version 3 is required for the first line’s syntax to work):

Get Data In XML Format
First I get all the computers in my little lab AD and then I collect data with the Get-WmiObject-Wrapper script, using the asynchronous version.
Now we have boottime.xml which contains the collected data, error messages and «no ping reply» messages.
Create A CSV Report Of Retrieved Boot Times
This creates a CSV report of the target computers from which we were successfully able to retrieve the last boot-up time. If you use the property «NoPing», you get computers that did not respond to ping — and if you use «Error», you get computers that had WMI errors.
You can then process it with Import-Csv and manipulate it in the usual ways. Here I convert the unfriendly date string to a regular [DateTime] object, sort it by this date/time and export it to a new CSV file with «clean dates», and then have a look at it with Import-Csv (ipcsv).
Windows last boot time
This forum has migrated to Microsoft Q&A. Visit Microsoft Q&A to post new questions.
Answered by:
![]()
Question
![]()
![]()
Since I installed Windows 10 on my PC, the value for LastBootUpTime has not updated.
I use BGINFO to display system info and the «Boot Time» value has not changed. I have gone so far as to perform a system shutdown and removing power from the PC, but nothing helps.
I have also tried extracting the LastBootTime class property from the «Win32_OperatingSystem» WMI Class, and it shows the same value that «Boot Time» displays.
Is there some system setting that I need to adjust?
Answers
![]()
![]()
Found it! By chance, after my last post here, I search for «PC not fully shutting down» and found my solution.
Because I had the «Turn on fast startup» option enabled in Control Panel\All Control Panel Items\Power Options\System Settings, my pc was indeed not fully shutting down. I turned that option off and boot time is now showing correctly in BGInfo and the others.
Now, I need to decide what is more important — FAST BOOTS and slight power savings or accurate statistics!
- Proposed as answer by -Mr Happy- Saturday, October 10, 2015 12:59 PM
- Marked as answer by MeipoXu Microsoft contingent staff Wednesday, October 21, 2015 1:30 AM
All replies
![]()
![]()
System Boot Time displays fine for me so it appears to work on Windows 10. Just checked BGinfo and that shows my last boot time.
if you type systeminfo from a command prompt does that show the System Boot Time you are expecting? (quite a lot of info System Boot Time about 11 lines from the top)
Is the time ok on your PC? is that correct does it update, any settings been changed in time related settings?
![]()
![]()
Systeminfo returns the same time as LastBootTime and BGinfo.
Interestingly, shortly after I posted my original question, I performed a Windows Update, and when it rebooted to PC, the LastBootTime showed up properly. Now, it’s showing THAT time (10/3/2015 09:14), even after a fresh power-up this morning (10/4/2015).
Ah, yes, my system time is accurate, and I have not made any time-related changes to my system.
![]()
![]()
Odd, almost like it does not get triggered or does not have permission to set it.
![]()
![]()
Sorry it took a while to get back on this one. I took a look in the system event log and the latest Event 12 was on the same date, a couple of seconds before the time shown with BGInfo, but the same time as shown in LastBootUpTime and SystemInfo.
I’m going to perform a test in a few minutes. I’ll be leaving the house for a couple hours, I will shot down and unplug power from the PC to see if it changes when I return. (I have noticed that the shutdown behavior has changed since I installed W10 — the PC reboots with keyboard input now, so I wonder if it is not truly shutting down)
![]()
![]()
Found it! By chance, after my last post here, I search for «PC not fully shutting down» and found my solution.
Because I had the «Turn on fast startup» option enabled in Control Panel\All Control Panel Items\Power Options\System Settings, my pc was indeed not fully shutting down. I turned that option off and boot time is now showing correctly in BGInfo and the others.
Now, I need to decide what is more important — FAST BOOTS and slight power savings or accurate statistics!
- Proposed as answer by -Mr Happy- Saturday, October 10, 2015 12:59 PM
- Marked as answer by MeipoXu Microsoft contingent staff Wednesday, October 21, 2015 1:30 AM
![]()
![]()
Great!! thank you, I had the same problem. Now I prefer disable the Fast Boot option, for me the accurate statistics are more important.
Just a little aclaration, I was looking the «Power Options/System Settings» entry, but I never found where to do click 🙂 and the trick was do click in the «Require a password on wakeup» option in the left side of the window. Inside is the checkbox «Turn on fast startup (recommended)» unchecking the checkbox the problem goes out.
Find Last BIOS Boot Time in Windows 10
How to Find Last BIOS Boot Time in Windows 10
BIOS is a special software built into the computer’s motherboard. It starts the operating system installed on the PC. It is also referred to as main board firmware. In modern devices, it is superseded by UEFI. The Last BIOS time value shows the amount of time in seconds that the UEFI firmware spent for device initialization, including POST (a power-on self-test) before it delivers boot management to the OS.
UEFI (Unified Extensible Firmware Interface) is a modern version of firmware created as a replacement for BIOS. It is intended to address the limitations of BIOS and make the initial hardware configuration more flexible and simple.
Tip: You might want to find your current BIOS version in order to see if your device has the latest BIOS or UEFI firmware release installed. Also, see How to tell if Windows 10 runs in UEFI mode or in the Legacy BIOS mode.
BIOS initialization happens before the operating system receives control. The assessment cannot thoroughly inspect the phase and can only report on its duration.
The user can reduce the bios boot time by enabling Fast Startup, by turning off the full screen logo, by disabling unused devices and ports, and by adjusting the boot priority to start the system directly from the primary boot device. The set of options that can reduce the boot time are vary from system to system.
To Find Last BIOS Boot Time in Windows 10,
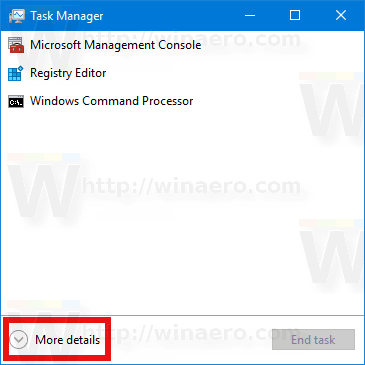
- Open Task Manager.
- If it looks as follows, switch it to the full view using the «More details» link in the bottom right corner.

- Click on the Startup tab.
- On the top right, check out the Last BIOS time value.
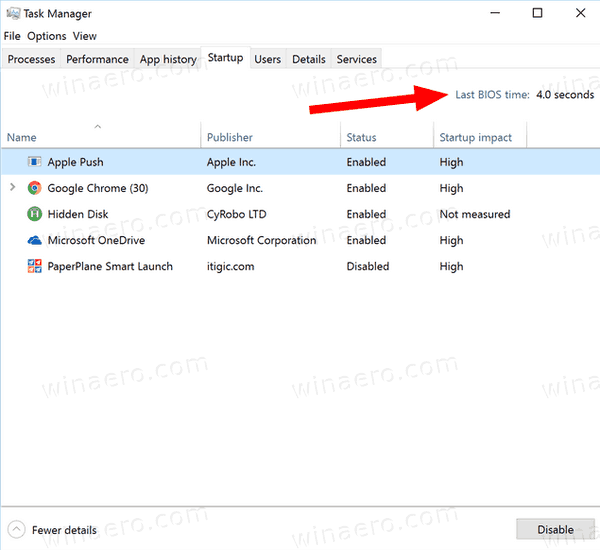
The value is in seconds. If Last BIOS time is blank, this means that your motherboard UEFI firmware doesn’t support this feature, and Windows 10 can’t obtain this information to display.
Note: This feature was first introduced in Windows 8 with the new Task Manager app. The classic Task Manager doesn’t include it.
Winaero greatly relies on your support. You can help the site keep bringing you interesting and useful content and software by using these options:
Share this post
About Sergey Tkachenko
Sergey Tkachenko is a software developer from Russia who started Winaero back in 2011. On this blog, Sergey is writing about everything connected to Microsoft, Windows and popular software. Follow him on Telegram, Twitter, and YouTube.


