- Tutorial: Get started with Visual Basic in Visual Studio
- Create a project
- Add a workload (optional)
- Option 1: Use the New Project dialog box
- Option 2: Use the Tools menu bar
- Create a «What Is Your Name» application
- Create a «Calculate This» application
- Quick answers FAQ
- What is Visual Basic?
- What is Visual Studio?
- What is a console app?
- What is .NET Core?
- Next steps
- Learn .NET
- Get Started
- Console
- In-browser Tutorial
- Mobile
- Desktop
- Game Development
- Machine Learning
- Internet of Things
- .NET 101 video series
- Microsoft Learn
- LinkedIn Learning
- Learning Materials
- Basic Computer Skills: A Guide For Complete Beginners
- 1. Working with Computer Hardware
- 2. Learning How to Use an Operating System
- 3. Using Word Processors
- 4. Getting Online
Tutorial: Get started with Visual Basic in Visual Studio
In this tutorial for Visual Basic (VB), you’ll use Visual Studio to create and run a few different console apps and explore some features of the Visual Studio integrated development environment (IDE) while you do so.
If you haven’t already installed Visual Studio, go to the Visual Studio downloads page to install it for free.
If you haven’t already installed Visual Studio, go to the Visual Studio downloads page to install it for free.
Create a project
First, we’ll create a Visual Basic application project. The project type comes with all the template files you’ll need, before you’ve even added anything!
Open Visual Studio 2017.
From the top menu bar, choose File > New > Project.
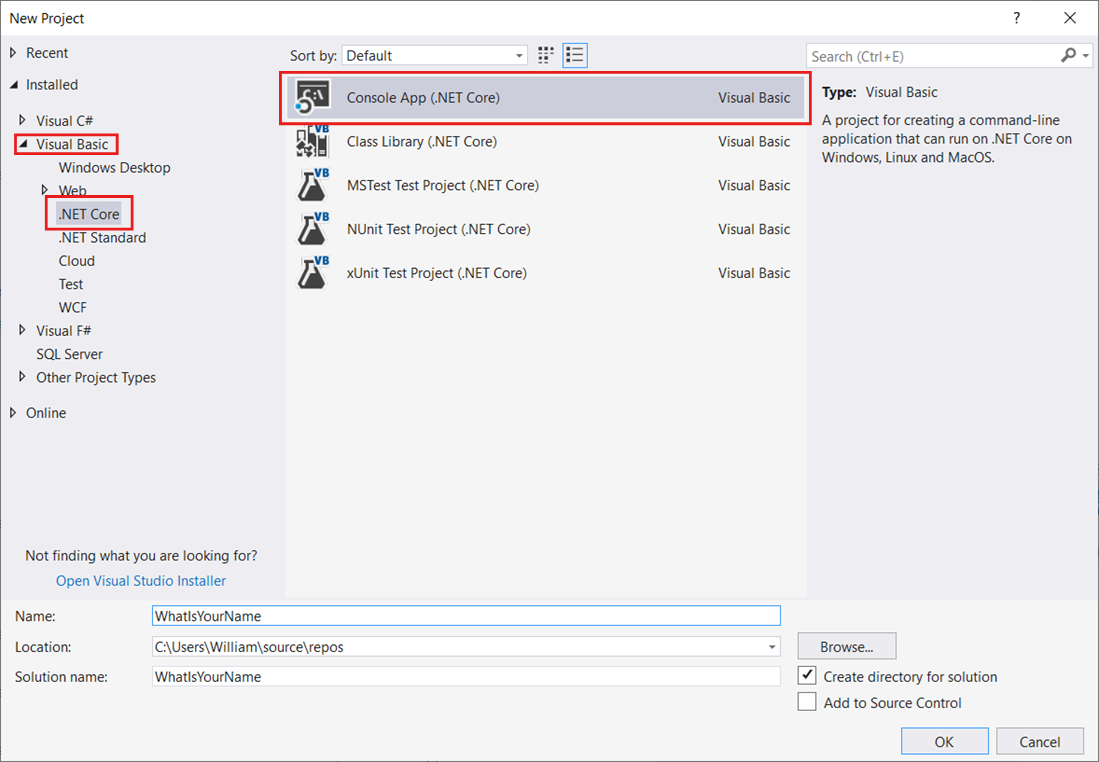
In the New Project dialog box in the left pane, expand Visual Basic, and then choose .NET Core. In the middle pane, choose Console App (.NET Core). Then name the project WhatIsYourName.
Add a workload (optional)
If you don’t see the Console App (.NET Core) project template, you can get it by adding the .NET Core cross-platform development workload. You can add this workload in one of the two following ways, depending on which Visual Studio 2017 updates are installed on your machine.
Option 1: Use the New Project dialog box
Click the Open Visual Studio Installer link in the left pane of the New Project dialog box.

The Visual Studio Installer launches. Choose the .NET Core cross-platform development workload, and then choose Modify.

Option 2: Use the Tools menu bar
Cancel out of the New Project dialog box and from the top menu bar, choose Tools > Get Tools and Features.
The Visual Studio Installer launches. Choose the .NET Core cross-platform development workload, and then choose Modify.
Some of the screenshots in this tutorial use the dark theme. If you aren’t using the dark theme but would like to, see the Personalize the Visual Studio IDE and Editor page to learn how.
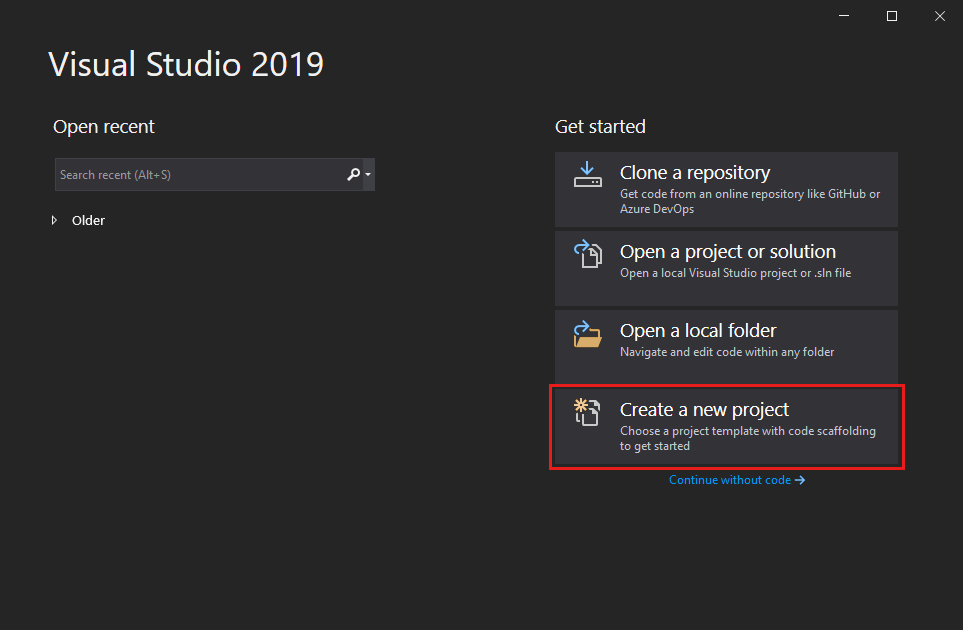
Open Visual Studio 2019.
On the start window, choose Create a new project.
In the Create a new project window, choose Visual Basic from the Language list. Next, choose Windows from the Platform list and Console from the project types list.
After you apply the language, platform, and project type filters, choose the Console Application template, and then choose Next.

If you do not see the Console Application template, you can install it from the Create a new project window. In the Not finding what you’re looking for? message, choose the Install more tools and features link.

Then, in the Visual Studio Installer, choose the .NET Core cross-platform development workload.

After that, choose the Modify button in the Visual Studio Installer. You might be prompted to save your work; if so, do so. Next, choose Continue to install the workload. Then, return to step 2 in this «Create a project» procedure.
In the Configure your new project window, type or enter WhatIsYourName in the Project name box. Then, choose Next.

In the Additional information window, .NET Core 3.1 should already be selected for your target framework. If not, select .NET Core 3.1. Then, choose Create.

Visual Studio opens your new project.
Create a «What Is Your Name» application
Let’s create an app that prompts you for your name and then displays it along with the date and time. Here’s how:
If it is not already open, then open your WhatIsYourName project.
Enter the following Visual Basic code immediately after the opening bracket that follows the Sub Main(args As String()) line and before the End Sub line:
This code replaces the existing WriteLine, Write, and ReadKey statements.

Use the green Start button, or press F5 to build and run your first app.
When the console window opens, enter your name. Your console window should look similar to the following screenshot:

Press any key to close the console window.
In the WhatIsYourName project, enter the following Visual Basic code immediately after the opening bracket that follows the Sub Main(args As String()) line and before the End Sub line:
This code replaces the existing WriteLine, Write, and ReadKey statements.
Use the green Start button, or press F5 to build and run your first app.
When the console window opens, enter your name. Your console window should look similar to the following screenshot:
Press any key to close the console window.
Create a «Calculate This» application
Open Visual Studio 2017, and then from the top menu bar, choose File > New > Project.
In the New Project dialog box in the left pane, expand Visual Basic, and then choose .NET Core. In the middle pane, choose Console App (.NET Core). Then name the file CalculateThis.
Enter the following code between the Module Program line and End Module line:
Your code window should look like the following screenshot:

Click CalculateThis to run your program. Your console window should look similar to the following screenshot:

On the start window, choose Create a new project.
In the Create a new project window, choose Visual Basic from the Language list. Next, choose Windows from the Platform list and Console from the project types list.
After you apply the language, platform, and project type filters, choose the Console Application template, and then choose Next.
Then, in the Configure your new project window, type or enter CalculateThis in the Project name box. Then, choose Next.
In the Additional information window, .NET Core 3.1 should already be selected for your target framework. If not, select .NET Core 3.1. Then, choose Create.
Enter the following code between the Module Program line and End Module line:
Your code window should look like the following screenshot:
Click CalculateThis to run your program. Your console window should look similar to the following screenshot:
Quick answers FAQ
Here’s a quick FAQ to highlight some key concepts.
What is Visual Basic?
Visual Basic is a type-safe programming language that’s designed to be easy to learn. It is derived from BASIC, which means «Beginner’s All-purpose Symbolic Instruction Code».
What is Visual Studio?
Visual Studio is an integrated development suite of productivity tools for developers. Think of it as a program you can use to create programs and applications.
What is a console app?
A console app takes input and displays output in a command-line window, also known as a console.
What is .NET Core?
.NET Core is the evolutionary next step of the .NET Framework. Where the .NET Framework allowed you to share code across programming languages, .NET Core adds the ability to share code across platforms. Even better, it’s open source. (Both the .NET Framework and .NET Core include libraries of prebuilt functionality as well as a common language runtime (CLR), which acts as a virtual machine in which to run your code.)
Next steps
Congratulations on completing this tutorial! To learn even more, see the following tutorial.
Learn .NET
Free tutorials, videos, courses, and more for beginner through advanced .NET developers.
Get Started
New to .NET and don’t know where to start? You can try .NET in your browser, at the console on your machine, or by building the app of your choice.
Console
Build a simple text-based application that runs in the console/terminal
In-browser Tutorial
Try .NET in your browser, without installing anything on your computer
Create a web app that runs on Windows, Linux, macOS, and Docker
Mobile
Build an app that dials numbers on iOS, Android, and Windows devices
Desktop
Develop an expense tracking desktop application for Windows
Game Development
Create a 3D spinning cube with Unity
Machine Learning
Build a machine learning model to classify iris flowers
Internet of Things
Blink an LED light on your Raspberry Pi, or other single-board computer

.NET 101 video series
Getting started with .NET development? We have you covered with our .NET 101 video series. Explore videos on web, mobile, desktop, C#, machine learning, containers/docker, data access, and more.

Microsoft Learn
Discover your path to build apps with .NET on Microsoft Learn. Whether you’re just starting or an experienced professional, Microsoft Learn’s hands-on approach helps you arrive at your goals faster, with more confidence and at your own pace for free.

LinkedIn Learning
Get an introduction to the programming skills needed for a career as a .NET software developer. Experience .NET learning courses that provide a broad perspective on core technologies leveraging .NET.
Learning Materials
Got the basics and want to learn more? Dig into the developer documentation for the different .NET app types and programming languages.
Basic Computer Skills: A Guide For Complete Beginners
 The computer revolution of the last two decades has transformed lives the world over. It has increased productivity in industries as diverse as deep sea drilling and fashion design, drastically improved communication globally and made the world’s information available at your fingertips. With increasing digitization, knowing how to operate computers has almost become a basic survival skill.
Learning basic computer skills can be difficult. Fortunately, with the right guidance, anyone can learn how to work with computers:
1. Working with Computer Hardware
Chief Focus: Using the mouse/touchpad and keyboard.
Making the transition to computers can feel intimidating at first. The mouse can feel patently unintuitive and the touchpad (which does the same job as the mouse) can be incredibly difficult to work with. If you’ve worked with typewriters, the computer keyboard won’t present that big a challenge, though the tactile feel of a keyboard is dramatically different from a typewriter’s.
The first step, therefore, is to familiarize yourself with basic computer hardware. Feel free to pick up the mouse and move it around. It’s okay if you can’t make sense of what’s happening on-screen – you will learn more about that later. For now, focus on being physically comfortable with the mouse, and if you are using a laptop, the touchpad.
The same applies for the keyboard. Try typing your name on the keyboard, one key at a time. You might make mistakes, but remember that unlike typewriters, undoing things on computers is as easy as pressing the ‘backspace’ key!
To use computers, you should be able to perform the following tasks:
- Moving the cursor on-screen with the mouse or touchpad.
- Clicking, right-clicking and double-clicking the mouse.
- Using basic keyboard functions such as backspace, enter/return, space bar, delete, tab, shift and caps lock.
- Basic typing skills.
2. Learning How to Use an Operating System
Chief Focus: Windows or Mac OS X
Think of an operating system (OS) as the interface which lets you communicate with the computer. The majority of you will start your computer experience with Windows, the operating system built by Microsoft. Some will start with Mac OS X, which is the operating system used on Apple computers.
For the purpose of this article, we will assume that you are using Microsoft Windows. You will be pleased to know that both these operating systems are quite similar. If you can work with Windows, it won’t take you long to work with OS X, and vice-versa.
To use an operating system effectively, you should be able to perform the following:
- Finding, running and closing a program.
- How files, folders and directories work.
- Saving a file.
- Using Windows Explorer to find and open a file.
- Shutting down and restarting a computer.
If you prefer to use Mac OS X instead, you will find this beginner’s tutorial on OS X to be of great use.
3. Using Word Processors
Chief Focus: Microsoft Word, WordPad
Now that you know how to use an operating system, you will undoubtedly be excited to get some actual work done. One of the first things you should familiarize yourself with is the humble word processor. A word processor is basically a software application that can create textual documents. Think of it an incredibly powerful typewriter.
Windows ships with WordPad and NotePad – two simple, yet effective text editors. Their Mac OS X equivalents are TextEdit and Notes.
If you want to do something more than write a basic text document, you will need a more powerful program like Microsoft Word. Microsoft Word is a part of the Microsoft Office suite of software tools. It is a highly capable word processor that can create everything from a simple letter to a complicated graphical flyer.
Knowing your way around a word processor is crucial to getting the most out of your computer. You should be familiar with the following before you proceed further:
- Opening Microsoft Word.
- Creating a new document in Word.
- Using basic formatting functions (bold, italics, underline, font size and type).
- Saving and printing a finished document.
4. Getting Online
Chief Focus: Web browsers and websites.
A computer without internet is like a Corvette without gas; it might look great sitting on the curb, but without gas, you aren’t really going to go anywhere.
The internet is one of the greatest inventions of mankind. You can use it to stay in touch with friends and relatives, follow the news, reference encyclopedias, shop for things, and search for virtually anything. Getting familiar with the internet is the first step in unleashing the full power of the computer.
To use the internet, you will need a web browser. A web browser is a software application that can open websites and communicate with the internet. Both Windows and Mac OS X ship with built-in web browsers – Internet Explorer and Safari respectively. There are other browsers as well, but for now, these should suffice.
Using the internet requires that you have basic competency with the following tasks:
- Finding and opening a web browser.
- Opening a website.
- Understanding links.
- Creating and using an email account.
- Searching on Google.
- Using Wikipedia as a reference tool.
- Opening a video.
You can also learn how to create your own blog with this free course on using Blogger.com
Learning how to use computers is not easy, but it is a vital skill in the 21st century. It will take you hours of effort to become comfortable with operating systems and web browsers and word processors, but the rewards – better, faster communication, increased productivity, and access to the wealth of the world’s information – are well worth it!


