- Windows Live Mail and Outlook Mail
- Настройка почты в программе Windows Live Mail
- Настройка почтовой программы Windows Live Mail по протоколу IMAP
- Настройка почтовой программы Windows Live Mail по протоколу POP3
- Set up email in the Mail app for Windows 10
- Stay connected and on schedule
- Add a new email account
- Add an account using advanced setup
- Troubleshooting
- Special instructions for other accounts
Windows Live Mail and Outlook Mail
Technical Level : Basic
Summary
The latest version of Outlook.com is called Outlook Mail, sometimes referred to as ‘Outlook on the web’. This version is built on the Office 365 platform, which should bring some performance improvements, and there are several interface enhancements. Some details of the preview version have been given in this blog post: New ways to get more done in Outlook.com.
However, the new version no longer supports the DeltaSync protocol which is the default configuration in Windows Live Mail for Microsoft email accounts (those @outlook, @hotmail, @live, @msn, @windowslive and any other free account with a mailbox at mail.live.com). This means that other methods will be needed to synchronize mail folders and messages with the Outlook Mail servers. This article explains how to achieve this by using IMAP instead of the default HTTP configuration.
Keywords: «server error 3219», «error 0x8DE00005», 0x80194194, «updating the calendar», «Outlook Email»
Details
Most Outlook.com accounts have already been upgraded to the new version. The indications of this for the user are:
A new layout on the web. The banner at the top of the page seems to vary, probably from market to market; this is the one I see:
In Windows Live Mail, an error message when synchronizing:
A. Deactivate the old account
This account will no longer work, new messages will not be downloaded and there will be no synchronization of other folders. For the time being, then, right-click on the account name in the folder pane and select Properties. On the General tab, deselect Include this account when receiving mail or synchronizing, then click Apply and OK. This will ensure that the account folders will remain intact with their contents during the transition.
B. Set up a new IMAP account
- When viewing your message list, press Ctrl-Shift-T to start the Add your email accounts wizard.
- Enter your email address, password and display name for outgoing messages.
- Select Manually configure server settings and click Next.
- For the incoming server, select IMAP from the dropdown.
For the incoming server address, enter outlook.office365.com [see footnote] and change the port number to 993.
Select Requires a secure connection (SSL).
For Authenticate using, select Clear text from the dropdown.
For Log-on username, enter the full email address. - For the outgoing mail server address, enter smtp.live.com and change the port to 587.
Select Requires a secure connection (SSL) and Requires authentication. - Click Next and Finish.
The program will try to connect and download the account folders and their contents. This may take some time if there are a lot of folders and/or messages, and it may stall. Be patient.
- If the program successfully downloads the account folders, right-click on the new account name in the folder pane and select Properties. On the IMAP tab,
- Select Check for new messages in all folders and Store special folders on IMAP server;
- Enter the following paths (carefully — if they are not exactly as shown, it may not work):
Sent Items path: Sent
Drafts path: Drafts
Deleted Items path: Deleted
Junk path: Junk
Right-click on the new account name in the folder pane and select Show or hide folders. The Show/Hide IMAP folders dialogue opens:
Click the Reset List button to refresh the folder list from the server.
On the All tab, use the Show and Hide buttons to indicate which folders you want to see in the folder pane.
There may be a number of contacts folders — Hide them, because they don’t contain anything meaningful in the mail window. It’s also wise to Hide any other folders, like Outbox, that weren’t there before. There should be only one folder for each of sent items, junk email and deleted items.
While viewing the message list, press Ctrl-Shift-O for Options. On the Advanced tab, select Use the ‘Deleted Items’ folder for IMAP accounts.
* The names of the IMAP special folders in Outlook Mail were accurate on 1 January 2018. They may not be the same as the names they have at mail.live.com; the special folders there are the ones at the top of the folder list in the left-hand pane, above any user-created folders. These will often have localized names, i.e. in the display language selected in the webmail options.
C. Remove the old account
Once you’re quite sure that all of your messages have been downloaded and that there are none in folders under the old account that you need to keep that aren’t in folders under the new account, you can right-click on the old account and select Remove account. This will remove the account from the folder pane and permanently delete all its folders and the messages in them, and it’s irreversible, so please make absolutely certain that you want to do this before going ahead.
Give your mail accounts names that are meaningful for you. Right-click on an account name in the folder pane and select Properties. Enter the name in the top box on the General tab, then click Apply and OK.
Calendar and contacts
Once your account has been upgraded, the calendar will no longer synchronize. Contacts will currently still synchronize with those at contacts.live.com.
Earlier versions of this article gave imap-mail.outlook.com as the IMAP server name. Servers with this alias have become unreliable since March 2017, and outlook.office365.com gives better results for most users. Changing the server name will not affect messages in the mailbox.
A print-friendly PDF of this article (559 kB) is available here:
Настройка почты в программе Windows Live Mail
Настройка почтовой программы Windows Live Mail по протоколу IMAP
Кликните на ссылку «Добавить учетную запись…»;

Введите необходимые данные:
Адрес электронной почты — имя вашего почтового ящика;
Пароль — действующий пароль от вашего почтового ящика;
Установите галочку напротив «Запомнить пароль», если вы хотите, чтобы почтовая программа запомнила пароль от почтового ящика и не запрашивала его при каждой попытке скачать почту;
Отображаемое имя — имя, которое будет отображаться в поле «От:» для всех отправляемых сообщений;

В разделе «Сведения сервера исходящих сообщений» укажите следующие данные:
Установите галочку напротив «Вручную настроить параметры сервера для учетной записи электронной почты» и нажмите «Далее».
В разделе «Сведения сервера входящих сообщений» укажите следующие данные:
Сервер входящих сообщений — IMAP;
Сервер входящих сообщений — imap.mail.ru;
Установите галочку напротив «Подключать через безопасное соединение (SSL)», чтобы включить шифрование для лучшей защиты данных;
Использовать для входа — Обычная проверка подлинности (простой текст);
Код входа — полное имя вашего почтового ящика.
Сервер входящих сообщений — smtp.mail.ru;
Установите галочку напротив «Подключать через безопасное соединение (SSL)», чтобы включить шифрование для лучшей защиты данных;
Установите галочку напротив «Серверу исходящих сообщений требуется проверка подлинности».
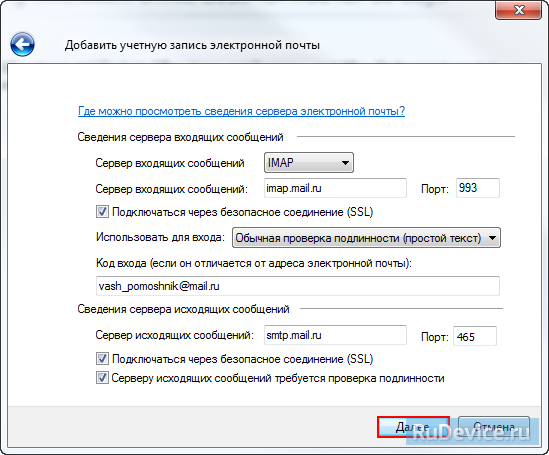
Проверьте, чтобы порт IMAP-сервера был указан 993, а порт SMTP-сервера 465.
Нажмите «Далее» и дождитесь сообщения об успешном создании учетной записи.
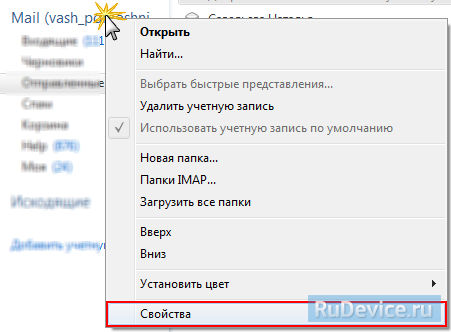
Теперь необходимо указать папки, в которых будут сохраняться все отправленные из почтовой программы письма, а также письма из других системных папок почтовой программы. Для этого кликните правой кнопкой мыши на имя только что созданной учетной записи и выберите «Свойства»
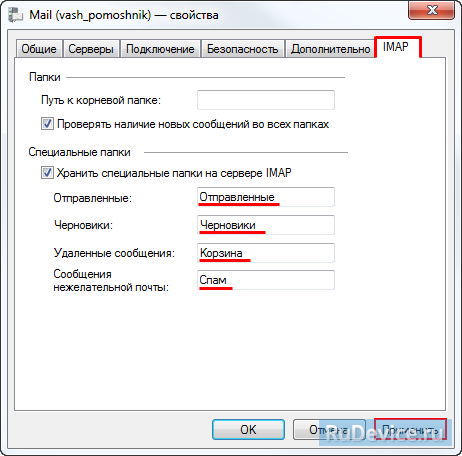
Перейдите на вкладку «IMAP», в разделе «Специальные папки» введите данные, представленные на картинке ниже, и нажмите «Применить».
Теперь почтовая программа настроена!
Настройка почтовой программы Windows Live Mail по протоколу POP3
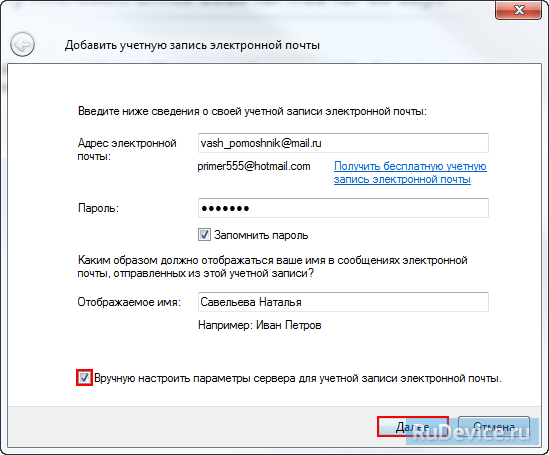
Кликните на ссылку «Добавить учетную запись…»;
Введите необходимые данные:
Адрес электронной почты — имя вашего почтового ящика;
Пароль — действующий пароль от вашего почтового ящика;
Установите галочку напротив «Запомнить пароль», если вы хотите, чтобы почтовая программа запомнила пароль от почтового ящика и не запрашивала его при каждой попытке скачать почту;
Отображаемое имя — имя, которое будет отображаться в поле «От:» для всех отправляемых сообщений;
В разделе «Сведения сервера исходящих сообщений» укажите следующие данные:
Установите галочку напротив «Вручную настроить параметры сервера для учетной записи электронной почты» и нажмите «Далее».
В разделе «Сведения сервера входящих сообщений» укажите следующие данные:
Сервер входящих сообщений — POP3;
Сервер входящих сообщений — pop.mail.ru;
Установите галочку напротив «Подключать через безопасное соединение (SSL)», чтобы включить шифрование для лучшей защиты данных;
Использовать для входа — Обычная проверка подлинности (простой текст);
Код входа — полное имя вашего почтового ящика.
Сервер входящих сообщений — smtp.mail.ru;
Установите галочку напротив «Подключать через безопасное соединение (SSL)», чтобы включить шифрование для лучшей защиты данных;
Установите галочку напротив «Серверу исходящих сообщений требуется проверка подлинности».
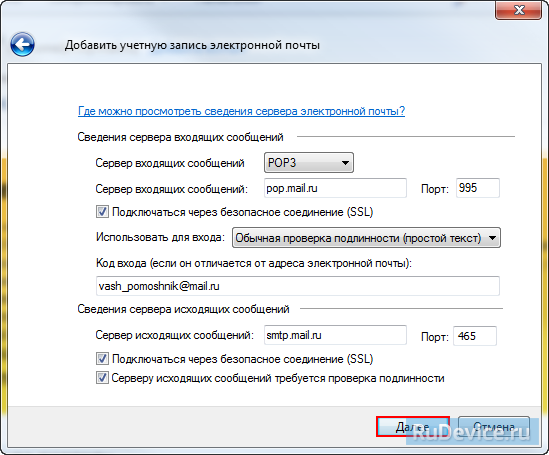
Проверьте, чтобы порт POP3-сервера был указан 995, а порт SMTP-сервера 465.
Нажмите «Далее» и дождитесь сообщения об успешном создании учетной записи.
Set up email in the Mail app for Windows 10
Stay connected and on schedule
You can be organized, on time, and buttoned up with Outlook — your life organizer.
If you log on to Windows 10 using a Microsoft account with an Outlook.com, Live, Hotmail, or MSN address, that account is added to the Mail and Calendar apps. You can add that and many other email accounts to the Mail and Calendar apps to start sending and receiving email and creating and managing events.
Seeing a message that your account is out of date? You probably need to update your account settings. See Fixing an out-of-date account for more information.
Did you set up your email, but you don’t see your messages? Change your mailbox sync settings.
Add a new email account
Open the Mail app by clicking the Windows Start menu and choosing Mail.

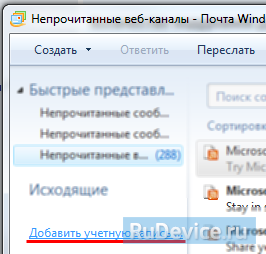
If this is the first time you’ve opened the Mail app, you’ll see a Welcome page. Select Add account to get started.
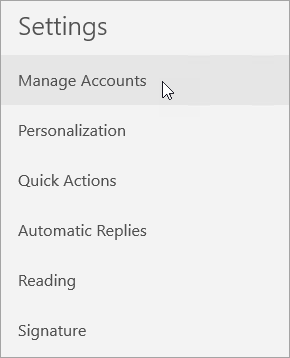
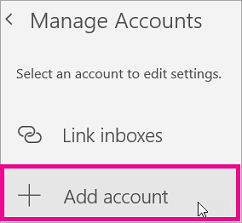
If you’ve used the Mail app before, at the bottom of the left navigation pane, select Settings  , and then choose Manage Accounts.
Note: On a phone or tablet, tap the three dots at the bottom of the page to access Settings.
Select Add account.
Choose the type of the account you want to add.
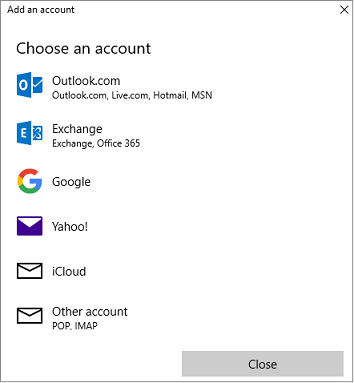
You may need to scroll down the Add an account dialog box to view all options.
If you choose Google, you’ll need to sign in to your Google account, enter your 2-step verification code if you’ve enabled that security feature, and give Windows permission to access your information. Click Allow and your account will be created.
If you choose another email account, you’ll need to follow the special instructions under Special instructions for other accounts below.
Enter the required information and click Sign in. For most accounts, this is your email address, password, and the account name. The account name is what you’ll see in both the left pane of Mail for Windows 10 as well as the Manage Accounts pane.
Note: If you receive the message “We couldn’t find info for that account. Make sure that the email address is correct and then try again,” you’ll need to click Try again three times before the button changes to Advanced. Click Advanced and follow the steps in the next section to add your account.
Click Done. Your data will start syncing as soon as your account is set up.
Note: It may take a few minutes for your account to synchronize. During this time, you may see «Not synced yet» in the message pane. If this message persists, see Resolve sync issues in Mail and Calendar apps in Windows 10.
Add an account using advanced setup
There are two ways you can access the Advanced setup options for your email account.
Click Advanced setup if your automatic email setup fails in Step 3 above.
Click Advanced setup from the Choose an account window in Step 2 above. The Advanced setup option is the last option on the list, and you may have to scroll to see it.
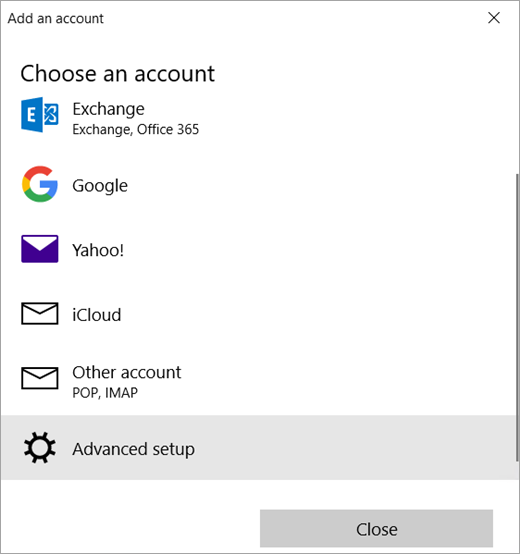
You can choose an Exchange ActiveSync account or an Internet email account. Unless your administrator has instructed you to use Exchange ActiveSync, click Internet email.
Enter the following information in the Advanced setup window.
Email address This is the name you’ll see in the left pane of the Mail app.
User name This is your full email address.
Password Enter your email account password.
Account name This is the name that you’ll see in the left pane of Mail for Windows 10, as well as in the Manage Accounts pane. You can choose any name you want.
Send your messages using this name Enter the name you want recipients to see when they receive your message.
Incoming email server You can get this information from your ISP or administrator. Usually, an incoming mail server address is in the format of mail.contoso.com or imap.google.com . For many email accounts, you can find this information in our POP and IMAP server name reference.
Account type Choose POP3 or IMAP4. Most email accounts use IMAP4. If you don’t know which one to choose, contact your ISP.
Outgoing (SMTP) email server You can get this information from your ISP or administrator. Usually, an outgoing email server address is in the format of mail.contoso.com or smtp.contoso.com .
By default, all four checkboxes at the bottom of the window will be selected. Most email accounts don’t require any changes to these options.
Your email provider can give you the settings you need to fill in the Advanced setup but you can also go to the POP and IMAP server name reference we’ve provided for the most popular email providers.
After you’ve entered the required information, click Sign in > Done.
Note: If you’re adding an account other than Gmail, see Special instructions for other accounts.
Troubleshooting
If you’re having problems setting up your account, try the following.
If you upgraded to Windows 10, you will need to re-add your accounts to Mail for Windows 10.
Make sure your email address and password are correct. Passwords are case-sensitive.
If you see your most recent messages but no older messages, you probably need to change your email sync duration.
If you see a message that your account is out-of-date, you probably need to either update your password, your incoming or outgoing servers, or your SSL settings. See Fixing an out-of-date account for more information.
Special instructions for other accounts
If you’ve enabled two-factor authentication on your iCloud account, you’ll need to generate an app-specific password to add your iCloud account to the Mail app.
Select Generate Password below App-Specific Passwords.
Follow the instructions on your screen.
Microsoft has added OAuth support for Yahoo! accounts in the Windows 10 Creators update. To install the Creators Update now, go to the software download site, and select Update now. For more information about the update, see Windows 10 Creators Update is here.
If you have a Japanese Yahoo! email account you will need to do the following:
You’ll need to add your Yahoo! account as an IMAP account. To do this, follow the steps in Add an account using advanced setup using imap.mail.yahoo.co.jp for your incoming mail server and smtp.mail.yahoo.co.jp for your outgoing mail server.
To sync your QQ mailbox with the Mail and Calendar apps, you need to enable IMAP on QQ.
Sign in to your QQ account.
Select Settings > Account > POP3/IMAP/SMTP/Exchange/CardDAV/CalDAV Service > Find IMAP/SMTP Service > Open.
You might need to send a text message to enable this service. After you select Open in step 2, a dialog might appear prompting you to use your phone to send a message to the displayed phone number.
After the text message is sent, QQ will open a new dialog with an authorization code. Copy the authorization code as you’ll need this to add your QQ mail account in the Mail and Calendar apps.
In the Mail and Calendar apps, remove your QQ account and add it again using the authorization code.
Your QQ account should now sync automatically.
When you try to connect your GMX.de or WEB.de account to the Mail and Calendar apps, you’ll receive an email in your GMX.de or WEB.de mailbox with instructions about how to enable access.
In a web browser, sign in to your GMX.de or WEB.de account.
Find the email message with instructions about how to connect your account to the Mail and Calendar apps, and follow the instructions.
Your account should now sync with the Mail and Calendar apps automatically.


