- linux-notes.org
- Сделать загрузочный USB с Windows через Mac OS X
- Windows live usb from mac
- How to Make a Windows 10 USB Using Your Mac — Build a Bootable ISO From Your Mac’s Terminal
- Quincy Larson
- Step 1: Download the Windows 10 ISO file
- Step 2: Insert your USB storage drive into your Mac
- Step 3: Use the diskutil command to identify which drive your USB is mounted on
- Step 4: Format your USB Drive to work with Windows
- Step 5: Use hdiutil to mount the Windows 10 folder and prepare it for transfer.
- Step 6: Copy the Windows 10 ISO over to your USB Drive
- Step 7: Put your USB into your new PC and start loading Windows
- Quincy Larson
- Create a bootable Windows 10 USB from macOS
- Preparations
- Download Windows 10
- Format the USB drive
- Create a bootable USB drive
- Why is an old Windows ISO file necessary?
- Alternative workarounds
linux-notes.org
Недавно, меня попросили переустановить Windows 10, мой опыт с данной ОС закончился 3 года назад когда купил я себе macbook. На момент использования венды, у меня была установлена Windows 7. Но речь пойдет не об этом, а о том как сделать загрузочный USB с Windows через Mac OS X и в своей статье «Сделать загрузочный USB с Windows через Mac OS X» все будет расписано.
Мне стало интересно как же мне записать образ на USB носитель с windows 10. Оказалось, не особо долгий и сложный процесс.
Сделать загрузочный USB с Windows через Mac OS X
1. С первого что необходимо начать — так это скачать сам образ с Window. Я не буду говорить, как и где скачать и так же не буду пиарить тот или другой сайт. Но можно скачать образ как с официального сайта, но или можно найти в интернете сайт с пиратским софтом.
Windows 10 может работать на всеми современными Mac-ами и поддерживать аппаратное обеспечение благодаря Boot Camp. Если вы хотите запустить Windows и иметь OS X на том же Mac, вы хотите создать загрузочный Windows 10 на USB, который можно создать через OS X и инструмент Boot Camp Assistant. Чтобы создать установочный USB с виндовс, нужно будет иметь при себе флэш-накопитель (по крайней мере на 8 Гб).
И так, скачанный образ windows 10 имеется на моем macbook.
2. Подсоединяем USB накопитель в Mac — он будет стерт. По этому, скопируйте и не потеряйте данные!
3. Открываем «Boot Camp Assistant app» утилиту, она находится в /Applications/Utilities/ (или можно запустить ее через Spotlight, собственно — что я и сделал). Чтобы запустить любую утилиту ( выполнить поиск и запустить ее) нужно нажать «control + space», ввести «Boot Camp Assistant app» и нажать «enter» — это если кто-то не знал.
Нажимаем на кнопку «Продолжить». Выбираем только «Создать диск установки windows 7 или новее» и нажимаем на кнопку «Продолжить»:

Boot Camp на Mac OS X
Как видно с моего скриншота, я выбрал путь к скачанному образу windows 10. Нас предупреждают что данные на выбранному диске ( это флешка) будет потеряны. И снова нажимаем на кнопку «Продолжить».
USB накопитель будет отформатирован и после чего произведется установка загрузочного WINDOWS 10 на флешку.
У меня это заняло около 20-30 времени. Все, тема «Сделать загрузочный USB с Windows через Mac OS X» завершена.
После чего можно установить windows на mac или на любой другой ноутбук или ПК.
Windows live usb from mac

- UEFI bios:
- Скидываем все настройки в default.
- AHCI — enable;
- Vt-d: Disable (+ в Clover дропнуть DMAR таблицу)
- Vt-x: Enable (только для 10.13 и если используете виртуальные машины)
- Intel Virtualization Technology — Enable
- Serial-port: Disable
- XHCI Hand-off: Disable (рекомендуеться)
- XHCI Hand-off: Enabled (только если что то не работает в режиме Disable )
- IOAPIC 24-119 Entries: Enabled (подмечено что у многих с этим пунктом паникует, поэтому тестируйте)
- CSM: Disable (по возможности)
- Fasboot: Disable
- Secure boot: Disable or Other OS
Legacy bios:
. .
[i]Примечание:
- HDD должен быть подключен к SATA-0, контролер Intel.
- . [/i]
Для установки потребуется флешка не менее 8Гб.
- ПК на ОС Windows XP/7/8.
- Скачать утилиту Boot Disk Utility с страницы разработчика cvad или с форума applelife.ru со страницы посвящённой данной утилите.
- Установить по инструкции
- Зайти на флешку в папку EFI\CLOVER\ и удалить папку OEM и файл config-sample (не путать с config.plist).
- Зайти на https://github.com/aci…pleSupportPkg/releases скачать ApfsDriverLoader.efi и скопировать его в папку EFI\CLOVER\drivers64UEFI (необходимо для macOs 10.13 и выше!)
- Добавить в EFI\CLOVER\Kext\Other https://github.com/acidanthera/Lilu/releases
- Добавить в EFI\CLOVER\Kext\Other https://github.com/aci…WhateverGreen/releases
- Скачать образ Mac OS X по указанным ссылкам:
Нажми и качай! - Развернуть скаченный образ на подготовленную флешку.
- Инструкция с applelife.ru пункт «Заливка дистрибутива macOS на второй том загрузочного USB Flash drive:«:
- Перед распаковкой образа необходимо нажать кнопку ^Format disk^.
- В основном окне программы -> Destination Disk — выбираем наш USB Flash Drive -> Part2.
- Нажимаем кнопку «Restore Partition».
- В открывшемся окне проводника выбираем распакованный файл с расширением *.hfs.
- Тем, кто устанавливает на ноутбук (или имеет PS/2 мышь или клавиатуру) , обязательно скачать
 VoodooPS2Controller.kext.zip ( 97,46 КБ )
, новая версия:VoodooPS2Controller.kext.zip ( 93,86 КБ )
положить в папку EFI/CLOVER/KEXT/10.X или Other - Всё, установочная флешка готова, можно приступать к установке.
 VoodooPS2Controller.kext.zip ( 97,46 КБ )
За данный споcоб установки благодарим cvad и Skvo
Данная инструкция написана по материалам с applelife.ru
Установить один из загрузчиков на диск (если он не входит в состав сборки) :
— Загрузчик №1 — Clover (рекомендуется для большинства пользователей);
Как это сделать: UEFI, Legacy BIOS.
— Загрузчик №2 — OpenCore (для опытных пользователей)
— Загрузчик №3 — Chameleon (на данный момент существует для очень старых систем и особых случаев);
*загрузчик устанавливаем только один, на ваш выбор
После входа в macOS первое, что делаем:
- Устанавливаем кекст для сетевой карты;
- Настраиваем SMbios;
- «Заводим» видео-карту (разрешение должно быть правильным, и верхняя строка прозрачная);
- Поднимаем «нативное управление питанием» процессора;
- Поднимаем звук через AppleALC или VoodooHDA
.
21. Ставим програмулинки и «рюшечки».
How to Make a Windows 10 USB Using Your Mac — Build a Bootable ISO From Your Mac’s Terminal

Quincy Larson

Most new PCs don’t come with DVD drives anymore. So it can be a pain to install Windows on a new computer.
Luckily, Microsoft makes a tool that you can use to install Windows from a USB storage drive (or «thumbdrive» as they are often called).
But what if you don’t have a second PC for setting up that USB storage drive in the first place?
In this tutorial we’ll show you how you can set this up from a Mac.
Step 1: Download the Windows 10 ISO file
You can download the ISO file straight from Windows. That’s right — everything we’re going to do here is 100% legal and sanctioned by Microsoft.
If you want an English-language version of the latest update of Windows 10, you can download the ISO here.
If you have a relatively new computer, you probably want the 64-bit version. If you’re not sure, go with the 32-bit version to be safe.
If you want a non-English-language version of Windows, or want to get an older update version, download the ISO here instead.
Step 2: Insert your USB storage drive into your Mac
The ISO file is only about 5 gigabytes, but I recommend you use a USB drive with at least 16 gigabytes of space just in case Windows needs more space during the installation process.
I bought a 32 gigabyte USB drive at Walmart for only $3, so this shouldn’t be very expensive.
Stick your USB drive into your Mac. Then open your terminal. You can do this using MacOS Spotlight by pressing both the ⌘ and Space bar at the same time, then typing «terminal» and hitting enter.
Don’t be intimidated by the command line interface. I’m going to tell you exactly which commands to enter.
Step 3: Use the diskutil command to identify which drive your USB is mounted on
Open Mac Spotlight using the ⌘ + space keyboard shortcut. Then type the word «terminal» and select Terminal from the dropdown list.
Paste the following command into your terminal and hit enter:
You will see output like this (note — your Mac’s terminal may be black text on a white background if you haven’t customized it).
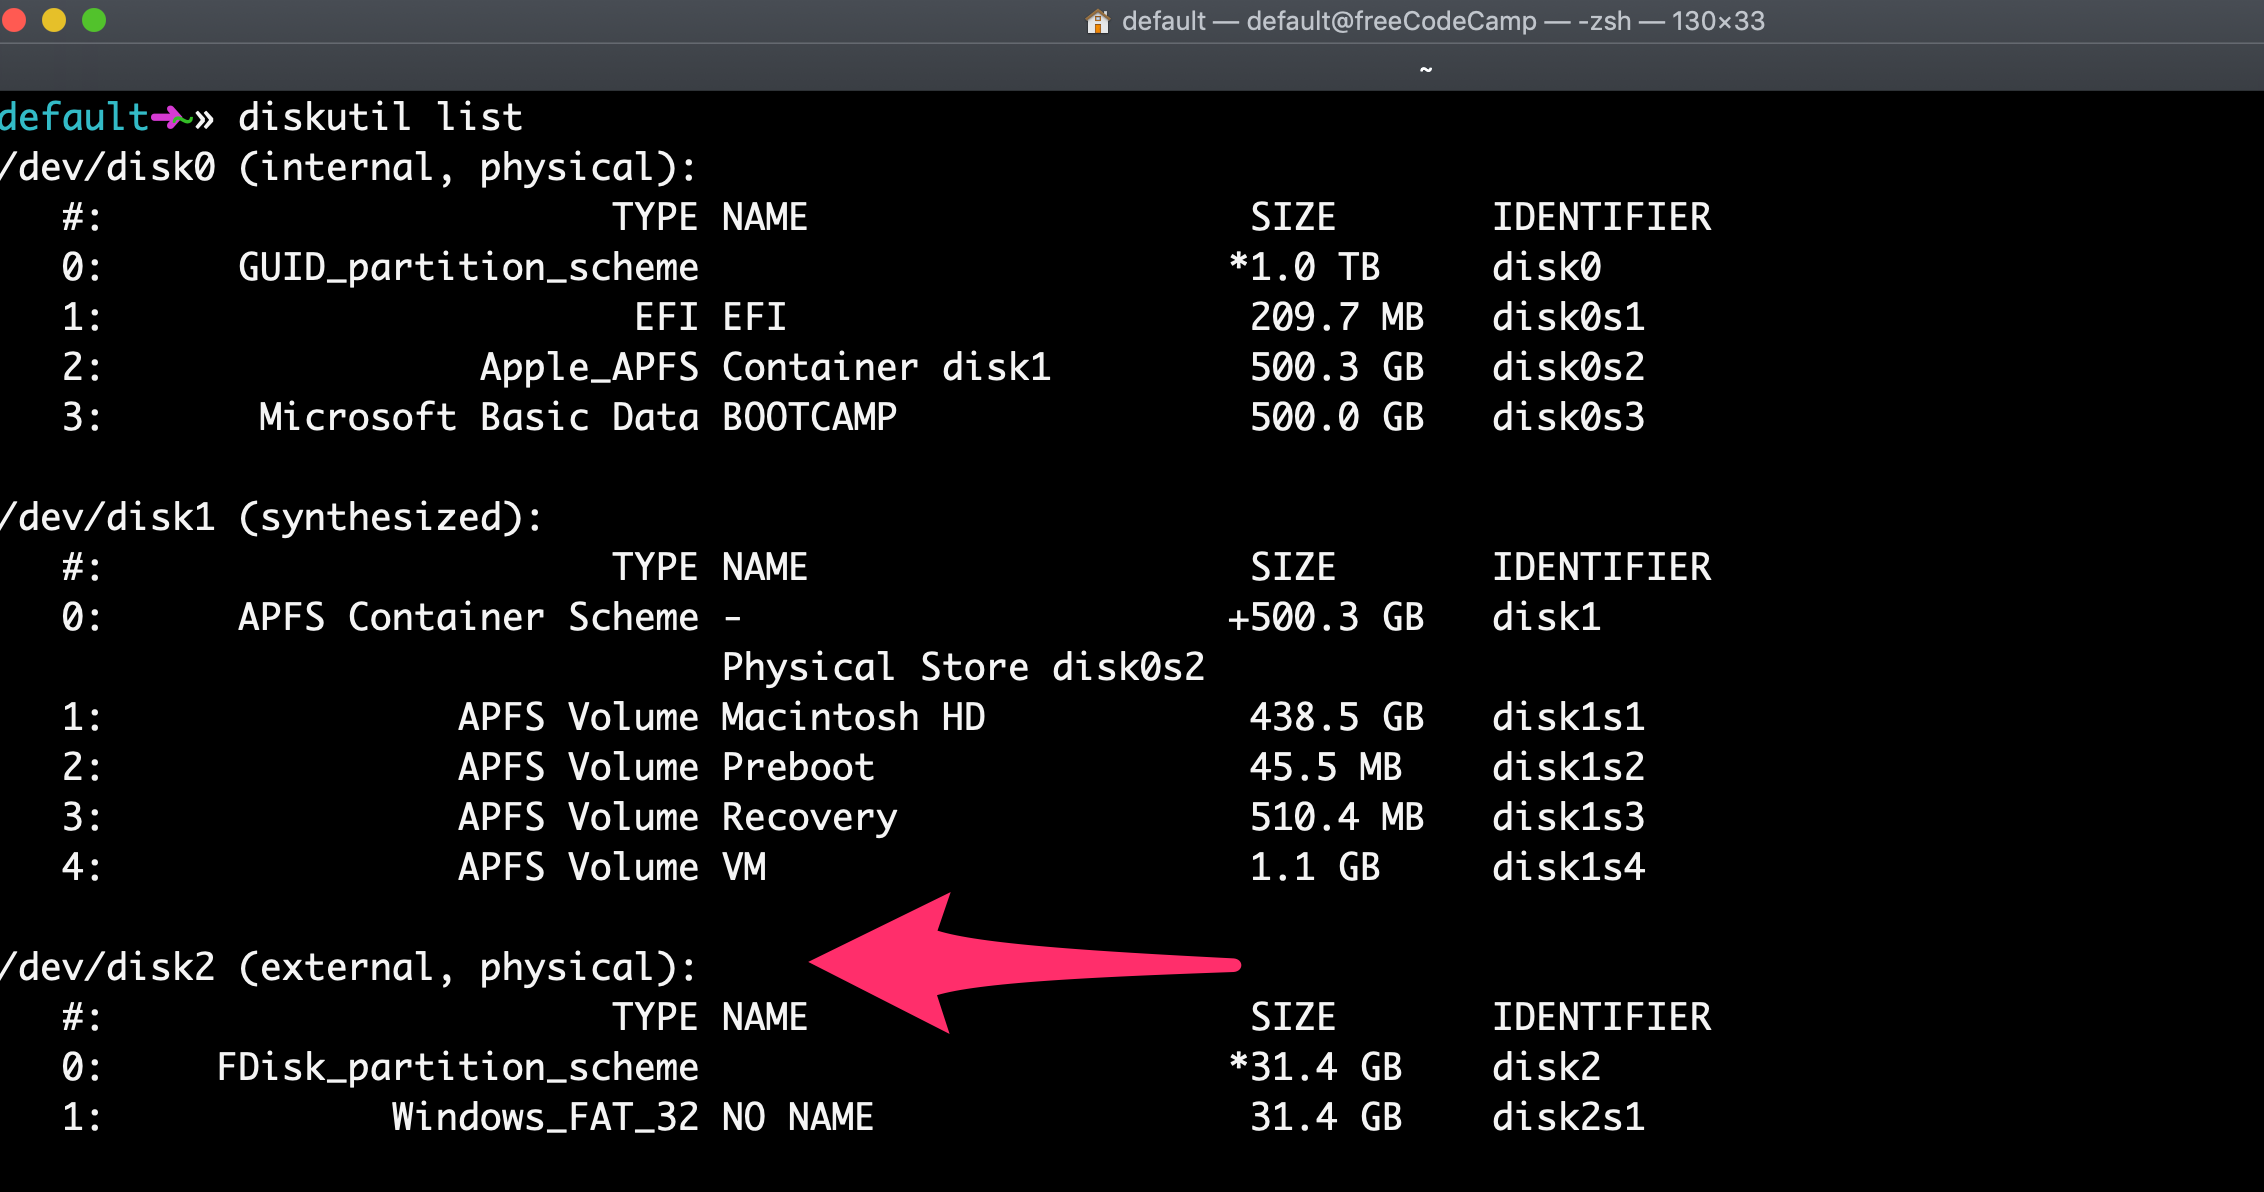
Copy the text I point to here. It will probably be something like
Step 4: Format your USB Drive to work with Windows
Next format your USB drive to Windows FAT32 format. This is a format that Windows 10 will recognize.
Note that you should replace the disk2 with the name of the your drive from step 3 if it wasn’t disk2 . (It may be disk3 or disk4 ).
Run this command using the correct disk number for your USB:
diskutil eraseDisk MS-DOS «WIN10» GPT /dev/disk2
Then you’ll see terminal output like this.
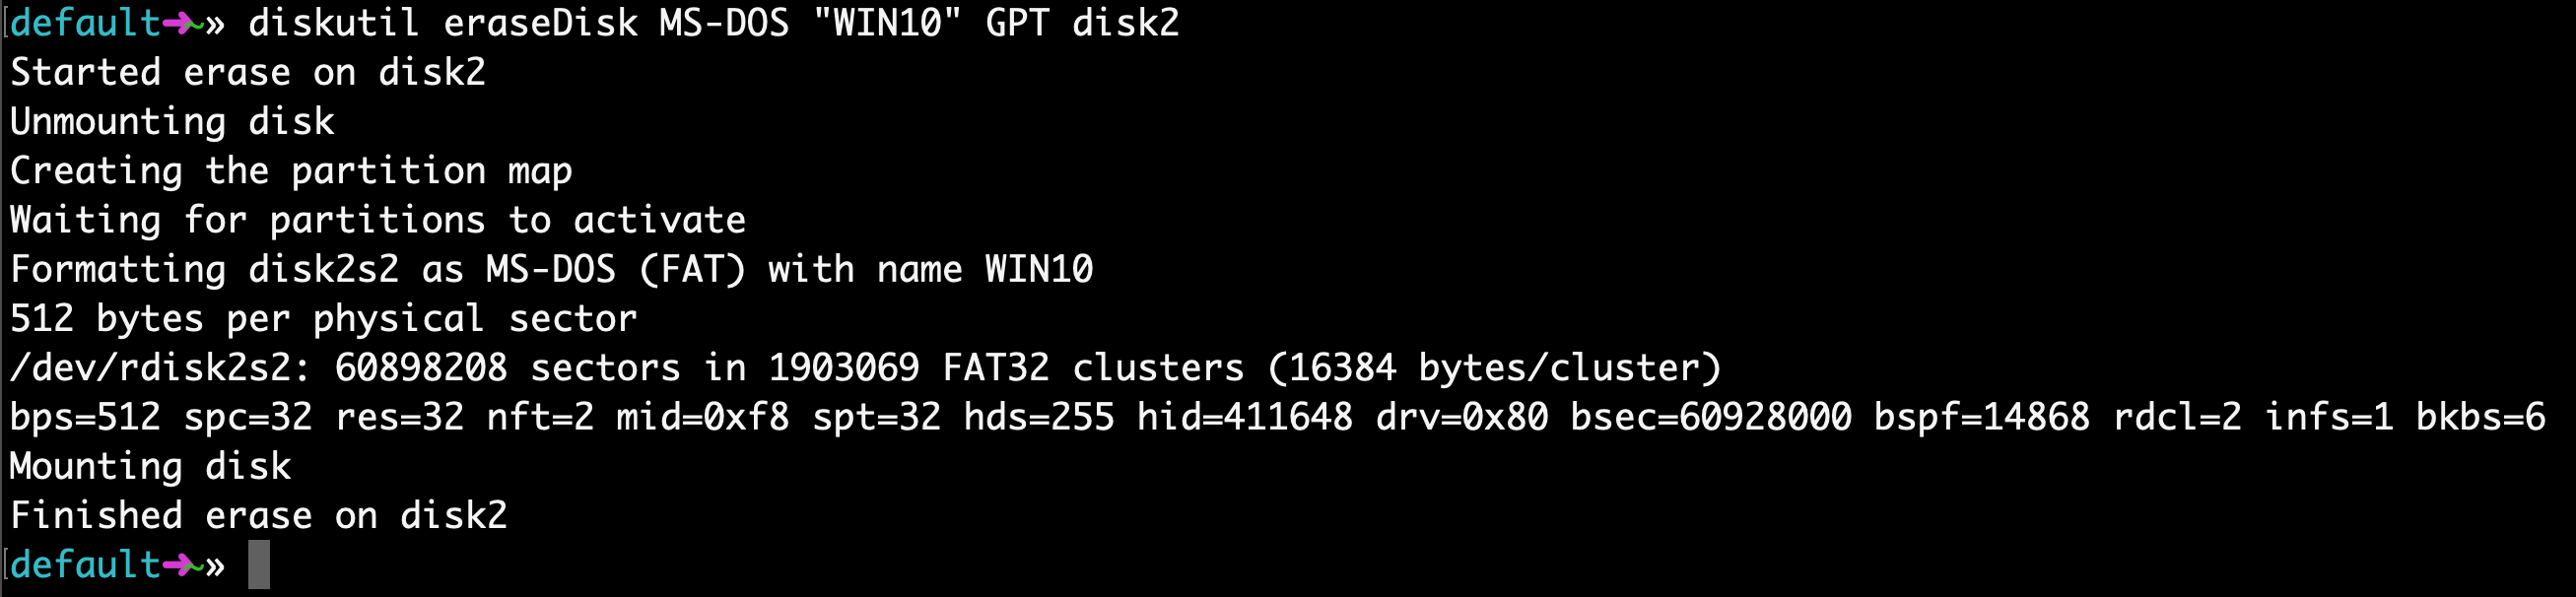
This will probably only take about 20 seconds on a newer computer, but may take longer on an older computer.
Note that for some hardware, you may instead need to run this command, which uses the MBR format for partitioning instead of GPT. Come back and try this command if step 7 fails, then redo steps 5, 6, and 7:
Step 5: Use hdiutil to mount the Windows 10 folder and prepare it for transfer.
Now we’re going to prep our downloaded ISO file so we can copy it over to our USB drive.
You will need to check where your downloaded Windows 10 ISO file is and use that. But your file is probably located in your
/Downloads folder with a name of Win10_1903_V1_English_x64.iso .
Step 6: Copy the Windows 10 ISO over to your USB Drive
Update April 2020: One of the files in the Windows 10 ISO – install.wim – is now too large to copy over to a FAT-32 formatted USB drive. So I’ll show you how to copy it over separately.
Thank you to @alexlubbock for coming up with this workaround.
First run this command to copy over everything but that file:
rsync -vha —exclude=sources/install.wim /Volumes/CCCOMA_X64FRE_EN-US_DV9/* /Volumes/WIN10
Then run this command to install Homebrew (if you don’t have it installed on your Mac yet):
/usr/bin/ruby -e «$(curl -fsSL https://raw.githubusercontent.com/Homebrew/install/master/install)»
Then use Homebrew to install a tool called wimlib with this terminal command:
brew install wimlib
Then go ahead and create the directory that you’re going to write the files into:
Then run this command. Note that this process may take several hours, you may see 0% progress until it finishes. Don’t abort it. It will use wimlib to split the install.wim file into 2 files less than 4 GB each (I use 3.8 GB in the following command), then copy them over to your USB:
wimlib-imagex split /Volumes/CCCOMA_X64FRE_EN-US_DV9/sources/install.wim /Volumes/WIN10/sources/install.swm 3800
Once that’s done, you can eject your USB from your Mac inside Finder. Note that Windows will automatically rejoin these files later when you’re installing.
Step 7: Put your USB into your new PC and start loading Windows
Congratulations — your computer now should boot directly from your USB drive. If it doesn’t, you may need to check your new PC’s BIOS and change the boot order to boot from your USB drive.
Windows will pop up a screen and start the installation process.
Enjoy your new PC, and your newly-installed copy of Windows.
Quincy Larson
The teacher who founded freeCodeCamp.org.
If you read this far, tweet to the author to show them you care. Tweet a thanks
Learn to code for free. freeCodeCamp’s open source curriculum has helped more than 40,000 people get jobs as developers. Get started
freeCodeCamp is a donor-supported tax-exempt 501(c)(3) nonprofit organization (United States Federal Tax Identification Number: 82-0779546)
Our mission: to help people learn to code for free. We accomplish this by creating thousands of videos, articles, and interactive coding lessons — all freely available to the public. We also have thousands of freeCodeCamp study groups around the world.
Donations to freeCodeCamp go toward our education initiatives, and help pay for servers, services, and staff.
Create a bootable Windows 10 USB from macOS

Oct 17, 2019 · 5 min read

This tutorial explains how to create a bootable Windows USB in macOS without any additional tools. The instructions are absolutely foolproof, no terminal is required and the resulting USB drive can be used to install Windows on any machine and is not limited to “Boot Camp”.
Preparations
You need a USB stick with a capacity of 8 GB or more. All the data on the USB drive will be lost in the process, so make sure to save the data elsewhere before you continue.
Download Windows 10
In this step you have to download a rather old version of Windows 10. If you want to find out why this is necessary please refer to the section on the bottom of this article.
Go to https://tb. r g-adguard.net and select “Windows (Final)” as type, “Windows 10, Version 1803 — Redstone 4 [Apr 2018] (build 17134.1)” as version (do not select a more recent version), “Windows 10” as edition, a language of your choice and finally the file that ends on “_x64.iso” if you don’t know any better. Finally click “Download” and continue with the next step in the meantime.
Warning
It looks like this step is no longer working adequately, because the described ISO images are not available for download anymore. If you get stuck here please try to use the website’s search function on the top, search for “Windows 10, Version 1803 (Updated Apr 2018) (x64)”. You will get to see the cryptic “SHA1” key on the right which you can use to easily search the web for alternative download sources.
For the German version, for instance, the SHA1 key is “537f817703323d28f673b4e36e377919e1ee034e” from which I found this download from “ComputerBase”. If you don’t find a download for your language, give the German version a try. I believe you can install the language pack of your choice later on then.

Format the USB drive
Make sure your USB drive is plugged into your Mac and continue by opening the “Disk Utility” app by either searching for it or by navigating to /Applications/Utilities/Disk Utility.app manually.

Click “View” in the top left corner and make sure “Show all devices” is enabled.

Select your thumb drive on the left and click “Erase”.

Insert an arbitrary name (e.g. “USB”) but make sure to select the “MS-DOS (FAT)” format and the “Master Boot Record” scheme. If you don’t have an option to select the scheme please double check that you got the previous step to “Show all devices” right. Now click “Erase” and wait until the process is finished.

Create a bootable USB drive
When the Windows 10 ISO download is done, double click the file to open it. A new window will appear.

Now copy all files to your USB drive (e.g. via drag & drop). The copy process may take a little while, depending on the speed of your thumb drive. When this is done you can eject the USB stick. You are now ready to boot Windows 10!
Why is an old Windows ISO file necessary?
Microsoft offers official downloads for Windows ISOs, but unfortunately you can not use them. On macOS you are forced to use the FAT32 filesystem for your thumb drive, because NTFS is not supported by macOS and ExFAT is probably not supported by your BIOS. But files in FAT32 are limited to a maximum size of 4 GB. The ISOs provided by Microsoft contain files that exceed that limit. Therefore you need to download an older version of Windows 10 from an alternative source. The website https://tb.rg-adguard.net gives us access to previous Windows releases. The files however are still coming from Microsoft directly, so there is nothing to worry about. Once the old Windows version is installed, you can use the integrated Windows updater to install the most recent version.
If you receive error messages while copying the Windows files to your USB drive saying “ install.wim : File too large” for your target medium, or you get an error during install saying that :\\Sources\install.wim can not be opened (error code 0x8007000D ), then you picked a Windows ISO that contains files that exceed the FAT32 limit of 4 GB.
Alternative workarounds
If you don’t want to use an outdated Windows installer to work around the FAT32 issues there are a couple of alternative approaches that you may try. However, I did not use them and can only give you a pointer.


