- Windows local system name
- Какого назначение системной учетной записи Local System
- Привилегии LocalSystem
- Сценарии вызова командной строки из под System
- Способы вызвать командную строку от имени системы
- LocalSystem Account
- Local Accounts
- About local user accounts
- Default local user accounts
- Administrator account
- Guest account
- HelpAssistant account (installed with a Remote Assistance session)
Windows local system name
Добрый день! Уважаемые читатели и гости одного из крупнейших IT блогов России Pyatilistnik.org. В прошлый раз мы с вами разобрали способы выключения компьютера средствами командной строки, в сегодняшней публикации мы рассмотрим задачу, как вызвать cmd от имени системной учетной записи Local System, рассмотрим варианты применения данной задачи. Думаю, что многим коллегам данная статья будет весьма познавательна и каждый найдет применение данному лайвхаку.
Какого назначение системной учетной записи Local System
Системная учетная запись (Local System) – это специальная встроенная, локальная учетная запись, созданная Windows в момент установки, для использования в системе и запуска из под нее различных служб Windows. В Windows огромное количество служб и процессов для своего запуска и работы используют именно системную запись. Посмотреть это можно в оснастке «Службы», которую можно открыть из окна «Выполнить» введя в нем services.msc.
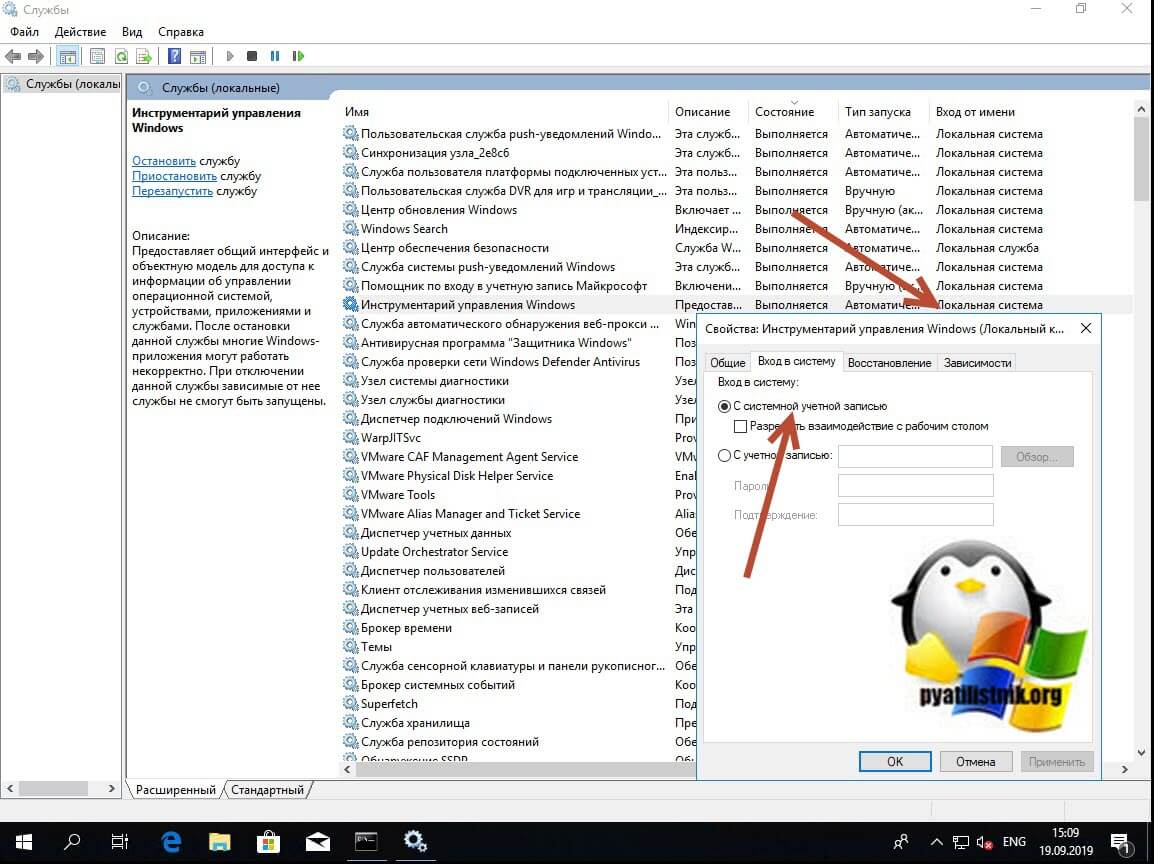
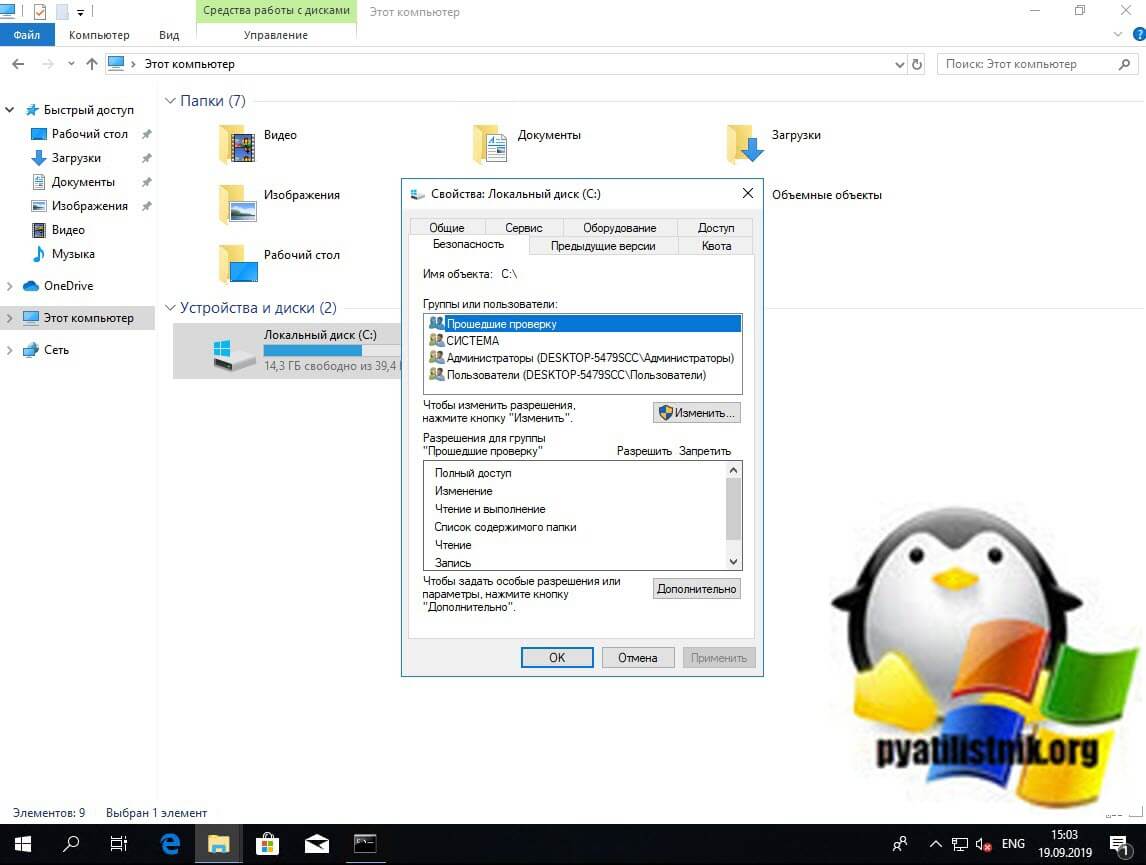
Учетная запись Ststem не отображается среди других учетных записей в диспетчере пользователей, но зато вы ее легко можете увидеть на вкладке «Безопасность» у любого системного диска, файла. куста реестра или папки. По умолчанию для учетной записи «Система (System)» предоставлены права полного доступа.
Служба, которая запускается в контексте учетной записи LocalSystem, наследует контекст обеспечения безопасности Диспетчера управления службами (SCM). Пользовательский идентификатор безопасности (SID) создается из значения SECURITY_LOCAL_SYSTEM_RID. Учетная запись не связывается с учетной записью любого пользователя, который начал работу. Она имеет несколько значений:
- Ключ реестра HKEY_CURRENT_USER связан с пользователем по умолчанию, а не текущим пользователем. Чтобы обратиться к профилю другого пользователя, имитируйте этого пользователя, а затем обратитесь к HKEY_CURRENT_USER.
- Служба может открыть ключ реестра HKEY_LOCAL_MACHINE\SECURITY.
- Служба представляет мандат компьютера для удаленного сервера. Если служба открывает командное окно (на экране дисплея) и запускает командный файл, пользователь должен нажать CTRL+C, чтобы закончить работу командного файла и получить доступ к окну команды с привилегиями LocalSystem.
Привилегии LocalSystem
- SE_ASSIGNPRIMARYTOKEN_NAME
- SE_AUDIT_NAME
- SE_BACKUP_NAME
- SE_CHANGE_NOTIFY_NAME
- SE_CREATE_PAGEFILE_NAME
- SE_CREATE_PERMANENT_NAME
- SE_CREATE_TOKEN_NAME
- SE_DEBUG_NAME
- SE_INC_BASE_PRIORITY_NAME
- SE_INCREASE_QUOTA_NAME
- SE_LOAD_DRIVER_NAME
- SE_LOCK_MEMORY_NAME
- SE_PROF_SINGLE_PROCESS_NAME
- SE_RESTORE_NAME
- SE_SECURITY_NAME
- SE_SHUTDOWN_NAME
- SE_SYSTEM_ENVIRONMENT_NAME
- SE_SYSTEM_PROFILE_NAME
- SE_SYSTEMTIME_NAME
- SE_TAKE_OWNERSHIP_NAME
- SE_TCB_NAME
- SE_UNDOCK_NAME
Сценарии вызова командной строки из под System
Давайте приведу интересную задачку по нашей теме. Предположим у вас есть доменная среда Active Directory. Вы с помощью инструмента групповой политики или SCCM развернули специализированное ПО, под названием StaffCop, или что-то другое. В момент развертывания или последующей настройки вы задали так, что пользователь даже при наличии прав локального администратора в своей системе не может останавливать службу и менять ее тип запуска, вопрос может ли локальный администратор это поправить и выключить службу?
Способы вызвать командную строку от имени системы
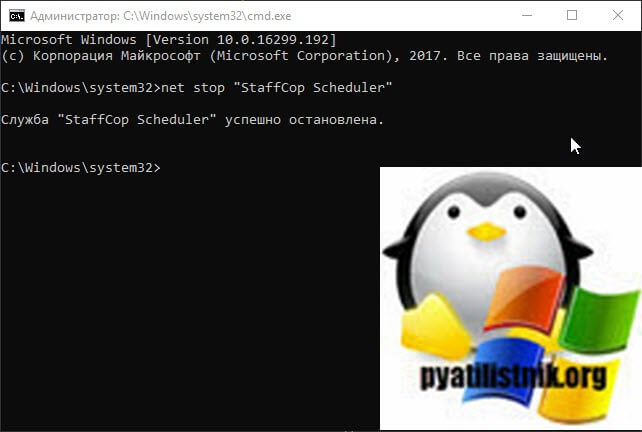
Я очень давно занимаюсь системным администрированием и уяснил давно принцип, если у вас есть права локального администратора, то вы можете все. Обойти любые ограничения и политики. Напоминаю. что я для тестирования развернул агента StaffCop, это такая программа для слежки, которую используют всякие шарашкины конторы. Агент по умолчанию запрещает выключение службы и изменение ее типа. Выглядит, это вот таким образом. Служба работает, имеет имя StaffCop Scheduler, но вот сделать с ней ничего не получается, все не активно.

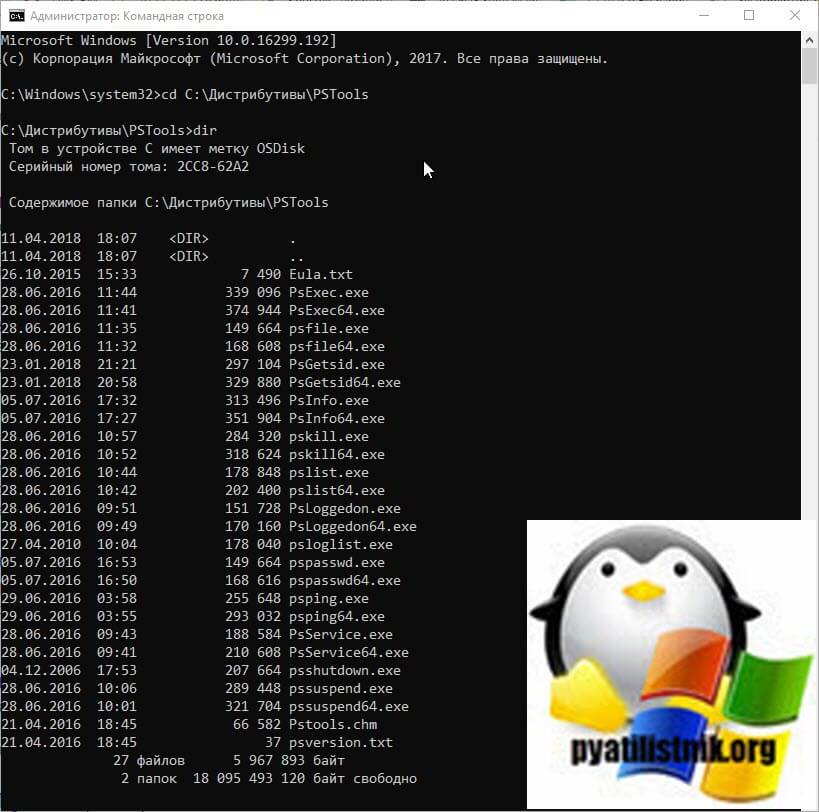
Для того, чтобы вызвать cmd от имени системы, вам необходимо скачать замечательный набор утилит PSTools, а конкретно нам будет нужна утилита PsExec.exe или PsExec64.exe. Если вы мой постоянный читатель, то вы помните, что я их использовал, чтобы удаленно включить RDP доступ на сервере. Скачать сборник PSTools можно с официального сайта по ссылке ниже, или же у меня с сайта.
Далее вам необходимо распаковать zip архив, в результате чего будет вот такой список утилит.

Теперь когда подготовительный этап готов, то можно продолжать. Откройте обязательно командную строку от имени администратора и введите команду:
Мой пример: cd C:\Дистрибутивы\PSTools
Командой dir я проверил, что это та папка и я вижу нужные мне утилиты PsExec.exe или PsExec64.exe.
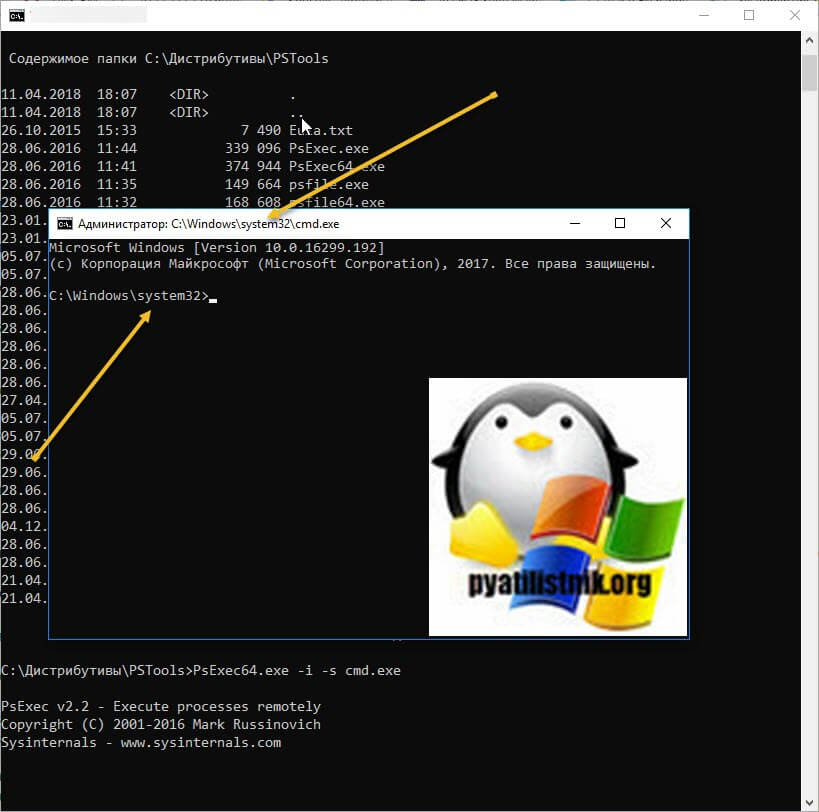
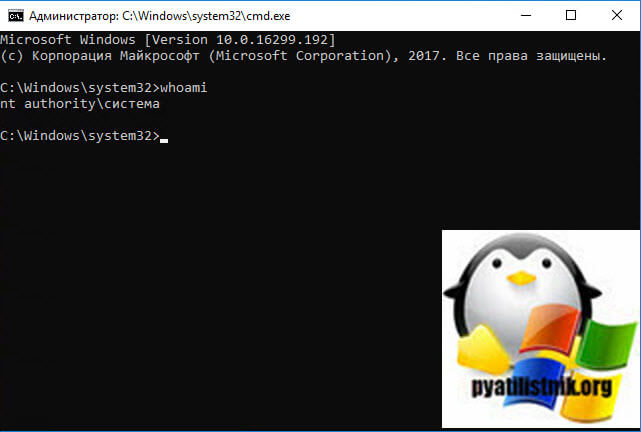
Последним шагом мы текущее окно командной строки из под текущего пользователя перезапустим от имени Local System. Пишем:
В итоге я вижу, что у меня открылось новое окно командной строки и оно уже работает в контексте «C:\Windows\system32>«, это и означает учетную запись Local System (Системная учетная запись)
Теперь давайте из под нее попробуем остановить нашу службу StaffCop Scheduler. Для этого есть ряд команд:
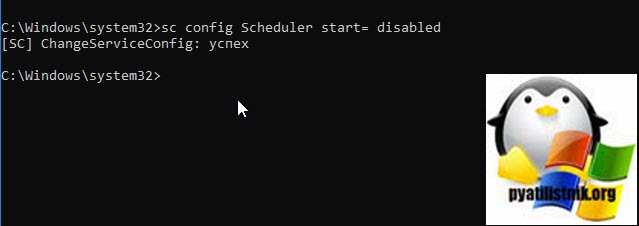
Далее вам необходимо изменить тип запуска и поменять с автоматического на отключена. Для этого пишем команду:
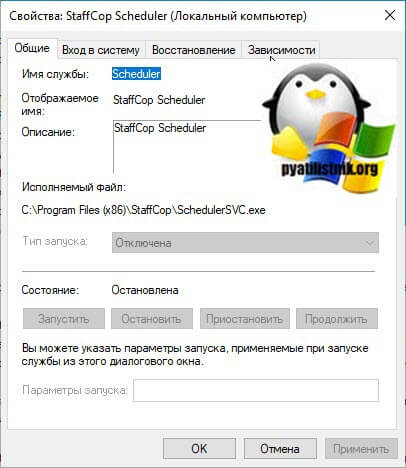
Как видим все успешно отработало. Если посмотреть оснастку «Службы», то видим вот такую картину.
Так, что имея права локального администратора и утилиту PsExec.exe, можно делать что угодно. Надеюсь, что вы теперь будите чаще вызывать окно командной строки от имени учетной записи системы. Давайте с вами напишем небольшой батник, который будет из ярлыка вызывать cmd от имени Local System. Создадим тестовый файл, поменяем ему сразу расширение с txt на cmd и откроем его текстовым редактором. Пропишем код:
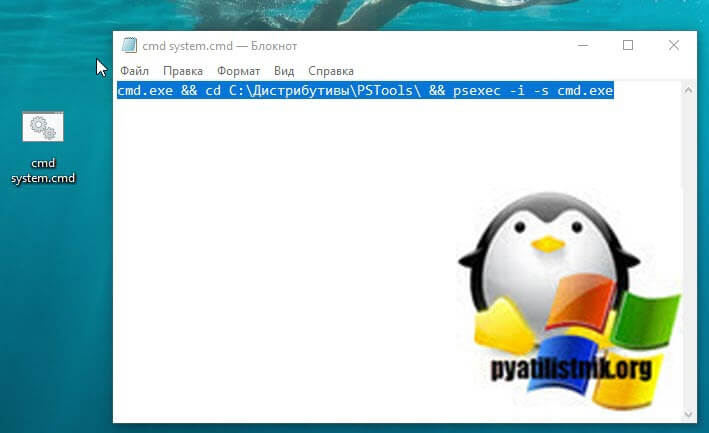
Щелкаем по файлу правым кликом и выбираем пункт «Запуск от имени администратора». В результате чего у вас сразу будет запущено окно cmd с правами учетной записи SYSTEM. Проверить, это можно введя команду whoami. Ответ NT AUTORITY\СИСТЕМА.
Если нужно запустить удаленно командную строку от имени NT AUTORITY\СИСТЕМА, то выполните такую конструкцию
LocalSystem Account
The LocalSystem account is a predefined local account used by the service control manager. This account is not recognized by the security subsystem, so you cannot specify its name in a call to the LookupAccountName function. It has extensive privileges on the local computer, and acts as the computer on the network. Its token includes the NT AUTHORITY\SYSTEM and BUILTIN\Administrators SIDs; these accounts have access to most system objects. The name of the account in all locales is .\LocalSystem. The name, LocalSystem or ComputerName\LocalSystem can also be used. This account does not have a password. If you specify the LocalSystem account in a call to the CreateService or ChangeServiceConfig function, any password information you provide is ignored.
A service that runs in the context of the LocalSystem account inherits the security context of the SCM. The user SID is created from the SECURITY_LOCAL_SYSTEM_RID value. The account is not associated with any logged-on user account. This has several implications:
- The registry key HKEY_CURRENT_USER is associated with the default user, not the current user. To access another user’s profile, impersonate the user, then access HKEY_CURRENT_USER.
- The service can open the registry key HKEY_LOCAL_MACHINE\SECURITY.
- The service presents the computer’s credentials to remote servers.
- If the service opens a command window and runs a batch file, the user could hit CTRL+C to terminate the batch file and gain access to a command window with LocalSystem permissions.
The LocalSystem account has the following privileges:
- SE_ASSIGNPRIMARYTOKEN_NAME (disabled)
- SE_AUDIT_NAME (enabled)
- SE_BACKUP_NAME (disabled)
- SE_CHANGE_NOTIFY_NAME (enabled)
- SE_CREATE_GLOBAL_NAME (enabled)
- SE_CREATE_PAGEFILE_NAME (enabled)
- SE_CREATE_PERMANENT_NAME (enabled)
- SE_CREATE_TOKEN_NAME (disabled)
- SE_DEBUG_NAME (enabled)
- SE_IMPERSONATE_NAME (enabled)
- SE_INC_BASE_PRIORITY_NAME (enabled)
- SE_INCREASE_QUOTA_NAME (disabled)
- SE_LOAD_DRIVER_NAME (disabled)
- SE_LOCK_MEMORY_NAME (enabled)
- SE_MANAGE_VOLUME_NAME (disabled)
- SE_PROF_SINGLE_PROCESS_NAME (enabled)
- SE_RESTORE_NAME (disabled)
- SE_SECURITY_NAME (disabled)
- SE_SHUTDOWN_NAME (disabled)
- SE_SYSTEM_ENVIRONMENT_NAME (disabled)
- SE_SYSTEMTIME_NAME (disabled)
- SE_TAKE_OWNERSHIP_NAME (disabled)
- SE_TCB_NAME (enabled)
- SE_UNDOCK_NAME (disabled)
Most services do not need such a high privilege level. If your service does not need these privileges, and it is not an interactive service, consider using the LocalService account or the NetworkService account. For more information, see Service Security and Access Rights.
Local Accounts
Applies to
- Windows 10
- Windows Server 2019
- Windows Server 2016
This reference topic for IT professionals describes the default local user accounts for servers, including how to manage these built-in accounts on a member or standalone server.
About local user accounts
Local user accounts are stored locally on the server. These accounts can be assigned rights and permissions on a particular server, but on that server only. Local user accounts are security principals that are used to secure and manage access to the resources on a standalone or member server for services or users.
This topic describes the following:
For information about security principals, see Security Principals.
Default local user accounts
The default local user accounts are built-in accounts that are created automatically when you install Windows.
After Windows is installed, the default local user accounts cannot be removed or deleted. In addition, default local user accounts do not provide access to network resources.
Default local user accounts are used to manage access to the local server’s resources based on the rights and permissions that are assigned to the account. The default local user accounts, and the local user accounts that you create, are located in the Users folder. The Users folder is located in the Local Users and Groups folder in the local Computer Management Microsoft Management Console (MMC). Computer Management is a collection of administrative tools that you can use to manage a single local or remote computer. For more information, see How to manage local accounts later in this topic.
Default local user accounts are described in the following sections.
Administrator account
The default local Administrator account is a user account for the system administrator. Every computer has an Administrator account (SID S-1-5-domain-500, display name Administrator). The Administrator account is the first account that is created during the Windows installation.
The Administrator account has full control of the files, directories, services, and other resources on the local computer. The Administrator account can create other local users, assign user rights, and assign permissions. The Administrator account can take control of local resources at any time simply by changing the user rights and permissions.
The default Administrator account cannot be deleted or locked out, but it can be renamed or disabled.
In Windows 10 and Windows Server 2016, Windows setup disables the built-in Administrator account and creates another local account that is a member of the Administrators group. Members of the Administrators groups can run apps with elevated permissions without using the Run as Administrator option. Fast User Switching is more secure than using Runas or different-user elevation.
Account group membership
By default, the Administrator account is installed as a member of the Administrators group on the server. It is a best practice to limit the number of users in the Administrators group because members of the Administrators group on a local server have Full Control permissions on that computer.
The Administrator account cannot be deleted or removed from the Administrators group, but it can be renamed.
Security considerations
Because the Administrator account is known to exist on many versions of the Windows operating system, it is a best practice to disable the Administrator account when possible to make it more difficult for malicious users to gain access to the server or client computer.
You can rename the Administrator account. However, a renamed Administrator account continues to use the same automatically assigned security identifier (SID), which can be discovered by malicious users. For more information about how to rename or disable a user account, see Disable or activate a local user account and Rename a local user account.
As a security best practice, use your local (non-Administrator) account to sign in and then use Run as administrator to accomplish tasks that require a higher level of rights than a standard user account. Do not use the Administrator account to sign in to your computer unless it is entirely necessary. For more information, see Run a program with administrative credentials.
In comparison, on the Windows client operating system, a user with a local user account that has Administrator rights is considered the system administrator of the client computer. The first local user account that is created during installation is placed in the local Administrators group. However, when multiple users run as local administrators, the IT staff has no control over these users or their client computers.
In this case, Group Policy can be used to enable secure settings that can control the use of the local Administrators group automatically on every server or client computer. For more information about Group Policy, see Group Policy Overview.
NoteВ В Blank passwords are not allowed in the versions designated in the Applies To list at the beginning of this topic.
ImportantВ В Even when the Administrator account has been disabled, it can still be used to gain access to a computer by using safe mode. In the Recovery Console or in safe mode, the Administrator account is automatically enabled. When normal operations are resumed, it is disabled.
Guest account
The Guest account is disabled by default on installation. The Guest account lets occasional or one-time users, who do not have an account on the computer, temporarily sign in to the local server or client computer with limited user rights. By default, the Guest account has a blank password. Because the Guest account can provide anonymous access, it is a security risk. For this reason, it is a best practice to leave the Guest account disabled, unless its use is entirely necessary.
Account group membership
By default, the Guest account is the only member of the default Guests group (SID S-1-5-32-546), which lets a user sign in to a server. On occasion, an administrator who is a member of the Administrators group can set up a user with a Guest account on one or more computers.
Security considerations
When enabling the Guest account, only grant limited rights and permissions. For security reasons, the Guest account should not be used over the network and made accessible to other computers.
In addition, the guest user in the Guest account should not be able to view the event logs. After the Guest account is enabled, it is a best practice to monitor the Guest account frequently to ensure that other users cannot use services and other resources, such as resources that were unintentionally left available by a previous user.
HelpAssistant account (installed with a Remote Assistance session)
The HelpAssistant account is a default local account that is enabled when a Remote Assistance session is run. This account is automatically disabled when no Remote Assistance requests are pending.
HelpAssistant is the primary account that is used to establish a Remote Assistance session. The Remote Assistance session is used to connect to another computer running the Windows operating system, and it is initiated by invitation. For solicited remote assistance, a user sends an invitation from their computer, through e-mail or as a file, to a person who can provide assistance. After the user’s invitation for a Remote Assistance session is accepted, the default HelpAssistant account is automatically created to give the person who provides assistance limited access to the computer. The HelpAssistant account is managed by the Remote Desktop Help Session Manager service.
Security considerations
The SIDs that pertain to the default HelpAssistant account include:
SID: S-1-5- -13, display name Terminal Server User. This group includes all users who sign in to a server with Remote Desktop Services enabled. Note that, in Windows Server 2008, Remote Desktop Services are called Terminal Services.
SID: S-1-5- -14, display name Remote Interactive Logon. This group includes all users who connect to the computer by using a remote desktop connection. This group is a subset of the Interactive group. Access tokens that contain the Remote Interactive Logon SID also contain the Interactive SID.
For the Windows Server operating system, Remote Assistance is an optional component that is not installed by default. You must install Remote Assistance before it can be used.
For details about the HelpAssistant account attributes, see the following table.
HelpAssistant account attributes
| Attribute | Value |
|---|---|


