- Файл заблокирован процессом Windows, как снять блокировку?
- Как разблокировать файл с помощью Process Explorer?
- Сброс дескриптора файла с помощью утилиты Handle
- Release a File Lock in Windows
- How to remove locked files & folders on Windows 10 PC
- How can I remove locked files and folders?
- 1. Try to install Stellar BitRaser
- BitRaser
- 2. Delete the file from Command Prompt
- 3. Use Windows Recovery
- 4. Use dedicated software to manage your locked files
- IOBit Unlocker
Файл заблокирован процессом Windows, как снять блокировку?
Иногда при попытке удалить, переименовать или переместить какой-то файл в Windows вы можете получить сообщение, что файл занят/заблокирован/используется) другим процессом. Чаще всего имя программы, которая держит файл открытым указывается прямо в окне сообщения File Explorer. Чтобы снять блокировку файла достаточно просто закрыть эту программу. Но бывает ситуации, когда какой-то файл и библиотека используется неизвестным или системным процессом. В этом случае снять блокировку с файла немного сложнее.
Сообщение о блокировке файла может выглядеть по-разному. Например в следующем примере указан тип файла и с каким приложением он ассоциирован:
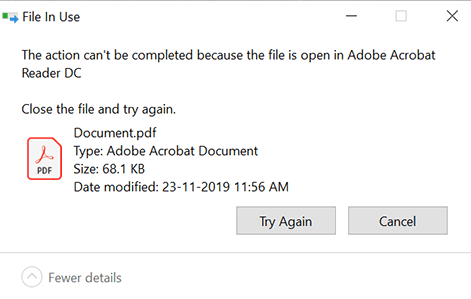
В этом случае вы можете легко понять какое приложение заблокировало файл и закрыть его.
Однако иногда можно увидеть более интересное сообщение, о том, что файл заблокирован неизвестным или системным процессом Windows. Это может быть, как процесс самой ОС Windows, так и другие процессе, работающий с правами System, например, антивирус, агент резервного копирования, база данных mssql и т.д.):
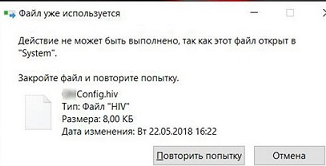
Попробуем разобраться, как понять какой программой, службой или системным процессом Windows занят файл, как разблокировать файл и можно ли разблокировать файл не закрывая родительский процесс.
Самый простой вариант разблокировать файл – завершить процесс, которые его заблокировал. Но это не всегда возможно, особенно на серверах.
Кроме того, это сторонняя утилита, при установке которой нужно быть внимательным, т.к. в процессе она предлагает установить пачку ненужные программы в нагрузку.
Когда процесс в Windows открывает файл, этому потоку ввода/вывода назначается файловый дескриптор (handler). Процесс и его дочерние процессы получают доступ к файлу по этому дескриптору. Через Window API вы можете послать сигнал файловой системе на освобождение данного дескриптора и снятие блокировки с файла.
Как разблокировать файл с помощью Process Explorer?
ProcessExplorer это бесплатная утилита из набора системных утилит Sysinternals, которую можно скачать на сайте Microsoft (https://docs.microsoft.com/en-us/sysinternals/downloads/process-explorer). Попробуем с помощью Process Explorer найти, какой процесс заблокировал определенный файл и освободить этот файл, сбросив файловый дескриптор процесса.
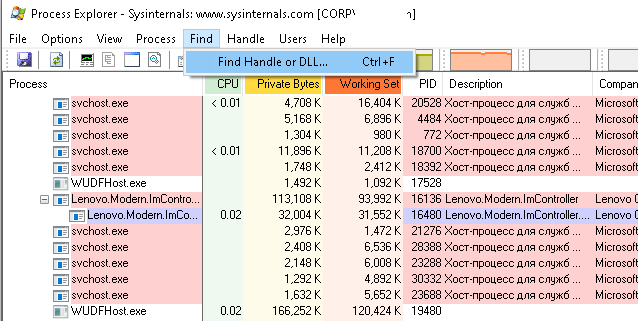
- ProcessExplorer не требует установки, просто скачайте распакуйте и запустите с правами администратора procexp.exe ;
- Выберите меню Find ->Find Handle or DLL (или нажмите Ctrl-F );

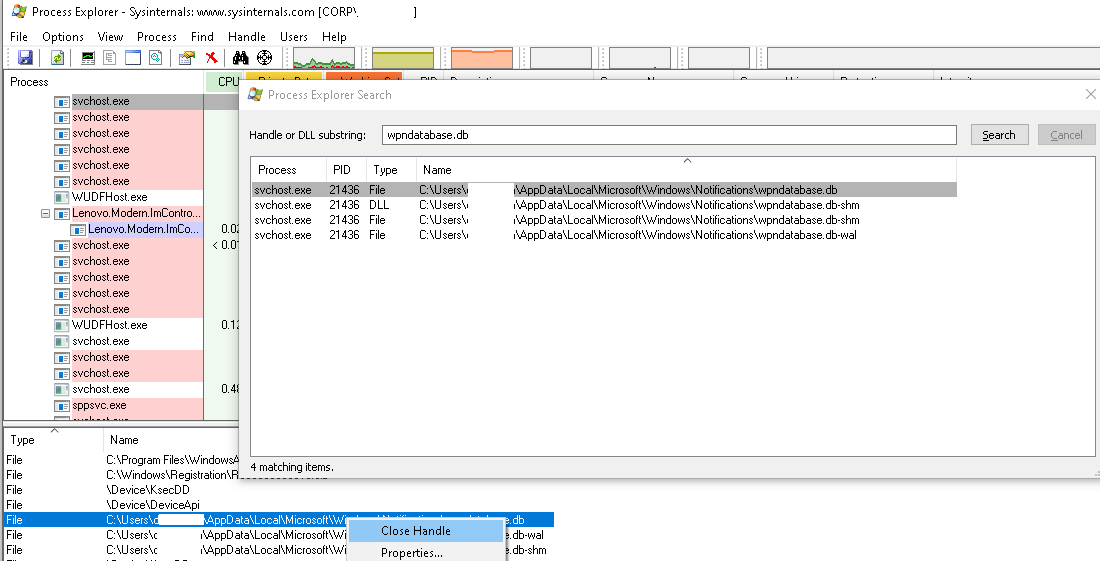
- Укажите имя файла, который нужно разблокировать и нажмите Search;
- Выберите нужный файл. Процесс, который открыл файлы будет выделен в дереве процессов. Можно завершить этот процесс, щелкнув по нему правой кнопкой и выбрав Kill Process Tree. Но можно попробовать закрыть дескриптор файла, не завершая процесс целиком. Дескриптор файла, который вы искали, автоматически выделяется в нижней панели Process Explorer. Щелкните по дескриптору правой кнопкой и выберите Close handle. Подтвердите закрытие файла.
Итак, вы закрыли дескриптор файла, не завершая родительский процесс. Теперь вы можете спокойно удалить или переименовать файл.
Сброс дескриптора файла с помощью утилиты Handle
Handle – это еще одна утилита командной строки из комплекта инструментов Sysinternals (доступна для скачивания на сайте Microsoft (https://docs.microsoft.com/en-us/sysinternals/downloads/handle. Она позволяет найти процесс, который заблокировал ваш файл и снять блокировку, освободив дескриптор.
- Скачайте и распакуйте архив с утилитой Handle;
- Запустите командную строку с правами администратора и выполните команду: handle64.exe > listproc.txt Данная команда сохранит список открытых дескрипторов в файл. Можно вывести дескрипторы для каталога, в котором находится файл, который вы хотите изменить: Handle64.exe -a C:\Some\Path или конкретного процесса: handle64.exe -p winword.exe
- Откройте файл listproc.txt в любом текстовом редакторе и найдите строку, в которой указано имя заблокированного файла. Скопируйте ID дескриптора файла (значение в hex формате). Затем поднимитесь немного выше к разделу, в котором указан процесс, являющийся владельцем данного дескриптора и запишите его ID. Для процесса запущенного от имени системы скорее всего будет PID 4.
 Данная команда сохранит список открытых дескрипторов в файл. Можно вывести дескрипторы для каталога, в котором находится файл, который вы хотите изменить: Handle64.exe -a C:\Some\Path или конкретного процесса: handle64.exe -p winword.exe
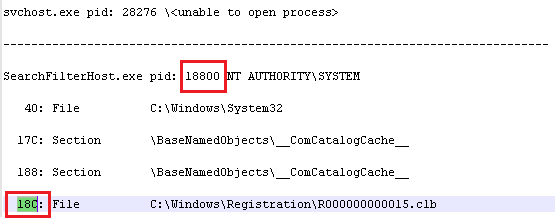
Если система отреагирует на закрытие файла корректно, вы разблокируете ваш файл без необходимости завершать процесс или перезагружать сервер/компьютер.
Release a File Lock in Windows
By Mitch Bartlett 10 Comments
If you work in IT, you’re probably familiar with Microsoft Windows users constantly locking files where others are not able to edit them. The problem of locked files seems to be most common with Microsoft Excel users.
It’s very common for users to leave an Excel spreadsheet open, causing an “Excel is locked for editing by another user” error to display for other users attempting to make changes to the spreadsheet.
If you have admin rights, you can force a disconnect and release the file lock using these steps.
Note: If you do not have permissions to release file locks, you may want to ask a person who does to grant you access or ask them to perform these steps.
- Hold the Windows Key and press “R” to bring up the Windows Run dialog screen.
- Type “mmc“, then press “Enter“.
- Go to “File” > “Add/Remove Snap-in…“.
- Scroll down and select “Shared Folders“, then choose “Add“.
- Select “Local computer” if you are logged into the computer or server where the file resides. Otherwise, select “Another computer“, then type the Computer Name of the other computer. You may also select “Browse…” to find the computer name.
- Select “Finish“.
- Select “OK“.
- Expand “Shared Folders“, then select “Open Files“.
- Find the file that is locked, then right-click it and choose “Close Open File“.
Now if you have the other user close the application, then re-open the file, they should be able to edit it without a locking issue.
This post applies to Windows 10, 7, 8, Server 2008, and Server 2012.
How to remove locked files & folders on Windows 10 PC

- Dealing with stubborn files and folders can be a nuisance. Even so, we have the right fixes for you.
- To remove those locked files in no time, you can try to delete them from Command Prompt.
- Take a look at these great file encryption software tools as well. In this way, you’ll be able to prevent similar situations from happening in the future.
- Don’t be shy to explore our File Removal Hub too. You won’t walk away disappointed.

For a Windows user, it’s possible that at one time or the other, there might be a situation in which the computer’s disk space gets crowded.
There might be attempts by the user to get rid of unneeded files without success.
When trying to delete an unneeded item, an annoying dialog box pops up, indicating that the action is not permitted as a result of a locked file.
The inability to delete a file or folder may either be because it’s locked (encrypted with a security code or password) or because the file is open in a program.
Sometimes, it may be a background program that is preventing the file from being deleted. To completely get rid of the locked files/folders, follow the procedures listed below.
How can I remove locked files and folders?
1. Try to install Stellar BitRaser
If you’re unable to delete user folders in Windows 10 using conventional methods, you might want to try a different, more professional approach.
Using dedicated file erasure software such as Stellar BitRaser comes with many advantages one of which is permanently erasing files that are beyond the scope of data recovery.
By securely erasing confidential data from all devices (running on Windows and Mac as well), servers, and partitions, this privacy safeguarding software meets all your media sanitization requirements.
Using it is as simple as a breeze too: all you need to do is download the.EXE file, install the tool, select the items you want to erase, and Delete.
BitRaser
2. Delete the file from Command Prompt

- Start the Command Prompt as an Administrator to activate user privileges.
- Type CD to open the root folder.
- Then type DEL filename (with extension) /F /Q where filename represents the name of the locked file to be deleted.
- Press Enter and the file will be gone.
A locked file can be deleted from the Windows Command Prompt. All that is needed is to launch the Command Prompt by typing cmd into the Windows search bar from the Start menu.
Some locked files may not be this easy to remove. This might prompt going the extra mile by trying out the Windows Recovery method described below. Alternatively, you can download software to fix this.
3. Use Windows Recovery

- Switch the computer off and insert the windows re-installation disc into the disc drive.
- Turn the PC on, and let it boot (not from the hard disk this time but from the disc).
- Put the computer into the recovery console mode by pressing the key R on the keyboard: this mode is a troubleshooting option built into windows.
- In the recovery mode, go to the location of the locked file using the Command Prompt. For example, a command like cd C: Documents Settings My Documents filename
- The pattern given in this example should be followed using the directory of the locked file to be deleted.
- After locating the file, it can be removed by typing in del and to leave the recovery mode. Type the command exit and restart the computer.
Windows Recovery is another method by which locked files can easily be deleted. Refer to the above procedure in that regard.
4. Use dedicated software to manage your locked files
There are a number of software tools that can be downloaded and used to manage locked files from the PC. Here are a few options:
4.1. IOBit Unlocker

This is a handy software that can unlock and manage the files and folders to keep them safe and available. What’s more, IOBit Unlocker is incredibly easy to use.
All you need to do is to drag and drop the locked file or folder into the software’s interface and choose the delete option (or unlock, rename, move, copy, and so on, according to your specific needs).
It also provides details about the location of the file and directory alongside the details of the process, so you’ll easily use it even if you’re not a pro.
IOBit Unlocker
4.2. Process Explorer
A renowned software called the Process Explorer comes in a similar format to the Windows Task Manager.
It’s easy to use and doesn’t require installation, all that is needed is to run it and allow administrator permission, then follow these steps.
- Go the File menu on the menu tab and choose show details for all processes.
- While still on the menu tab, select the Find option, and click on Find Handle or DLL.
- Enter the name of the locked folder in the search field of the process explorer task manager.
- Choose the locked file and check out the handle in the details section below the window.
- In the same manner that the process can be ended on the regular windows task manager: right-click on the filehandle and click on close handle.
- You would have effectively stopped it from running in the background and stop it from getting deleted. You can now go back to the file location and delete the file.

4.3. LockHunter
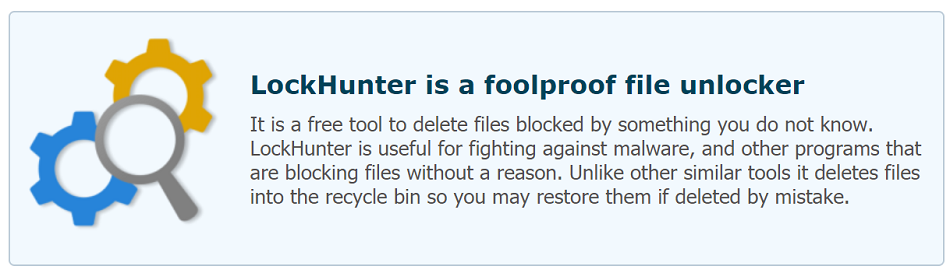
This comes in as a very helpful software. LockHunter also helps in identifying the particular program that is keeping the file locked.
Going forward, the processes can be stopped in an expedited manner before the file gets deleted.
Lockhunter doesn’t permanently remove the file. However, it sends the file to the recycle bin allowing the user the chance of restoring the file if need be.
4.4. FileASSASSIN

This is an easy to use software tool and its line of action is similar to 10bitunlocker. It is useful in deleting locked files especially those that are inaccessible due to a virus or other malware.
- Access FileASSASSIN on the computer.
- Drag the locked file or folder into the FileASSASSIN text area.
- Select how exactly how the file or folder should be deleted from the various menu options and click on execute to get the file deleted.
- Access to the files will be possible using the FileASSASSIN thereafter.
Depending on which of these options are a point of interest, deleting a locked file should not pose a problem anymore.
What software are you using to deal with locked folders in Windows 10? Share your experience with us via the comments section below.


