- How to Show/Hide All User Accounts from Login Screen in Windows 10?
- How to Hide User Account from Windows Logon Screen?
- How to Show All Local User Account on Login Screen in Windows 10?
- Showing Logged Domain Users on Windows 10 Login Screen
- How to Hide Specific User Account from the Sign-in Screen?
- Related Reading
- How to Run Windows File Explorer Elevated (as.
- Using Malicious Software Removal Tool (MRT.exe) on Windows
- How to Clean Up Large System Volume Information.
- How to Disable NetBIOS and LLMNR Protocols in.
- Enable Windows Lock Screen after Inactivity via GPO
- 21 comments
- How to check that no users are logged in with C# on Windows 7?
- 4 Answers 4
How to Show/Hide All User Accounts from Login Screen in Windows 10?
By default, the logon screen in Windows 10/8.1 and Windows Server 2016/2012 R2 displays the account of the last user who logged in to the computer (if the user password is not set, this user will be automatically logged on, even if the autologon is not enabled). However, it is possible to display all user accounts on the welcome screen in Windows 10. You can configure different behavior of this function: you can show the last logon username, hide it, or even list all local or logged domain users.
How to Hide User Account from Windows Logon Screen?
Displaying the account name on the Windows login screen is convenient for users, but reduces the computer security. An attacker who gained local access to a computer will have to pick up only a password (for this there are various ways of social engineering, brute force attacks, or a banal sticker with a password on the monitor).
You can hide the last logged user name on a Windows welcome screen through the GPO. Open the domain (gpmc.msc) or local (gpedit.msc) Group Policy editor and go to the section Computer Configuration -> Windows Settings -> Security Settings -> Local Policies -> Security Options. Enable the policy “Interactive logon: Do not display last user name”. By default, this policy is disabled.
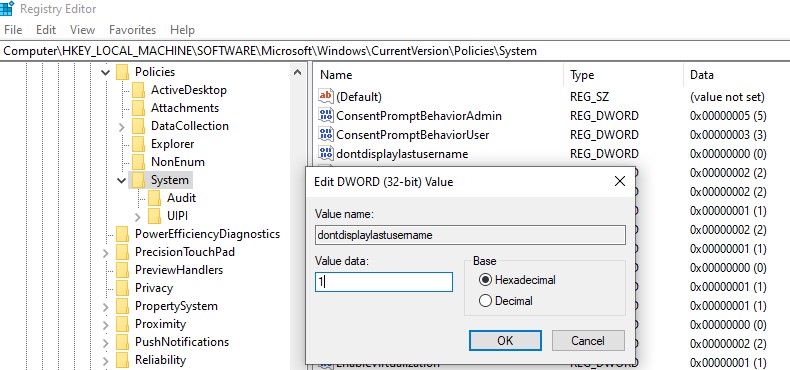
Also, you can hide the username on the login screen through the registry. To do this go to the registry key HKEY_LOCAL_MACHINE\SOFTWARE\Microsoft\Windows\CurrentVersion\Policies\System, create a new DWORD parameter named dontdisplaylastusername with the value 1.
Additionally, you can hide the username on a locked computer. To do this, in the same GPO section you need to enable the policy “Interactive logon: Display user information when the session is locked” and select the value “Do not display user information”.
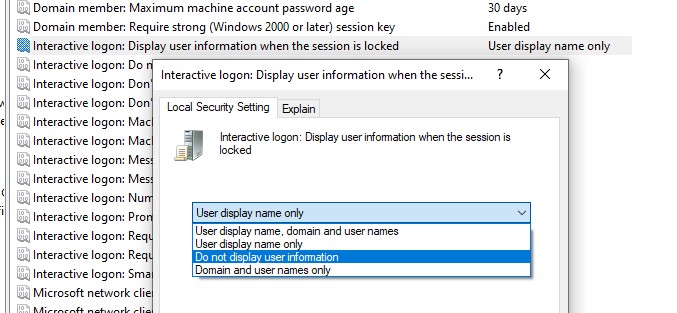
A registry parameter named DontDisplayLockedUserId in the same registry key with a value of 3 corresponds to this policy setting.
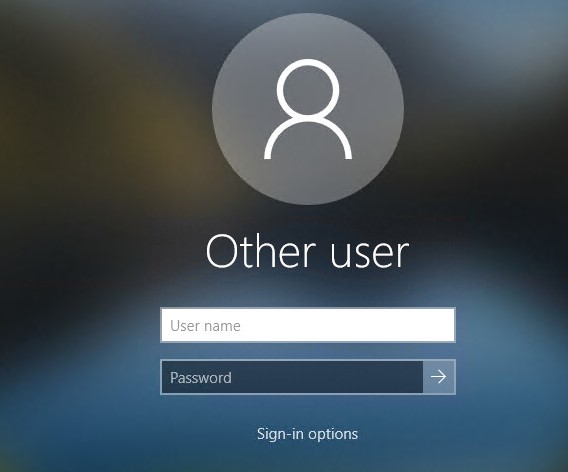
Now on the computer login screen and on the Windows lock screen, an empty fields for entering a username and password are displayed.
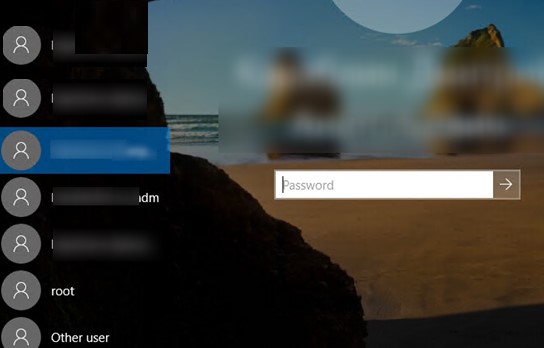
How to Show All Local User Account on Login Screen in Windows 10?
In Windows 10 / 8.1, you can list all local user accounts on the welcome screen. To log in to the computer, the user just needs to click on the desired account and specify its password.
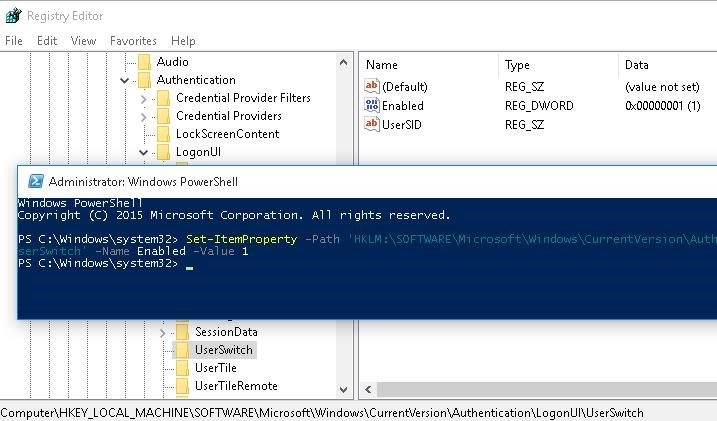
To display all local users on the Windows login screen, you need to change the value of Enabled parameter to 1 in the following registry key: HKEY_LOCAL_MACHINE\SOFTWARE\Microsoft\Windows\CurrentVersion\Authentication\LogonUI\UserSwitch. You can change this parameter through the RegEdit GUI, Reg Add cli command or Set-ItemProperty PowerShell cmdlet:
Reg Add HKLM\SOFTWARE\Microsoft\Windows\CurrentVersion\Authentication\LogonUI\UserSwitch /v Enabled /t REG_DWORD /d 1 /f
Set-ItemProperty -Path ‘HKLM:\SOFTWARE\Microsoft\Windows\CurrentVersion\Authentication\LogonUI\UserSwitch’ -Name Enabled -Value 1
However, the Windows automatically resets the value of the Enabled parameter to 0 at each user logon. In order to always change the registry value to 1, it’s easier to create a new task in the Task Scheduler that will run at user logon.
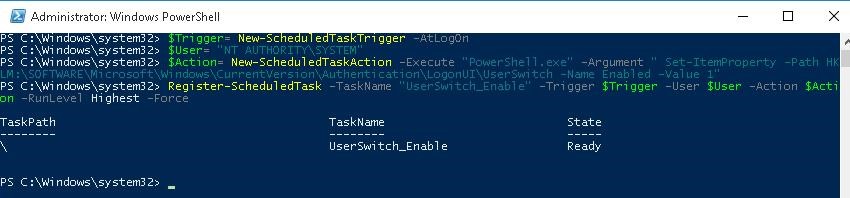
The Scheduler task must run one of the commands shown above. You can create this task manually using the taskschd.msc graphic console. But it seems to me that it is much easier to create a Scheduler task using PowerShell. In our case, the commands to create a new task may look as follows:
$Trigger= New-ScheduledTaskTrigger -AtLogOn
$User= «NT AUTHORITY\SYSTEM»
$Action= New-ScheduledTaskAction -Execute «PowerShell.exe» -Argument «Set-ItemProperty -Path HKLM:\SOFTWARE\Microsoft\Windows\CurrentVersion\Authentication\LogonUI\UserSwitch -Name Enabled -Value 1»
Register-ScheduledTask -TaskName «UserSwitch_Enable» -Trigger $Trigger -User $User -Action $Action -RunLevel Highest –Force
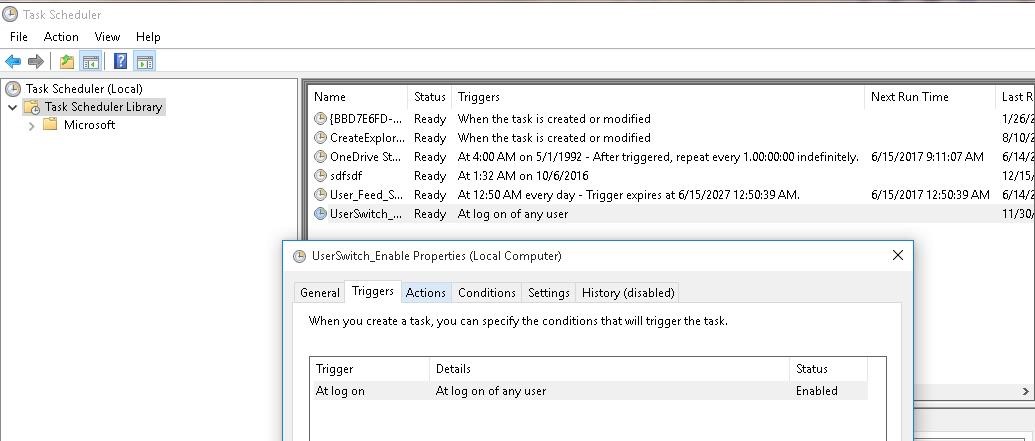
Make sure that the task appeared in Windows Task Scheduler (taskschd.msc).
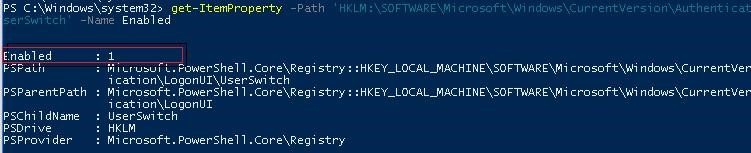
Log off and then log on again. The task must start automatically and change the value of Enabled registry parameter to 1. Check the current value of the parameter. As you can see, it is 1:
get-ItemProperty -Path ‘HKLM:\SOFTWARE\Microsoft\Windows\CurrentVersion\Authentication\LogonUI\UserSwitch’ -Name Enabled
After the next reboot, all local user accounts will be displayed on Windows 10/8.1 logon screen instead of the last one.
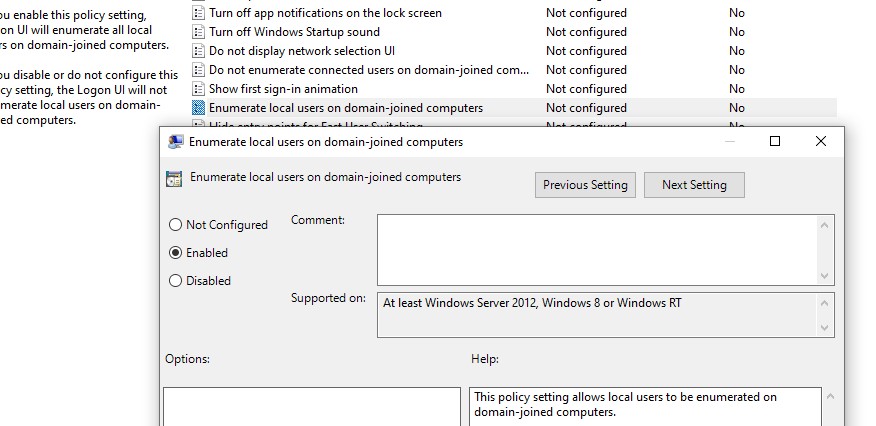
There is a separate group policy setting that makes it much easier to list local users account on the Welcome screen of the domain-joined computers. Open the GPO editor, go to the section Computer Configuration -> Administrative Templates -> System -> Logon and enable the policy “Enumerate local users on domain-joined computers”.
Showing Logged Domain Users on Windows 10 Login Screen
If several domain users use one computer, on the welcome screen you can display a list of users who have local active/disconnected session (users will only be displayed if they are logged in, for example, when using public computers, kiosks, an RDS server or its Windows 10 analogue).
To do this, check that in the Computer Configuration -> Windows Settings -> Security Settings -> Local Policies -> Security Options the following policies are disabled:
- Interactive logon: Don’t display last signed-in: Disabled
- Interactive logon: Don’t display username at sign-in: Disabled
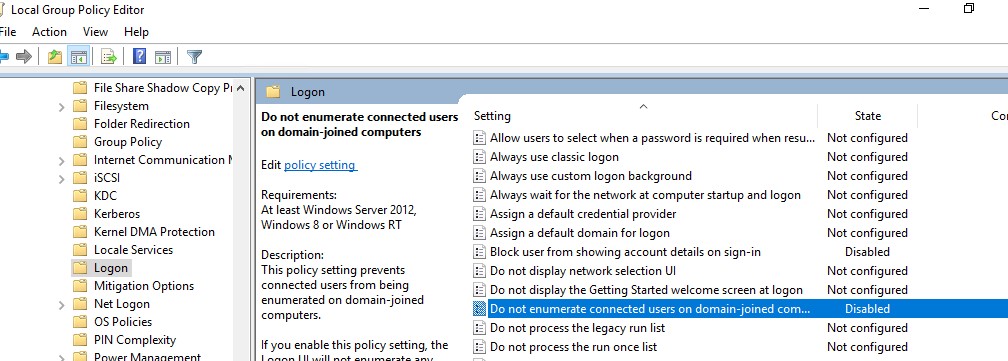
Then disable the policies in the section Computer Configuration -> Administrative Templates -> System -> Logon:
- Block user from showing account details on sign-in: Disabled
- Do not enumerate connected users on domain-joined computer: Disabled
After that, the welcome screen will display a list of accounts with active sessions that have logged in but have been disconnected. It is enough for the user to log in once, and after that just select an account from the list and enter the password.
How to Hide Specific User Account from the Sign-in Screen?
The Windows Welcome screen displays users who are members of one of the following local groups: Administrators, Users, Power Users, Guests.
You can hide any user from the list on the Windows 10 sign-in screen by running the command:
reg add «HKLM\SOFTWARE\Microsoft\Windows NT\CurrentVersion\Winlogon\SpecialAccounts\UserList» /t REG_DWORD /f /d 0 /v UserName
Managing Exchange Mailbox Inbox Rules with PowerShell
How to Delegate Control and Administrator Privileges in Active Directory?
Related Reading
How to Run Windows File Explorer Elevated (as.
Using Malicious Software Removal Tool (MRT.exe) on Windows
How to Clean Up Large System Volume Information.
How to Disable NetBIOS and LLMNR Protocols in.
Enable Windows Lock Screen after Inactivity via GPO
21 comments
Mine displays all of the accounts by default. How come?
This is absurd. If this is actually the setting- which has taken an hour of googling to find- to show all the local users on the login screen, the fact that it has to be set and then a timed script created to keep it set is… nucking futs. What a hate joke of an OS.
I agree completely. It’s as if none of the developers considered the basics only the settings one would need to perform a hostile takeover of IBM. I’ve been chasing a way for days to login as any other user in Windows 10. There’s no way to switch users and no solution anywhere. Ask Microsoft? Their response is “There’s no way to switch users in Windows 10? Have you tried logging out?” (Almost took a hostage.)
Arf! This is not about local account, but this tuto is about domain account. When you have severals doamain users on the same domain computer, its interresting to show all users account on the start menu.
By default, they have to choose “other user” and type both their ID and password. So with this method, they just have to click on appropriate username and type password.
For information, this doesn’t work. Scheduled task is working on all users, the reg value switch from 0 to 1 at startup for all users but on startup screen, only last user logged appear.
Not working. MS probably killed it in an update.
You have to change the permissions of the userswitch reg key : change the owner to Admin group and enable full control of the key for Admin and disable the write permission for SYSTEM. This is working since Windows 8.
@Roland – not an adminstrator but often end up having to do deskside support. How do I do what you suggested?
Try to run this powershell script as admin :
## Taken from P/Invoke.NET with minor adjustments.
$Definition = @’
using System;
using System.Runtime.InteropServices;
public class AdjPriv <
[DllImport(“advapi32.dll”, ExactSpelling = true, SetLastError = true)]
internal static extern bool AdjustTokenPrivileges(IntPtr htok, bool disall,
ref TokPriv1Luid newst, int len, IntPtr prev, IntPtr rele);
[DllImport(“advapi32.dll”, ExactSpelling = true, SetLastError = true)]
internal static extern bool OpenProcessToken(IntPtr h, int acc, ref IntPtr phtok);
[DllImport(“advapi32.dll”, SetLastError = true)]
internal static extern bool LookupPrivilegeValue(string host, string name,
ref long pluid);
[StructLayout(LayoutKind.Sequential, Pack = 1)]
internal struct TokPriv1Luid <
public int Count;
public long Luid;
public int Attr;
>
internal const int SE_PRIVILEGE_ENABLED = 0x00000002;
internal const int TOKEN_QUERY = 0x00000008;
internal const int TOKEN_ADJUST_PRIVILEGES = 0x00000020;
public static bool EnablePrivilege(long processHandle, string privilege) <
bool retVal;
TokPriv1Luid tp;
IntPtr hproc = new IntPtr(processHandle);
IntPtr htok = IntPtr.Zero;
retVal = OpenProcessToken(hproc, TOKEN_ADJUST_PRIVILEGES | TOKEN_QUERY,
ref htok);
tp.Count = 1;
tp.Luid = 0;
tp.Attr = SE_PRIVILEGE_ENABLED;
retVal = LookupPrivilegeValue(null, privilege, ref tp.Luid);
retVal = AdjustTokenPrivileges(htok, false, ref tp, 0, IntPtr.Zero,
IntPtr.Zero);
return retVal;
>
>
‘@
# Take ownership privilege
$ProcessHandle = (Get-Process -id $pid).Handle
$type = Add-Type $definition -PassThru
for ($i=1; $i -le 10;$i++) <
$status=$type[0]::EnablePrivilege($processHandle, “SeTakeOwnershipPrivilege”)
if ($status)
if ($i -eq 10)
start-sleep 1|out-null
>
#
$keypath=”SOFTWARE\Microsoft\Windows\CurrentVersion\Authentication\LogonUI\UserSwitch”
#
# Get localized admin group name
$admin=(get-wmiobject win32_group| Where-Object <$_.sid -eq “s-1-5-32-544”>).name
# Change Owner to the local Administrators group
$regKey = [Microsoft.Win32.Registry]::LocalMachine.OpenSubKey(“$keypath”, “ReadWriteSubTree”, “TakeOwnership”)
$regACL = $regKey.GetAccessControl()
$regACL.SetOwner([System.Security.Principal.NTAccount]”$admin”)
$regKey.SetAccessControl($regACL)
# Change Permissions for the local Administrators group
$regKey = [Microsoft.Win32.Registry]::LocalMachine.OpenSubKey(“$keypath”, “ReadWriteSubTree”, “ChangePermissions”)
$regACL = $regKey.GetAccessControl()
$regRule = New-Object System.Security.AccessControl.RegistryAccessRule (“$admin”,”FullControl”,”ContainerInherit”,”None”,”Allow”)
$regACL.SetAccessRule($regRule)
# Change Permissions for System
$regRule = New-Object System.Security.AccessControl.RegistryAccessRule (“SYSTEM”,”SetValue”,”ContainerInherit”,”None”,”Deny”)
$regACL.SetAccessRule($regRule)
$regKey.SetAccessControl($regACL)
New-ItemProperty -Path “HKLM:\$keyPath” -Name “Enabled” -Value 1 -PropertyType DWORD -Force |out-null
You need to run this as admin since admin privilege is required to get ownership of the userswitch key owned by the system account.
How to check that no users are logged in with C# on Windows 7?
I’m using C# Windows Forms. Is there an easy way to check if there are no users logged in?
Below is the code I’ve used for XP, which doesn’t seem to work under windows 7 when a user is logged out.
[edit]: The program is executed by the task scheduler, not by a user.
4 Answers 4
You can use the Cassia library to see the active logon sessions.
Enumerating for the explorer.exe was always flawed, not only in Windows 7. An user session does not necessarily require explorer.exe to be the default shell, so the process named explorer may well be not runnig. And enumerating processes require privileges a normal C# Windows forms application does not held.
The proper way to find user session is to enumerate them via LsaEnumerateLogonSessions . Another alternative is to use WMI and interogate the Win32_LogonSession class.
In theory you cannot run a program like that because the program is running and activated while a user is logged in!
Think about the old Windows 2000/XP logging process which uses GINA (Graphical Identification and authentication) in which when the login credentials are verified, it spawns the process Explorer which in turn activates startup and run-once applications upon logging in.
The Login process is now updated and revamped. The only way you can find out about the current sessions is in the unmanaged code perspective, a process that runs before the login credentials dialog box.


