- Enabling debug logging for the Netlogon service
- More information
- For Windows Server 2019, Windows Server 2016, Windows Server 2012 R2
- Alternative methods to enable Netlogon logging
- Получаем логи (историю) входа пользователя в домен AD
- Политика аудита входа пользователя в домен
- PowerShell: истории сетевых входов пользователя в домен
- Получаем информацию об активности пользователя в домене по событиям Kerberos
Enabling debug logging for the Netlogon service
This article describes the steps to enable logging of the Netlogon service in Windows to monitor or troubleshoot authentication, DC locator, account lockout, or other domain communication-related issues.
Original product version: В Windows 10 — all editions, Windows Server 2016, Windows Server 2019, Windows Server 2012 R2
Original KB number: В 109626
More information
This section, method, or task contains steps that tell you how to modify the registry. However, serious problems might occur if you modify the registry incorrectly. Therefore, make sure that you follow these steps carefully. For added protection, back up the registry before you modify it. Then, you can restore the registry if a problem occurs. For more information about how to back up and restore the registry, click the following article number to view the article in the Microsoft Knowledge Base:
322756 How to back up and restore the registry in Windows
The version of Netlogon.dll that has tracing included is installed by default on all currently supported versions of Windows. To enable debug logging, set the debug flag that you want by using Nltest.exe, the registry, or Group Policy. To do it, follow these steps:
For Windows Server 2019, Windows Server 2016, Windows Server 2012 R2
These steps also apply to Windows 10.
To enable Netlogon logging:
Open a Command Prompt window (administrative Command Prompt window for Windows Server 2012 R2 and later versions).
Type the following command, and then press Enter:
It’s typically unnecessary to stop and restart the Netlogon service for Windows Server 2012 R2 or later to enable Netlogon logging. Netlogon-related activity is logged to %windir%\debug\netlogon.log. Verify new writes to this log to determine whether a restart of the Netlogon service is necessary. If you have to restart the service, open a Command Prompt window (administrative Command Prompt window for Windows 10, and Windows Server 2012 R2 and later versions). Then run the following commands:
- In some circumstances, you may have to perform an authentication against the system in order to obtain a new entry in the log to verify that logging is enabled.
- Using the computer name may cause no new test authentication entry to be logged.
To disable Netlogon logging, follow these steps:
Open a Command Prompt window (administrative Command Prompt window for Windows Server 2012 R2 and higher).
Type the following command, and then press Enter:
It’s typically unnecessary to stop and restart the Netlogon service for Windows Server 2012 R2 or later versions to disable Netlogon logging. Netlogon-related activity is logged to %windir%\debug\netlogon.log. Verify that no new information is being written to this log to determine whether a restart of the Netlogon service is necessary. If you have to restart the service, open a Command Prompt window (administrative Command Prompt window for Windows 10, and Windows Server 2012 R2 and later versions). Then run the following commands:
Alternative methods to enable Netlogon logging
In all versions of Windows, you can use the registry method that’s provided in the Enable/Disable logging by using registry method section.
On computers that are running Windows Server 2012 R2 and later versions of the operating system, you can also use the following policy setting to enable verbose Netlogon logging (value is set in bytes):
\Computer Configuration\Administrative Templates\System\Net Logon\Specify log file debug output level
A value of decimal 545325055 is equivalent to 0x2080FFFF (which enables verbose Netlogon logging). This Group Policy setting is specified in bytes.
The Group Policy method can be used to enable Netlogon logging on a larger number of systems more efficiently. We don’t recommend that you enable Netlogon logging in policies that apply to all systems, such as the Default Domain Policy. Instead, consider narrowing the scope to systems that may be causing problems by using one of the following methods:
- Create a new policy by using this Group Policy setting, and then provide the Read and Apply Group Policy rights to a group that contains only the required computer accounts.
- Move computer objects into a different OU, and then apply the policy settings at that OU level.
Enable/Disable logging by using registry method
To enable logging, you may have to obtain a checked build of Netlogon.dll.
Start Registry Editor.
If it exists, delete the Reg_SZ value of the following registry entry, create a REG_DWORD value with the same name, and then add the 2080FFFF hexadecimal value:
HKEY_LOCAL_MACHINE\SYSTEM\CurrentControlSet\Services\Netlogon\Parameters\DBFlag
It’s typically unnecessary to stop and restart the Netlogon service for Windows Server 2012 R2 and later versions to enable Netlogon logging. Netlogon-related activity is logged to %windir%\debug\netlogon.log. Verify the new writes to this log to determine whether a restart of the Netlogon service is necessary. If you have to restart the service, open a Command Prompt window (administrative Command Prompt window for Windows Server 2012 R2/Windows 10 and above). Then run the following commands:
- In some circumstances, you may have to do an authentication against the system to obtain a new entry in the log to verify that logging is enabled.
- Using the computer name may cause no new test authentication entry to be logged.
To disable Netlogon logging, follow these steps:
In Registry Editor, change the data value to 0x0 in the following registry key:
Exit Registry Editor.
It’s typically unnecessary to stop and restart the Netlogon service for Windows Server 2012 R2, Windows 10, or later versions to disable Netlogon logging. Netlogon-related activity is logged to %windir%\debug\netlogon.log. Verify that no new information is being written to this log to determine whether a restart of the Netlogon service is necessary. If you have to restart the service, open a Command Prompt window (administrative Command Prompt window for Windows Server 2012 R2/Windows 10 and later versions of the operating system). Then run the following commands:
Set the maximum log file size for Netlogon logs:
The MaximumLogFileSize registry entry can be used to specify the maximum size of the Netlogon.log file. By default, this registry entry doesn’t exist, and the default maximum size of the Netlogon.log file is 20 MB. When the file reaches 20 MB, it’s renamed to Netlogon.bak, and a new Netlogon.log file is created. This registry entry has the following parameters:
- Path: HKEY_LOCAL_MACHINE\SYSTEM\CurrentControlSet\Services\Netlogon\Parameters
- Value Name: MaximumLogFileSize
- Value Type: REG_DWORD
- Value Data:
Remember that the total disk space that’s used by Netlogon logging is the size that’s specified in the maximum log file size times two (2). It’s required to accommodate space for the Netlogon.log and Netlogon.bak file. For example, a setting of 50 MB can require 100 MB of disk space, which provides 50 MB for Netlogon.log and 50 MB for Netlogon.bak.
As mentioned earlier, on Windows Server 2012 R2 and later versions of the operating system, you can use the following policy setting to configure the log file size (value is set in bytes):
\Computer Configuration\Administrative Templates\System\Net Logon\Maximum Log File Size
For more information, click the following article numbers to view the articles in the Microsoft Knowledge Base:
247811 How domain controllers are located in Windows
Получаем логи (историю) входа пользователя в домен AD
Есть несколько различных инструментов получения информации о времени логина пользователя в домен. Время последней успешной аутентификации пользователя в домене можно получить из атрибута lastLogon (обновляется только на контроллере домена, на котором выполнена проверка учетных данных пользователя) или lastLogonTimpestamp (реплицируется между DC в домене, но по умолчанию только через 14 дней). Вы можете получить значение этого атрибута пользователя в редакторе атрибутов AD или командлетом Get-ADUser. Однако иногда нужно получить историю активности (входов) пользователя в домене за большой период времени.
Вы можете получить информацию об успешных входах (аутентфикации) пользователя в домене из журналов контроллеров домена. В этой статье мы покажем, как отслеживать историю входов пользователя в домен с помощью PowerShell.. Т.е. можно получить полную историю активности пользователя в домене, время начала работы и компьютеры, с которых работает пользователь.
Политика аудита входа пользователя в домен
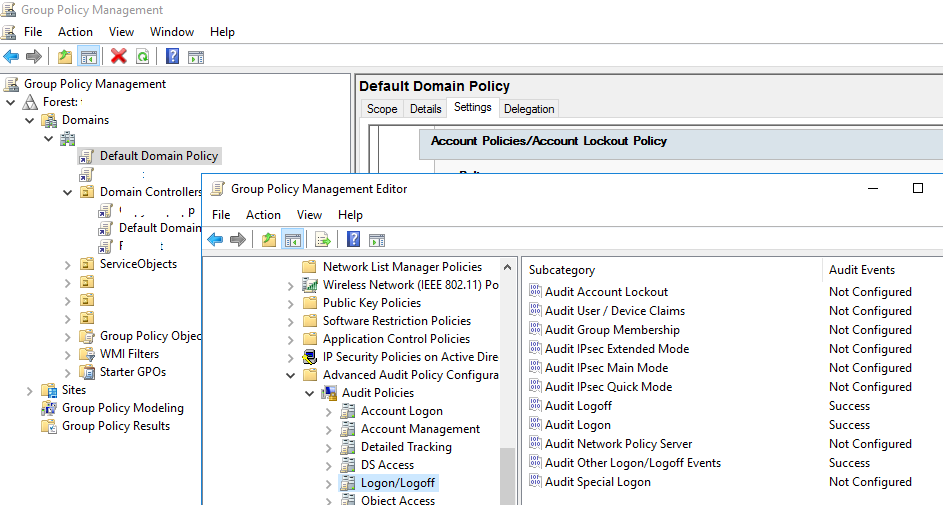
Чтобы в журналах контроллеров домена отображалась информация об успешном/неуспешном входе в систему, нужно включить политику аудита событий входа пользователей.
- Запустите редактор доменных GPO – GPMC.msc;
- Откройте настройки Default Domain Policy и перейдите в раздел Computer Configuration -> Policies -> Windows Settings -> Security Settings –> Advanced Audit Policy Configuration -> Audit Policies -> Logon/Logoff;
 Audit Policies -> Logon/Logoff» width=»692″ height=»371″ srcset=»https://winitpro.ru/wp-content/uploads/2020/04/advanced-audit-policy-configuration-greater-audit-polic.png 943w, https://winitpro.ru/wp-content/uploads/2020/04/advanced-audit-policy-configuration-greater-audit-polic-300×161.png 300w, https://winitpro.ru/wp-content/uploads/2020/04/advanced-audit-policy-configuration-greater-audit-polic-768×411.png 768w» sizes=»(max-width: 692px) 100vw, 692px»/>
 - Включите две политики аудита (Audit Logon и Audit Other Logon/Logoff Events). Чтобы в журналах Security на DC и компьютерах регистрировались как успешные, так и неуспешные политики входа, выберите в настройках политика аудита опции Success и Failure
- Сохраните изменения в GPO и обновите настройки политик на контроллерах домена командой: gpupdate /force (или подождите 90 минут, без учета репликации между DC).
 Audit Policies -> Logon/Logoff» width=»692″ height=»371″ srcset=»https://winitpro.ru/wp-content/uploads/2020/04/advanced-audit-policy-configuration-greater-audit-polic.png 943w, https://winitpro.ru/wp-content/uploads/2020/04/advanced-audit-policy-configuration-greater-audit-polic-300×161.png 300w, https://winitpro.ru/wp-content/uploads/2020/04/advanced-audit-policy-configuration-greater-audit-polic-768×411.png 768w» sizes=»(max-width: 692px) 100vw, 692px»/>
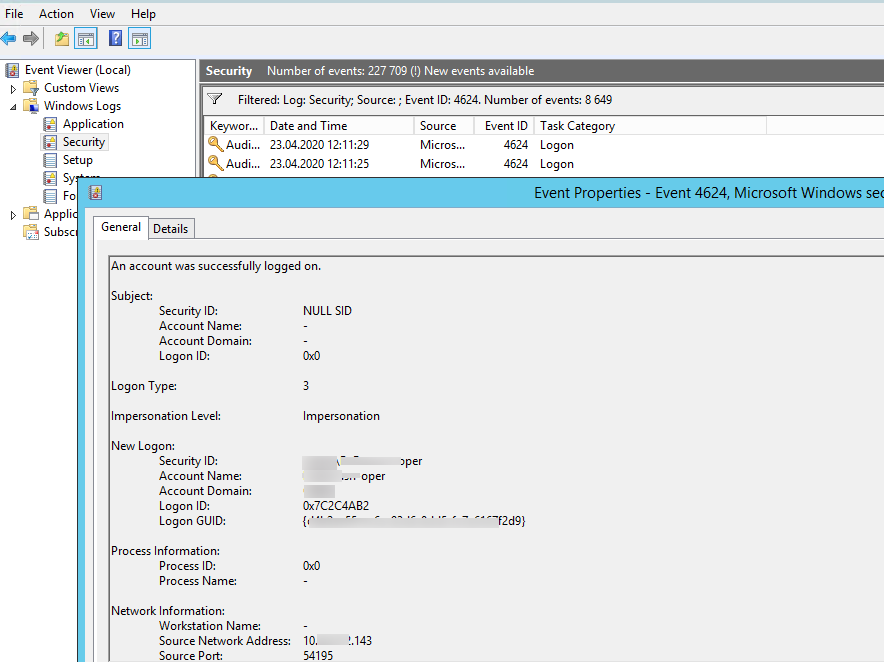
Теперь при входе пользователя на любой компьютер домена Active Directory в журнале контроллера домена, который выполняет аутентификацию пользователя, появляется событие с Event ID 4624 (An account was successfully logged on). В описании этого события указана учетная запись, которая успешно аутентифицировалась (Account name), имя (Workstation name) или IP адрес (Source Network Address) компьютера, с которого выполнен вход.
Также в поле Logon Type указан тип входа в систему. Нас интересуют следующие коды
- Logon Type 10 – Remote Interactive logon – вход через службы RDP, теневое подключение или Remote Assistance (на DC такое событие может быть при входе администратора, или другого пользователя, которому предоставлены права входа на DC) Это событие используется при анализе событий входа пользователей по RDP.
- Logon Type 3 – Network logon сетевой вход (происходит при аутентфикации пользователя на DC, подключения к сетевой папке, принтеру или службе IIS)
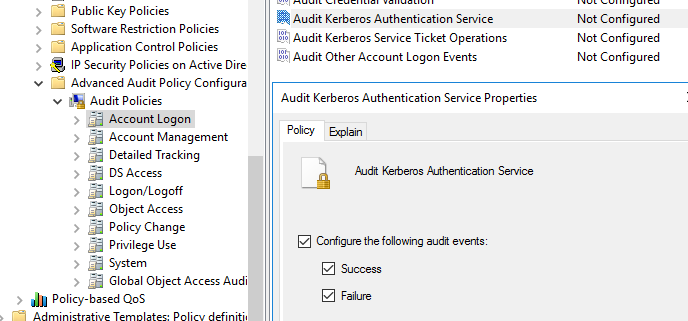
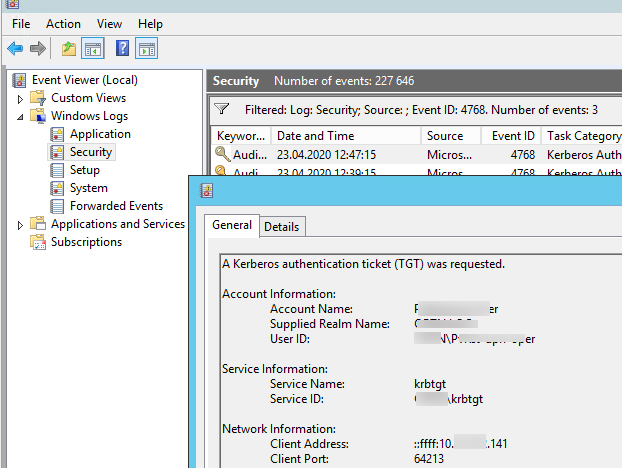
Также можно отслеживать событие выдачи билета Kerberos при аутентификации пользователя. Event ID 4768 — A Kerberos authentication ticket (TGT) was requested. Для этого нужно включить аудит событий в политики Account Logon –> Audit Kerberos Authentication Service -> Success и Failure.
В событии 4768 также указана учетная запись пользователя (Account Name или User ID), который получил билет Kerberos (аутентифицировался) и имя (IP адрес) компьютера.
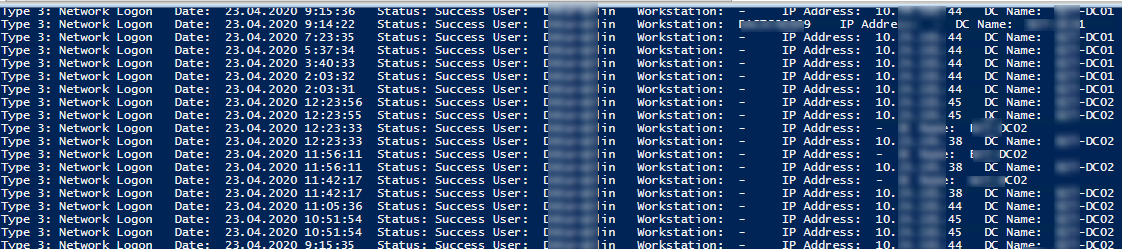
PowerShell: истории сетевых входов пользователя в домен
С помощью командлета PowerShell Get-Eventlog можно получить все события из журнала контроллера домена, отфильтровать их по нужному коду (EventID) и вывести данные о времени, когда пользователь аутентифицировался в домене, и компьютере, с которого выполнен вход. Т.к. в домене может быть несколько контроллеров домена и нужно получить история входов пользователя с каждого из них, нужно воспользоваться командлетом Get-ADDomainController (из модуля AD для Windows PowerShell). Данный командлет позволяет получить список всех DC в домене.
Следующий PowerShell скрипт позволяет получить все события входа пользователя в домен AD со всех контроллеров домена. На выходе вы получаете таблицу с историей входа пользователя и компьютеров, с которых аутентифицировался пользователь.
# имя пользователя, историю входов которого нужно получить
$checkuser=’*ivanov*’
# получаем информацию об истории входов пользователя за последних 2 дня, можете изменить
$startDate = (get-date).AddDays(-2)
$DCs = Get-ADDomainController -Filter *
foreach ($DC in $DCs)<
$logonevents = Get-Eventlog -LogName Security -InstanceID 4624 -after $startDate -ComputerName $dc.HostName
foreach ($event in $logonevents)<
if (($event.ReplacementStrings[5] -notlike ‘*$’) -and ($event.ReplacementStrings[5] -like $checkuser)) <
# Remote (Logon Type 10)
if ($event.ReplacementStrings[8] -eq 10)<
write-host «Type 10: Remote Logon`tDate: «$event.TimeGenerated «`tStatus: Success`tUser: «$event.ReplacementStrings[5] «`tWorkstation: «$event.ReplacementStrings[11] «`tIP Address: «$event.ReplacementStrings[18] «`tDC Name: » $dc.Name
>
# Network(Logon Type 3)
if ($event.ReplacementStrings[8] -eq 3)<
write-host «Type 3: Network Logon`tDate: «$event.TimeGenerated «`tStatus: Success`tUser: «$event.ReplacementStrings[5] «`tWorkstation: «$event.ReplacementStrings[11] «`tIP Address: «$event.ReplacementStrings[18] «`tDC Name: » $dc.Name
>
>
>
>
Получаем информацию об активности пользователя в домене по событиям Kerberos
Также вы можете получить историю аутентификации пользователя в домене по по событию выдачи билета Kerberos (TGT Request — EventID 4768). В этом случае в итоговых данных будет содержаться меньшее количество событий (исключены сетевые входы, обращения к папкам на DC во время получения политик и выполнения логон-скриптов). Следующий PowerShell скрипт выведет информацию о всех входах пользователей за последние 24 часа:
$alluserhistory = @()
$startDate = (get-date).AddDays(-2)
$DCs = Get-ADDomainController -Filter *
foreach ($DC in $DCs)<
$logonevents = Get-Eventlog -LogName Security -InstanceID 4768 -after $startDate -ComputerName $dc.HostName
foreach ($event in $logonevents)<
if ($event.ReplacementStrings[0] -notlike ‘*$’) <
$userhistory = New-Object PSObject -Property @<
UserName = $event.ReplacementStrings[0]
IPAddress = $event.ReplacementStrings[9]
Date = $event.TimeGenerated
DC = $dc.Name
>
$alluserhistory += $userhistory
>
>
>
$alluserhistory

Обратите, что в этом случае вы не увидите события входов пользователей, которые аутентифицировались с клиентов или приложений, которые используют NTLM вместо Kerberos.


