- How to resize a window
- Basic resize in Windows
- Custom resize in Windows
- How to resize a window using the Windows key and keyboard
- How to resize a window using Windows menus
- How to resize a game window
- How to resize a window on a Mac
- WM_SIZE message
- Parameters
- Return value
- Example
- Remarks
- How to change partition size in Windows 10
- Change partition size with Windows 10 Disk Management
- How to decrease partition size in Windows 10:
- How to increase partition size in Windows 10:
- Adjust partition size with partition editor
- Take care of data while resizing disk partition
- How to reduce the size of Windows 10’s footprint on your PC
- How to use Compact OS to reduce the size of Windows 10
- Reducing the Windows footprint even more
- More Windows 10 resources
- Halo: MCC’s live service elements make it better, not worse
- Microsoft’s Surface Duo is not ‘failing up’
- Here’s what you can do if Windows 10 update KB5001330 is causing issues
- These are the best PC sticks when you’re on the move
How to resize a window
Resizing a window can be useful in many situations. For instance, when you need to fit more than one on the same screen. The following sections show you how to resize a window in using both Windows and macOS.
A window that is maximized cannot be resized. Furthermore, certain types of windows cannot be resized at all.
Basic resize in Windows
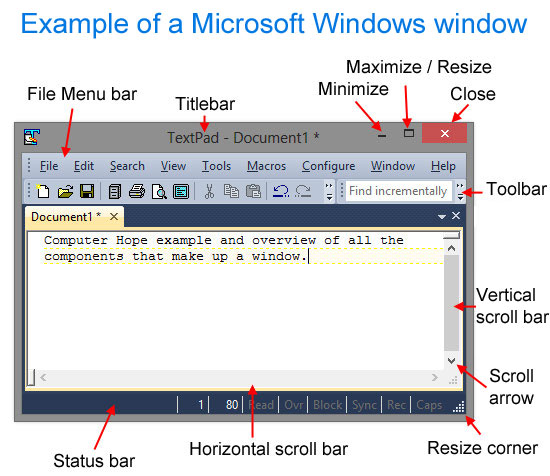
As you can see in the image below, there are two buttons for resizing a window automatically.
- Minimize — Clicking this button, which looks like a dash, collapses the window onto the Taskbar.
- Maximize / Resize — Clicking this button, which looks like a box or two boxes, toggles the window between full and nearly full (not maximized) screen.
Custom resize in Windows
When the upper-right section of the window looks like  , your window is now in «resize mode,» meaning you can use the mouse cursor to make the window any size you want. To do so, move the cursor to any edge or corner of the window until a double-headed arrow appears. When this arrow appears, click-and-drag it to make the window larger or smaller. If this double-headed arrow does not appear, the window cannot be resized.
The below animation shows a double-headed arrow on the bottom, left, and corner of a window and how it resizes a window. To make the window horizontally bigger, move the cursor to the left or right edge of the window until it turns into the double-headed arrow. To make the window vertically bigger, do the same thing at the top or bottom of the window. To resize both horizontally and vertically, use one of the corners of the window.
How to resize a window using the Windows key and keyboard
If you are running Microsoft Windows 7, Windows 8, or Windows 10, you can use Windows key keyboard shortcuts to resize and arrange windows on your computer. For example, pressing the Windows key and the left arrow key resizes it to fit only the left half of the screen. Windows key and the right arrow key resizes the window to fit the right half of the screen.
How to resize a window using Windows menus
A window can also be resized using a series of keyboard shortcuts. Below are the steps for resizing a window only using the keyboard.
- Press Alt + Spacebar to open the window menu.
- If the window is maximized, arrow down to Restore and press Enter , then press Alt + Spacebar again to open the window menu.
- Arrow down to Size.
- Press the up or downarrow key if you want to resize the window vertically, or the left or right arrow key if you want to resize horizontally.
- Once an arrow key is pressed, you can press the same arrow key or the opposite arrow key to resize the window.
How to resize a game window
When playing a computer game, it most likely defaults to a fullscreen mode that prevents the game from resizing. To resize a game window, the game must first be capable of being played in a windowed mode. If available, the setting is found in the game settings and may be labeled «borderless fullscreen» or «window mode» or be a checkbox. Once in a window mode, it may be possible to resize the window using any of the methods mentioned on this page. However, keep in mind that some games only have a window mode for performance reasons and may still not support the ability to be resized.
How to resize a window on a Mac
A Mac window can be resized using the mouse and the buttons located in the upper-left corner of the desktop.
- Minimize — Clicking this button (yellow circle), which looks like a dash, collapses the window into the Dock.
- Maximize / Resize — Clicking this button (green circle), which looks like a box or two boxes, toggles the window between full and nearly full (not maximized) screen.
- Custom size — First, make sure that the window is not maximized. Then, hover your mouse cursor over the corner, bottom, or top of the window. Click and drag to resize the window to the size you desire.
WM_SIZE message
Sent to a window after its size has changed.
A window receives this message through its WindowProc function.
Parameters
The type of resizing requested. This parameter can be one of the following values.
| Value | Meaning |
|---|---|
| SIZE_MAXHIDE 4 | Message is sent to all pop-up windows when some other window is maximized. |
| SIZE_MAXIMIZED 2 | The window has been maximized. |
| SIZE_MAXSHOW 3 | Message is sent to all pop-up windows when some other window has been restored to its former size. |
| SIZE_MINIMIZED 1 | The window has been minimized. |
| SIZE_RESTORED 0 | The window has been resized, but neither the SIZE_MINIMIZED nor SIZE_MAXIMIZED value applies. |
The low-order word of lParam specifies the new width of the client area.
The high-order word of lParam specifies the new height of the client area.
Return value
Type: LRESULT
If an application processes this message, it should return zero.
Example
Remarks
If the SetScrollPos or MoveWindow function is called for a child window as a result of the WM_SIZE message, the bRedraw or bRepaint parameter should be nonzero to cause the window to be repainted.
Although the width and height of a window are 32-bit values, the lParam parameter contains only the low-order 16 bits of each.
The DefWindowProc function sends the WM_SIZE and WM_MOVE messages when it processes the WM_WINDOWPOSCHANGED message. The WM_SIZE and WM_MOVE messages are not sent if an application handles the WM_WINDOWPOSCHANGED message without calling DefWindowProc.
How to change partition size in Windows 10
by Andy, Updated on: March 1, 2021
This article introduces how to change partition size for Windows 10 computer without losing data. Resize disk partition with native Disk Management and partition editor software.

When system C drive is running out of space, nobody wants to start from scratch, so many people search by Google to find a better way. In technical forums, many people have similar questions such as:
- Is it possible to change partition size in Windows 10 without reinstalling OS.
- Is it safe to re-size partition and which tool is better to change allocated partition size.
The answer is definitely yes. To change volume size in Windows 10 laptop and desktop, there are 2 options: Windows built-in Disk Management and third party partition editor software. Because of many shortages, Disk Management is not the best tool to change partition size.
Change partition size with Windows 10 Disk Management
Windows 10 Disk Management inherited Shrink Volume and Extend Volume functions from previous version. Shrink Volume can decrease the size of both system C drive and data volumes. Extend Volume can increase size of a drive when there is adjacent Unallocated space. Both functions are safe to change partition size in Windows 10 (32 & 64 bit).
However, if you want to extend a volume by shrinking another one, Disk Management cannot help you, learn why.
How to decrease partition size in Windows 10:
- Press Windows and X on the keyboard and select Disk Management from the list.
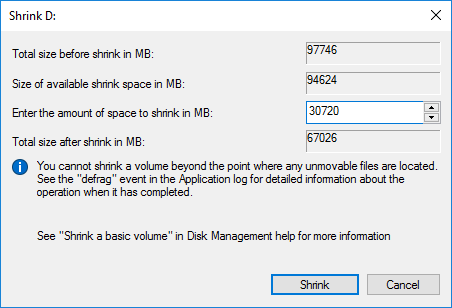
- Right click the drive you want to decrease and select Shrink Volume.
- Enter the amount of space (1024MB=1GB) and click Shrink to execute.
This drive will be shrunk within a short time in most cases.
Restrictions of Shrink Volume function:
- Only NTFS partition can be shrank, FAT32 and other types of volumes are not supported.
- Unallocated space can only be generated on the right side.
- Sometimes you can only shrink little space because of some unmovable files are located, even though there is large amount of free space in this drive.
How to increase partition size in Windows 10:
Only when your disk drive configuration meet the requirements below, Extend Volume is workable to increase partition size.
- There must be adjacent Unallocated space on the right side of the drive that you want to extend. If there’s no such Unallocated space, you must delete the right contiguous partition.
- The drive that you want to extend must be formatted with NTFS, FAT32 and other types of partitions are not supported.
- On MBR disk, the partitions to be deleted and extended must be the same Primary or Logical drive. Otherwise, you still cannot extend partition after deleting the right contiguous one.
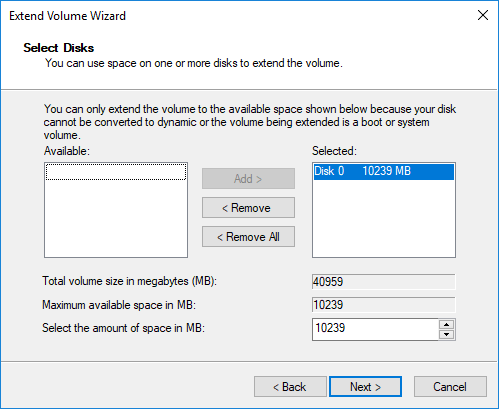
To increase volume size with Disk Management:
- Right click the NTFS partition that has right adjacent Unallocated space and select Extend Volume.
- Simply click Next in the pop-up Extend Volume Wizard window.
- Click Next to use default selected disk and space, or change manually.
- Click Finish to execute.
Adjust partition size with partition editor
Comparing with Windows 10 Disk Management, NIUBI Partition Editor has advantages while resizing partition, for example:
- Both NTFS and FAT32 partitions are supported to shrink and extend.
- Unallocated space can be made on either left or right when shrinking a drive.
- Partitions can be extended via 1 step with adjacent Unallocated space on either side.
- Unallocated space can be moved and combined to any nonadjacent partition on the same disk.
- If there is not plenty of space in the same disk, NIUBI can copy to a larger one and extend partition with extra space.
How to change partition size in Windows 10 with NIUBI Partition Editor:
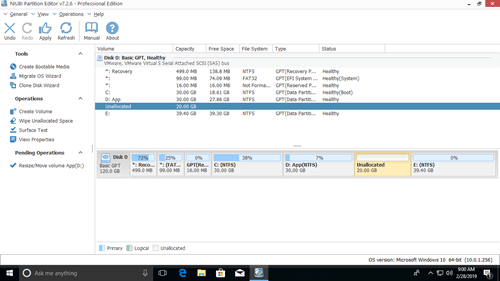
Download this program and you’ll see all disk partitions with structure and other information. In my test computer, there are drive C, D, E and system reserved partitions.
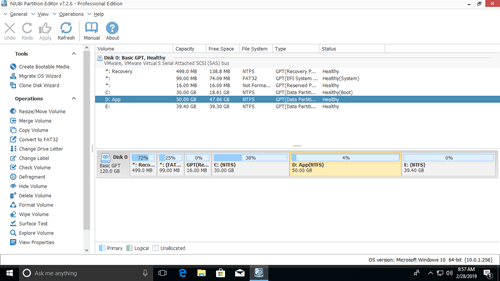
There are two options when decrease partition size, right click this partition (here is D:) and select «Resize/Move Volume».
Option 1: If you drag left border towards right in the pop-up window,
Then Unallocated space will be produced on the left side.
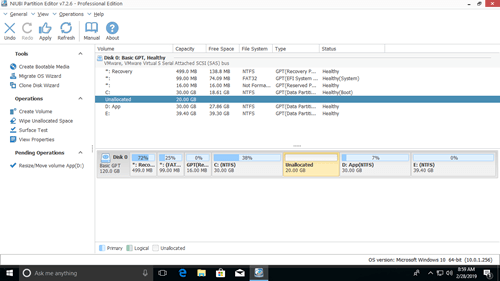
Option 2: If you drag right border towards left in the pop-up window,
Then Unallocated space will be produced on the right side.
These Unallocated space can be used to create new volume or combine to other partition.
To increase size of partition C:
Right click C and select «Resize/Move Volume» again, drag right border rightwards to combine Unallocated space.
To increase size of partition E:
Right click E and select «Resize/Move Volume» again, drag left border leftwards to combine Unallocated space.
If you want to decrease E to increase C, follow Option 1 to make Unallocated space on the left side of E. Before adding Unallocated space to C drive, there is an additional step to move Unallocated space to left side of D. To do this, right click drive D and select «Resize/Move Volume», drag middle position towards right in the pop-up window.
Take care of data while resizing disk partition
There is potential system and data damage risk while change partition size for Windows 10 computer. So you’d better back up first and use safe partitioning software. Better than other software, NIUBI Partition Editor provides powerful 1 Second Rollback, Virtual Mode and Cancel-at-well technologies to protect system and data.
Besides changing partition size, it helps you do many other operations such as: merge, convert, defrag, copy, hide, wipe and scan partition. Initialize, convert, set read-only attribute to disk, etc.
How to reduce the size of Windows 10’s footprint on your PC

Alongside many new features and changes, Windows 10 also includes additional improvements that are often overlooked because they are implemented under the hood. For example, if you haven’t noticed, the installation now takes far less space than previous versions, which enables it to run on devices with smaller storage capacities.
Microsoft even made changes to the recovery process to eliminate the use of a recovery image. Instead, if you ever need to reset your device, the OS will use the files already stored in the winsxs folder. Using this method, users can get around 4GB of space back.
While they all are welcomed improvements your device will take advantage without additional configuration, you may need to reduce the drive usage even more, and this is when «Compact OS» comes in handy.
Compact OS is a new mechanism that compresses all the installation files and preinstalled applications, letting you run Windows 10 from a compressed environment, reducing the footprint and freeing up space.
In this Windows 10 guide, we walk you through the steps to use the Compact OS command-line tool to shrink the Windows footprint size to save space on your device.
How to use Compact OS to reduce the size of Windows 10
Compact OS technically is a replacement for WIMBoot which offered similar advantages. You can still use it, but the new mechanism is a lot easier to set up and deploy.
It’s worth noting that this guide focuses on using Compact OS on a computer already running Windows 10, but you can also use this tool to deploy a compressed installation of Windows 10 on new devices.
Warning: While the process is safe, you’ll be making system changes, and there is always a chance something will go wrong. We recommend making a full backup of your PC before proceeding.
Ready? Follow these steps:
- Open Start.
- Search for Command Prompt, right-click the result, and select Run as administrator.
Type the following command to verify that your system is not already compressed and press Enter:
Type the following command to reduce the size of Windows 10 and apps and press Enter:

Once you completed these steps, Compact OS will begin the compression process, which could take up to 20 minutes.

Over time, the footprint of Windows 10 will be kept small, thanks to the system being able to interact with the original files directly to remove or replace them as required, unlike WIMBoot, which combines files into a single WIM file.
You can always revert the changes using the same instructions, but on step No. 4, use this command Compact.exe /CompactOS:never and press Enter.
Reducing the Windows footprint even more
Although using Compact OS can free up additional space, you should also consider that the pagefile.sys (virtual memory) and hiberfil.sys (hibernation data) can increase in size of the footprint even more, depending on the amount of memory in your device.
For example, if you have a tablet with a small storage capacity, and it’s limited to 1GB of memory, the system files will use less space than on a device with more than 1GB of memory.
In order to save extra space to reduce the overall size of Windows 10, you can remove or reduce the size of the hiberfil.sys file. Here’s how:
- Open Start.
- Search for Command Prompt, right-click the result, and select Run as administrator.
Type the following command to make Hiberfil.sys smaller and press Enter:
powercfg /h /type reduced
The above command reduces the size of the hibernation file by 30 percent. If you want to remove the file completely, you can use the powercfg /h /off command instead.
If you want to change the hibernation settings back to the full amount, simply follow the same instructions, but on step No. 3, make sure to use this command powercfg /h /size 100 .
Using this method, you’ll be able to reclaim around 3GB of space and an additional 30 percent of the hiberfil.sys file.
While you can use Compact OS on any device, this is a feature designed to make the system files lighter on a low-cost device with limited storage. Also, using this method shouldn’t affect system performance noticeably.
More Windows 10 resources
For more helpful articles, coverage, and answers to common questions about Windows 10, visit the following resources:
![]()
Halo: MCC’s live service elements make it better, not worse
Halo: The Master Chief Collection is more popular than ever, but some fans don’t agree with the live service approach 343 Industries has taken with it. Here’s why those elements are, at the end of the day, great for the game and for Halo overall.
![]()
Microsoft’s Surface Duo is not ‘failing up’
Microsoft announced this week that it was expanding Surface Duo availability to nine new commercial markets. While Surface Duo is undoubtedly a work in progress, this is not a sign of a disaster. It’s also doesn’t mean that Surface Duo is selling a ton either. Instead, the reason for the expansion is a lot more straightforward.
![]()
Here’s what you can do if Windows 10 update KB5001330 is causing issues
In this guide, we’ll show you the steps to get rid of the update KB5001330 to fix profile, gaming, and BSoD problems with the Windows 10 October 2020 Update and May 2020 Update.
![]()
These are the best PC sticks when you’re on the move
Instant computer — just add a screen. That’s the general idea behind the ultra-portable PC, but it can be hard to know which one you want. Relax, we have you covered!


