- Mail merge in Microsoft Word does not work on a computer that is running Windows 7 or Windows Server 2008 R2
- Symptoms
- Resolution
- Hotfix information
- Prerequisites
- Restart requirement
- Hotfix replacement information
- File information
- Use mail merge to send bulk email messages
- Step 1: Prepare your main document
- Step 2: Set up your mailing list
- See also
- Step 1: Create a main document in Word
- Step 2: Set up your mailing list
- Set up a new mail merge list with Word
- Create a new mail merge list
- Create a mailing list in Word
- Create a mailing list in Word
Mail merge in Microsoft Word does not work on a computer that is running Windows 7 or Windows Server 2008 R2
Symptoms
Consider the following scenario. You have a computer that is running Windows 7 or Windows Server 2008 R2. On this computer, you use the Mail Merge feature in Microsoft Word 2010. Microsoft Office Word 2007, or Microsoft Office Word 2003. In this scenario, you notice that the Mail Merge feature does not work for plain text or for attached mails.
For example, assume that you try to use mail merge to create an e-mail message and then automatically generate an e-mail recipient from a database. However, you notice that the e-mail message that is created does not have a specified recipient.
Note This issue also occurs for a MAPI-based e-mail client other than Microsoft Outlook.
Resolution
Hotfix information
A supported hotfix is available from Microsoft. However, this hotfix is intended to correct only the problem that is described in this article. Apply this hotfix only to systems that are experiencing the problem described in this article. This hotfix might receive additional testing. Therefore, if you are not severely affected by this problem, we recommend that you wait for the next software update that contains this hotfix.
If the hotfix is available for download, there is a «Hotfix download available» section at the top of this Knowledge Base article. If this section does not appear, contact Microsoft Customer Service and Support to obtain the hotfix.
Note If additional issues occur or if any troubleshooting is required, you might have to create a separate service request. The usual support costs will apply to additional support questions and issues that do not qualify for this specific hotfix. For a complete list of Microsoft Customer Service and Support telephone numbers or to create a separate service request, visit the following Microsoft Web site:
http://support.microsoft.com/contactus/?ws=supportNote The «Hotfix download available» form displays the languages for which the hotfix is available. If you do not see your language, it is because a hotfix is not available for that language.
Prerequisites
No prerequisites are required.
Restart requirement
You may have to restart the computer after you apply this hotfix.
Hotfix replacement information
This hotfix does not replace a previously released hotfix.
File information
The global version of this hotfix installs files that have the attributes that are listed in the following tables. The dates and the times for these files are listed in Coordinated Universal Time (UTC). The dates and the times for these files on your local computer are displayed in your local time together with your current daylight saving time (DST) bias. Additionally, the dates and the times may change when you perform certain operations on the files.
Windows 7 and Windows Server 2008 R2 file information notes
Important Windows 7 hotfixes and Windows Server 2008 R2 hotfixes are included in the same packages. However, hotfixes on the Hotfix Request page are listed under both operating systems. To request the hotfix package that applies to one or both operating systems, select the hotfix that is listed under «Windows 7/Windows Server 2008 R2» on the page. Always refer to the «Applies To» section in articles to determine the actual operating system that each hotfix applies to.
The MANIFEST files (.manifest) and the MUM files (.mum) that are installed for each environment are listed separately in the «Additional file information for Windows Server 2008 R2 and for Windows 7» section. MUM and MANIFEST files, and the associated security catalog (.cat) files, are extremely important to maintaining the state of the updated component. The security catalog files, for which the attributes are not listed, are signed with a Microsoft digital signature.
Use mail merge to send bulk email messages
Before you begin, open a blank document in Word and type the body of the email message you want to send.
To send an email, a MAPI-compatible email program like Outlook or Gmail needs to be installed.
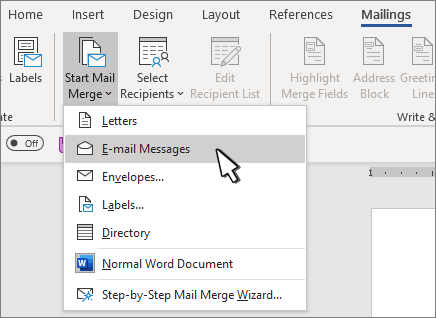
Step 1: Prepare your main document
Go to Mailings > Start Mail Merge > E-mail Messages.
Step 2: Set up your mailing list
The mailing list is your data source. For more info, see Data sources you can use for a mail merge.
If you don’t have a mailing list, you can create one during mail merge.
If you’re using an Excel spreadsheet, format the ZIP Codes or postal codes column as text to preserve any zeros. For more info see Format mail merge numbers, dates, and other values in Excel.
If you want to use your Outlook contacts, make sure Outlook is your default email program and the same versions as Word.
Make sure your data source has a column for email addresses and that there’s an email address for everyone you’re sending email to.
Go to Mailings > Select Recipients.
Choose a data source. For more info, see Data sources you can use for a mail merge.
Choose File > Save.
If you need to edit, sort, or filter your mailing list, see Mail merge: Edit recipients.
Go to Mailings > Greeting Line.
Choose the format you want to use.
Choose OK to insert the merge field.
Choose File > Save .
You can add other fields from your data source to your email message. For more information, see Insert mail merge fields.
Note: You’ll need to format your email manually after inserting fields.
If any part of your address or other fields are missing, see Mail merge: Match Fields to fix.
To change the font, size, or spacing of the merged content, select the merge field name and make the changes you want.
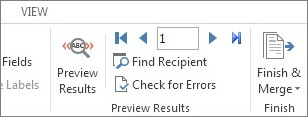
Choose Preview Results, and then choose Next  or Previous
  to see the names and addresses in the body of your letter.
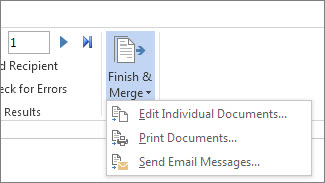
Choose Finish & Merge > Send E-mail Messages.
In the To box, choose the email address column or field from your mailing list.
Note: Word sends an individual message to each email address. You can’t Cc or Bcc other recipients. You can include links, but you can’t add attachments to the email.
In the Subject line box, type a subject line for the message.
In the Mail format box, choose HTML (the default setting) or Plain text to send the document as the body of the email message.
Under Send records, use one of the following:
All records (default).
Current record only the record viewable on your screen is sent the message.
From and To send only a range of records.
Choose OK to run mail merge.
Go to File > Save. When you save the main document, you also save its connection to the data source. To reuse, open the document and answer Yes when prompted to keep the connection to the data source.
See also
Before you begin, open a blank document in Word and type the body of the email message you want to send.
To send an email, a MAPI-compatible email program like Outlook or Gmail needs to be installed.
Step 1: Create a main document in Word
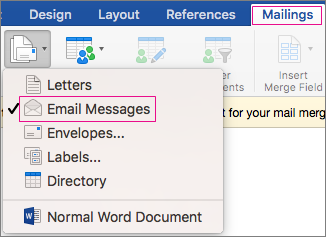
Go to Mailings > Start Mail Merge > Email Messages.
In Word, type the email message you want to send.
Step 2: Set up your mailing list
The mailing list is your data source. For more info, see Data sources you can use for a mail merge.
If you don’t have a mailing list, you can create one during mail merge.
If you’re using an Excel spreadsheet, format the ZIP Codes or postal codes column as text to preserve any zeros. For more info see Format mail merge numbers, dates, and other values in Excel.
If you want to use your Outlook contacts, make sure Outlook is your default email program and is the same version as Word.
Make sure your data source has a column for email addresses and that there’s an email address for everyone you’re sending email to.
Go to Mailings > Select Recipients.
Choose a data source. For more info, see Data sources you can use for a mail merge.
Choose File > Save.
If you need to edit, sort, or filter your mailing list, see Mail merge: Edit recipients.
Go to Mailings > Insert Merge Field, and then choose the fields to add.

In your main document, select Drag fields into this box or type text, and click or tap the text to remove it.
Add and format the fields you want to be included in the email message, and choose OK.
Go to Mailings > Preview Results to see how the email messages look.

Use the left and right arrow buttons on the Mailings tab, to scroll through each email message.
Select Preview Results again to add or remove merge fields.
When ready, go to Mailings > Finish & Merge > Merge to E-Mail.
Merge to E-Mail is unavailable if you have not selected your default email program.
Choose the To merge field, the subject, and whether to send as text, HTML, or as an attachment. When you send as an attachment, the email has no body text, but the message is sent as an attached document.
Set up a new mail merge list with Word
If you don’t have a mailing list as a source for names and addresses in a mail merge, you can create one in Word.
Create a new mail merge list
Go to File > New > Blank Document.
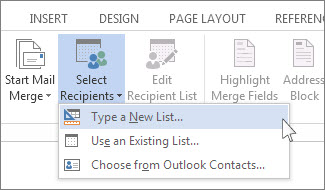
Choose Select Recipients > Type a New List.
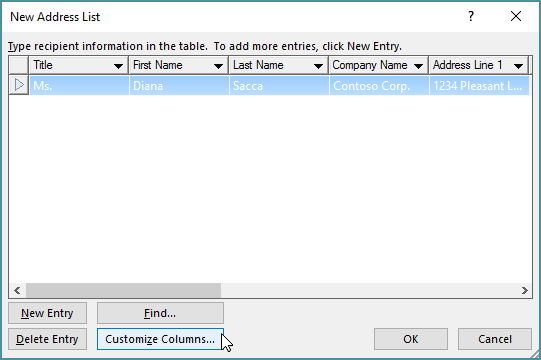
In the New Address List dialog box type recipient information in each column as appropriate. For more info on using the dialog box, see Edit Data Source.
For each new record, select Add New.
If you need more columns, such as for an order number, follow these steps:
In the New Address List dialog box choose Customize Columns.

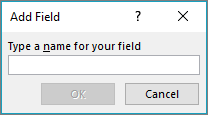
Type a field name and then select OK.
Repeat steps b and c for each column or field to add.
When you’re done adding all the people you want to your list, choose OK.
In the Save Address List dialog box, give your new file a name, and then choose Save.
You can now insert mail merge fields in your document. For more information, see Insert mail merge fields.
Create a mailing list in Word
A mailing list can be created within Word for sending bulk mail during mail merge process.
Go to File > New > New Document.
Go to Mailings > Select Recipients > Create a New List.
In the Edit List Fields, you’ll see a set of automatic fields that Word supplies. If you want a new field, type a name into New Field name to add it to the list.
Use the Up  and Down
  buttons to reposition fields
In the Save dialog, give the list a name and save it.
In Edit List Entries, type the data in each column for the mailing list.
For each new record, select the + button. To remove a record, go to the record and press the — button
When you’re done adding all the people you want to your list, choose OK.
To later modify the list, follow these steps:
Go to Mailings > Select Recipients.
Select Use an existing list, choose the list you previously created and select Open.
Add or edit records in the Edit List Entries dialog box.
Create a mailing list in Word
A mailing list can be created within Word for sending bulk mail during mail merge process.
On the View menu, choose Print Layout.
On the Standard toolbar, choose New  .
.
You use this blank document to create a data source.
On the Tools menu, choose Mail Merge Manager.
Under 1. Select Document Type, choose Create New, and then select Form Letters.
Under 2. Select Recipients List, choose Get List, and then select New Data Source.
In the Field names in header row box, click any field names that you don’t want to include in your data source, choose Remove Field Name, and then select OK.
Type a name and choose a location for your data source, and then choose Save.
Remember where you save the data source. You will need to know the location later.
In the Data Form dialog box, type the data for one data record (for example, a recipient’s first name in FirstName, last name in LastName, street address in Address1, and so on).
Note: Do not enter spaces in boxes that you want to leave blank.
After you finish filling in the boxes for one record, choose Add New.
Repeat steps 8 and 9 for each record that you want to enter.
After you add all the records that you want, choose OK.
Tip: To return to the Data Form dialog box later, in the Mail Merge Manager, under 2. Select Recipients List, select Edit Data Source  .
.
On the File menu, choose Close.
To save the data source, choose Save.
To discard the blank open document, choose Don’t Save.


