- Set up email in the Mail app for Windows 10
- Stay connected and on schedule
- Add a new email account
- Add an account using advanced setup
- Troubleshooting
- Special instructions for other accounts
- Скачайте бесплатное приложение Outlook для своего телефона
- Outlook
- Бесплатные почта и календарь Outlook
- Бесплатные почта и календарь Outlook
- Скачайте бесплатное приложение Outlook для своего телефона.
- Электронная почта и календарь в одном удобном приложении
- Защита корпоративного класса
- Доступ к Office. Бесплатно.
- Поддерживайте порядок в делах
- Еще больше специальных возможностей
- Ищете Hotmail?
- Вас приветствует Outlook
- Расширьте возможности Outlook
- Windows mail email account
- Настроить по протоколу POP3
Set up email in the Mail app for Windows 10
Stay connected and on schedule
You can be organized, on time, and buttoned up with Outlook — your life organizer.
If you log on to Windows 10 using a Microsoft account with an Outlook.com, Live, Hotmail, or MSN address, that account is added to the Mail and Calendar apps. You can add that and many other email accounts to the Mail and Calendar apps to start sending and receiving email and creating and managing events.
Seeing a message that your account is out of date? You probably need to update your account settings. See Fixing an out-of-date account for more information.
Did you set up your email, but you don’t see your messages? Change your mailbox sync settings.
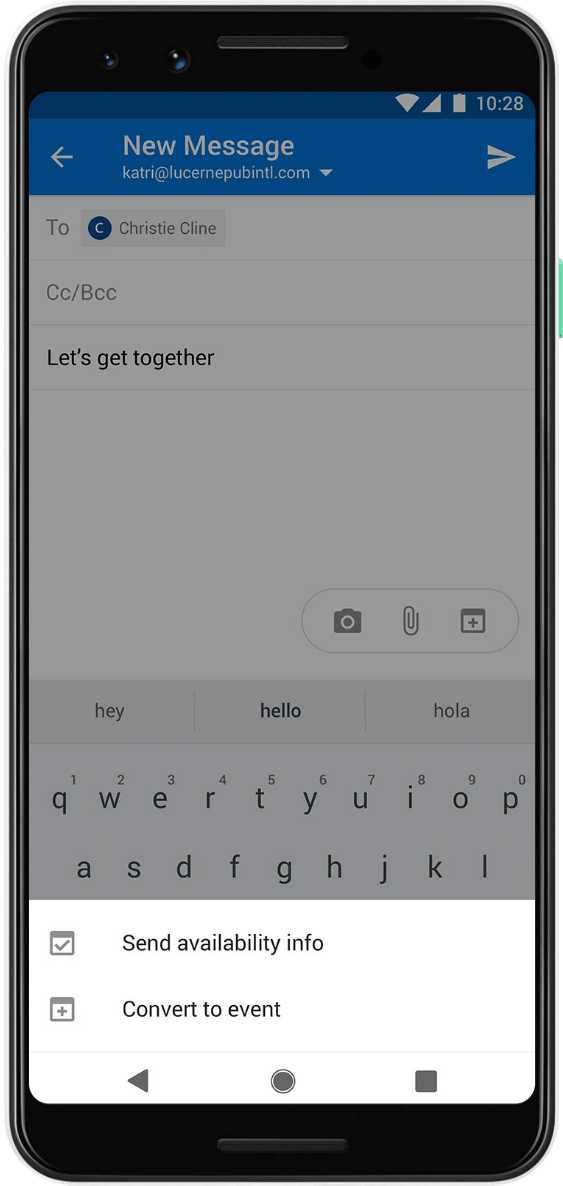
Add a new email account
Open the Mail app by clicking the Windows Start menu and choosing Mail.

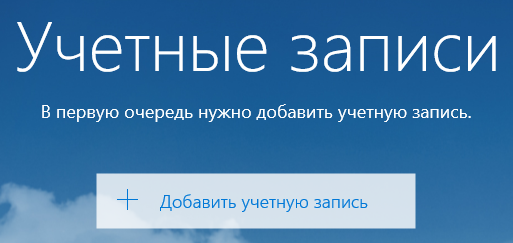
If this is the first time you’ve opened the Mail app, you’ll see a Welcome page. Select Add account to get started.
If you’ve used the Mail app before, at the bottom of the left navigation pane, select Settings  , and then choose Manage Accounts.
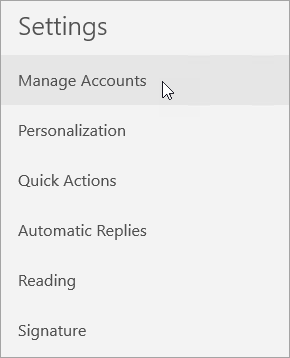
Note: On a phone or tablet, tap the three dots at the bottom of the page to access Settings.
Select Add account.
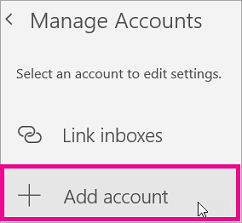
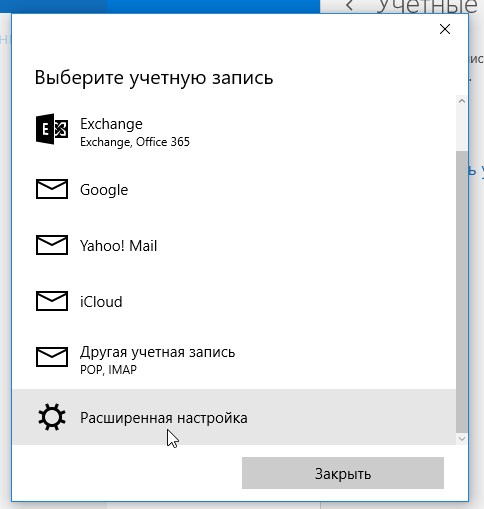
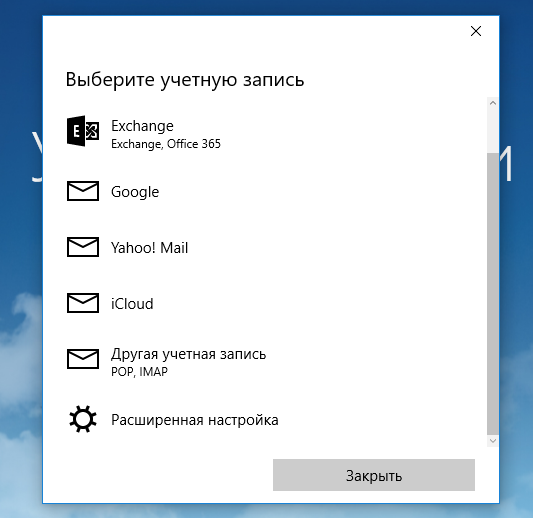
Choose the type of the account you want to add.
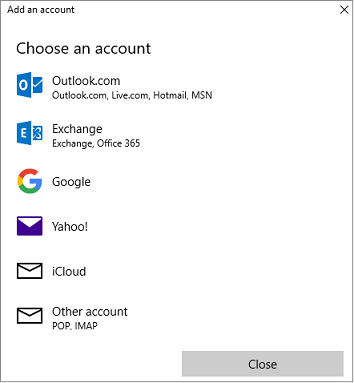
You may need to scroll down the Add an account dialog box to view all options.
If you choose Google, you’ll need to sign in to your Google account, enter your 2-step verification code if you’ve enabled that security feature, and give Windows permission to access your information. Click Allow and your account will be created.
If you choose another email account, you’ll need to follow the special instructions under Special instructions for other accounts below.
Enter the required information and click Sign in. For most accounts, this is your email address, password, and the account name. The account name is what you’ll see in both the left pane of Mail for Windows 10 as well as the Manage Accounts pane.
Note: If you receive the message “We couldn’t find info for that account. Make sure that the email address is correct and then try again,” you’ll need to click Try again three times before the button changes to Advanced. Click Advanced and follow the steps in the next section to add your account.
Click Done. Your data will start syncing as soon as your account is set up.
Note: It may take a few minutes for your account to synchronize. During this time, you may see «Not synced yet» in the message pane. If this message persists, see Resolve sync issues in Mail and Calendar apps in Windows 10.
Add an account using advanced setup
There are two ways you can access the Advanced setup options for your email account.
Click Advanced setup if your automatic email setup fails in Step 3 above.
Click Advanced setup from the Choose an account window in Step 2 above. The Advanced setup option is the last option on the list, and you may have to scroll to see it.
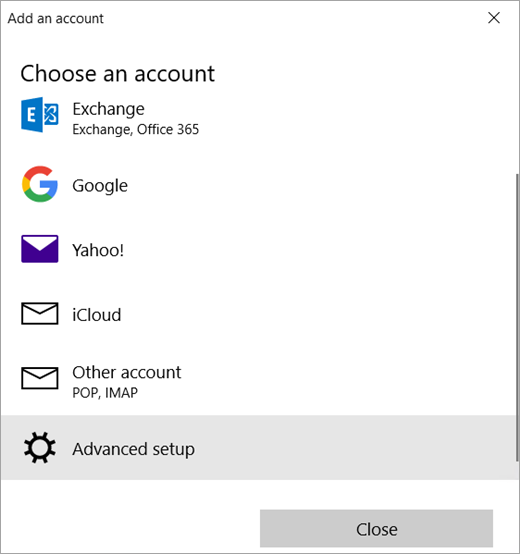
You can choose an Exchange ActiveSync account or an Internet email account. Unless your administrator has instructed you to use Exchange ActiveSync, click Internet email.
Enter the following information in the Advanced setup window.
Email address This is the name you’ll see in the left pane of the Mail app.
User name This is your full email address.
Password Enter your email account password.
Account name This is the name that you’ll see in the left pane of Mail for Windows 10, as well as in the Manage Accounts pane. You can choose any name you want.
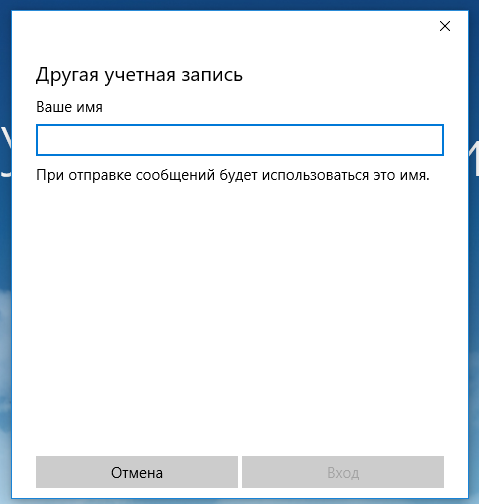
Send your messages using this name Enter the name you want recipients to see when they receive your message.
Incoming email server You can get this information from your ISP or administrator. Usually, an incoming mail server address is in the format of mail.contoso.com or imap.google.com . For many email accounts, you can find this information in our POP and IMAP server name reference.
Account type Choose POP3 or IMAP4. Most email accounts use IMAP4. If you don’t know which one to choose, contact your ISP.
Outgoing (SMTP) email server You can get this information from your ISP or administrator. Usually, an outgoing email server address is in the format of mail.contoso.com or smtp.contoso.com .
By default, all four checkboxes at the bottom of the window will be selected. Most email accounts don’t require any changes to these options.
Your email provider can give you the settings you need to fill in the Advanced setup but you can also go to the POP and IMAP server name reference we’ve provided for the most popular email providers.
After you’ve entered the required information, click Sign in > Done.
Note: If you’re adding an account other than Gmail, see Special instructions for other accounts.
Troubleshooting
If you’re having problems setting up your account, try the following.
If you upgraded to Windows 10, you will need to re-add your accounts to Mail for Windows 10.
Make sure your email address and password are correct. Passwords are case-sensitive.
If you see your most recent messages but no older messages, you probably need to change your email sync duration.
If you see a message that your account is out-of-date, you probably need to either update your password, your incoming or outgoing servers, or your SSL settings. See Fixing an out-of-date account for more information.
Special instructions for other accounts
If you’ve enabled two-factor authentication on your iCloud account, you’ll need to generate an app-specific password to add your iCloud account to the Mail app.
Select Generate Password below App-Specific Passwords.
Follow the instructions on your screen.
Microsoft has added OAuth support for Yahoo! accounts in the Windows 10 Creators update. To install the Creators Update now, go to the software download site, and select Update now. For more information about the update, see Windows 10 Creators Update is here.
If you have a Japanese Yahoo! email account you will need to do the following:
You’ll need to add your Yahoo! account as an IMAP account. To do this, follow the steps in Add an account using advanced setup using imap.mail.yahoo.co.jp for your incoming mail server and smtp.mail.yahoo.co.jp for your outgoing mail server.
To sync your QQ mailbox with the Mail and Calendar apps, you need to enable IMAP on QQ.
Sign in to your QQ account.
Select Settings > Account > POP3/IMAP/SMTP/Exchange/CardDAV/CalDAV Service > Find IMAP/SMTP Service > Open.
You might need to send a text message to enable this service. After you select Open in step 2, a dialog might appear prompting you to use your phone to send a message to the displayed phone number.
After the text message is sent, QQ will open a new dialog with an authorization code. Copy the authorization code as you’ll need this to add your QQ mail account in the Mail and Calendar apps.
In the Mail and Calendar apps, remove your QQ account and add it again using the authorization code.
Your QQ account should now sync automatically.
When you try to connect your GMX.de or WEB.de account to the Mail and Calendar apps, you’ll receive an email in your GMX.de or WEB.de mailbox with instructions about how to enable access.
In a web browser, sign in to your GMX.de or WEB.de account.
Find the email message with instructions about how to connect your account to the Mail and Calendar apps, and follow the instructions.
Your account should now sync with the Mail and Calendar apps automatically.
Скачайте бесплатное приложение Outlook для своего телефона
На этом сайте используются файлы cookie для аналитики, персонализированного содержимого и рекламы. Продолжая просматривать этот сайт, вы соглашаетесь с таким использованием.
Outlook
Подключитесь. Наведите порядок. Работайте эффективно.
Бесплатные почта и календарь Outlook
Все необходимое, чтобы эффективно решать задачи и всегда оставаться на связи — дома, в дороге и где угодно.
Бесплатные почта и календарь Outlook
Все необходимое, чтобы эффективно решать задачи и всегда оставаться на связи — дома, в дороге и где угодно.
Скачайте бесплатное приложение Outlook для своего телефона.
Электронная почта и календарь в одном удобном приложении
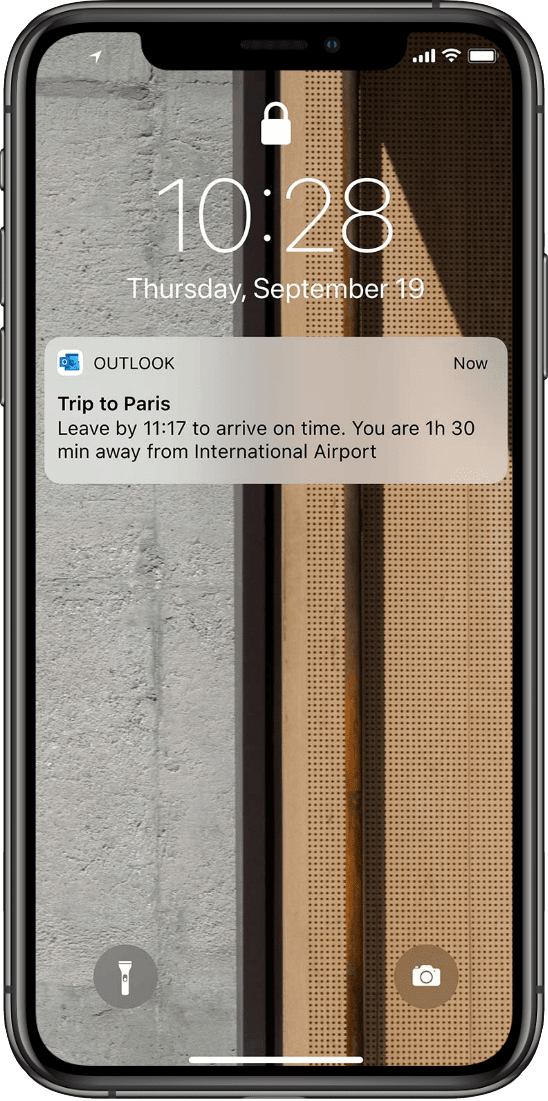
Всегда будьте в курсе важных событий и сохраняйте доступ к сообщениям.
Электронная почта one-place-interface-icon-calendar
Отправляйте, получайте и упорядочивайте электронную почту.
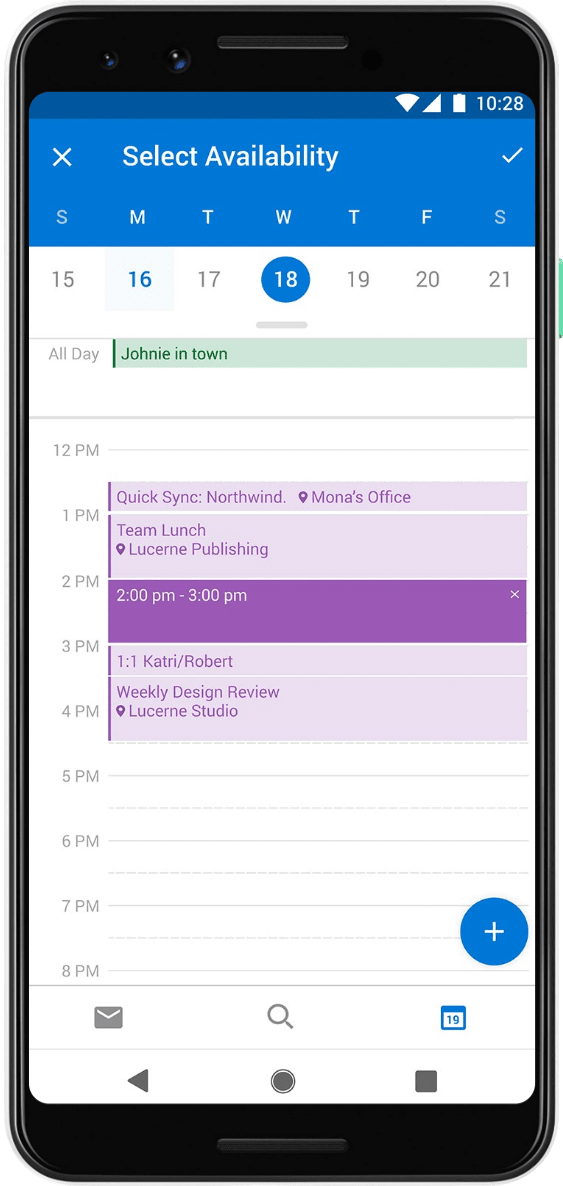
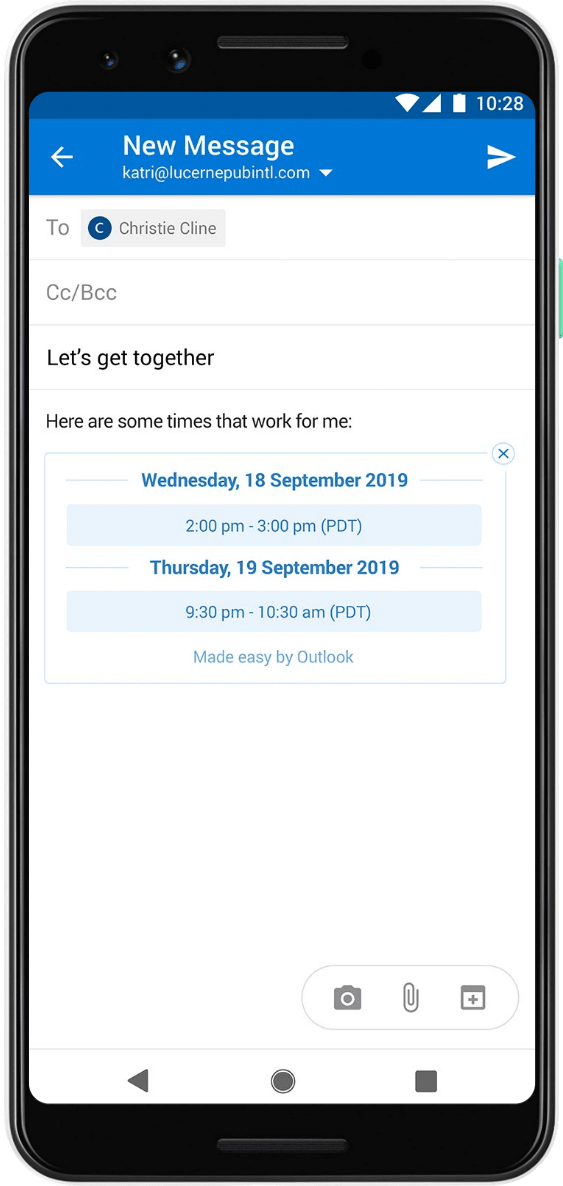
Планируйте и организовывайте встречи, собрания и мероприятия.
Просматривайте сведения о контактах, наводя указатель мыши на имя.
Определяйте приоритетность задач с помощью Microsoft To Do.
Находите сообщения, людей и документы.
Защита корпоративного класса
Outlook круглосуточно защищает вашу конфиденциальность и предотвращает получение спама.
- Защита с помощью тех же средств Майкрософт, которые используются для корпоративных клиентов. Шифрование данных в почтовом ящике и после отправки электронной почты. Автоматическая блокировка небезопасных ссылок, которые связаны с фишингом, вирусами и вредоносными программами. Premium Обнаружение программ-шантажистов и восстановление важных файлов в OneDrive. Premium
Доступ к Office. Бесплатно.
Совместная работа — это просто, если вы пользуетесь Word , PowerPoint и Excel . А с помощью Skype вы можете общаться в реальном времени — не покидая свою папку «Входящие».
Поддерживайте порядок в делах
Встроенный календарь Outlook с широкими возможностями поможет вам отслеживать встречи и планировать собрания.

Еще больше специальных возможностей
Мы разработали Outlook.com, чтобы они были доступны для всех пользователей, с интуитивной навигацией в системе управления, поддержкой нескольких специальных устройств и многое другое.
Ищете Hotmail?
Вот он! Hotmail превратился в Outlook, но это по-прежнему лучшая бесплатная служба электронной почты и календарей.
Вас приветствует Outlook
Электронная почта, календарь и многое другое.
Расширьте возможности Outlook
Мы разработали набор расширенных возможностей Outlook для людей, которые активно работают с электронной почтой и календарем. Оформите подписку на Microsoft 365, чтобы получить доступ к интерфейсу без рекламы, использованию личных доменов, расширенным функциям обеспечения безопасности, полной классической версии Office и 1 ТБ облачного хранилища. Сведения о премиум-возможностях Outlook, доступных по подписке на Microsoft 365
Windows mail email account
1. Нажмите «Добавить учетную запись».
2. Выберите тип учетной записи — «Другая учетная запись POP, IMAP».
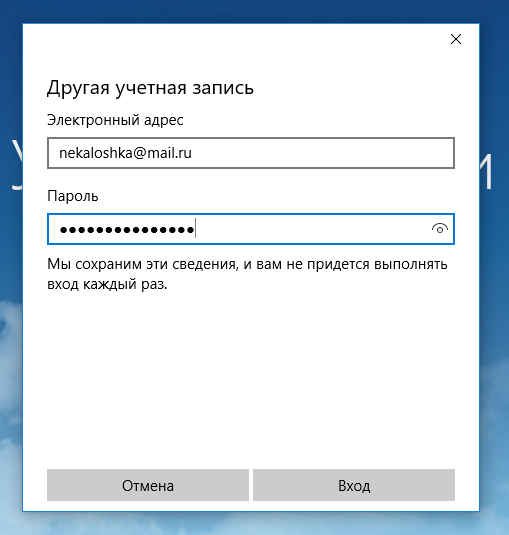
3. Введите необходимые данные:
| Электронный адрес | Полное имя вашего аккаунта |
| Пароль |