Back up your email
Stay connected and on schedule
You can be organized, on time, and buttoned up with Outlook — your life organizer.
If you are using email for work, you are most likely using an Exchange or IMAP account. Exchange and IMAP servers automatically archive your email so that you can access it anytime or anywhere. If you have an Exchange account, check with your admin about how to access your archived email.
If you want to back up the message folders locally (in addition to keeping them on the server), you can automatically move or delete older items with AutoArchive or export the items to a .pst file that you can restore later as needed and use by importing.
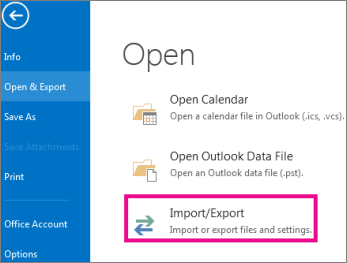
Select File > Open & Export > Import/Export.
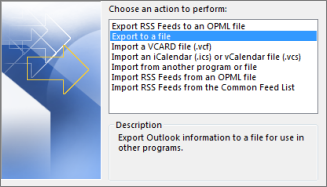
Select Export to a file, and then select Next.
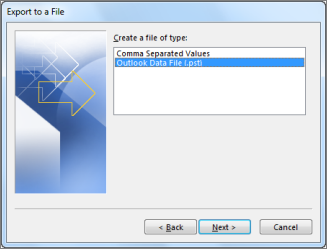
Select Outlook Data File (.pst), and select Next.
Select the mail folder you want to back up and select Next.
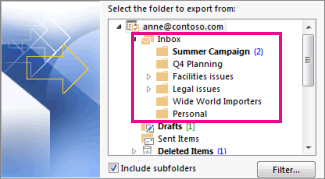
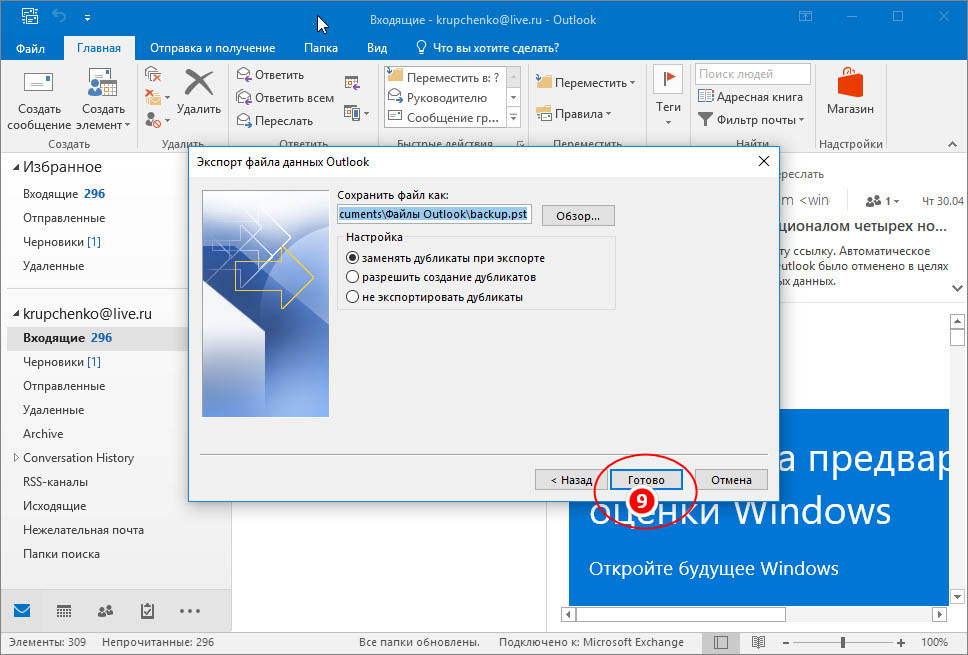
Choose a location and name for your backup file, and then select Finish.

If you want to ensure no one has access to your files, enter and confirm a password, and then select OK.
The messages that you keep in a .pst file are no different from other messages. You can forward, reply, or search through the stored messages as you do with other messages.
How to take backup/restore of Windows live mail
Is there any way I can backup mail from windows live mail to a flash drive and then restore it to the same computer after upgrading the operating system to windows7 from XP (which requires a drive format, erasing everything)? I used to be able to do this (backup/restore) using Outlook Express but am not able to use the same procedure with Windows Live Mail.
ORIGINAL TITLE : windows live mail
The procedure towards the end of this article works perfectly from Win7 to Win7. I have used it many times and it is very pleasing to see it work. It does not require any importing, moves the calendar and all contacts, as well as the exact setup of your Accounts and passwords.
I have not tried it on XP to Win7, but I presume it will work the same way.
Backup Windows Live Mail
Backup your Windows Live Mail mail and contacts
- Open the mail portion, click on the down pointing arrow in the top left corner, choose Export Email, then choose Email Messages, then choose Windows Live Mail.
- Now choose where the backup is to go. Create another folder inside your backup drive folder for this entire backup and name it email yourname dd-mm-yy
- Open the address book (Contact list) portion of Windows Live Mail
- On the top towards the right, find the Export icon. Choose comma separated values
- Click the browse button and navigate to your external hard drive folder for this backup and create yet another folder named address book yourname dd-mm-yy.
- On the next screen choose which data elements to backup. I choose them all
Move your Mail folder (a one time thing)
Windows Live Mail (WLM) sets itself up in a very inconvenient place. Hard to find. There is no reason not to move it to a more accessible location on your hard drive. This is a one time thing. Once you do it, you will never have to do it again. Now, make backing up that folder a regular part of your regular backup procedure.
- With WLM open, click on the little blue rectangle with the arrow in it on the top left of the WLM window
- Click on Options then Mail, the Advanced tab, Maintenance, Store folder
- Click the Change button. A navigation list of your hard drive pops up.
- Now navigate to the C: line, click once on it.
- Click Make new folder
- Type your name followed by the word mail, click OK, Click OK
- Close all the open windows.
- Close WLM
- When you next open WLM, it will take longer because that is when it actually moves your mail folder
The reason you should do this is that in the future you will be following the back up procedure above, BUT also you will be backing up that Mail folder to your external hard drive as well. The reason to do this is that if ever your system needs to be re-built, the re-builder can copy that Mail folder to the right place in your “new” system and all of your mail, contacts, calendars and ever the way you have WLM set up, will be in effect in the new computer.
Once Windows is re-built and all is working, download WLM 2011 from:
http://filehippo.com/download_windows_live_mail/ this is the 2011 version which works better than the 2012 one. The main advantage of the 2011 version is that Groups do not work in 2012. If you do not use groups, download WLM 2012 from the Microsoft site
- Start your newly installed WLM and ignore all messages.
- In WLM, click the tiny arrow icon on the nearly top left. Choose Options, Mail
- Click the Advanced tab, now Maintenance, Store folder
- Use your mouse to select the entire content shown in that window, Ctrl+C to copy it.
- Close WLM
- Navigate to the location you just copied by pasting (Ctrl+V) it into the text box above the start button
- Delete all the contents of this folder, but not the folder, which will now be empty.
- Copy the content (not the folder) of your backed-up WLM, and paste it into the folder you just deleted the contents of.
- Start WLM, and you will have everything back just as you had it before. No importing, no having to go and reset everything back the way you like it. You won’t even have to set up the accounts again. This even has your passwords.
- Type indexing options into the text box above the start globe
- Click Modify and add your new Windows Live Mail folder.
You should now use the “move” procedure above on your new or newly re-built PC.
Как сохранить электронную почту на жесткий диск

Что бы там не говорили, вопросам безопасности пользовательских данных компаниями уровня Google , Microsoft или даже Яндекс уделяется достаточно пристальное внимание, поэтому о сохранности хранящихся на их почтовых серверах писем пользователи могут особо не беспокоиться. Впрочем, кто желает перестраховаться, тот может сохранить накопившуюся на сервере корреспонденцию на жёсткий диск компьютера.
Экспорт электронных писем поддерживается большинством почтовых сервисов, отличается только сама его процедура.
Экспорт писем в Gmail
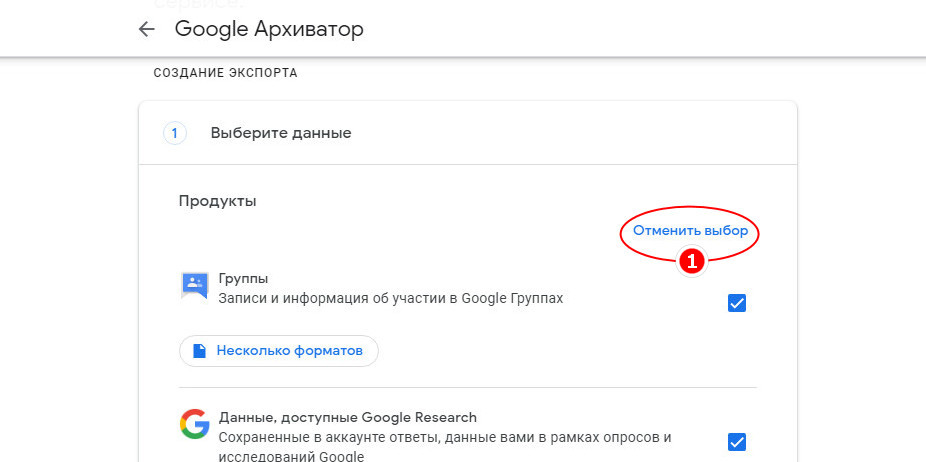
Вытащить и сохранить что бы то ни было, в том числе и почту, из аккаунта Goggle можно с помощью родного сервиса Google Архиватор.
Перейдите в браузере по адресу takeout.google.com/settings/takeout и первым делом отмените выбор всех продуктов, ведь вам нужна только почта.
Прокрутив страницу вниз, найдите блок «Почта» и отметьте его птичкой.
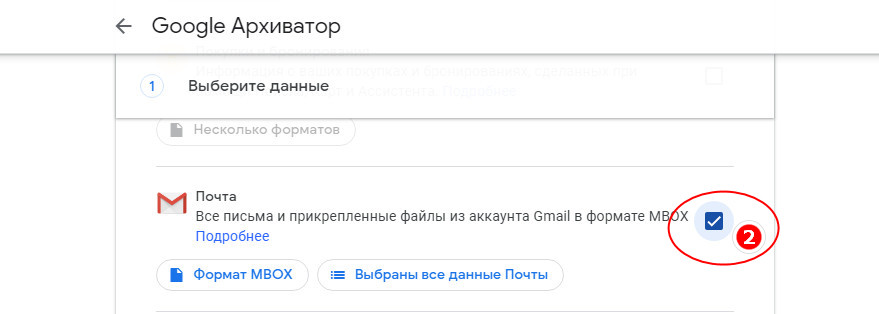
По умолчанию выбираются все письма, если вам нужны только входящие или исходящие, нажмите кнопку «Выбраны все данные…» и снимите отметки с ненужных пунктов.
Формат сохранения доступен только один — MBOX .
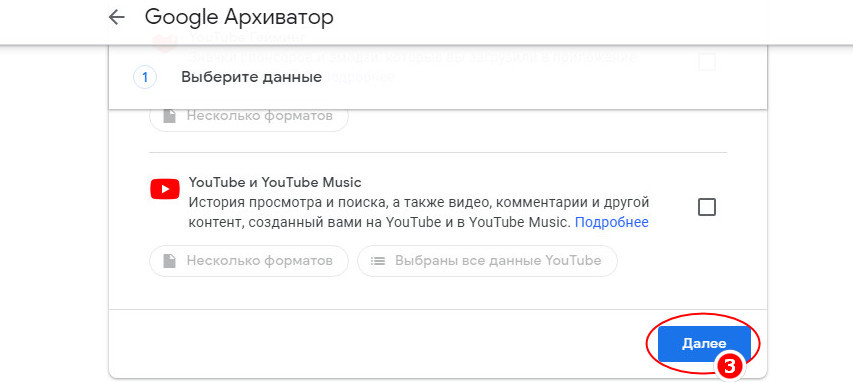
По сути, это обычный текстовый файл, с просмотром которого легко справится Блокнот или другой текстовый редактор. Теперь прокрутите страницу в самый низ, нажмите «Далее».
Выберите способ получения файла.
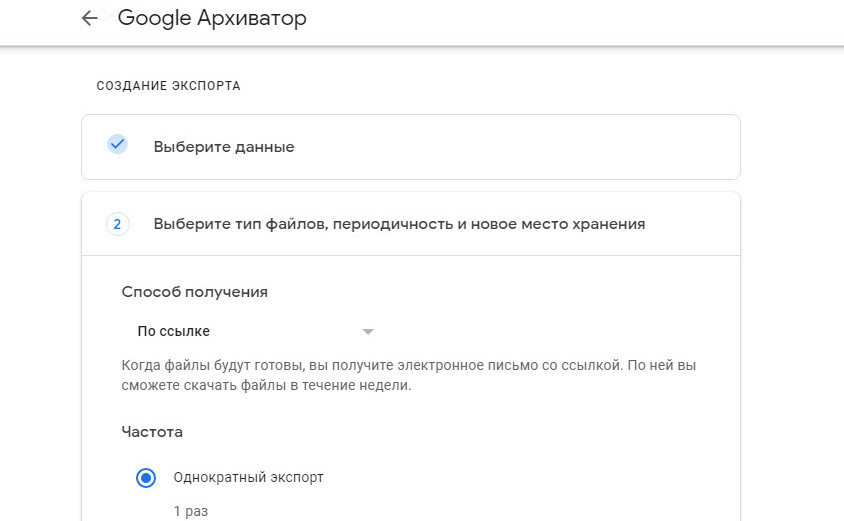
И нажмите «Создать экспорт».
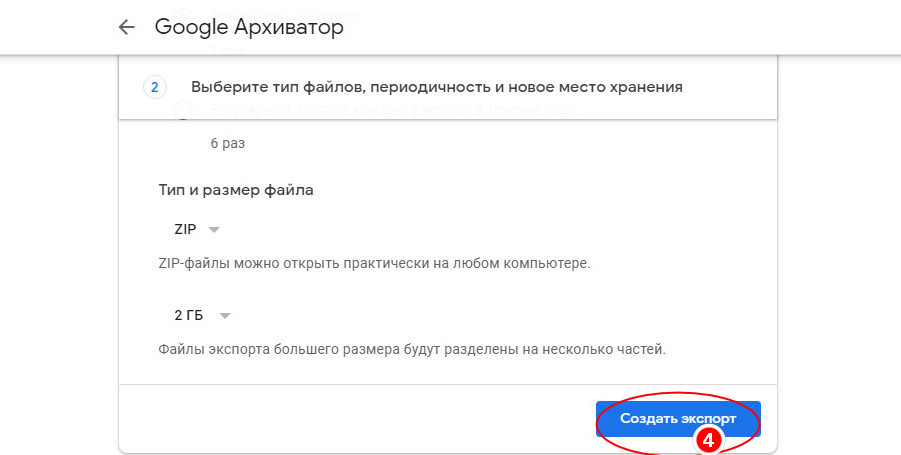
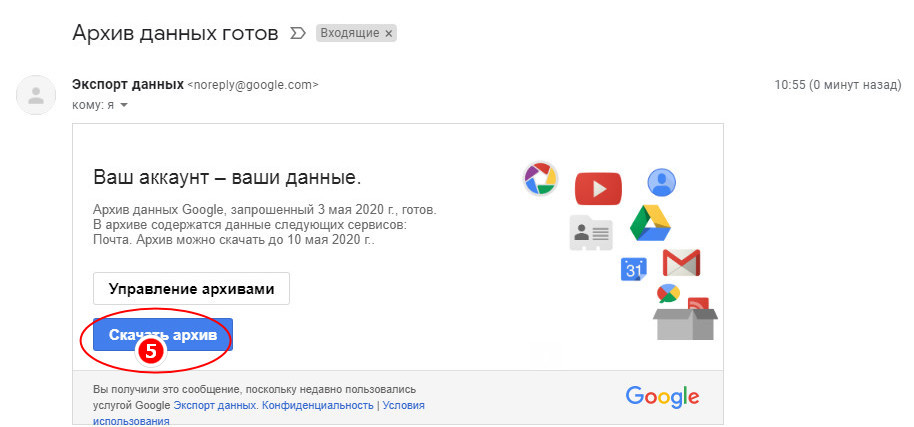
Процесс сбора данных займет некоторое время, по его завершении вы получите уведомление на почту со ссылкой на скачивание архива с экспортированными письмами.
Экспорт писем в Outlook
Если вы используете для работы с электронной корреспонденцией клиент Outlook, для сохранения из него писем на жесткий диск выполните следующие действия.
Выберите Файл.
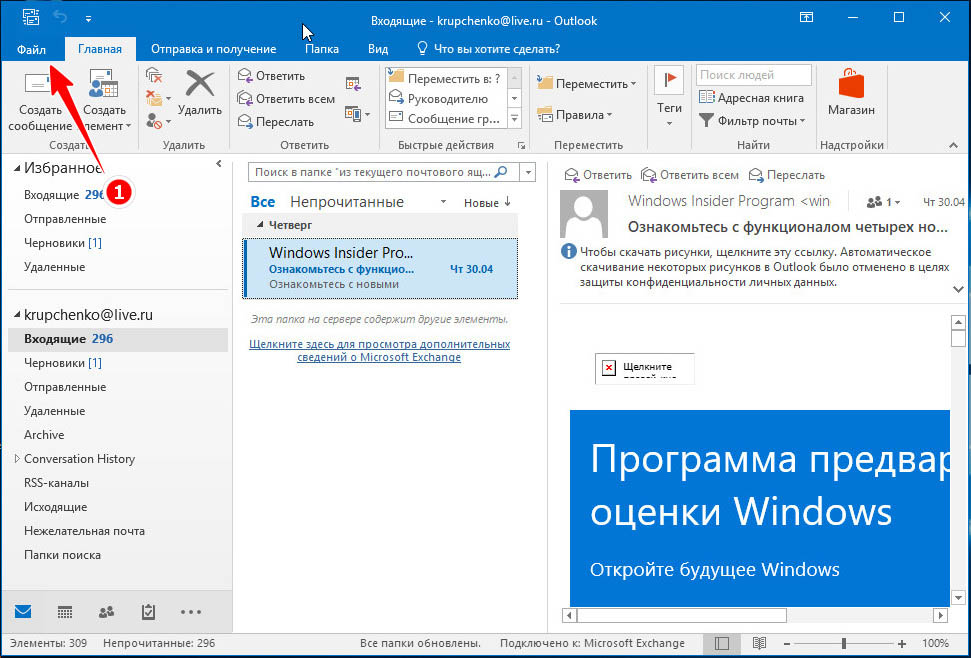
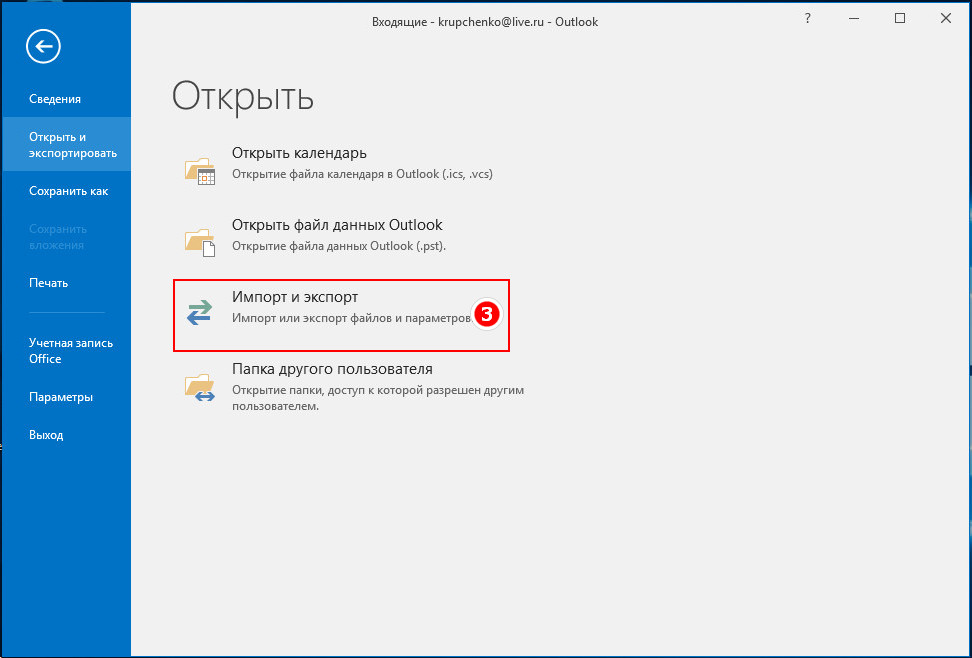
Открыть и экспортировать.
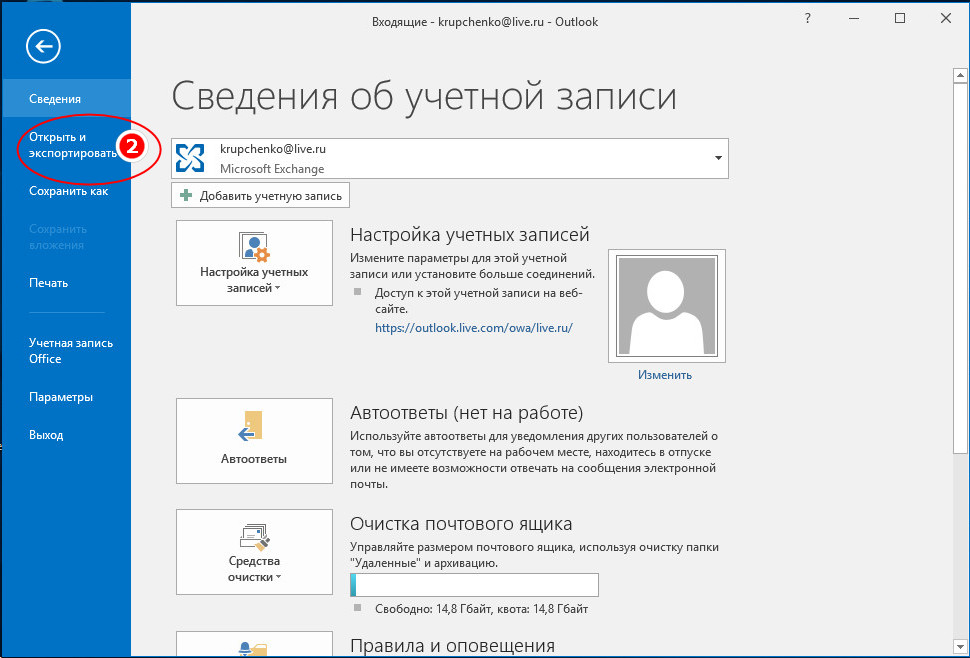
Импорт и Экспорт.
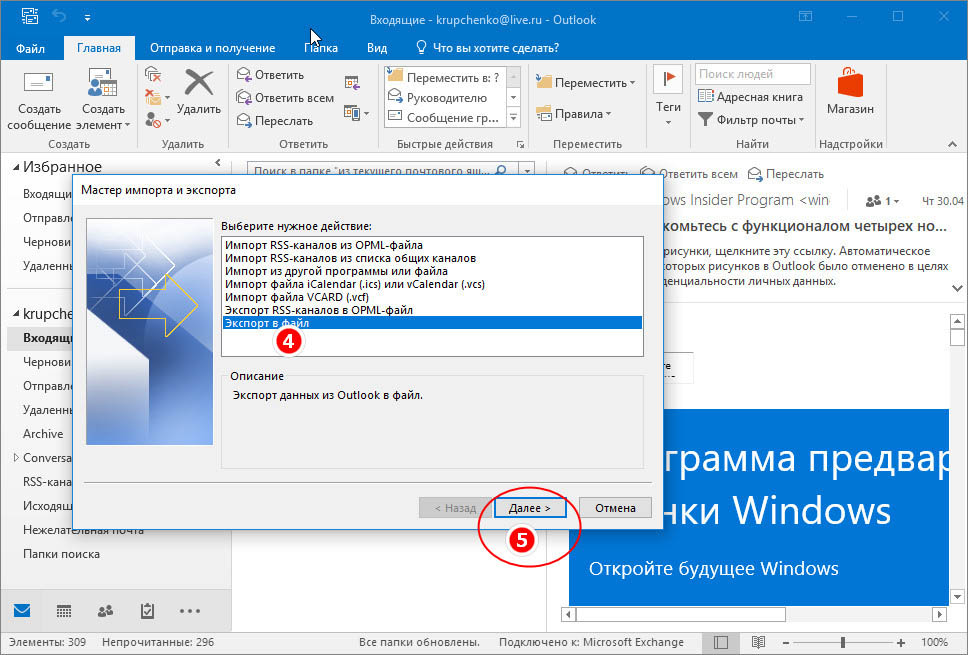
В открывшемся окне мастера выберите Экспорт в файл.
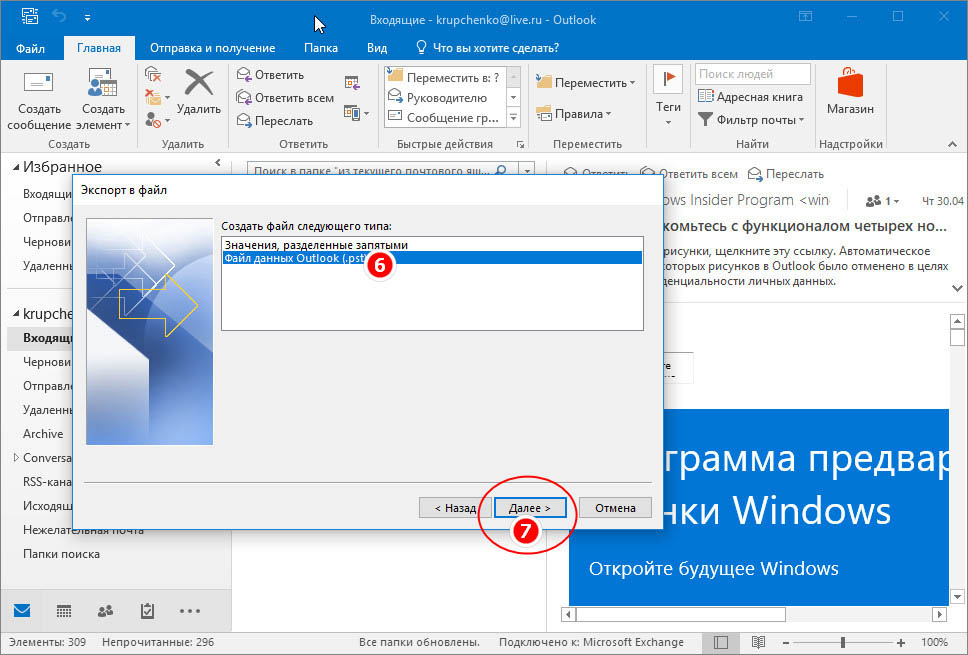
Файл данных Outlook.
Укажите нужную папку с данными.
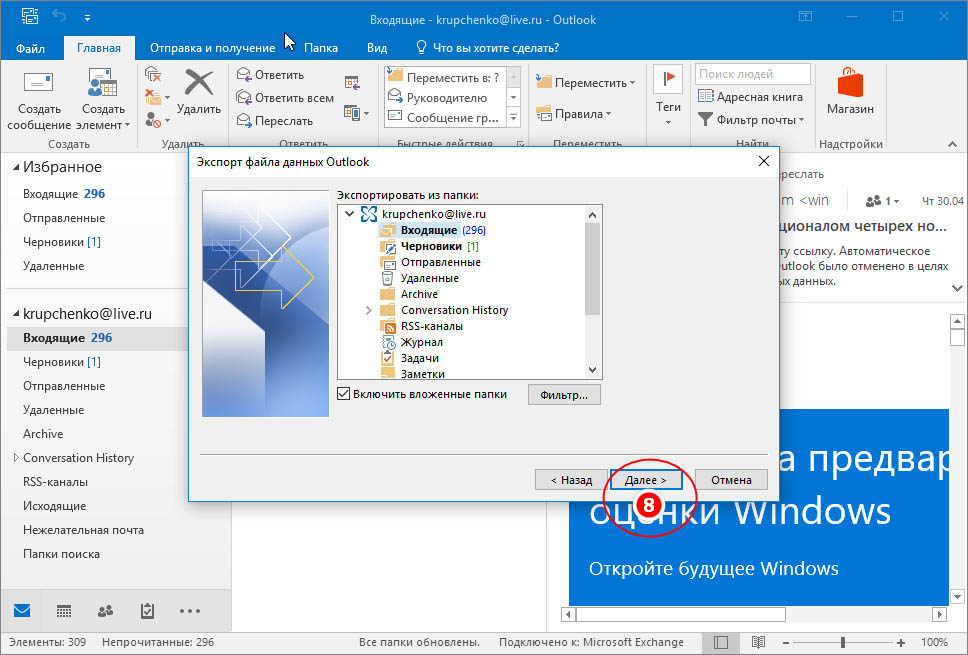
И сохраните PST -файл в удобное расположение.
Экспорт почты в Handy Backup
В отличие от двух предыдущих способов, этот способ универсален и может использоваться для экспорта почты из разных источников — как серверов, так и клиентов. Handy Backup поможет вытащить и сохранить письма из Gmail , Яндекс Почты , Mail.RU , Outlook , Thunderbird и других сервисов и программ.
Последовательность действий будет отличаться в зависимости от источника.
Чтобы экспортировать почту с сервера, выполните следующие действия:
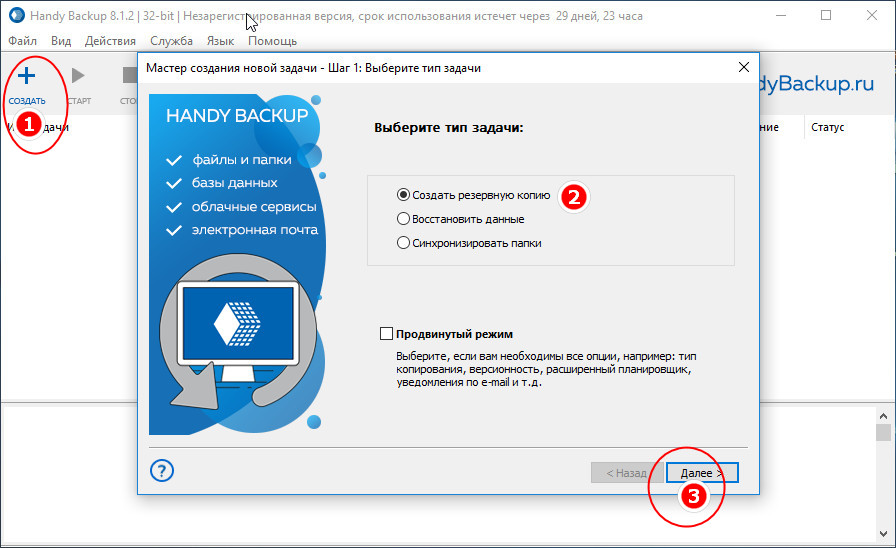
1. Создайте новое задание и выберите создание резервной копии;
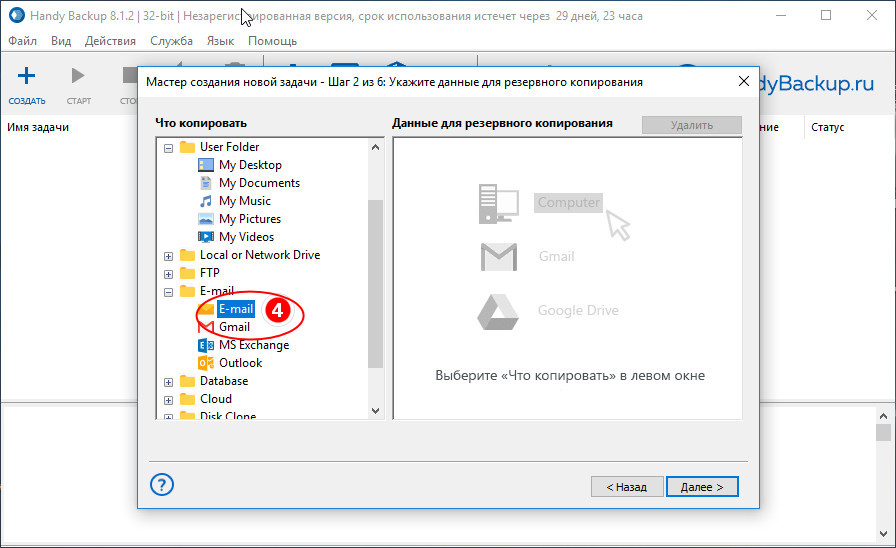
2. Выберите источник (Gmail, Outlook или Email, если сервер не указан прямо) ;
3. Нажмите «Создать подключение».
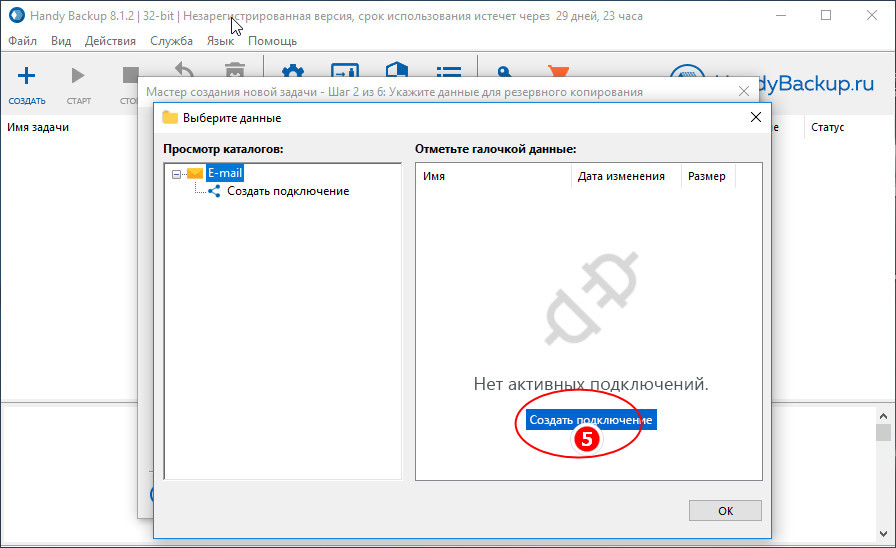
И укажите данные для подключения (сервер, email и пароль) .
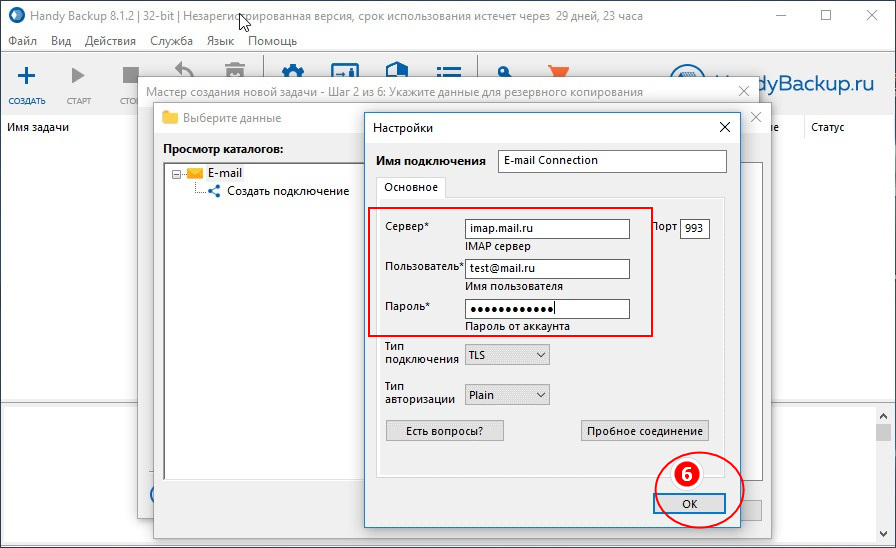
Для Яндекс Почты IMAP сервер будет imap.yandex.ru , для Mail.ru — imap.mail.ru ;
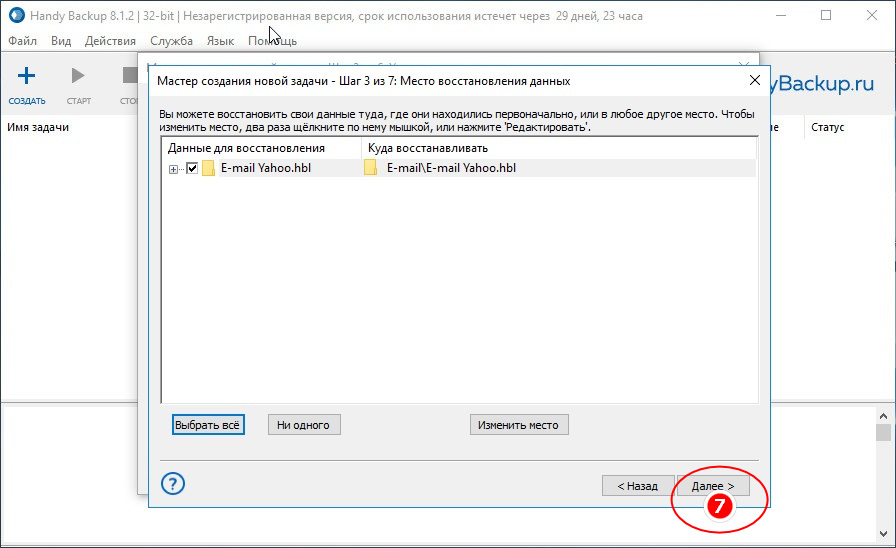
4. Нажмите «OK», отметьте птичкой данные для восстановления и укажите куда именно хотите их сохранить.
Если данные нужно вытащить из локального клиента вроде The Bat! или Thunderbird , в мастере создания задачи нужно использовать плагин «Computer», указав путь к папке профиля пользователя.
Экспорт почты в Email Backup Wizard
Более удобной, чем Handy Backup является программа Email Backup Wizard, специально заточенная под экспорт и создание резервных копий электронных писем. Приложением поддерживается около сотни сервисов, оно не нуждается в настройках и к тому же проще в использовании. Чтобы экспортировать почту, к примеру, из Яндекса, выполняем следующе действия:
1. На вкладке «Select Email» вводим адрес почты и пароль, а затем жмем «Login»;
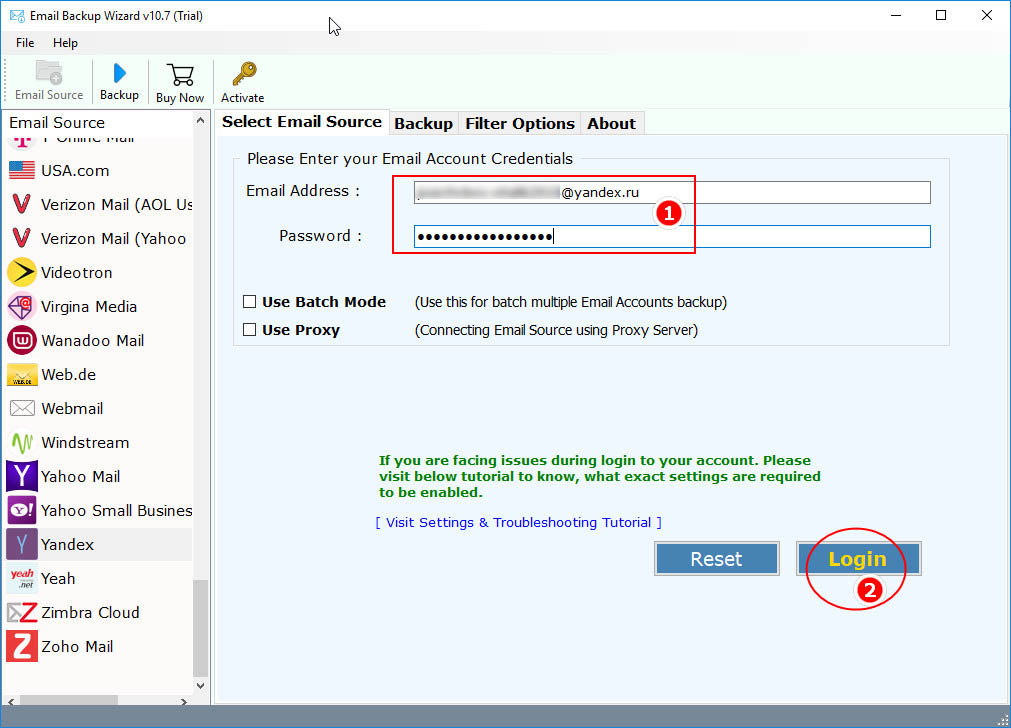
2. На вкладке «Backup» отмечаем каталоги, которые нужно экспортировать, выбираем формат сохранения и жмем «Backup».

В результате на рабочем столе будет создана папка с вложенными каталогами и файлами писем в удобном для чтения формате.
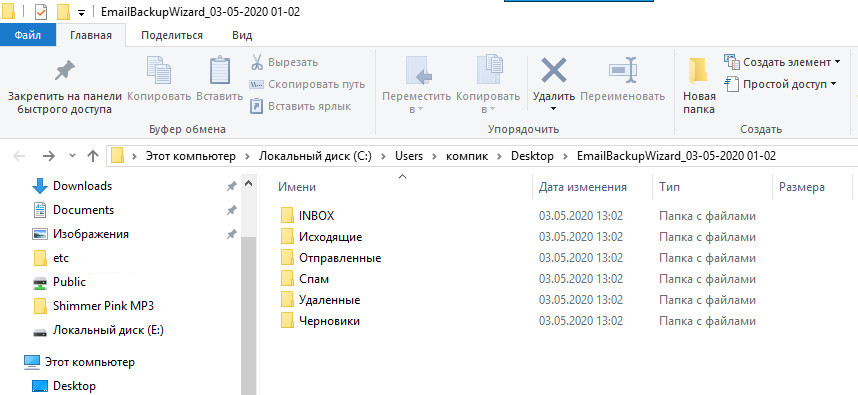
Да, это однозначно наиболее быстрый и удобный способ сохранить электронную почту на жесткий диск.
В нашем примере Handy Backup при попытке подключиться к почтовым серверам Яндекс почему-то терпела неудачу, а вот Email Backup Wizard справилась с задачей сразу же. Единственный минус в том, что обе программы платные, с другой стороны, если экспорт электронной почты нужно выполнить единоразово, для этого вполне хватит и триал-версии.
Windows 10 Mail app. backup?
Replies (8)
It is better to backup our email, in order for us to make sure that we will be on track of what emails we are sending and receiving. Kindly click this link on how to backup your email.
Get back to us if you need further assistance.
1 person found this reply helpful
Was this reply helpful?
Sorry this didn’t help.
Great! Thanks for your feedback.
How satisfied are you with this reply?
Thanks for your feedback, it helps us improve the site.
How satisfied are you with this reply?
Thanks for your feedback.
I think he is talking about he windows 10 mail app and NOT office outlook.
I want to backup the windows 10 mail app too, how to do this ?
5 people found this reply helpful
Was this reply helpful?
Sorry this didn’t help.
Great! Thanks for your feedback.
How satisfied are you with this reply?
Thanks for your feedback, it helps us improve the site.
How satisfied are you with this reply?
Thanks for your feedback.
Backing up emails and other important information is necessary, especially if you’re in the process of recovery from a system failure. Here’s how to backup files in Windows 10 Mail app:
- Open the Mail app. Add your email account, if not yet done.
- Go the email message that you wish to save or back up.
- Once the email message is open, click the Actions icon, then click the Save as option.
Let us know if your concern has been resolved.
Was this reply helpful?
Sorry this didn’t help.
Great! Thanks for your feedback.
How satisfied are you with this reply?
Thanks for your feedback, it helps us improve the site.
How satisfied are you with this reply?
Thanks for your feedback.
You don’t understand. I want to know how to backup the whole mail app with all the messages from all the accounts. Not one email at a time !
I want to backup everything like we can do in Outlook with the pst file.
I know I can save one email but how about the whole app with all the accounts and all the messages ?
12 people found this reply helpful
Was this reply helpful?
Sorry this didn’t help.
Great! Thanks for your feedback.
How satisfied are you with this reply?
Thanks for your feedback, it helps us improve the site.
How satisfied are you with this reply?
Thanks for your feedback.
The Windows 10 Mail app has a great touch support, easy to use and a preinstalled app. Though the Outlook desktop app and Mail app looks similar, they also have differences when it comes to their functionality. To better understand the difference between the features of Mail app and Outlook 2016, you can check this article. In addition, creating a backup of your emails on the Mail app is a great innovation that can be included in our future updates. We recommend that you submit this suggestion on our Feedback Hub app installed on your computer so our Support Engineers can include this in our future updates.
Feel free to respond if you need more help.
Was this reply helpful?
Sorry this didn’t help.
Great! Thanks for your feedback.
How satisfied are you with this reply?
Thanks for your feedback, it helps us improve the site.


