- Mapped network drive may fail to reconnect in Windows 10, version 1809
- Symptoms
- Workaround
- Create a script file named MapDrives.cmd
- Create a script file named MapDrives.ps1
- Workarounds
- Workaround 1: Create a startup item
- How to map network drive from command line
- Map system drive (C:) of remote computer
- How to Map a Network Drive in Windows 10
- How to Map Network Drive on Windows 10
- How to Map Network Drive on Windows 10 from File Explorer
- How to Map Network Drive on Windows 10 from Existing Shortcut
- How to Map Network Drive on Windows 10 from Command Prompt
- How to Map Network Drive on Windows 10 with Logon Script
- Create a Batch file with the Commands to Map the Drive (s)
- Copy the Batch file to \DomainName. \NETLOGON
- Assign Users the Logon Script in Active Directory Users and Computers
- Assign the batch file to users using Group Policy
- How to Map Network Drive on Windows 10 with Group Policy
Mapped network drive may fail to reconnect in Windows 10, version 1809
This article provides a workaround for the issue that mapped network drive may fail to reconnect in Windows 10, version 1809.
Original product version: В Windows 10, version 1809
Original KB number: В 4471218
Symptoms
You experience the following issues in Windows 10, version 1809:
- In Windows Explorer, a red X appears on the mapped network drives.
- Mapped network drives are displayed as Unavailable when you run the net use command at a command prompt.
- In the notification area, a notification displays the following message:
Could not reconnect all network drives.
Workaround
Microsoft is working on a resolution and estimates a solution will be available by the end of November 2018. Monitor the mapped drive topic in the Windows 10 1809 Update History KB 4464619. Currently, you can work around this issue by running scripts to automatically reconnect mapped network drive when you log on the device. To do this, create two script files, and then use one of the workarounds, as appropriate.
Create a script file named MapDrives.cmd
The file should be run at a regular but not at an elevated command prompt because it should be run at the same privilege as Windows Explorer:
Create a script file named MapDrives.ps1
The file should be run at a regular but not at an elevated command prompt because it should be run at the same privilege as Windows Explorer:
Workarounds
All workarounds should be executed in standard user security context. Executing scripts in an elevated security context will prevent mapped drivers from being available in the standard user context.
Workaround 1: Create a startup item
This workaround works only for the device that has network access at logon. If the device has not established a network connection by the time of logon, the startup script won’t automatically reconnect network drives.
How to map network drive from command line
We can map a network drive from windows command line using the command net use. Syntax is given below.
The above command maps the drive letter Z: to the network share \\remotepc\sharename. If the logged in user has authorized access to this network share, the above command completes successfully without asking the user to provide username/password. Otherwise it will prompt to supply the credentials of an account authorized to access the share. Upon providing the required credentials, the share gets mapped to the drive Z:
We can also use * instead of Z:. This will automatically pick up the unused drive letter starting from Z:
You can alsp specify username and password in net use command. See examples below.
If you don’t want to type the password in plain text in the windows command line you can specify just the user name. Net use will prompt you for the password.
You can use Net use command to map webdav shares also.
Once the network share is mapped, you can start using it like a local drive. You can open the network share in explorer with the drive letter. Open explorer and specify drive letter in the address bar(Z:)
You can also do ‘start Z:’ from command prompt. This would open the network drive in explorer.
Map system drive (C:) of remote computer
If you have administrator access to the remote computer then you can map the system drive or any other drive of the remote computer with the below command.
hi
i have a problem with this command.when i use this command it does not show me the mapped drive in my computer window.what should i do to monitor the mapped drive?
thank you
Unfortunately you have to edit the registry with a new value key ..enable local connections…google that and you shall get the answer, not so difficult
How to add the folder which has spaces in the share path say \\Kites\Way Back Schedule\ where there is no access for the share to be altered or modified.
Is there any way to know which drive letter was assigned after using * ? I´m creating a BAT file and at the end I would like to execute START S: , but not sure which letter was assign.
How to Map a Network Drive in Windows 10
By Melanie Pinola 29 April 2019
You can easily create a shortcut to another drive or folder shared on your network by mapping that location. When you map a network drive, it will show up as a new drive under This PC in File Explorer, so you can quickly access the shared files you need, just like you would your local hard drive. Here’s how to make that network drive shortcut in Windows 10.

How to Map a Network Drive in Windows 10
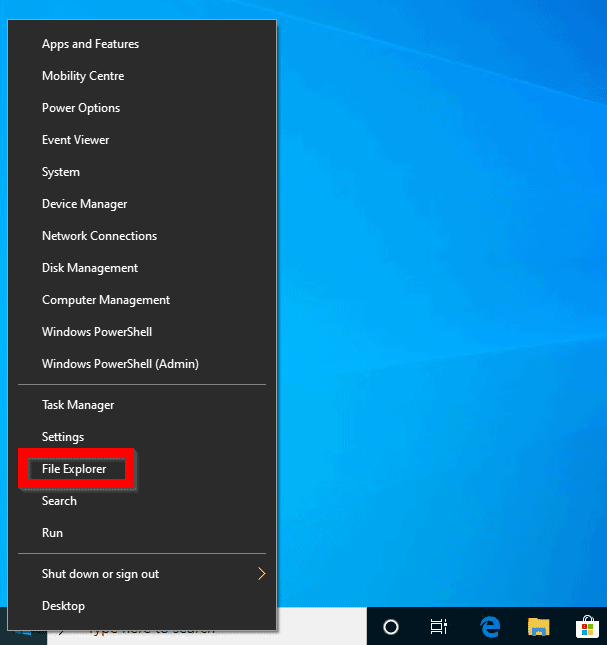
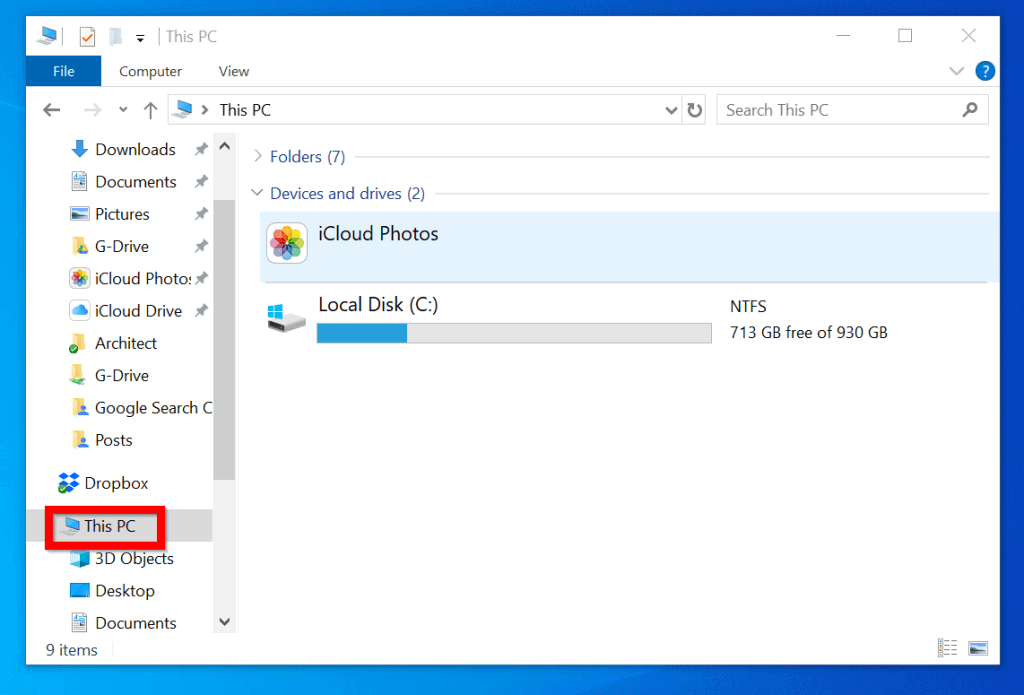
1. Open File Explorer and select This PC.
2. Click the Map network drive drop-down in the ribbon menu at the top, then select «Map network drive.» (This is under the Computer tab, which should open automatically when you go to This PC, as above.)
3. Select the drive letter you want to use for the network folder, then hit Browse.
4. If you receive an error message, then you’ll need to turn on network discovery. To do so, open the Control Panel, select Network and Sharing Center and choose Change advanced sharing settings from the top-left corner. From there, select Turn on network discovery. Save changes.
choose network folder
5. Navigate to the folder you want to map and hit OK after selecting it.
6. Confirm your selection and click Finish. You can choose to reconnect to the folder every time you sign in so it’s always available. You can even use a different user account to connect to the folder if needed.
7. When you’re done, you should see the new drive letter under This PC and will be able to access its contents like you would any other folder. If you want to disconnect the network drive, right-click on it and select Disconnect.
How to Map Network Drive on Windows 10
In this Itechguide, Victor teaches you how to map a network drive on Windows 10. The guide covers steps for 5 methods to map a network drive on Windows 10 .
Expand “Browse Post Topics” below to go straight to a topic.
Here are the details for each method
Browse Post Topics
How to Map Network Drive on Windows 10 from File Explorer

Here are the steps to map a network drive using this method:
- Right-click start menu. Then select File Explorer.
- When File Explorer opens, click This PC.
- Then click Computer tab.

- Finally, click Map network drive drop-down and select Map network drive.
- When the tool opens, at the Drive drop-down, select a drive letter to assign the network drive. If you know the full path to a network share, enter it in the Folder field using the format \\ServerName\ShareName. Then click Finish.

- Alternatively, if you do not know the full path to the share you want to map, enter the server name in the format \\ServerName. Then click Browse. The network computer will then display all the shares. Click on the share you wish to map and click OK.

- Finally, click Finish. The mapped drive will open automatically (see the second image below).


How to Map Network Drive on Windows 10 from Existing Shortcut

Another method is to map a network share from a Shortcut. If you have an existing network share shortcut, simply right-click it and map the share to a drive.
But if you do not already have a shortcut to the share, here are the steps to create the shortcut. Then map the share to a drive.
- Right-click anywhere on your desktop and point to New. Then select Shortcut.

- At the first page of the Create Shortcut wizard, enter the path to the network share. Use the format \\ServerName\ShareName. Then click Next.

- Then on the Type a name for the shortcut field, enter a name for the share or accept the default name. When you finish, click Finish. The shortcut to the network share will be created on your desktop (see the second image below).


- To map the share to a drive on your computer, right-click the shortcut. Then select Map network drive.

- Then select a drive letter from the Drive drop-down and click Finish.

How to Map Network Drive on Windows 10 from Command Prompt
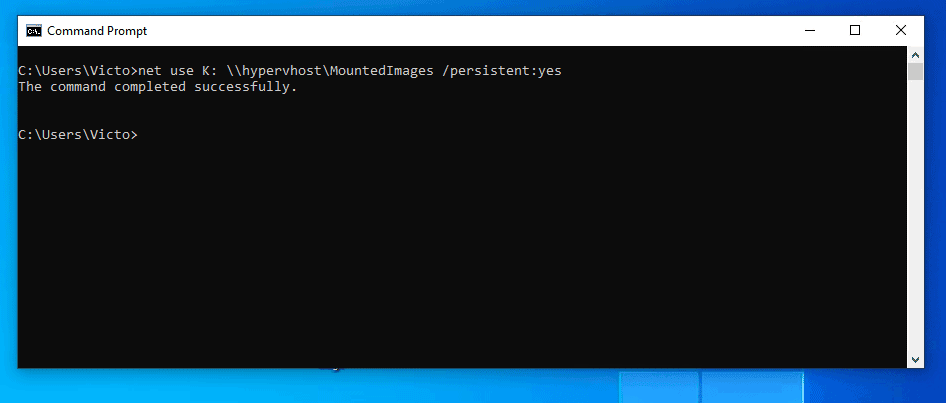
This is one quick way to map a network share to a drive.
Here are the steps to use this method:
- Type cmd on the search bar. Then open Command Prompt.

- At command prompt type this command. Then press enter.
with the drive letter you want to map the drive to. For example K:
with the path to the share you want to map.
Finally, for the /persistent switch specify Yes or No. Yes will reconnect the drive at eaxh logon. No will not.
Here is an actual command for this demo:
The result of the command:
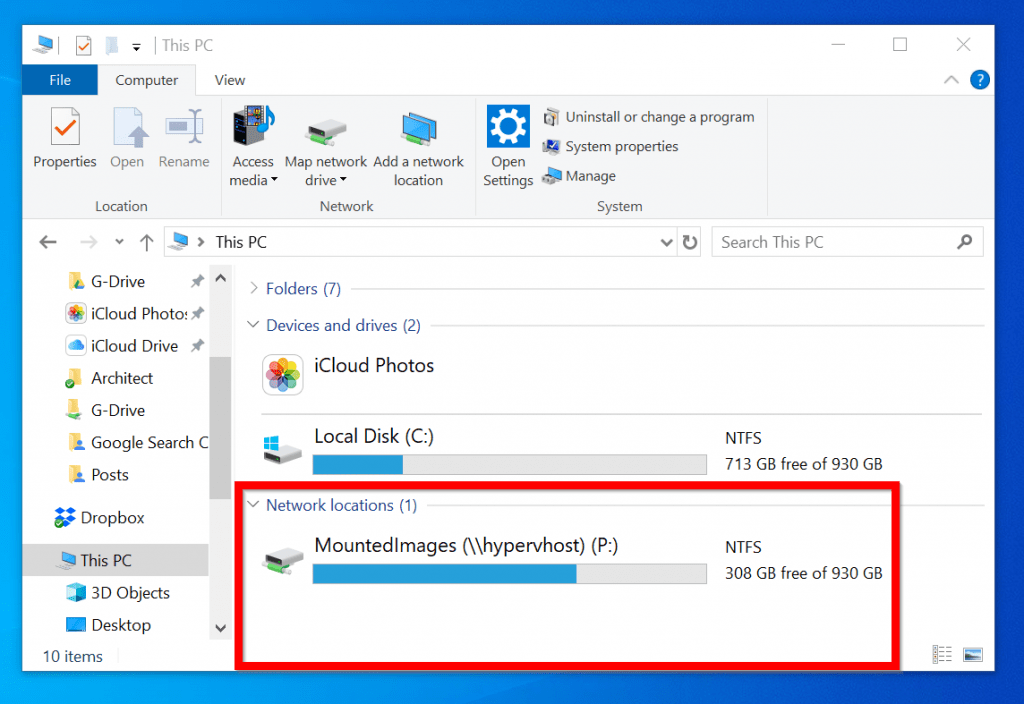
Here is the mapped drive in my This PC.

The remaining methods discussed in this guide are for Sys Admins.
How to Map Network Drive on Windows 10 with Logon Script
System Administrators can automatically map a network drive or drives using logon script.
There are 3 steps to complete this task:
- Create a Batch file with the commands to map the drive (s)
- Copy the batch file to \\DomainName. \NETLOGON
- Assign Users the logon script in Active Directory Users and Computers OR
- Assign the batch file to users using Group Policy
Create a Batch file with the Commands to Map the Drive (s)
- Open a notepad and enter the commands similar to the commands used in the last section.
- Here is an example

- Save the file with .bat extension: File ->Save As…Give the file a name then include .bat extension. Have the names in quote. See the example below. Finally, click Save. The file will look like the file in the second image below.


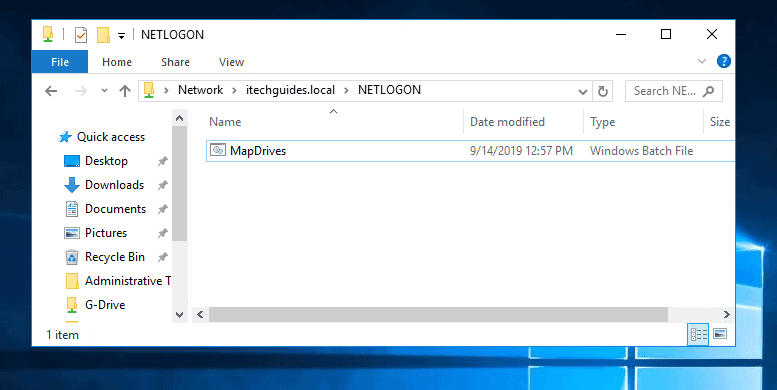
Copy the Batch file to \\DomainName. \NETLOGON
The final step in this method is to copy the batch file you just created to the NETLOGON share in your domain.
- Open Run command (Windows logo + R keys)
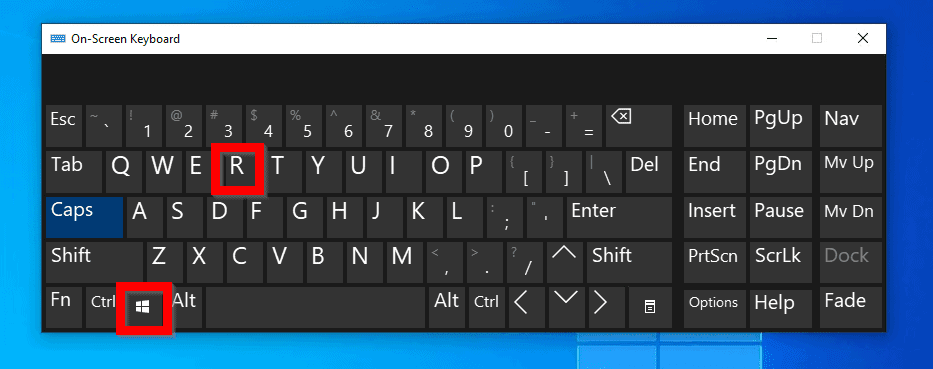
- At the Run command enter a path similar to this below. Then press enter or OK.
Change itechguides.local to the FQDM for your domain.

- Finally, copy the batch file you created earlier to the NETLOGON share.
Assign Users the Logon Script in Active Directory Users and Computers
After creating the logon script and copying it to the NETLOGON share, the last step to map network drive in Windows 10 is to assign the script to a user.
Here are the steps:
- Logon to your a Domain Controller and open Active Directory Users and Computers.
- Navigate to the AD OU or container where your users are located. It is usually Users container except you moved the users to another OU.
- Double-click the user you wish to assign the logon script. On the Profile tab, enter the name of the batch file in the Logon Script field. When you finish, click OK.
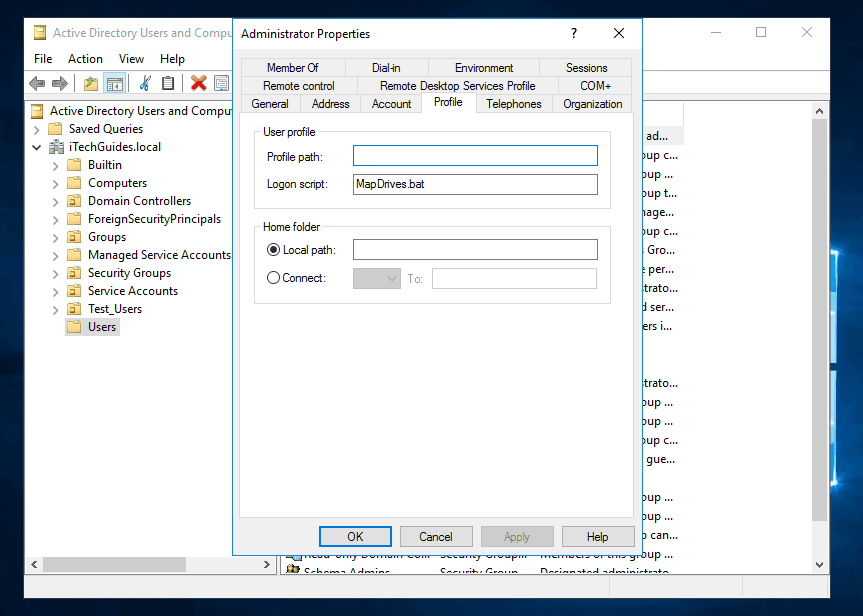
- When next the user logs on to Active Directory, the script will run and the drive will be mapped automatically.

Assign the batch file to users using Group Policy
This is an alternative way to automatically assign the batch file to users.
Here are the steps:
- Copy the batch file you created earlier.
- Open the GPO you wish to use. This GPO must be assigned to the AD container with the users you wish to assign the batch file automatically.
- Right-click the GPO and click Edit.
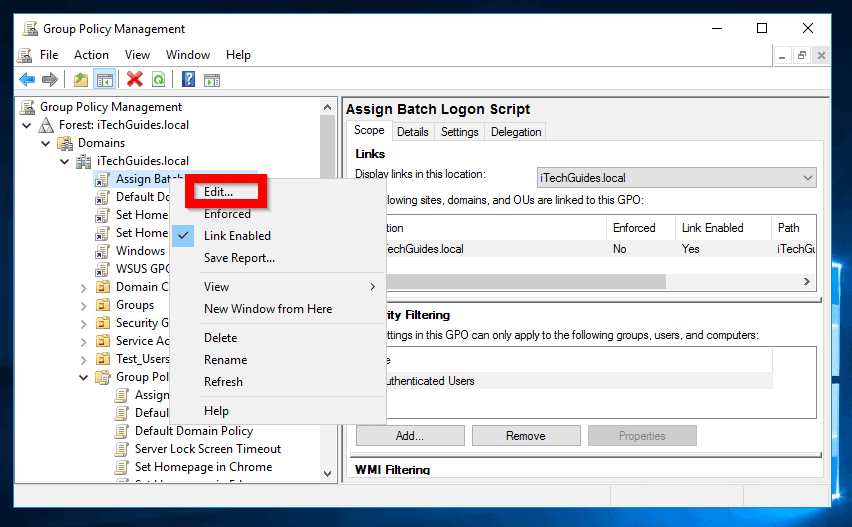
- When the navigate to User Configuration > Policies -> Windows Settings > Scripts.

- Double-click Logon. Then click Show Files…

- When the path opens, paste the batch file. Then close the path.
When next a user logs on to Active Directory, the script will run and the drive will be mapped.
How to Map Network Drive on Windows 10 with Group Policy
As you can see, it is very easy to map a network drive on Windows 10! I hope you found this Itechguide helpful. If you found it helpful, kindly vote Yes to the “Was this post Helpful” question below.
Alternatively, you could ask a question, leave a comment or provide feedback with the “Leave a Reply” form found towards the end of this page.
Finally, for more Windows 10 Itechguides, visit our Windows 10 How-To page.


