- Скачать Microsoft PowerPoint бесплатно
- Microsoft PowerPoint на русском
- Форматы звуковых и видеофайлов, поддерживаемые в PowerPoint
- Рекомендуемые видеоформаты
- Рекомендуемые звуковые форматы
- Поддерживаемые форматы
- Дополнительные сведения
- См. также
- Рекомендуемые видеоформаты
- Рекомендуемые звуковые форматы
- PowerPoint для macOSПоддерживаемые форматы
- Turn your presentation into a video
- Save as a video file
- Save as a PowerPoint Show
- Why turn your presentation into a video?
- What parts of a presentation won’t be included in a video?
- What to do with your video after creating it
- Save to the Microsoft video-sharing site
- Save as a video file
- Save as a PowerPoint Show
- Why turn your presentation into a video?
- What parts of a presentation won’t be included in a video?
- What to do with your video after creating it
Скачать Microsoft PowerPoint бесплатно
| В Microsoft Office входит множество программ, и среди других в перечне присутствует Microsoft Office PowerPoint. С ее помощью, применяя набор красочных слайдов, создаются электронные презентации, отчеты, с последующей их демонстрацией на лекциях, практических занятиях. Microsoft Windows, macOS, IOS и Android – ОС, в которых доступен Повер Поинт. | |
| Скачать PowerPoint на компьютер | Загрузить PowerPoint для любого устройства |

Microsoft PowerPoint на русском
В программе выполняется подготовка презентаций любого уровня – от самых простых до наиболее сложных, с последующим их просмотром при помощи специального проекционного оборудования. Во время выступлений применяются различные технологии демонстрации (слайд фильмы, презентационные конференции в сети при помощи нескольких ПК). С PowerPoint также создаются анимационные ролики, инфографика, различные видео. Слайды печатаются на бумажные носители и используются в качестве вспомогательного раздаточного материала.
Слайд представляет собой отдельный лист, на котором при помощи Повер Поинт размещается разнообразная информация (графическая, текстовая, фото или видеоматериалы). Каждый из слайдов бывает разного размера, между собой они различаются типом оформления. Кроме того, в любом инфоблоке может содержаться анимация. Анимаэффекты также применяют, если необходимо выполнить переход от слайда к слайду. Исходя из этого, презентация – это непростой, но эффективный инструмент, способствующий упрощению создания различных информационных сюжетов, удобных для визуального восприятия, и даже мультипликационных роликов.
Форматы звуковых и видеофайлов, поддерживаемые в PowerPoint
Рекомендуемые видеоформаты
PowerPoint 2010: WMV
Более поздние версии PowerPoint: .mp4 файлы в кодировке видео H.264 и звук AAC
Рекомендуемые звуковые форматы
PowerPoint 2010: WAV, WMA
Более поздние версии PowerPoint: .m4a файлы в кодировке со звуком AAC
Не волнуйтесь: чтобы преобразовывать эти форматы, достаточно знать их названия.
Совет: Check out these YouTube videos from Microsoft Creators for more help with video and audio!
Поддерживаемые форматы
Поддерживаемые форматы видеофайлов
Файл Windows Video (для некоторых файлов в формате AVI могут потребоваться дополнительные кодеки)
Файл Windows Video (для некоторых файлов в формате AVI могут потребоваться дополнительные кодеки)
Файлы Windows Media Video
*Только PowerPoint 2013 и более новые версии. 32-разрядная версия PowerPoint 2010 может воспроизводить MP4- или MOV-файлы, только если на компьютере установлен проигрыватель QuickTime. (Дополнительные сведения см. на странице скачивания QuickTime для Windows сайта Apple). Для PowerPoint 2013 и более новых версий ТРЕБУЕТСЯ установка проигрывателя QuickTime, чтобы воспроизводить видеофайлы MP4 в одном определенном случае: при использовании Windows 7 на виртуальной машине (VM).
Поддерживаемые форматы звуковых файлов
AAC — аудиофайл MPEG-4*
Аудиофайл Windows Media
* Только в PowerPoint 2013 и более поздних версиях. 32-разрядная версия PowerPoint 2010 может воспроизводить MP4- или MOV-файлы, только если на компьютере установлен проигрыватель QuickTime. (Дополнительные сведения см. на странице скачивания QuickTime для Windows сайта Apple.)
Дополнительные сведения
Если у вас наблюдается медленное воспроизведение, отставание звука от видео, перебои со звуком или потеря кадров, см. статью Советы по улучшению качества воспроизведения и совместимости звуковых и видеофайлов.
PowerPoint также может поддерживать другие типы файлов, если вы установите дополнительные кодеки. Если вы хотите узнать, как найти кодеки для компьютера, см. статью Успешное воспроизведение аудио- и видеозаписей в презентации.
Некоторые старые форматы видеофайлов могут некорректно сжиматься или экспортироваться в Office на компьютерах с Windows RT. Используйте современные форматы, например H.264 и AAC, которые поддерживаются PowerPoint 2013 RT. PowerPoint 2010 поддерживает формат AAC, если установлен нужный кодек (например, ffDShow). Хотите узнать, какая у вас версия Office?
См. также
Рекомендуемые видеоформаты
MP4-файлы в формате H.264 и звуком в формате AAC
Рекомендуемые звуковые форматы
M4A-файлы, закодированные с помощью звукового файла AAC
Не волнуйтесь: чтобы преобразовывать эти форматы, достаточно знать их названия.
Совет: Check out these YouTube videos from Microsoft Creators for more help with video and audio!
Звуковые файлы, полученные из iTunes Store, могут не воспроизводиться в файлах, к которым предоставлен общий доступ
Музыкальные файлы, приобретенные в iTunes Store, воспроизводятся только на авторизованных компьютерах, так что для тех, кому вы предоставляете общий доступ к презентации, воспроизведение файлов из iTunes может оказаться невозможным.
PowerPoint для macOSПоддерживаемые форматы
Форматы видеофайлов, поддерживаемые в PowerPoint 2016 для Mac, PowerPoint 2019 для Mac и PowerPoint для Microsoft 365 для Mac
Фильм AVI (для некоторых AVI-файлов могут потребоваться дополнительные кодеки)
Фильм Apple MPEG-4
MPG, MPEG, MPE, M75, M15
Транспортный поток MPEG-2
Форматы звуковых файлов, поддерживаемые в PowerPoint 2016 для Mac, PowerPoint 2019 для Mac, и PowerPoint для Microsoft 365 для Mac
Звуковой файл AU
Звуковой файл MP3
Звуковой файл MPEG-4
Звуковой файл WAV
Звуковой файл Audible.com
Звуковой файл Apple MPEG-4
AAC — звуковой файл MPEG-2
Формат Apple CoreAudio
Звуковой файл AC-3
Улучшенный звуковой файл AC-3
Файлы Windows Media (WMV, WMA) не поддерживаются в PowerPoint 2016 для Mac или PowerPoint для Microsoft 365 для Mac. Существует ряд сторонних средств для Mac, которые могут преобразовать WMV- или WMA-файл в один из поддерживаемых форматов, перечисленных выше.
Кроме того, если у вас есть подписка наMicrosoft 365, которая включаетMicrosoft Stream вы можете добавить WMV- или WMA-файл в Stream и вставить его в презентацию оттуда. Подробнее о Microsoft Stream.
Звуковые файлы, полученные из iTunes Store, могут не воспроизводиться в файлах, к которым предоставлен общий доступ
Музыкальные файлы, приобретенные в iTunes Store, воспроизводятся только на авторизованных компьютерах, так что для тех, кому вы предоставляете общий доступ к презентации, воспроизведение файлов из iTunes может оказаться невозможным.
Turn your presentation into a video
When you make a recording of a presentation, all its elements (narration, animation, pointer movements, timings, and so on) are saved in the presentation itself. In essence, the presentation becomes a video that your audience can watch in PowerPoint.
So you have two options for turning your presentation into a video that’s ready to view:
Save/export your presentation to a video file format (.mp4 or .wmv).
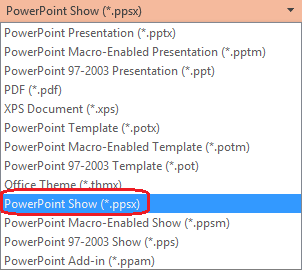
Save your presentation as a PowerPoint Show (.ppsx) file. (A PowerPoint Show appears full-screen in Slide Show, ready to view immediately.)
Tip: Check out these YouTube videos from Microsoft Creators for more help with video!
Save as a video file
After you’ve created your slides and recorded any timing and narrations and laser pointer gestures that you want to include, you’re ready to create a video file.

On the File menu, select Save to ensure all your recent work has been saved in PowerPoint presentation format (.pptx).
Click File > Export > Create a Video. (Or, on the Recording tab of the ribbon, click Export to Video.)
In the first drop-down box under the Create a Video heading, select the video quality you want, which pertains to the resolution of the finished video. The higher the video quality, the larger the file size. (You may want to test them to determine which one meets your needs.)
For displaying on
3840 x 2160, largest file size
1920 x 1080, large file size
Computer and HD screens
1280 x 720, medium file size
Internet and DVD
852 x 480, smallest file size
* The Ultra HD (4K) option is only available if you’re using Windows 10.
The second drop-down box under the Create a Video heading tells whether your presentation includes narration and timings. (You may switch this setting if you like.)
If you haven’t recorded timed narration, by default the value is Don’t Use Recorded Timings and Narrations.
The default time spent on each slide is 5 seconds. You can change that timing in the Seconds to spend on each slide box. To the right of the box, click the up arrow to increase the duration, or click the down arrow to decrease the duration.
If you have recorded a timed narration, by default the value is Use Recorded Timings and Narrations.
Click Create Video.
In the File name box, enter a file name for the video, browse for the folder that will contain this file, and then click Save.
In the Save as type box, choose either MPEG-4 Video or Windows Media Video.
You can track the progress of the video creation by looking at the status bar at the bottom of your screen. The video creation process can take up to several hours depending on the length of the video and the complexity of the presentation.
Tip: For a long video, you can set it up to be created overnight. That way, it’ll be ready for you the following morning.
To play your newly-created video, go to the designated folder location, and then double-click the file.
Save as a PowerPoint Show
When someone opens a PowerPoint Show file, it appears full-screen in Slide Show, rather than in edit mode. The viewer begins watching the presentation immediately.
On the File menu, select Save to ensure all your recent work has been saved in PowerPoint presentation format (.pptx).
On the File menu, select Save As.
Choose the folder location where you want to store your PowerPoint Show file.
In the Save as type box, choose PowerPoint Show (*.ppsx).
Why turn your presentation into a video?
When you want to give a high-fidelity version of your presentation to colleagues or customers (either as an e-mail attachment, published to the web, on a CD or DVD), save it and let it play as a video.
You can save your presentation as either an MPEG-4 video file (.mp4) or a .wmv file. Both formats are widely supported and can be streamed over the internet.
Some tips to remember when recording your presentation as a video:
You can record and time voice narration and laser pointer movements in your video.
You can control the size of the multimedia file and the quality of your video.
You can include animations and transitions in your movie.
Viewers do not need to have PowerPoint installed on their computers to watch it.
If your presentation contains an embedded video, the video will play correctly without your needing to control it.
Depending on the content of your presentation, creating a video may take some time. Lengthy presentations and presentations with animations, transitions, and media content will likely take longer to create. Fortunately, you can continue to use PowerPoint while the video is being created
What parts of a presentation won’t be included in a video?
The following items won’t be included in a video that you create using PowerPoint:
Media inserted in previous versions of PowerPoint. To include these, you can convert or upgrade the media object.
For example, if you inserted the media using PowerPoint 2007, it will be linked and it will play in the presentation. However, when you export the file as a video, the linked media will be dropped. You can convert the file to the new file format (click the File tab, and under Info, click Convert), or you can right-click the media object and then click to upgrade; it will embed the file and export it correctly.
QuickTime media (unless you have a third-party QuickTime codec named ffdShow installed and you have optimized for compatibility)
What to do with your video after creating it
After you create a video, you can share it with others by using the following methods:
Save to the Microsoft video-sharing site
After you’ve created the video file, you can upload it to a video-sharing site. Microsoft Stream is an enterprise video service where people in an organization can upload, view, and share videos. Microsoft 365 business or education subscribers have access to this service from within PowerPoint for Microsoft 365.
Select File > Export, and then select Publish to Microsoft Stream.

Type a title and a description for the video.
Set other options, including whether you want others in your organization to have permission to see the video:

Select the Publish button.
The upload process can take several minutes, depending on the length of the video. A status bar at the bottom of the PowerPoint window tracks the progress, and PowerPoint shows a message when the upload is finished:
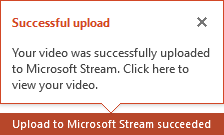
Click the message to go directly to the video playback page on Microsoft Stream.
For more information about this service, begin reading with What is Microsoft Stream? It includes information about Office 365 Video vs. Microsoft Stream.
Tip: Check out these YouTube videos from Microsoft Creators for more help with video!
Save as a video file
After you’ve created your slides and recorded any timing and narrations and laser pointer gestures that you want to include, you’re ready to create a video file.
On the File menu, select Save to ensure all your recent work has been saved in PowerPoint presentation format (.pptx).
Click File > Export > Create a Video. (Or, on the Recording tab of the ribbon, click Export to Video.)
In the first drop-down box under the Create a Video heading, select the video quality you want, which pertains to the resolution of the finished video. The higher the video quality, the larger the file size. (You may want to test them to determine which one meets your needs.)
For displaying on
Ultra HD (4K) 1 2
3840 x 2160, largest file size
1920 x 1080, large file size
Computer and HD screens
1280 x 720, medium file size
Internet and DVD
852 x 480, smallest file size
1 The Ultra HD (4K) option is only available if you’re using Windows 10.
2 In PowerPoint 2016, the Ultra HD (4K) option isn’t available in the Volume License edition.
The second drop-down box under the Create a Video heading tells whether your presentation includes narration and timings. (You may switch this setting if you like.)
If you haven’t recorded timed narration, by default the value is Don’t Use Recorded Timings and Narrations.
The default time spent on each slide is 5 seconds. You can change that timing in the Seconds to spend on each slide box. To the right of the box, click the up arrow to increase the duration, or click the down arrow to decrease the duration.
If you have recorded a timed narration, by default the value is Use Recorded Timings and Narrations.
Click Create Video.
In the File name box, enter a file name for the video, browse for the folder that will contain this file, and then click Save.
In the Save as type box, choose either MPEG-4 Video or Windows Media Video.
You can track the progress of the video creation by looking at the status bar at the bottom of your screen. The video creation process can take up to several hours depending on the length of the video and the complexity of the presentation.
Tip: For a long video, you can set it up to be created overnight. That way, it’ll be ready for you the following morning.
To play your newly-created video, go to the designated folder location, and then double-click the file.
Save as a PowerPoint Show
When someone opens a PowerPoint Show file, it appears full-screen in Slide Show, rather than in edit mode. The viewer begins watching the presentation immediately.
On the File menu, select Save to ensure all your recent work has been saved in PowerPoint presentation format (.pptx).
On the File menu, select Save As.
Choose the folder location where you want to store your PowerPoint Show file.
In the Save as type box, choose PowerPoint Show (*.ppsx).
Why turn your presentation into a video?
When you want to give a high-fidelity version of your presentation to colleagues or customers (either as an e-mail attachment, published to the web, on a CD or DVD), save it and let it play as a video.
You can save your presentation as either an MPEG-4 video file (.mp4) or a .wmv file. Both formats are widely supported and can be streamed over the internet.
Some tips to remember when recording your presentation as a video:
You can record and time voice narration and laser pointer movements in your video.
You can control the size of the multimedia file and the quality of your video.
You can include animations and transitions in your movie.
Viewers do not need to have PowerPoint installed on their computers to watch it.
If your presentation contains an embedded video, the video will play correctly without your needing to control it.
Depending on the content of your presentation, creating a video may take some time. Lengthy presentations and presentations with animations, transitions, and media content will likely take longer to create. Fortunately, you can continue to use PowerPoint while the video is being created
What parts of a presentation won’t be included in a video?
The following items won’t be included in a video that you create using PowerPoint:
Media inserted in previous versions of PowerPoint. To include these, you can convert or upgrade the media object.
For example, if you inserted the media using PowerPoint 2007, it will be linked and it will play in the presentation. However, when you export the file as a video, the linked media will be dropped. You can convert the file to the new file format (click the File tab, and under Info, click Convert), or you can right-click the media object and then click to upgrade; it will embed the file and export it correctly.
QuickTime media (unless you have a third-party QuickTime codec named ffdShow installed and you have optimized for compatibility)
What to do with your video after creating it
After you create a video, you can share it with others by using the following methods:


